1 vue3项目:vue-cli搭建项目-基本架构
文章目录
- 1 环境
- 2 创建基本框架
- 3 添加第三方包
-
- 3.1 axios
- 3.2 element-ui
- 3.3 可选包
-
- 3.3.1 加密处理js-base64、js-md5
- 3.3.2 vuex持久化vuex-persistedstate
- 4 清理非必要文件
- 5 运行检查
- 6 插件升级与卸载
-
- 6.1 升级
- 6.2 卸载
- 7 使用vue-cli工具
-
- 7.1 vue ui
- 7.2 以vue3插件方式安装第三方包
注意:
以下使用的是yarn命令,也可以使用npm命令,相应的
yarn add要替换为 npm install
1 环境
PS C:\Users\MuYi> npm list -g
d:\WebEnv\nodejs\node_global
+-- @vue/[email protected]
+-- [email protected]
`-- [email protected]
升级vue-cli
管理员模式下npm install -g @vue/cli
2 创建基本框架
PS D:\WebCode\Vue> vue create geavue

Vue CLI v5.0.4
? Please pick a preset: Manually select features
? Check the features needed for your project: Babel, PWA, Router, Vuex, CSS Pre-processors, Linter, Unit
? Choose a version of Vue.js that you want to start the project with 3.x
? Use history mode for router? (Requires proper server setup for index fallback in production) Yes
? Pick a CSS pre-processor (PostCSS, Autoprefixer and CSS Modules are supported by default): Sass/SCSS (with dart-sass)
? Pick a linter / formatter config: Basic
? Pick additional lint features: Lint on save
? Pick a unit testing solution: Jest
? Where do you prefer placing config for Babel, ESLint, etc.? In package.json
? Save this as a preset for future projects? Yes
? Save preset as: last

  Preset last saved in C:\Users\MuYi\.vuerc


Vue CLI v5.0.4
✨  Creating project in D:\WebCode\Vue\geavue.
...省略内容

  Generating README.md...

  Successfully created project geavue.
  Get started with the following commands:

 $ cd geavue
 $ yarn serve

 WARN  Skipped git commit due to missing username and email in git config, or failed to sign commit.
       You will need to perform the initial commit yourself.

PS D:\WebCode\Vue>
上面保存的last配置文件名为 .vuerc,一般存放在当前用户更目录下,见上面的提示信息
Preset last saved in C:\Users\MuYi.vuerc
可以编辑该文件,方便下次直接调用
{
  "useTaobaoRegistry": true,
  "packageManager": "yarn",
  "presets": {
    "base-vue-cli": {
      "useConfigFiles": false,
      "plugins": {
        "@vue/cli-plugin-babel": {},
        "@vue/cli-plugin-pwa": {},
        "@vue/cli-plugin-router": {
          "historyMode": true
        },
        "@vue/cli-plugin-vuex": {},
        "@vue/cli-plugin-eslint": {
          "config": "base",
          "lintOn": [
            "save"
          ]
        },
        "@vue/cli-plugin-unit-jest": {}
      },
      "vueVersion": "3",
      "cssPreprocessor": "dart-sass"
    },
    "last": {
      "useConfigFiles": false,
      "plugins": {
        "@vue/cli-plugin-babel": {},
        "@vue/cli-plugin-pwa": {},
        "@vue/cli-plugin-router": {
          "historyMode": true
        },
        "@vue/cli-plugin-vuex": {},
        "@vue/cli-plugin-eslint": {
          "config": "base",
          "lintOn": [
            "save"
          ]
        },
        "@vue/cli-plugin-unit-jest": {}
      },
      "vueVersion": "3",
      "cssPreprocessor": "dart-sass"
    }
  },
  "latestVersion": "5.0.4",
  "lastChecked": 1648191568533
}
选项说明
- Babel:将ES6编译成ES5
- TypeScript:JS超集,主要是类型检查
- Router和Vuex,路由和状态管理
- Linter/Formatter:代码检查工具
- CSS Pre-processors:css预编译 Unit
- Testing:单元测试,开发过程中前端对代码进行自运行测试
3 添加第三方包
进入项目目录
PS D:\WebCode\Vue> cd .\geavue\
3.1 axios
PS D:\WebCode\Vue\geavue> yarn add axios -S
3.2 element-ui
PS D:\WebCode\Vue\geavue> yarn add element-plus -S
- 这里不使用element提供的icon,使用iconFont自由度更大。网址:https://www.iconfont.cn/
- 参见文章:vue或html中使用iconfont自定义图标: link
3.3 可选包
3.3.1 加密处理js-base64、js-md5
可只用一项
yarn add js-base64 -S
yarn add js-md5 -S
3.3.2 vuex持久化vuex-persistedstate
yarn add vuex-persistedstate -S
如果需要存储在cookie中需提前安装js-cookie
yarn add js-cookie -S
部分持久化
// 非Module格式:xxxx
// 使用了Module的格式:ModuleName.xxxx,这里持久化的是Theme模块数据
const THEME_PATHS = ['Theme']
export default new Vuex.Store( {
   state: {},
   mutations: {},
   actions: {},
   modules: {
    Theme: Theme
    },
    plugins: [
    createTheneState(
      { paths: THEME_PATHS   }
      )]
    })
4 清理非必要文件
清理文件后项目结构
删除系统自动添加的示例文件,以及axios的index.js文件

- main.js文件
import { createApp } from 'vue'
import App from './App.vue'
import './registerServiceWorker'
import router from './router'
import store from './store'

const app=createApp(App)
  app.use(store).use(router)
  app.mount('#app')
- App.vue
App.vue
5 运行检查
yarn serve
浏览器中打开 localhost:8080
6 插件升级与卸载
6.1 升级
- 修改package.json文件中具体插件的版本号
 "dependencies": {
    "axios": "^0.26.1",
    "vuex": "^4.0.0"
  },
  "devDependencies": {
    "@babel/core": "^7.12.16",
- 运行命令
npm install
或者
yarn install
- 也可以直接运行
yarn upgrade
6.2 卸载
- 使用yarn或npm安装的包,卸载命令
yarn remove 包名
或
 npm uninstall 包名 --save
- 使用vue安装的包
npm uninstall vue-cli-plugin-包名
vue-cli-plugin-包名 为插件名的一般形式,需要在package.json文件中核对
7 使用vue-cli工具
7.1 vue ui
项目路径下执行
PS D:\WebCode\Vue\geavue> vue ui
  Starting GUI...
  Ready on http://localhost:8000
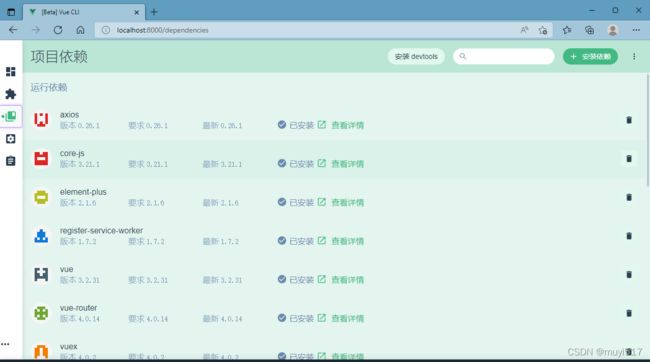
可以交互式的对项目进行管理、插件的安装升级卸载、运行、维护等操作
7.2 以vue3插件方式安装第三方包
项目路径下,使用 vue add 插件包名 -S
vue add axios -S
此种方式会自动配置加载第三方包,但实际效果一般,不建议采用此方式。