OS篇-Bochs在Ubuntu下的安装教程
OS篇-Bochs在Ubuntu下的安装教程
最近在看《操作系统真相还原》这本书,打算跟着做一个微型操作系统,就有了这篇教程
环境准备
OS篇-Bochs在Ubuntu下的安装教程
安装软件
- 下载
wget https://udomain.dl.sourceforge.net/project/bochs/bochs/2.6.2/bochs-2.6.2.tar.gz
- 解压
tar -zxvf bochs-2.6.2.tar.gz
- 配置
./configure \
--prefix=/your_path/bochs \
--enable-debugger\
--enable-disasm \
--enable-iodebug \
--enable-x86-debugger \
--with-x \
--with-x11
解释
–prefix=/your_path/bochs 是用来指定 bochs 的安装目录,根据个人实际情况将 your_path 替换为自己待安装的路径。
–enable-debugger 打开 bochs 自己的调试器。
–enable-disasm 使 bochs 支持反汇编。
–enable-iodebug 启用 io 接口调试器。
–enable-x86-debugger 支持 x86 调试器。
–with-x 使用 x windows。
–with-x11 使用 x11 图形用户接口。
- make install
make install报错
x.cc:37:10: fatal error: X11/Xlib.h: No such file or directory #include
还报错
x.cc:42:10: fatal error: X11/extensions/Xrandr.h: No such file or directory #include
解决方法
sudo apt-get install libx11-dev ................. for X11/Xlib.h
sudo apt-get install mesa-common-dev........ for GL/glx.h
sudo apt-get install libglu1-mesa-dev ..... for GL/glu.h
sudo apt-get install libxrandr-dev ........... for X11/extensions/Xrandr.h
sudo apt-get install libxi-dev ................... for X11/extensions/XInput.h
配置软件
将安装目录下的配置文件bochs/share/doc/bochs/bochsrc-sample.txt复制到当前目录
mv /home/mikey/bochs/share/doc/bochs/bochsrc-sample.txt ./bochsrc
查看配置文件
[work@localhost bochs]$ cat bochsrc
###############################################
# Configuration file for Bochs
###############################################
# 第一步,首先设置 Bochs 在运行过程中能够使用的内存,本例为 32MB。
# 关键字为:megs
megs: 32
# 第二步,设置对应真实机器的 BIOS 和 VGA BIOS。
# 对应两个关键字为:romimage 和 vgaromimage
romimage: file=/实际路径/bochs/share/bochs/BIOS-bochs-latest
vgaromimage: file=/实际路径/bochs/share/bochs/VGABIOS-lgpl-latest
# 第三步,设置 Bochs 所使用的磁盘,软盘的关键字为 floppy。
# 若只有一个软盘,则使用 floppya 即可,若有多个,则为 floppya,floppyb...
#floppya: 1_44=a.img, status=inserted
# 第四步,选择启动盘符。
#boot: floppy
#默认从软盘启动,将其注释
boot: disk
#改为从硬盘启动。我们的任何代码都将直接写在硬盘上,所以不会再有读写软盘的操作。
# 第五步,设置日志文件的输出。
log: bochs.out
# 第六步,开启或关闭某些功能。
# 下面是关闭鼠标,并打开键盘。
mouse: enabled=0
keyboard_mapping: enabled=1,
map=/实际路径/bochs/share/bochs/keymaps/x11-pc-us.map
# 硬盘设置
ata0: enabled=1, ioaddr1=0x1f0, ioaddr2=0x3f0, irq=14
# 下面的是增加的 bochs 对 gdb 的支持,这样 gdb 便可以远程连接到此机器的 1234 端口调试了
gdbstub: enabled=1, port=1234, text_base=0, data_base=0, bss_base=0
###################配置文件结束#####################
测试开机
mikey@mikey:~/bochs/bin$ ./bochs
========================================================================
                       Bochs x86 Emulator 2.6.2
                Built from SVN snapshot on May 26, 2013
                  Compiled on Feb 26 2021 at 11:34:31
========================================================================
00000000000i[     ] reading configuration from bochsrc
------------------------------
Bochs Configuration: Main Menu
------------------------------

This is the Bochs Configuration Interface, where you can describe the
machine that you want to simulate.  Bochs has already searched for a
configuration file (typically called bochsrc.txt) and loaded it if it
could be found.  When you are satisfied with the configuration, go
ahead and start the simulation.

You can also start bochs with the -q option to skip these menus.

1. Restore factory default configuration
2. Read options from...
3. Edit options
4. Save options to...
5. Restore the Bochs state from...
6. Begin simulation
7. Quit now

Please choose one: [6] 2

What is the configuration file name?
To cancel, type 'none'. [bochsrc]
00000000000i[     ] reading configuration from bochsrc
------------------------------
Bochs Configuration: Main Menu
------------------------------

This is the Bochs Configuration Interface, where you can describe the
machine that you want to simulate.  Bochs has already searched for a
configuration file (typically called bochsrc.txt) and loaded it if it
could be found.  When you are satisfied with the configuration, go
ahead and start the simulation.

You can also start bochs with the -q option to skip these menus.

1. Restore factory default configuration
2. Read options from...
3. Edit options
4. Save options to...
5. Restore the Bochs state from...
6. Begin simulation
7. Quit now

Please choose one: [6] 6
00000000000i[     ] installing x module as the Bochs GUI
00000000000i[     ] Bochs x86 Emulator 2.6.2
00000000000i[     ]   Built from SVN snapshot on May 26, 2013
00000000000i[     ] Compiled on Feb 26 2021 at 11:34:31
00000000000i[     ] System configuration
00000000000i[     ]   processors: 1 (cores=1, HT threads=1)
00000000000i[     ]   A20 line support: yes
00000000000i[     ] IPS is set to 4000000
00000000000i[     ] CPU configuration
00000000000i[     ]   SMP support: no
00000000000i[     ]   level: 6
00000000000i[     ]   APIC support: xapic
00000000000i[     ]   FPU support: yes
00000000000i[     ]   MMX support: yes
00000000000i[     ]   3dnow! support: no
00000000000i[     ]   SEP support: yes
00000000000i[     ]   SSE support: sse2
00000000000i[     ]   XSAVE support: no
00000000000i[     ]   AES support: no
00000000000i[     ]   MOVBE support: no
00000000000i[     ]   ADX support: no
00000000000i[     ]   x86-64 support: no
00000000000i[     ]   MWAIT support: yes
00000000000i[     ] Optimization configuration
00000000000i[     ]   RepeatSpeedups support: no
00000000000i[     ]   Fast function calls: no
00000000000i[     ]   Handlers Chaining speedups: no
00000000000i[     ] Devices configuration
00000000000i[     ]   NE2000 support: no
00000000000i[     ]   PCI support: yes, enabled=yes
00000000000i[     ]   SB16 support: no
00000000000i[     ]   USB support: no
00000000000i[     ]   VGA extension support: vbe
00000000000i[MEM0 ] allocated memory at 0x7f7ad1cea010. after alignment, vector=0x7f7ad1ceb000
00000000000i[MEM0 ] 32.00MB
00000000000i[MEM0 ] mem block size = 0x00100000, blocks=32
00000000000i[MEM0 ] rom at 0xfffe0000/131072 ('/home/mikey/bochs/share/bochs/BIOS-bochs-latest')
00000000000i[     ] init_dev of 'pci' plugin device by virtual method
00000000000i[DEV  ] i440FX PMC present at device 0, function 0
00000000000i[     ] init_dev of 'pci2isa' plugin device by virtual method
00000000000i[DEV  ] PIIX3 PCI-to-ISA bridge present at device 1, function 0
00000000000i[     ] init_dev of 'cmos' plugin device by virtual method
00000000000i[CMOS ] Using local time for initial clock
00000000000i[CMOS ] Setting initial clock to: Fri Feb 26 11:58:08 2021 (time0=1614311888)
00000000000i[     ] init_dev of 'dma' plugin device by virtual method
00000000000i[DMA  ] channel 4 used by cascade
00000000000i[     ] init_dev of 'pic' plugin device by virtual method
00000000000i[     ] init_dev of 'pit' plugin device by virtual method
00000000000i[     ] init_dev of 'floppy' plugin device by virtual method
00000000000i[DMA  ] channel 2 used by Floppy Drive
00000000000i[     ] init_dev of 'vga' plugin device by virtual method
00000000000i[MEM0 ] Register memory access handlers: 0x0000000a0000 - 0x0000000bffff
00000000000i[VGA  ] interval=200000
00000000000i[MEM0 ] Register memory access handlers: 0x0000e0000000 - 0x0000e0ffffff
00000000000i[BXVGA] VBE Bochs Display Extension Enabled
00000000000i[XGUI ] test_alloc_colors: 16 colors available out of 16 colors tried
00000000000i[XGUI ] font 8 wide x 16 high, display depth = 24
00000000000i[MEM0 ] rom at 0xc0000/41472 ('/home/mikey/bochs/share/bochs/VGABIOS-lgpl-latest')
00000000000i[     ] init_dev of 'acpi' plugin device by virtual method
00000000000i[DEV  ] ACPI Controller present at device 1, function 3
00000000000i[     ] init_dev of 'ioapic' plugin device by virtual method
00000000000i[IOAP ] initializing I/O APIC
00000000000i[MEM0 ] Register memory access handlers: 0x0000fec00000 - 0x0000fec00fff
00000000000i[IOAP ] IOAPIC enabled (base address = 0xfec00000)
00000000000i[     ] init_dev of 'keyboard' plugin device by virtual method
00000000000i[KBD  ] will paste characters every 400 keyboard ticks
00000000000i[     ] init_dev of 'harddrv' plugin device by virtual method
00000000000i[HD   ] HD on ata0-0: 'disk.img', 'flat' mode
00000000000p[HD   ] >>PANIC<< ata0-0: could not open hard drive image file 'disk.img'
========================================================================
Bochs is exiting with the following message:
[HD   ] ata0-0: could not open hard drive image file 'disk.img'
========================================================================
00000000000i[CTRL ] quit_sim called with exit code 1
因为还没有设置启动盘所以报错,但是可以看到GUI界面还是挺激动的是吧哈哈哈哈
创建启动盘
使用bin/bximage进行创建
-fd 创建软盘。
-hd 创建硬盘。
-mode 创建硬盘的类型,有 flat、sparse、growing 三种。
-size 指创建多大的硬盘,以 MB 为单位。
-q 以静默模式创建,创建过程中不会和用户交互
bin/bximage -hd -mode="flat" -size=60 -q hd60M.img
这个命令串中最后一个 hd60M.img 是咱们创建的虚拟硬盘的名称。
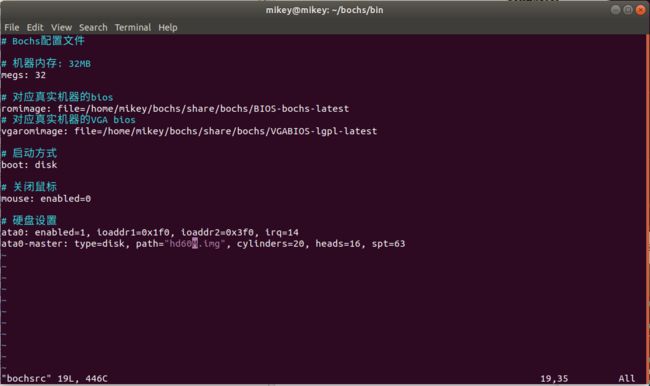
修改配置文件
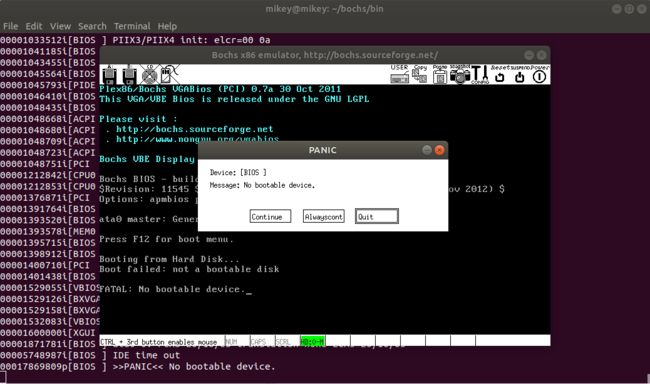
重新启动./bochs -f bochsrc查看效果
编写MBR
vim mbr.S
;主引导程序
;------------------------------------------------------------
SECTION MBR vstart=0x7c00
mov ax,cs
mov ds,ax
mov es,ax
mov ss,ax
mov fs,ax
mov sp,0x7c00
; 清屏利用 0x06 号功能,上卷全部行, 则可清屏 。
; -----------------------------------------------------------
;INT 0x10
;功能号:0x06
;功能描述:上卷窗口
;------------------------------------------------------
;输入:
;AH 功能号= 0x06
;AL = 上卷的行数(如果为 0,表示全部)
;BH = 上卷行属性
;(CL,CH) = 窗口左上角的(X,Y)位置
;(DL,DH) = 窗口右下角的(X,Y)位置
;无返回值:
mov ax, 0x600
mov bx, 0x700
mov cx, 0
; 左上角: (0, 0)
mov dx, 0x184f
; 右下角: (80,25),
; VGA 文本模式中,一行只能容纳 80 个字符,共 25 行 。
; 下标从 0 开始,所以 0x18=24,0x4f=79
int 0x10
; int 0x10
;;;;;;;;;
;下面这三行代码获取光标位置
;;;;;;;;;
;.get_cursor 获取当前光标位置,在光 标位置处打印字符 。
mov ah, 3
; 输入: 3 号子功能是获取光标位置,需要存入 ah 寄存器
mov bh, 0
; bh 寄存器存储的是待获取光标的页号
; 输出: ch=光标开始行,cl=光标结束行
; dh=光标所在行号,dl=光标所在列号
int 0x10
;;;;;;;;;
;获取光标位置结束
;;;;;;;;;;;;;;;;
;;;;;;;;;
;打印字符串
;;;;;;;;;;;
;还是用 10h 中断,不过这次调用 13 号子功能打印字符串
mov ax, message
mov bp, ax
; es:bp 为串首地址,es 此时同 cs 一致,
; 开头时已经为 sreg 初始化
; 光标位置要用到 dx 寄存器中内容,cx 中的光标位置可忽略
mov cx, 5
; cx 为串长度,不包括结束符 0 的字符个数
mov ax, 0x1301
;子功能号 13 显示字符及属性,要存入 ah 寄存器,
; al 设置写字符方式 ah=01: 显示字符串,光标跟随移动
mov bx, 0x2
; bh 存储要显示的页号,此处是第 0 页,
; bl 中是字符属性,属性黑底绿字(bl = 02h)
int 0x10
; 执行 BIOS 0x10 号中断
;;;;;;;;;
;打字字符串结束
;;;;;;;;;;;;;;;
; 使程序悬停在此
jmp $
message db "1 MBR"
times 510-($-$$) db 0
db 0x55,0xaa
编译
nasm -o mbr.bin mbr.S
查看其大小为512k
ls -lb mbr.bin
配置
dd if=/home/mikey/bochs/bin/mbr.bin of=/home/mikey/bochs/bin/hd60M.img bs=512 count=1 conv=notrunc
查看
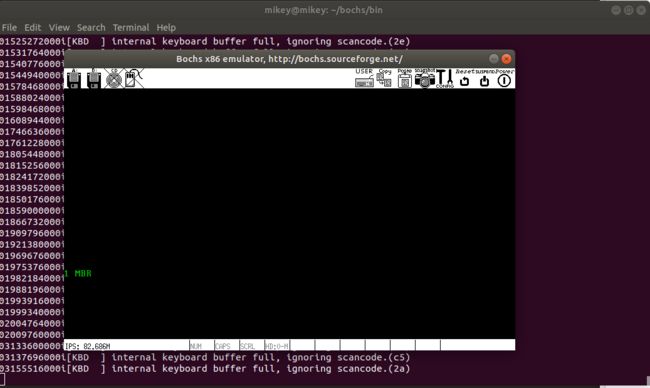
./bochs -f bochsrc
即可完成一个简单MBR的编写
参考资料
《操作系统真相还原》
Ubuntu 16.04LTS 安装和配置Bochs


