记录第一次ANN跑BCI Competition iv 2a过程
前言
研一新生一枚,刚被老师确定方向(复杂动作运动想象解码),BCI领域纯纯小白一枚,此文仅是为了浅层记录一下github上找的代码跑竞赛数据的过程。全篇仅代表个人理解,望指出不足之处和不对的地方。
代码地址:https://github.com/BUVANEASH/EEG-Motor-Imagery-Classification---ANN/blob/master/MNE_WPD_CSP_ANN.ipynb
老师甩下一句“那你先跑一下bci竞赛运动想象四分类吧”,我就开始了我的寻找之旅。
一、下载实验数据
先给个EEG公开数据汇总:脑电(EEG)等公开数据集汇总_脑机接口社区的博客-CSDN博客_脑电数据集
BCI竞赛下载教程:BCI竞赛数据集下载及测试集的标签查看_『汐月』的博客-CSDN博客
BCI COMPETITION IV 2A为例:
1、下载数据集
往下滑,到Download of data sets一栏,填写相关信息,邮箱必须是正确的你在使用的邮箱
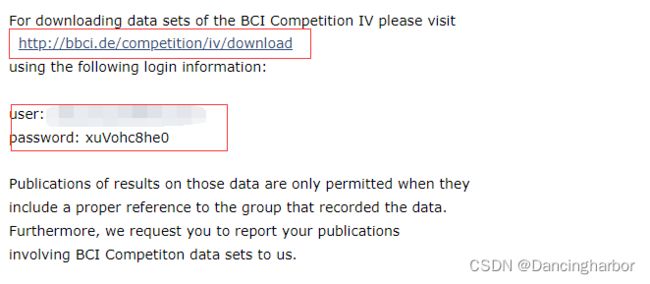
填写完之后,刚刚输入的邮箱会收到一封邮件,点击邮件中的链接,在页面中输入邮箱号以及邮件中的password即可
我需要2a数据集,所以点击红框中的链接进行下载。PS:速度慢可以尝试挂VPN或者IDM下载
2、下载测试集标签
我原本想着应该可以开始了吧,但是这个GDF文件下载下来,我对实验一无所知啊,所以下载了2a的description文件(很重要,里面说了实验范式,通道,event类型啊等等)。这里翻到了热心网友的description for 2a的翻译帖子,贴出以供参考:BCI Competition 2008 – Graz dataset A个人翻译(附MATLAB安装BioSig)_骖络逝水桓的博客-CSDN博客_biosig安装
发现刚刚下载的GDF压缩包里面不提供测试集标签啊,虽然我身为小白一枚不知道后面要不要用到,但是我觉得还是下载下来比较好(顺便可以摸鱼混时长)。
回到BCI Competition IV的官网:BCI Competition IV
往下翻,翻到News一栏,点击 here 链接
在跳出的新页面中翻到底,点击下载
二、找代码
数据集都有了,那我需要代码去跑它啊!一头雾水,不知道找啥,我打开了github,尝试了各种词条搜索,找到了一个适合我的项目(属于把饭一口一口喂到我嘴里),github上有一些项目那么多.py 、.***文件,我真的不知道怎么开始啊。
代码地址再次贴出:https://github.com/BUVANEASH/EEG-Motor-Imagery-Classification---ANN/blob/master/MNE_WPD_CSP_ANN.ipynb
代码使用的是jupyter notebook。一开始我是想寻找MATLAB的,后来发现MATLAB、python的项目代码都很难找,找到了也不是很看得懂,直接放弃(有没有人教教我怎么找到代码)。因此顺便使用了一下jupyter notebook。
三、安装环境
推荐安装Anaconda(python3.x),用过的都说好,教程不在放出,网上有很多,只需要安装仔细就行了。
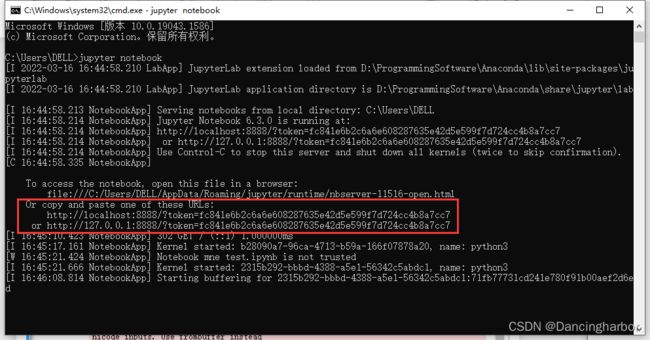
win+r,cmd,回车,打开命令行行云流水,输入jupyter notebook,然后在浏览器中输入红框中的地址即可进入jupyter notebook
四、运行代码
本节可能还包含安装各种库,因为不知道代码中使用什么了库,由于之前我闲来无事可能会先安装了某些库,安装部分大同小异。
安装完anaconda后,在命令行中输入conda list ,可以查看你当前环境下已安装的库
conda list导入数据:
#导入数据

import mne
import matplotlib.pyplot as pl
import numpy as np

# Mention the file path to the dataset
# filename根据自己的来
filename = "E:/BCI_data/BCICIV_2a_gdf/A01T.gdf"

raw = mne.io.read_raw_gdf(filename)

print(raw.info)
print(raw.ch_names)
芭比Q,mne库我一开始就没装,那命令行安装mne吧。
pip install -U mne这一pip我没有报错,谢天谢地。
这里贴出mne的document网址,便于查询函数参数:Documentation overview — MNE 0.24.1 documentation
mne提供gdf文件的read函数,真方便。matlab中需要安装BioSigg工具箱读取gdf。
mne使用Raw数据结构存储,打印raw.info查看信息
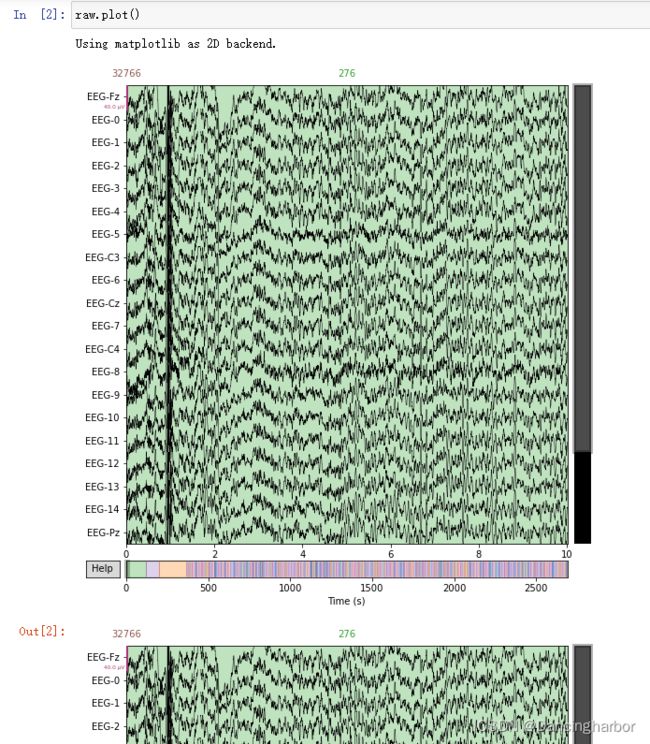
再用raw.plot()看一下:
plot出来的居然是我们熟悉的脑电信号图。
Events 和 Epoch的提取(我认为就是数据的预处理):
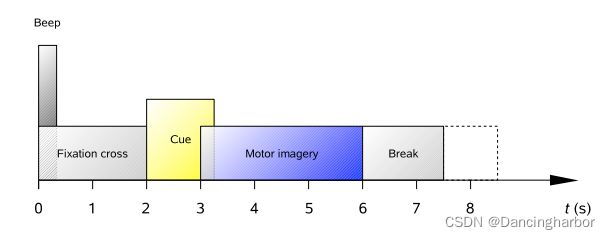
实验数据是全程记录的,但是根据范式来看,我们只需要分析3s运动想象的片段。
因此我们需要分段,提取epochs。而分段需要根据数据中的mark(即event)来将数据切分成一段一段的,除此之外的数据我们就不用了。
贴出一开始帮师兄预处理EEG我找的原理贴,我觉得讲得很通俗易懂:手把手教你EEG脑电数据预处理-原理篇_脑机接口社区的博客-CSDN博客_脑电基线校正
代码无非就是实现这些预处理步骤(滤波,删除无用通道等)。
# Find the events time positions
events, _ = mne.events_from_annotations(raw)

# Pre-load the data

raw.load_data()

# Filter the raw signal with a band pass filter in 7-35 Hz

raw.filter(7., 35., fir_design='firwin')

# Remove the EOG channels and pick only desired EEG channels

raw.info['bads'] += ['EOG-left', 'EOG-central', 'EOG-right']

picks = mne.pick_types(raw.info, meg=False, eeg=True, eog=False, stim=False,
                       exclude='bads')

# Extracts epochs of 3s time period from the datset into 288 events for all 4 classes

tmin, tmax = 1., 4.
# left_hand = 769,right_hand = 770,foot = 771,tongue = 772
event_id = dict({'769': 7,'770': 8,'771': 9,'772': 10})

epochs = mne.Epochs(raw, events, event_id, tmin, tmax, proj=True, picks=picks,
                baseline=None, preload=True)
首先看
# Find the events time positions
events, _ = mne.events_from_annotations(raw)
在EEGdata中event和mark、trigger其实表示的是同一个意思,即在我们关注的事件发生时,打上一个我们认得出的标记,这样子就可以从我们收集到的一长段数据中,找到我们感兴趣的事件范围了。
在MNE中,Events和Annotations都是一种数据结构,Events存储为Numpy数组,Annotations在MNE-Python中定义的类似列表的类。为了后续处理,可以为Annotations创建events。
这时候我为了理解代码中的mne.events_from_annotations(raw)函数,便去翻阅了MNE的document。
该函数的返回值如下:
不是很理解这里gdf中的events到底装了什么东西,所以我小小的修改了一下代码。
# Find the events time positions
events, events_dict = mne.events_from_annotations(raw)

print('Number of events:',len(events))
print(events_dict)
print(events)
可以看到Annotations descriptions刚好是2a的description文档中event_type,events_dict可以看到数据字典,怕说不清楚,可以看图自行理解。
滤波:代码作者获得了7-35Hz的raw信号(我觉得可以再试试8-30Hz的?其他人好像都这么干的)
# Filter the raw signal with a band pass filter in 7-35 Hz

raw.filter(7., 35., fir_design='firwin')
删除无用通道:我们是四分类想象,EOG-xxxx是眼睛的通道,跟我们的实验无关,删除。
# Remove the EOG channels and pick only desired EEG channels

raw.info['bads'] += ['EOG-left', 'EOG-central', 'EOG-right']

picks = mne.pick_types(raw.info, meg=False, eeg=True, eog=False, stim=False,
                       exclude='bads')
mne.pick_types还比较好理解,不进行阐述。返回的应该是array of int,应该是能代表好通道的数字。
分段:根据event来分段,提取epochs
# Extracts epochs of 3s time period from the datset into 288 events for all 4 classes

tmin, tmax = 1., 4.
# left_hand = 769,right_hand = 770,foot = 771,tongue = 772
event_id = dict({'769': 7,'770': 8,'771': 9,'772': 10})

epochs = mne.Epochs(raw, events, event_id, tmin, tmax, proj=True, picks=picks,
                baseline=None, preload=True)
我一开始对tmin,tmax产生了疑问。经过查询,此处的tmin和tmax是根据event开始的时间来计算的。
我们需要的events(events有很多种类),我们只需要四类events,即769,770,771,772
这四类events都是从Cue开始计算,即坐标中的2s,而我们需要分析的是范式中Motor imagery的3s数据,这对应的是events开始后的第1s和第4s。因此,tmin,tmax=1,4.
对于event_id这一字典我一开始不理解为什么不直接使用分类标签中的1,2,3,4,在后来的梳理中理解了:提取epochs使用的是events,当然是要使用events携带的标签。在一开始我们使用events_dict查看了events对应的标签,刚好是我们这里字典映射{'769': 7,'770': 8,'771': 9,'772': 10}。这不是巧了么
print(epochs)一下看看
舒服了,2a的实验设计中 一名受试者在一次实验中刚好有288次测试(一次实验有6次run,一次run有48次测试,四类每一类测试12次)。
我去,这劲头一下子就上来了,居然没报错,结果还是对的。
获取epochs的平均数据:
这一部分的处理我在思考有没有必要,后续的代码中也没有用到,打印出来的图我肉眼看也看不懂,若是有佬帮忙解惑将十分感谢。
受试者在受到闪光或者声音之类的刺激后,大脑会产生不同类型的电位,称此为诱发电位(Evoked potential)。为了解决这些诱发电位,我们需要对信号进行平均。
# left_hand = 769,right_hand = 770,foot = 771,tongue = 772

# Left hand epoch average plot

evoked = epochs['769'].average()
print(evoked)
evoked.plot(time_unit='s')

# Right hand epoch average plot

evoked = epochs['770'].average()
print(evoked)
evoked.plot(time_unit='s')

# Foot epoch average plot

evoked = epochs['771'].average()
print(evoked)
evoked.plot(time_unit='s')

# Tongue epoch average plot

evoked = epochs['772'].average()
print(evoked)
evoked.plot(time_unit='s')
代码很简单,没什么好讲的,跳过。
获取数据和标签
# Getting labels and changing labels from 7,8,9,10 -> 1,2,3,4
labels = epochs.events[:,-1] - 7 + 1

data = epochs.get_data()
标签和数据都是必须的,不多说。
这里对epochs.events进行切片,ndarray的切片操作是在[]里加逗号的形式。
竞赛中给的分类标签是1,2,3,4。
PS:我一开始疑问比较多,为什么不直接用一开始获得的events来切片,稍稍一想就知道了:一开始的events包括了其他杂七杂八的东西啊,我们要的是四分类,所以对epoch中的events进行切片。
print一下labels和data.shape
对于data最后一列表示的时间我不是很理解,为什么是751这个值,希望有佬能解答。
接下来是特征提取和特征分类:代码没有分的特别开,所以放一块了
先是小波包分解的函数
有小波分解和小波包分解,这两个工具适合对非平稳信号分析,而我们的EEG就是非平稳信号。
这两个工具都是用树的结构将原始信号一层一层的分解。
小波变换只对信号的低频部分进一步分解,而小波包分解除了对低频信号分解,还可以分解高频部分。
小波分解: 小波包分解:
贴出两个帖子帮助理解小波分解和小波包分解:
小波和小波包:小波与小波包、小波包分解与信号重构、小波包能量特征提取 暨 小波包分解后实现按频率大小分布重新排列(Matlab 程序详解)_cqfdcw的博客-CSDN博客_小波包分解
用python进行小波包分解(代码):用python进行小波包分解_qq_41978536的博客-CSDN博客_python小波包分解
小波包分解代码:
import pywt

# signal is decomposed to level 5 with 'db4' wavelet

def wpd(X):
    coeffs = pywt.WaveletPacket(X,'db4',mode='symmetric',maxlevel=5)
    return coeffs

def feature_bands(x):

    Bands = np.empty((8,x.shape[0],x.shape[1],30)) # 8 freq band coefficients are chosen from the range 4-32Hz

    for i in range(x.shape[0]):
        for ii in range(x.shape[1]):
             pos = []
             C = wpd(x[i,ii,:])
             pos = np.append(pos,[node.path for node in C.get_level(5, 'natural')])
             for b in range(1,9):
                 Bands[b-1,i,ii,:] = C[pos[b]].data

    return Bands

wpd_data = feature_bands(data)
这一部分代码有些参数我也一头雾水,不知道为什么这么设置。
wpd(X)函数就是实例化一个小波包对象
feature_bands(x)函数中:
Bands = np.empty((8,x.shape[0],x.shape[1],30))
# 8 freq band coefficients are chosen from the range 4-32Hz
这里就是生成一个多维数组,若x传入data,则这里的Bands.shape应该是8*288*22*30(8个频带,288个epoch,22个通道,30个不知道什么东西的data)。(我一开始不理解这是个什么形状的多维数组,我画了个树形状的图帮助自己理解。)
不知道为什么要传入数字8和30,先往下看。
for i in range(x.shape[0]):
        for ii in range(x.shape[1]):
             pos = []
             C = wpd(x[i,ii,:])
             pos = np.append(pos,[node.path for node in C.get_level(5, 'natural')])#按自然顺序得到特定层上的所有节点
             for b in range(1,9):
                 Bands[b-1,i,ii,:] = C[pos[b]].data#为什么是C[pos[b]]?

    return Bands
贴一下data(即参数x)的shape:(n_channels,n_epochs,n_times)
这里就相当于把每一个epoch的每一通道(or每一通道的每一epoch)拿去做小波包分解,分解成一颗五层的二叉树。
通过C.get_level(5,'natural'),可以按自然顺序得到二叉树C的第五层节点,这里节点好像是按照路径名称来的。
接下来再用数据把八个频带都填满,即Bands[b-1,i,ii,:]
我不是很理解为什么要用C[pos[b]].data来填。print(C[pos[b]].data)一下,
还是没有头绪,不过也知道了为什么Bands最后一维开了30,C[pos[*]].data的数量刚好30.有可能只是为了方便用了pos[b]?
最后Bands即我们最后使用的数据存储在wpd_data中。
from mne.decoding import CSP # Common Spatial Pattern Filtering
from sklearn import preprocessing
from sklearn.preprocessing import OneHotEncoder
from keras.models import Sequential
from keras.layers import Dense
from keras.layers import Dropout
from keras import regularizers
from sklearn.model_selection import ShuffleSplit

# OneHotEncoding Labels
enc = OneHotEncoder()
X_out = enc.fit_transform(labels.reshape(-1,1)).toarray()

# Cross Validation Split 交叉验证拆分
cv = ShuffleSplit(n_splits = 10, test_size = 0.2, random_state = 0)

from sklearn.metrics import accuracy_score
from sklearn.metrics import cohen_kappa_score
from sklearn.metrics import precision_score
from sklearn.metrics import recall_score

acc = []
ka = []
prec = []
recall = []
这里需要安装Keras库,安装它需要先安装Tensorflow。
安装这种库,懂得都懂,也不知道哪来的错误。
凡是有install命令的,我都在后面加一句-i http://mirrors.aliyun.com/pypi/simple/ --trusted-host mirrors.aliyun.com
例:
pip install keras -i http://mirrors.aliyun.com/pypi/simple/ --trusted-host mirrors.aliyun.com
这就是强制使用国内镜像源了。
这一段基本上都是做一些准备工作:
将labels转换为独热编码(OneHotEncoder)。什么是独热编码?就是一位是1,其他位都是0的编码。比如红,100;黄,010;蓝,001.
numpy.reshape(-1,1)是把labels转换成1列的函数。reshape(1,-1)是转换成1行.
为交叉验证准备拆分函数。test_size参数设置拆分出来的测试集大小。
建立分类器模型:
def build_classifier(num_layers = 1):
    classifier = Sequential()
    #First Layer
    classifier.add(Dense(units = 124, kernel_initializer = 'uniform', activation = 'relu', input_dim = 32,
                         kernel_regularizer=regularizers.l2(0.01))) # L2 regularization
    classifier.add(Dropout(0.5))
    # Intermediate Layers
    for itr in range(num_layers):
        classifier.add(Dense(units = 124, kernel_initializer = 'uniform', activation = 'relu',
                             kernel_regularizer=regularizers.l2(0.01))) # L2 regularization
        classifier.add(Dropout(0.5))
    # Last Layer
    classifier.add(Dense(units = 4, kernel_initializer = 'uniform', activation = 'softmax'))
    classifier.compile(optimizer = 'rmsprop' , loss = 'categorical_crossentropy', metrics = ['accuracy'])
    return classifier
这里代码作者使用了Keras中的Sequential模型,详细教程:
深入学习Keras中Sequential模型及方法 - 战争热诚 - 博客园
Dense层学习教程:keras里的Dense()函数_nick_0126的博客-CSDN博客_dense函数
Sequential模型的第一层一定要定义Dense层的形状,例:input_dim=32。
regularizers.l2(0.01)是L2 regularization 正则化,防止过拟合,提高泛化能力。
什么叫过拟合(overfitting)?其直观表现就是随着你训练过程进行,网络越来越复杂,越来越深,在训练集上的error越来越小,但是验证集上的error反而增大,这就是过拟合。因为训练出来的网络过拟合训练集,对训练集以外的就不够拟合。
正则化可以避免过拟合,接下来的Dropout(0.5)也是避免过拟合的一种方式。
这一块代码都是些参数,我觉得摸不着看不见,可能这都是前辈的经验。不要问,问就是经验。
模型建立完毕,接下来就是训练,预测,评分:
for train_idx, test_idx in cv.split(labels):

    Csp = [];ss = [];nn = [] # empty lists

    label_train, label_test = labels[train_idx], labels[test_idx]
    y_train, y_test = X_out[train_idx], X_out[test_idx]

    # CSP filter applied separately for all Frequency band coefficients

    Csp = [CSP(n_components=4, reg=None, log=True, norm_trace=False) for _ in range(8)]
    ss = preprocessing.StandardScaler()

    X_train = ss.fit_transform(np.concatenate(tuple(Csp[x].fit_transform(wpd_data[x,train_idx,:,:],label_train) for x  in range(8)),axis=-1))

    X_test = ss.transform(np.concatenate(tuple(Csp[x].transform(wpd_data[x,test_idx,:,:]) for x  in range(8)),axis=-1))

    nn = build_classifier()

    nn.fit(X_train, y_train, batch_size = 32, epochs = 300)

    y_pred = nn.predict(X_test)
    pred = (y_pred == y_pred.max(axis=1)[:,None]).astype(int)

    acc.append(accuracy_score(y_test.argmax(axis=1), pred.argmax(axis=1)))
    ka.append(cohen_kappa_score(y_test.argmax(axis=1), pred.argmax(axis=1)))
    prec.append(precision_score(y_test.argmax(axis=1), pred.argmax(axis=1),average='weighted'))
    recall.append(recall_score(y_test.argmax(axis=1), pred.argmax(axis=1),average='weighted'))
首先是对labels标签(都是1,2,3,4,···)进行拆分,返回的是索引值!!!!注意是数组索引(int),不是值,不是列表,不是数组。我当时就理解错了,就一直不理解接下来的代码。
接下来是创建CSP滤波器,什么叫CSP?一种特征提取算法,很适合EEG。
不是很理解为什么作者要实例化8个CSP滤波器,每次用一个难道不行么?
ss=preprocessing.StandardScaler()StandardScaler是进行标准化/归一化的工具
看接下来的代码前,先理解一下fit,transform,fit_transform:
fit和transform没有任何关系,仅仅是数据处理的两个不同环节,之所以出来fit_transform这个函数名,仅仅是为了写代码方便,会高效一点。
sklearn里的封装好的各种算法使用前都要fit,fit相对于整个代码而言,为后续API服务。fit之后,然后调用各种API方法,transform只是其中一个API方法,所以当你调用transform之外的方法,也必须要先fit。
fit即拟合,求得训练集X的均值,方差,最大值,最小值。
transform在fit基础上,进行标准化,降维等操作。
根据对训练集进行fit的整体指标,对剩余的数据(测试集)使用同样的均值、方差、最大最小值等指标进行转换transform(测试集),从而保证train、test处理方式相同。
详细解释:fit_transform,fit,transform区别和作用详解!!!!!!_九点澡堂子的博客-CSDN博客_fit_transform
在看下面的代码。
设置csp模型参数,提取训练集的相关特征
X_train = ss.fit_transform(np.concatenate(tuple(Csp[x].fit_transform(wpd_data[x,train_idx,:,:],label_train) for x in range(8)),axis=-1))参数axis=1则以行为单位操作,asix=0以列为单位操作。
详细解释:彻底理解numpy中的axis_虾米儿xia的博客-CSDN博客_numpy的axis
设置csp模型参数,提取测试集相关特征:测试集没有使用fit_transform
X_test=ss.transform(np.concatenate(tuple(Csp[x].transform(wpd_data[x,test_idx,:,:]) for x in range(8)),axis=-1))训练模型:
nn.fit(X_train, y_train, batch_size = 32, epochs = 300)预测:
y_pred = nn.predict(X_test)
pred = (y_pred == y_pred.max(axis=1)[:,None]).astype(int)
评分:
acc.append(accuracy_score(y_test.argmax(axis=1), pred.argmax(axis=1)))
ka.append(cohen_kappa_score(y_test.argmax(axis=1), pred.argmax(axis=1)))
prec.append(precision_score(y_test.argmax(axis=1), pred.argmax(axis=1),average='weighted'))
recall.append(recall_score(y_test.argmax(axis=1), pred.argmax(axis=1),average='weighted'))

import pandas as pd

scores = {'Accuracy':acc,'Kappa':ka,'Precision':prec,'Recall':recall}

Es = pd.DataFrame(scores)

avg = {'Accuracy':[np.mean(acc)],'Kappa':[np.mean(ka)],'Precision':[np.mean(prec)],'Recall':[np.mean(recall)]}

Avg = pd.DataFrame(avg)


T = pd.concat([Es,Avg])

T.index = ['F1','F2','F3','F4','F5','F6','F7','F8','F9','F10','Avg']
T.index.rename('Fold',inplace=True)

print(T)
后面的都不细讲了。
五、结语
文章都是自己的理解,不知道对不对,希望有佬看到错误能指出。没什么好说的,寄!
以下为修改补充
老师太忙了,半个学期没管我,我又去刷力扣了,今天突然想起来之前有些疑惑已经解决了,更新一下博客。
之前提出为什么小波包分解使用如下数据?
for b in range(1,9):
    Bands[b-1,i,ii,:] = C[pos[b]].data#为什么是C[pos[b]]?
在后来的阅读论文中看到,与运动想象最相关的μ节律(8-14Hz)和β节律(16-24Hz)。
我们的代码中将数据重构成5层
所以我认为我们的data只需要第五层的第2-3个叶子结点,
代码修改为
for b in range(1,3):
    Bands[b-1,i,ii,:]=C[pos[b]].data


