Mysql主主架构搭建以及Keepalived配置VIP
目录
一 数据库架构图
二 机器配置
三 mysql主主配置
四 Keepalived高可用配置
一 数据库架构图
二 机器配置
master1 172.16.90.180 CentOS 7.6 Keepalived VIP:172.16.90.186
master2 172.16.90.181 CentOS 7.6 Keepalived VIP:172.16.90.186
三 mysql主主配置
首先在两个节点上都下载mysql:
#获取5.7安装包
wget https://dev.mysql.com/get/Downloads/MySQL-5.7/mysql-5.7.36-el7-x86_64.tar.gz
#安装mysql
mkdir -p /app/
tar -xvf mysql-5.7.36-el7-x86_64.tar.gz -C /app/
ln -s /app/mysql-5.7.36-el7-x86_64/ /app/mysql
(ln -s命令可通过linux中ln -s 命令详解_坚持就有希望的博客-CSDN博客_ln- s,详细了解)
cd /app/mysql/
#创建MySQL用户
useradd mysql
#创建数据目录
mkdir /data/mysql -p
#目录授权
chown mysql.mysql -R /data/mysql
chown mysql.mysql -R /app/mysql
#配置环境变量
vim /etc/profile
#末尾添加这行内容
export PATH=/app/mysql/bin:$PATH
source /etc/profile
#初始化数据库
mysqld --initialize-insecure --user=mysql --basedir=/app/mysql --datadir=/data/mysql
#配置mysql主配置文件
cat >> /etc/my.cnf << EOF
[mysqld]
basedir = /app/mysql
datadir = /data/mysql
pid-file = /tmp/mysql.pid
socket = /tmp/mysql.sock
port = 3306
user = mysql
log_error = /data/mysql/mysql-error.log
slow-query-log-file = /data/mysql/mysql-slow.log
log_bin = /data/mysql/mysql-master-bin.log
relay-log = /data/mysql/mysql-relay-bin
server-id = 1
innodb_buffer_pool_size = 1024M
innodb_log_buffer_size = 16M
key_buffer_size = 128M
query_cache_size = 256M
tmp_table_size = 128M
binlog_format = mixed
skip-external-locking
skip-name-resolve
character-set-server = utf8
collation-server = utf8_bin
max_allowed_packet = 16M
thread_cache_size = 256
table_open_cache = 4096
back_log = 1024
max_connect_errors = 100000
interactive_timeout = 1800
wait_timeout = 1800
max_connections = 500
sort_buffer_size = 16M
join_buffer_size = 4M
read_buffer_size = 4M
read_rnd_buffer_size = 16M
binlog_cache_size = 2M
thread_stack = 192K
max_heap_table_size = 128M
myisam_sort_buffer_size = 128M
bulk_insert_buffer_size = 256M
open_files_limit = 65535
query_cache_limit = 2M
slow-query-log
long_query_time = 2
expire_logs_days = 3
max_binlog_size = 1000M
slave_parallel_workers = 4
log-slave-updates
binlog_ignore_db = mysql
replicate_wild_ignore_table = mysql.%
sync_binlog = 1
innodb_file_per_table = 1
innodb_flush_method = O_DIRECT
innodb_buffer_pool_instances = 4
innodb_log_file_size = 512M
innodb_log_files_in_group = 3
innodb_open_files = 4000
innodb_read_io_threads = 8
innodb_write_io_threads = 8
innodb_thread_concurrency = 8
innodb_io_capacity = 2000
innodb_io_capacity_max = 6000
innodb_lru_scan_depth = 2000
innodb_max_dirty_pages_pct = 85
innodb_flush_log_at_trx_commit = 2
sql_mode=NO_ENGINE_SUBSTITUTION,STRICT_TRANS_TABLES
[mysqldump]
quick
quote-names
max_allowed_packet = 16M
[client]
default-character-set = utf8
[mysql]
default-character-set = utf8
[isamchk]
key_buffer = 128M
sort_buffer_size = 4M
read_buffer = 2M
write_buffer = 2M
[myisamchk]
key_buffer = 128M
sort_buffer_size = 4M
read_buffer = 2M
write_buffer = 2M
EOF
#准备服务管理配置文件
cat >> /etc/systemd/system/mysqld.service << EOF
[Unit]
Description=MySQL Server
Documentation=man:mysqld(8)
Documentation=http://dev.mysql.com/doc/refman/en/using-systemd.html
After=network.target
After=syslog.target
[Install]
WantedBy=multi-user.target
[Service]
User=mysql
Group=mysql
ExecStart=/app/mysql/bin/mysqld --defaults-file=/etc/my.cnf
LimitNOFILE = 5000
EOF
#启动mysql服务
systemctl daemon-reload
systemctl start mysqld
systemctl status mysqld
在master1中为mysql从库账户授权:
grant replication slave on . to 'sync'@'192.168.10.%' identified by 'syncpwd';
flush privileges;
show master status; #当前主库状态,即master1
在master2中为mysql从库账户授权:
grant replication slave on . to 'sync'@'192.168.10.%' identified by 'syncpwd';
flush privileges;
show master status; #当前主库状态,即master2
在maste1中指定master2为主库:
stop slave;
change master to master_host='172.16.90.181',master_user='sync',master_password='syncpwd',master_log_file='mysql-bin.000004',master_log_pos=599;
flush privileges;
SET GLOBAL SQL_SLAVE_SKIP_COUNTER=1;
START SLAVE;
start slave;
在maste2中指定master1为主库:
stop slave;
change master to master_host='172.16.90.180',master_user='sync',master_password='syncpwd',master_log_file='mysql-bin.000004',master_log_pos=599;
flush privileges;
SET GLOBAL SQL_SLAVE_SKIP_COUNTER=1;
START SLAVE;
start slave;
MySQL双主配置完成,验证配置成功
show slave status\G
如果两个节点下面的属性都是Yes,则说明安装成功
Slave_IO_Running: Yes
Slave_SQL_Running: Yes
笔者在安装的过程中出现了Slave_IO_Running: No,并且报错为:
Got fatal error 1236 from master when reading data from binary log
然后通过这篇博客找到了解决方法,再次记录一下:
Got fatal error 1236 from master when reading data from binary log: 'Could not find first log file n_君子志邦的博客-CSDN博客
至此,mysql主主已经配置完成。
四 Keepalived高可用配置
首先在两个机器上都安装Keepalived。
安装:yum install -y keepalived
启动:systemctl start keepalived && systemctl enable keepalived
说明: 当两台服务器都正常的时候 用户默认访问服务器A,如果A有异常则访问B服务器。
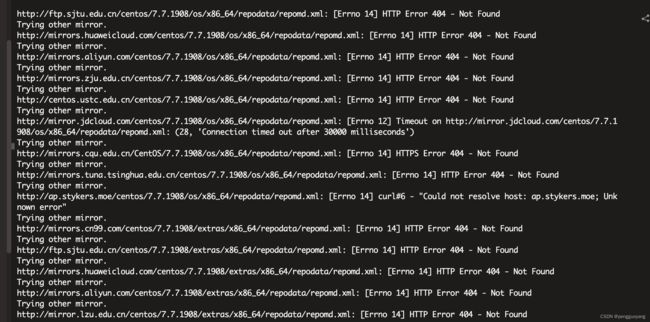
首先记录一下这里踩的一个坑:yum下载keepalived报错:
然后就更换了yum源,然后就可以正常下载 keepalived了,参考博客:
yum 修改源_zb313982521的博客-CSDN博客_修改yum源
下载完keepalived后,vim /etc/keepalived/keepalived.conf
节点1配置文件修改为:
! Configuration File for keepalived
global_defs {
    notification_email {
    ops@localhost
    }

    notification_email_from root@localhost
    smtp_server 127.0.0.1
    smtp_connect_timeout 30
    router_id mysql-master
}

vrrp_instance VI_1 {
    state MASTER
    interface ens192
    virtual_router_id 51
    priority 100
    advert_int 1
    authentication {
        auth_type PASS
        auth_pass 1111
    }
    virtual_ipaddress {
        172.16.90.186
    }
}
节点2配置文件修改为:
! Configuration File for keepalived
global_defs {
    notification_email {
    ops@localhost
    }

    notification_email_from root@localhost
    smtp_server 127.0.0.1
    smtp_connect_timeout 30
    router_id mysql-master
}

vrrp_instance VI_1 {
    state BACKUP
    interface ens192
    virtual_router_id 51
    priority 90
    advert_int 1
    authentication {
        auth_type PASS
        auth_pass 1111
    }
    virtual_ipaddress {
        172.16.90.186
    }
}
然后直接使用172.16.90.186这个VIP访问数据库。当访问成功,并且插入数据时,两个主节点都更新了数据,则证明mysql主主配置和keepalived配置成功。


