奔跑吧linux内核-使用qemu运行linux系统
安装linux主机相关工具
sudo apt-get install qemu-system-arm libncurses5-dev gcc-aarch64-linux-gnu build-essential git bison flex libssl-dev
上面执行后,默认安装 的arm64 gcc 版本是:并检查是否如下
aarch64-linux-gnu-gcc -v
Using built-in specs.
COLLECT_GCC=aarch64-linux-gnu-gcc
COLLECT_LTO_WRAPPER=/usr/lib/gcc-cross/aarch64-linux-gnu/9/lto-wrapper
Target: aarch64-linux-gnu
Configured with: ../src/configure -v --with-pkgversion='Ubuntu 9.3.0-17ubuntu1~20.04' --with-bugurl=file:///usr/share/doc/gcc-9/README.Bugs --enable-languages=c,ada,c++,go,d,fortran,objc,obj-c++,gm2 --prefix=/usr --with-gcc-major-version-only --program-suffix=-9 --enable-shared --enable-linker-build-id --libexecdir=/usr/lib --without-included-gettext --enable-threads=posix --libdir=/usr/lib --enable-nls --with-sysroot=/ --enable-clocale=gnu --enable-libstdcxx-debug --enable-libstdcxx-time=yes --with-default-libstdcxx-abi=new --enable-gnu-unique-object --disable-libquadmath --disable-libquadmath-support --enable-plugin --enable-default-pie --with-system-zlib --without-target-system-zlib --enable-libpth-m2 --enable-multiarch --enable-fix-cortex-a53-843419 --disable-werror --enable-checking=release --build=x86_64-linux-gnu --host=x86_64-linux-gnu --target=aarch64-linux-gnu --program-prefix=aarch64-linux-gnu- --includedir=/usr/aarch64-linux-gnu/include
Thread model: posix
gcc version 9.3.0 (Ubuntu 9.3.0-17ubuntu1~20.04)
qemu虚拟机的版本是 并检查是否如下
qemu-system-aarch64  --version
QEMU emulator version 4.2.1 (Debian 1:4.2-3ubuntu6.14)
Copyright (c) 2003-2019 Fabrice Bellard and the QEMU Project developers
下载代码仓库,
git clone https://github.com/figozhang/runninglinuxkernel_5.0.git
编译内核
sudo ./run_debian_arm64.sh build_kernel
编译根文件系统
sudo ./run_debian_arm64.sh build_rootfs
生成rootfs_debian_arm64.ext4的根文件系统
运行刚编译好的arm64版本的linux系统
sudo ./run_debian_arm64.sh run
        Starting Login Service...
[  112.880454] virtio_net virtio1 enp0s1: renamed from eth0
[  OK  ] Started D-Bus System Message Bus.
         Starting WPA supplicant...
         Starting LSB: Execute the …-e command to reboot system...
[  OK  ] Started Periodic ext4 Onli…ata Check for All Filesystems.
         Starting System Logging Service...
[  OK  ] Started Daily apt upgrade and clean activities.
[  OK  ] Reached target Timers.
         Starting DHCP Client Daemon...
[  OK  ] Started Raise network interfaces.
[  OK  ] Started System Logging Service.
[  OK  ] Started Remove Stale Onlin…ext4 Metadata Check Snapshots.
[  OK  ] Started LSB: Execute the k…c -e command to reboot system.
         Starting LSB: Load kernel image with kexec...
         Starting Rotate log files...
         Starting Online ext4 Metad…a Check for All Filesystems...
[  OK  ] Started Login Service.
[  OK  ] Started WPA supplicant.
[  OK  ] Started Avahi mDNS/DNS-SD Stack.
[  OK  ] Started LSB: Load kernel image with kexec.
[  OK  ] Reached target Network.
         Starting Permit User Sessions...
         Starting OpenBSD Secure Shell server...
[  OK  ] Reached target Network is Online.
         Starting Kernel crash dump capture service...
         Starting Daily apt download activities...
[  OK  ] Started Permit User Sessions.
[  OK  ] Started Getty on tty1.
[  OK  ] Started Serial Getty on ttyAMA0.
[  OK  ] Reached target Login Prompts.
[  OK  ] Started Online ext4 Metadata Check for All Filesystems.

Debian GNU/Linux buster/sid benshushu ttyAMA0

benshushu login: [  194.494138] kdump-tools[298]: Starting kdump-tools: Creating symlink /var/lib/kdump/vmlinuz.

benshushu login:
benshushu login: root
123
Password:


Login incorrect
benshushu login: root
Password:
[  235.882897] kdump-tools[298]: kdump-tools: Generating /var/lib/kdump/initrd.img-5.0.0
Last login: Tue Feb 18 02:06:31 UTC 2020 on ttyAMA0


Linux benshushu 5.0.0 #1 SMP Fri Mar 26 13:01:59 CST 2021 aarch64

Welcome Running Linux Kernel.
Created by Benshushu <runninglinuxkernel@126.com>

Buy linux kernel traning course:
https://shop115683645.taobao.com/

Wechat: runninglinuxkernel


benshushu:~#
benshushu:~#
benshushu:~#
benshushu:~#
benshushu:~#
benshushu:~#
benshushu:~# [  292.736680] kdump-tools[298]: find: ‘/var/tmp/mkinitramfs_BaZNBB/lib/modules/5.0.0/kernel’: No such file or directory
系统帐户密码
root
123
在线安装软件包
qemu虚拟机通过virtIO-net技术生成虚拟的网卡,并通过网络桥接技术和主机进行网络共享,
benshushu:~# ifconfig
enp0s1: flags=4163<UP,BROADCAST,RUNNING,MULTICAST>  mtu 1500
        inet 10.0.2.15  netmask 255.255.255.0  broadcast 10.0.2.255
        inet6 fec0::ce16:adb:3e70:3e71  prefixlen 64  scopeid 0x40<site>
        inet6 fe80::c86e:28c4:625b:2767  prefixlen 64  scopeid 0x20<link>
        ether 52:54:00:12:34:56  txqueuelen 1000  (Ethernet)
        RX packets 19  bytes 3799 (3.7 KiB)
        RX errors 0  dropped 0  overruns 0  frame 0
        TX packets 55  bytes 6862 (6.7 KiB)
        TX errors 0  dropped 0 overruns 0  carrier 0  collisions 0

lo: flags=73<UP,LOOPBACK,RUNNING>  mtu 65536
        inet 127.0.0.1  netmask 255.0.0.0
        inet6 ::1  prefixlen 128  scopeid 0x10<host>
        loop  txqueuelen 1000  (Local Loopback)
        RX packets 2  bytes 78 (78.0 B)
        RX errors 0  dropped 0  overruns 0  frame 0
        TX packets 2  bytes 78 (78.0 B)
        TX errors 0  dropped 0 overruns 0  carrier 0  collisions 0
可以看到这生成了enp0s1的网卡,ip 等信息,这里可以通过 apt-get update命令更新debian系统的软件仓库
如果不能更新可能是系统时间比较老,可以使用date命令来设置日期, 这里可以更新
hushu:~# apt-get update
Get:1 http://mirrors.ustc.edu.cn/debian unstable InRelease [154 kB]
Get:2 http://mirrors.ustc.edu.cn/debian unstable/non-free Sources [86.7 kB]
Get:3 http://mirrors.ustc.edu.cn/debian unstable/main Sources [9143 kB]
Get:4 http://mirrors.ustc.edu.cn/debian unstable/contrib Sources [50.8 kB]
Get:5 http://mirrors.ustc.edu.cn/debian unstable/main arm64 Packages [8483 kB]
Get:6 http://mirrors.ustc.edu.cn/debian unstable/main armhf Packages [8344 kB]
Get:7 http://mirrors.ustc.edu.cn/debian unstable/main Translation-en [6489 kB]
Get:8 http://mirrors.ustc.edu.cn/debian unstable/non-free arm64 Packages [71.8 kB]
Get:9 http://mirrors.ustc.edu.cn/debian unstable/non-free armhf Packages [61.9 kB]
Get:10 http://mirrors.ustc.edu.cn/debian unstable/non-free Translation-en [101 kB]
Get:11 http://mirrors.ustc.edu.cn/debian unstable/contrib armhf Packages [48.5 kB]
Get:12 http://mirrors.ustc.edu.cn/debian unstable/contrib arm64 Packages [49.0 kB]
Get:13 http://mirrors.ustc.edu.cn/debian unstable/contrib Translation-en [53.1 kB]
Fetched 33.1 MB in 59s (566 kB/s)
Reading package lists... Done
date -s 2021-03-29
可以使用apt-get install 命令安装软件包,如gcc
apt-get install gcc
在主机与qemu虚拟机中共享文件
通过 NET_9P技术,需要QEMU虚拟机中内核 与主机linux内核都使能 NET_9P模块,本实验已支持,可测试一下
创建一个文件
/runninglinuxkernel_5.0-rlk_5.0/kmodules$ touch zyk
以后就可以将主机上交叉编译的内核 模块放在qemu的虚拟内核中调试,也可以直接在qemu虚拟机中编译调试
更新内核配置修改的路径
ls arch/arm64/configs/
busybox_defconfig         debian_default_defconfig  debian_defconfig
重新编译内核
sudo ./run_debian_arm64.sh build_kernel
更新根文件系统
sudo ./run_debian_arm64.sh update_rootfs
要在run起来 的内核中编译测试代码,将代码放在
runninglinuxkernel_5.0/kmodules
下面便是
helloworld.c
#include Makefile
BASEINCLUDE ?= /lib/modules/`uname -r`/build
hello-world-objs := helloworld.o
obj-m := hello-world.o
all :
	$(MAKE) -C $(BASEINCLUDE) M=${PWD} modules;
clean:
	$(MAKE) -C $(BASEINCLUDE) M=$(PWD) clean;
	rm -f *.ko;
一般linux系统的内核模块都会安装到/lib/modules目录下,通过uname -r命令可以找到对应的内核版本
benshushu:5-module# ls /lib/modules/5.0.0+/
build		   modules.builtin.alias.bin  modules.order
kernel		   modules.builtin.bin	      modules.softdep
modules.alias	   modules.dep		      modules.symbols
modules.alias.bin  modules.dep.bin	      modules.symbols.bin
modules.builtin    modules.devname	      source
export BASEINCLUDE=/home/toby/桌面/runninglinuxkernel_5.0/
export ARCH=arm64
export CROSS_COMPILE=aarch64-linux-gnu-
make -C /home/toby/桌面/runninglinuxkernel_5.0/ M=${pwd} modules
放在QEMU系统中编译并运行
在QEMU虚拟机安装必要的软件包
# apt install build-essential
benshushu:helloworld# make
make -C /lib/modules/`uname -r`/build M=/mnt/helloworld modules;
make[1]: Entering directory '/usr/src/linux'
  CC [M]  /mnt/helloworld/helloworld.o
  LD [M]  /mnt/helloworld/hello-world.o
  Building modules, stage 2.
  MODPOST 1 modules
  CC      /mnt/helloworld/hello-world.mod.o
  LD [M]  /mnt/helloworld/hello-world.ko
make[1]: Leaving directory '/usr/src/linux'
benshushu:helloworld# ls
Makefile	hello-world.mod.c  helloworld.c
Module.symvers	hello-world.mod.o  helloworld.o
hello-world.ko	hello-world.o	   modules.order
benshushu:helloworld# insmod hello
hello-world.ko     hello-world.mod.o  hello-world.o      helloworld.o
benshushu:helloworld# insmod hello-world.ko
[  882.192060] hello_world: loading out-of-tree module taints kernel.
[  882.208593] hello_world: module verification failed: signature and/or required key missing - tainting kernel
[  882.256529] hello world, I am benshushu
模块加载成功后,系统会在/sys/modules目录下新建一个目录,这里为hello_world_modules
benshushu:5-module# ls /sys/module/
8250	     crc_t10dif		  ipv6	       random	  virtio_blk
8250_core    cryptomgr		  kernel       rcupdate   virtio_net
acpi	     dynamic_debug	  keyboard     rcutree	  virtio_pci
acpiphp      efi_pstore		  loop	       sbsa_gwdt  vt
arm_ccn      efivars		  module       shpchp	  watchdog
arm_smmu     fb			  mousedev     sit	  workqueue
arm_smmu_v3  firmware_class	  pci_hotplug  spurious   xilinx_uartps
blk_cgroup   hello_world_modules  pcie_aspm    srcutree   xz_dec
block	     ip6_gre		  pciehp       suspend	  zswap
button	     ip6_tunnel		  printk       sysrq
cpufreq      ip_gre		  processor    tcp_cubic
cpuidle      ipip		  pstore       thermal
benshushu:5-module# ls /sys/module/hello_world_modules/
coresize  holders  initsize  initstate	notes  refcnt  sections  taint	uevent
benshushu:5-module#
模块传参数,给内核模块传参数
static int debug = 1;
module_param(debug,int,0644);
MODULE_PARM_DESC(debug,"enable debugging info");
static int mytest= 1;
module_param(mytest,int,0644);
MODULE_PARM_DESC(mytest,"test for info param");
#include 变量生效:
benshushu:5-module# insmod hello-world-modules.ko debug=0 mytest=10
benshushu:5-module# rmmod hello_world_modules
[  651.063703] good bye
benshushu:5-module# insmod hello-world-modules.ko debug=2 mytest=10
[  655.263355] my fist kernel module init debug 2
[  655.263620] my fist kernel module init mytest10
在/sys/module/hello_world_modules/parameters/下看到两个新增的参数
benshushu:5-module# cat /sys/module/hello_world_modules/parameters/mytest
10
benshushu:5-module# cat /sys/module/hello_world_modules/parameters/debug
2
benshushu:5-module#
符号共享:
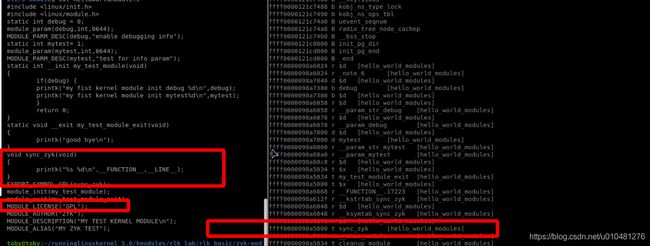
EXPORT_SYMBOL
EXPORT_SYMBOL_GPL ->需要模块声明为GPL   MODULE_LICENSE("GPL");
benshushu:5-module# cat /proc/kallsyms
通过qemu虚拟机调试ARMV8的LINUX内核
安装工具环境aarch64-linux-gnu-gcc和QEMU工具包
sudo apt-get install qemu qemu-system-arm gcc-aarch64-linux-gnu build-essential bison flex bc
安装 gdb-multiarch工具包
sudo apt-get install gdb-multiarch
运行脚本启动QEMU虚拟机和GDB服务
./run_debian_arm64.sh run debug
/runninglinuxkernel_5.0-rlk_5.0$ ./run_debian_arm64.sh run debug
Enable qemu debug server
WARNING: Image format was not specified for '/home/toby/runninglinuxkernel_5.0-rlk_5.0/rootfs_debian_arm64.ext4' and probing guessed raw.
         Automatically detecting the format is dangerous for raw images, write operations on block 0 will be restricted.
         Specify the 'raw' format explicitly to remove the restrictions.
在另一个超级终端中启动GDB
gdb-multiarch --tui vmlinux
(gdb) set architecture  aarch64
The target architecture is assumed to be aarch64
(gdb) target remote toby:1234
Remote debugging using localhost:1234
0x0000000040000000 in ?? ()
(gdb) b start_kernel
Breakpoint 1 at 0xffff000011b90470 (2 locations)
Note: breakpoint 1 also set at pc 0xffff000011b90470.
Breakpoint 2 at 0xffff000011b90470 (2 locations)
Note: breakpoint 2 also set at pc 0xffff000011b90478.
Note: breakpoints 1 and 2 also set at pc 0xffff000011b90470.
Breakpoint 3 at 0xffff000011b90470 (2 locations)
(gdb) c
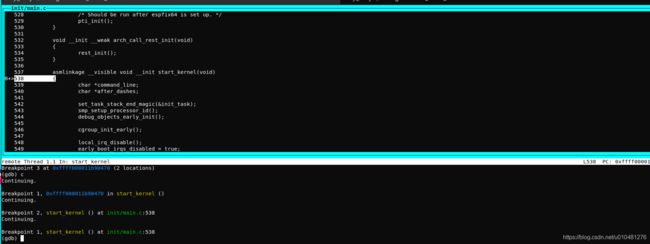
如下图GDB开始接管linux内核的运行,并且在断点处暂停,这时可使用GDB命令来调试内核
 gdb command
b 行号或函数 添加断点

r 跑到下一个断点

s 单步跟踪

n 单步执行

p 查看当前程序的运行数据 比如:p a 输出a变量的值 输出格式可以设置: 比如p/d a 十进制输出a变量的值

p array@idx 可以查看数组 array 中 idx 处的值

设置display,比如 display a 这样以后每次调试都会输出a变量的值

x 查看内存地址中的值 语法:x/

l 查看原程序代码,l 9 列出第9行附件的源码(l 2,8 列出2-8行之间的数据),l func 列出指定函数附件的源码

p x=8 在调试过程中修改变量x的值,下面生效

jump 实现跳转,可以是文件的行号,也可以是file:line,也可以是+num这种格式 jump address是代码行的内存地址

signal 产生信号量

return 强制返回

call 强制调用

until(简写u) 当在一个循环体内时,运行退出循环

until +行号 运行至某行停住,不仅仅跳出循环

finish 当前函数执行完,并打印函数返回时的堆栈地址和返回值及参数值等信息

skip 在 step 时跳过一些不想关注的函数或者某个文件的代码,如 skip function add 表示跳过函数 add,skip file step.c 跳过文件 step.c,info skip 查看跳过的信息。

c 继续执行 跳到下一个断点

bt 查看堆栈

where 报错时查看哪里出错,与 bt 类似

info b 查看断点情况

q 退出

ptype 输出结构体类型

info registers 显示寄存器值, info all-registers 显示所有寄存器

info breakpoints 可以查看所有已设置的端点
命令进阶
设断点
info breakpoints 查看所有断点

b 9 或者 b test.c:9 根据行号设置断点

b func 根据函数名设置断点

b test.c:9 if b==0 根据程序某个条件会出现问题,设置该条件断点(这样当出现问题时,会卡主,用来判断是否是该问题)

rbreak print* 对所有 print 开头的函数都设断点,rbreak test.c:. 对test.c 中所有函数设断点

tbreak test.c:9 设 临时断点 ,即这个断点只生效一次

ignore 1 30 忽略某个断点的前面 30 次执行,从第 31 次开始生效,节约时间

watch a 观察某个值或表达式,什么时候发生变化

disable/enable num 禁用/启用所有/某个断点

clear 清除所有断点,用于清除某个函数,某行的断点,如 clear func 、clear linenum

delete 删除所有断点,包括watchpoints, catchpoints,用于删除断点号的断点,如 delete bnum
查看变量
p 'test.c'::a 打印某个文件的变量,p 'main'::b 打印某个函数定义的变量

p *p@10 打印指针指向的内容,@后面为打印的长度

p *$.next 打印链表linkNode的下一个节点内容

p/x c 按十六进制打印内容(x:十六进制,d:十进制,o:八进制,t:二进制,c:字符格式,f:浮点格式)

x addr 查看内存地址值

display e 程序断住显示某个变量的值
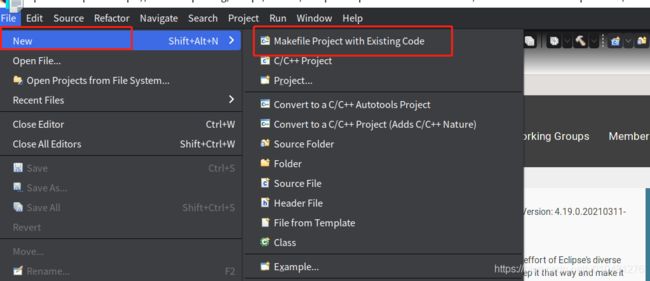
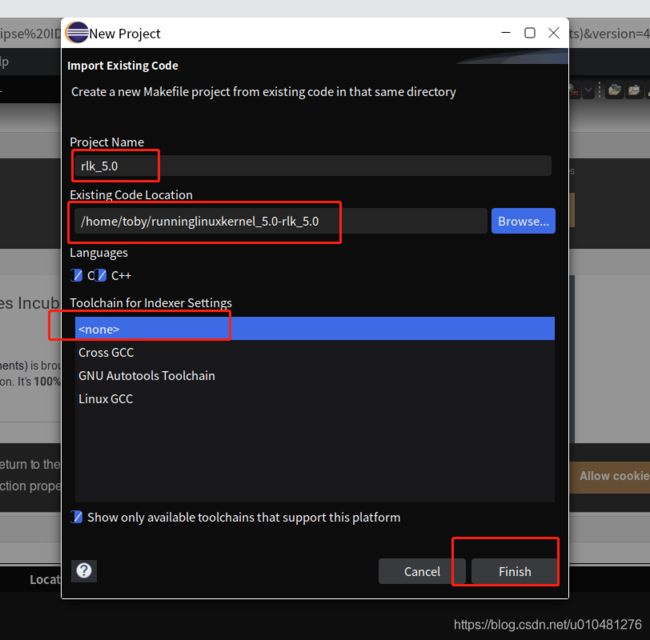
图形化调试
进入 Eclipse 官方主页
下载页面 找到 Eclipse IDE for C/C++ Developers
elipse-cdt下载
需要提前安装java环境
sudo apt-get install openjdk-13-jre
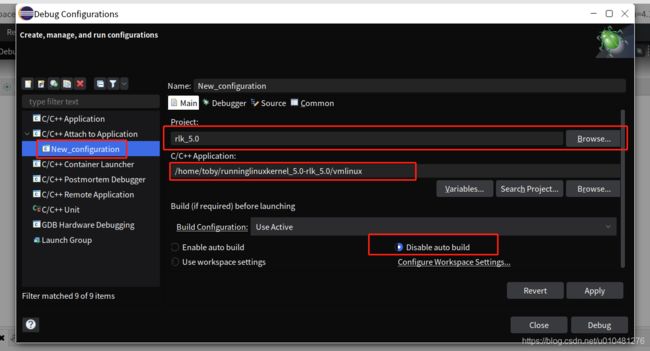
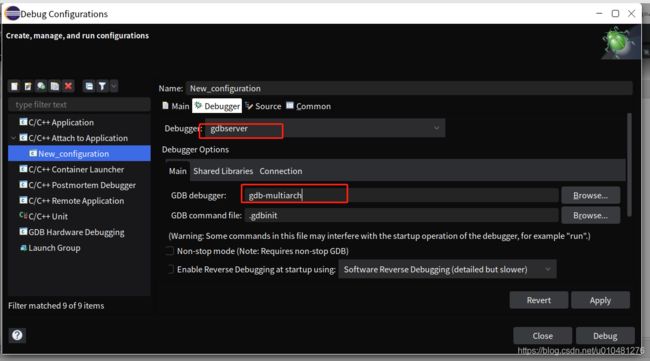
gdb-multiarch
设置完后点Debug
在LINUX的主机另一终端中运行QEMU虚拟机和gdbserver
./run_debian_arm64.sh run debug
~/runninglinuxkernel_5.0-rlk_5.0$ ./run_rlk_arm64.sh run debug
Enable qemu debug server
WARNING: Image format was not specified for '/home/toby/runninglinuxkernel_5.0-rlk_5.0/rootfs_debian_arm64.ext4' and probing guessed raw.
         Automatically detecting the format is dangerous for raw images, write operations on block 0 will be restricted.
         Specify the 'raw' format explicitly to remove the restrictions.
在图形客户端中打开调试,或在图形中点小昆虫图标
(gdb)  file vmlinux
(gdb) set architecture  aarch64
The target architecture is assumed to be aarch64
(gdb) target remote toby:1234
Remote debugging using localhost:1234
0x0000000040000000 in ?? ()
(gdb) b start_kernel

