【Spring Boot】初识Spring Boot以及整合框架
一、闲话
开始Spring Boot的学习,万事开头难,一旦开始,就有动力继续学下去
二、基本要点
官网:SpringBoot官网地址
1、简介
SpringBoot的设计目的是用来简化新Spring应用的初始搭建以及开发过程。该框架使用了特定的方式来进行配置,从而使开发人员不再需要定义样板化的配置。
SpringBoot框架中有两个非常重要的策略:开箱即用和约定优于配置
2、优点
- 开箱即用,提供各种默认配置简化开发
- 内嵌式容器(tomcat)简化web项目
- 没有冗余代码生成,没有Spring那样有很多xml文件需要配置
- 通过导入对应的启动器starter,来管理众多依赖
3、微服务架构
-
单体应用架构
在微服务架构出现之前,我们一般都是使用单体应用架构,也就是所谓的all in one,我们部署时只需要一个war包即可,但是如果要修改一个小功能,我们需要停掉整个服务,重新打包,而且对于体量特别大的应用,使用这种架构不便于维护和分工 -
微服务架构(高内聚低耦合)
将不同的功能独立成一个个模块,随机组合,这样,每一个功能服务都是可替换、可独立升级、可独立部署的,微服务之间通过轻量级HTTP进行通信
三、创建Spring Boot项目
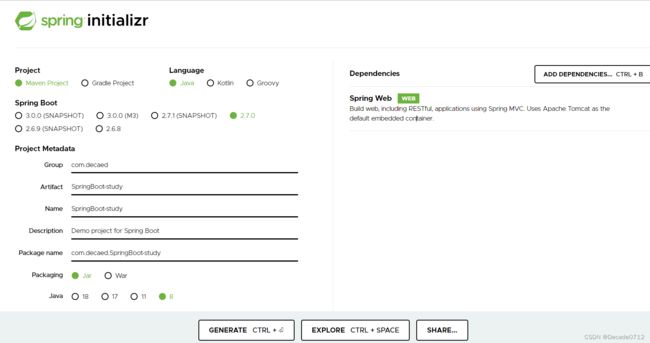
1、在官网自动生成
访问Spring官网,进入https://start.spring.io/
如图,按照需要填写信息,点击generate就会自动生成一个zip包,下载到本地后解压导入idea即可
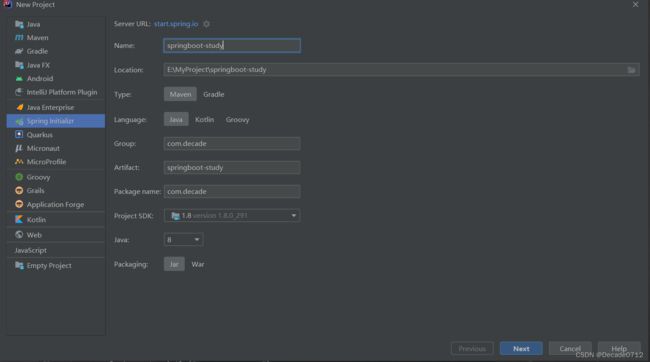
2、idea中自动生成
我们直接在idea中new一个project,按照如下配置创建工程
1)整合web框架
- 选中web依赖,pom文件中就会引入spring-boot-starter-web
- 这样项目就会使用 Spring MVC 构建 Web 应用程序,包括restful应用程序。
- 使用 Apache Tomcat 作为默认的嵌入式容器
- Spring Boot 中对依赖都做了很好的封装,可以看到很多 spring-boot-starter-xxx 系列的依赖,这是 Spring Boot 的特点之一,不需要人为去引入很多相关的依赖了,starter-xxx 系列直接都包含了所必要的依赖

我们可以编写一个测试类进行测试
package com.decade.controller;

import org.springframework.stereotype.Controller;
import org.springframework.web.bind.annotation.RequestMapping;
import org.springframework.web.bind.annotation.ResponseBody;

@Controller
@RequestMapping(value = "/test")
public class TestController {

    @RequestMapping(value = "/hello")
    @ResponseBody
    public String testHello() {
        return "测试 OK!";
    }
}
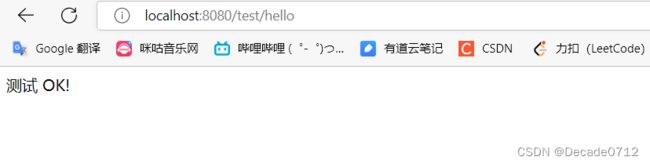
然后可以通过主启动类启动项目,无需再配置tomcat,启动时可以看到spring boot版本和内置tomcat版本
我们可以发现,无需像SSM框架那样配置DispatcherServlet
由于Springboot是自动扫描的,我们也不需要配置包扫描路径了
可以直接从浏览器访问http://localhost:8080/test/hello,结果如下
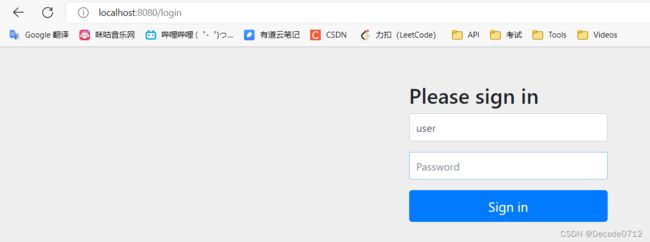
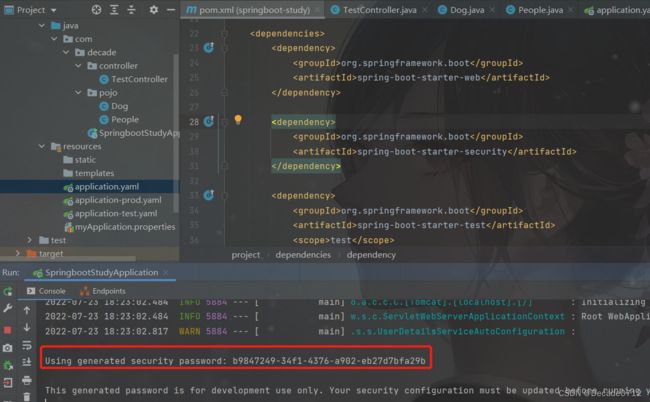
2)整合SpringSecurity框架
首先我们引入相关依赖
<dependency>
	<groupId>org.springframework.bootgroupId>
	<artifactId>spring-boot-starter-securityartifactId>
dependency>
这样我们再访问直接的接口时,就需要使用默认的user用户和随机生成的密码进行登录了
3)整合mybatis框架
我们理清思路,我们要整合mybatis框架,需要怎么做?
- 首先引入依赖
<dependency>
   <groupId>mysqlgroupId>
   <artifactId>mysql-connector-javaartifactId>
dependency>
<dependency>
   <groupId>org.mybatis.spring.bootgroupId>
   <artifactId>mybatis-spring-boot-starterartifactId>
   <version>1.3.2version>
dependency>
然后我们如果要使用mapper.xml,那么就得配置maven资源过滤
<resource>
   <directory>src/main/javadirectory>
   <includes>
   	<include>**/*.xmlinclude>
   includes>
   <filtering>truefiltering>
resource>
- 接着在我们的yaml文件中配置数据库连接配置
如果要使用mapper.xml,那么要配置mapper-locations,指向我们SQL映射文件的路径
这里解释一下classpath和classpath的区别
classpath:只会到你的class路径中查找找文件;
classpath:不仅包含class路径,还包括jar文件中(class路径)进行查找
spring:
  profiles:
    active: '@environment@' #这里是多环境打包的配置,暂不关注
  datasource:
    url: jdbc:mysql://localhost:3306/decade_test?useUnicode=true&characterEncoding=UTF-8
    username: root
    password: root
    driver-class-name: com.mysql.cj.jdbc.Driver
mybatis:
  mapper-locations: classpath*:com/decade/mapper/*.xml #注意:一定要对应mapper映射xml文件的所在路径
- 最后写业务代码
数据实体类
package com.decade.pojo;

import lombok.AllArgsConstructor;
import lombok.Data;
import lombok.NoArgsConstructor;

@Data
@AllArgsConstructor
@NoArgsConstructor
public class User {
   private String id;
   private String name;
   private int age;
   private String sex;
}
Controller层
package com.decade.controller;

import com.decade.pojo.User;
import com.decade.service.TestService;
import org.springframework.beans.factory.annotation.Autowired;
import org.springframework.stereotype.Controller;
import org.springframework.web.bind.annotation.PathVariable;
import org.springframework.web.bind.annotation.RequestMapping;

@Controller
@RequestMapping(value = "/test")
public class TestController {

   @Autowired
   private TestService testService;

   @RequestMapping(value = "/queryInfo/{userId}")
   @ResponseBody
   public User queryInfo(@PathVariable("userId") String userId) {
       return testService.queryUserInfo(userId);
   }
}
Service层,接口类
package com.decade.service;

import com.decade.pojo.User;

public interface TestService {
    User queryUserInfo(String id);
}
实现类
package com.decade.service.impl;

import com.decade.mapper.TestMapper;
import com.decade.pojo.User;
import com.decade.service.TestService;
import org.springframework.beans.factory.annotation.Autowired;
import org.springframework.stereotype.Service;

@Service
public class TestServiceImpl implements TestService {
   @Autowired
   private TestMapper mapper;

   @Override
   public User queryUserInfo(String id) {
       return mapper.queryUserInfoById(id);
   }
}
最后是Dao层,SpringBoot中@Mapper : 表示本类是一个 MyBatis 的 Mapper接口类,无需再做配置
package com.decade.mapper;

import com.decade.pojo.User;
import org.apache.ibatis.annotations.Mapper;
import org.apache.ibatis.annotations.Param;
import org.apache.ibatis.annotations.Select;

@Mapper
public interface TestMapper {
    @Select("select * from t_decade_user where id = #{id}")
    User queryUserInfo(@Param("id") String id);

    User queryUserInfoById(@Param("id") String id);
}
DOCTYPE mapper
        PUBLIC "-//mybatis.org//DTD Config 3.0//EN"
        "http://mybatis.org/dtd/mybatis-3-mapper.dtd">
<mapper namespace="com.decade.mapper.TestMapper">

    <resultMap id="userMap" type="com.decade.pojo.User">
        <result property="age" column="age" jdbcType="INTEGER"/>
        <result property="id" column="id" jdbcType="INTEGER"/>
        <result property="name" column="name" jdbcType="VARCHAR"/>
        <result property="sex" column="sex" jdbcType="VARCHAR"/>
    resultMap>

    <select id="queryUserInfoById" parameterType="String" resultMap="userMap">
        select * from t_decade_user
        where id = #{id}
    select>

mapper>
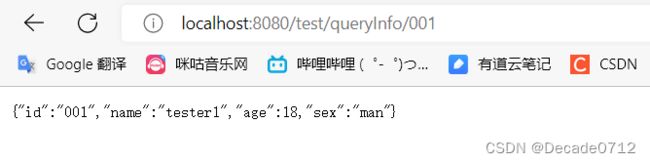
最终,测试接口效果如下
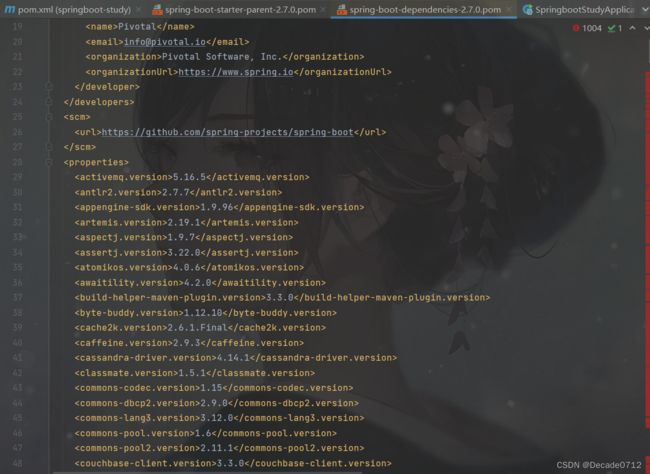
3、依赖管理
1)spring boot的核心依赖都在父工程中
即点击spring-boot-starter-parent,再点击spring-boot-dependencies
就可以看见spring boot相关依赖的版本信息,如图所示
如果想要选择自己需要的依赖版本号
先要查看springboot的spring-boot-dependencies中管理依赖版本的key
然后在当前项目的pom文件中重写依赖版本即可,如下所示(properties需要放在dependencies前面)
<properties>
	<mysql-version>5.1.43mysql-version>
properties>
2)启动器:Spring boot的启动场景
例如spring-boot-starter-web,它就会自动导入所有web环境所需的依赖
Spring boot将所有的场景都变成了一个个启动器,我们需要时自己导入即可
Spring boot相关starter
dependency>
	<groupId>org.springframework.bootgroupId>
	<artifactId>spring-boot-starter-webartifactId>
dependency>
如有错误,欢迎指正!!