devops运维手册
devops运维
- devops运维
-
- 一. 搭建Prometheus
-
- 安装Prometheus(以下搭建环境都在/usr/local目录下)
- 1. 从 https://prometheus.io/download/ 下载相应版本,安装到服务器上
- 2.查看相应版本,解压即可使用
- 3.后台启动普罗米修斯
- 4.我们把服务以系统管理的方式添加
- 5.启动服务,并且添加到配置文件
- 二.安装Node Exporter
-
- 1.下载部署
- 2.添加到systemctl服务
- 3.配置开机启动
- 4.修改Prometheus 配置文件Prometheus.yml,增加相关监控
- 5.最后访问ip:9090
- 三.搭建Grafana可视化图形工具
-
- 1.什么是Grafana
- 2.下载安装
- 3.开启服务
- 4.访问grafana
- 四.Prometheus+Alertmanager
-
- 1.Alertmanager安装:
- 2.配置定义一下分组和路由:
- 3.Alertmanager global:
- 4.添加到启动项,并且启动、默认监听9093端口:
- 5.启动邮件报警服务
- 6.配置 prometheus 规则与alert:
-
- 1、修改prometheus.yml的alerting部分,让alertmangers能与Prometheus通信:
- 2、定义告警文件:
- 3、告警规则定义,这里简单的从主机down机简单写起:
- 4.定义告警模板:
-
- 1、首先新建一个模板文件:
- 2、修改配置文件,使用模板:
- 5.恢复告警通知:
-
- 1、添加恢复消息:
- 2、修改模板,添加恢复消息:
- 告警收敛(分组,抑制,静默)
- 五.Grafana+onealert报警 (推荐使用但是免费版只能创建2个实例)
-
- 1.去官网申请账号
- 2.创建告警实例
- 3.创建grafana告警通知
- 六.mysql服务监控安装
-
- 1.概况
- 2.安装mysqld_exporter用来监控mysql
-
- 1、安装exporter
- 2、添加mysql 账户:
- 3、编辑配置文件:
- 4、设置配置文件:
- 5、添加配置到prometheus.yml
- 6、测试看有没有返回数值:
- 7、mysql告警规则
-
- 1.配置
- 2、添加规则到prometheus:
- 3、重新启动prometheus:
- 3、打开web ui我们可以看到规则生效了:
- 七.Redis服务监控
-
- 1.安装redis_exporter插件
- 2.启动redis_exporter登陆redis
- 3.查看redis_exporte是否开启
-
- 4.修改prometheus配置文件
- 5.重启prometheus
- 6.grafana可视化redis服务信息
- 八.kafka服务监控
-
- 1.安装kafka_exporter插件
- 2.启动kafka_exporter监控服务
- 3.查看kafka_exporter是否开启
-
- 4.修改prometheus配置文件
- 5.重启prometheus
- 6.grafana可视化redis服务信息
- 九.Prometheus监控springboot项目
-
- 1. 项目整合
- 2.修改配置文件
- 暴露服务端口(默认)
devops运维
一. 搭建Prometheus
安装Prometheus(以下搭建环境都在/usr/local目录下)
1. 从 https://prometheus.io/download/ 下载相应版本,安装到服务器上
官网prometheus提供的是二进制版,解压就能用,不需要编译
[root@host-10-10-2-99 ~]#
wget https://github.com/prometheus/prometheus/releases/download/v2.13.1/prometheus-2.13.1.linux-amd64.tar.gz
[root@host-10-10-2-99 ~]# tar -xf prometheus-2.13.1.linux-amd64.tar.gz
[root@host-10-10-2-99 ~]# mv prometheus-2.13.1.linux-amd64 /usr/local/prometheus
[root@host-10-10-2-99 ~]# cd /usr/local/prometheus/
2.查看相应版本,解压即可使用
[root@host-10-10-2-99 prometheus]# ./prometheus --version
prometheus, version 2.13.1 (branch: HEAD, revision: 6f92ce56053866194ae5937012c1bec40f1dd1d9)
  build user:       root@88e419aa1676
  build date:       20191017-13:15:01
  go version:       go1.13.1
3.后台启动普罗米修斯
[root@host-10-10-2-99 prometheus]# ./prometheus &
即可完成启动,访问 http://ip:9090 端口即可,默认读取当前目录下的prometheus.yml配置文件:
4.我们把服务以系统管理的方式添加
[root@host-10-10-2-99 prometheus]# vim /etc/systemd/system/prometheus.service
[Unit]
Description=Prometheus Monitoring System
Documentation=Prometheus Monitoring System

[Service]
ExecStart=/usr/local/prometheus/prometheus \
  --config.file=/usr/local/prometheus/prometheus.yml \
  --web.listen-address=:9090

[Install]
WantedBy=multi-user.target
5.启动服务,并且添加到配置文件
[root@host-10-10-2-99 prometheus]# systemctl enable prometheus
Created symlink from /etc/systemd/system/multi-user.target.wants/prometheus.service to /etc/systemd/system/prometheus.service.
[root@host-10-10-2-99 prometheus]# systemctl start prometheus
二.安装Node Exporter
在Prometheus的架构设计中,Prometheus Server并不直接服务监控特定的目标,其主要任务负责数据的收集,存储并且对外提供数据查询支持。因此为了能够能够监控到某些东西,如主机的CPU使用率,我们需要使用到Exporter。Prometheus周期性的从Exporter暴露的HTTP服务地址(通常是/metrics)拉取监控样本数据。
Node Exporter 可以采集到系统相关的信息,例如CPU、内存、硬盘等系统信息。Node Exporter采用Golang编写,并且不存在任何的第三方依赖,只需要下载,解压即可运行。
1.下载部署
[root@host-10-10-2-99 ~]#
wget https://github.com/prometheus/node_exporter/releases/download/v0.18.1/node_exporter-0.18.1.linux-amd64.tar.gz
[root@host-10-10-2-99 ~]# tar -xf node_exporter-0.18.1.linux-amd64.tar.gz
[root@host-10-10-2-99 ~]# mv node_exporter-0.18.1.linux-amd64 /usr/local/node_exporter
2.添加到systemctl服务
[root@host-10-10-2-99 ~]# cat /etc/systemd/system/node_exporter.service
[Unit]
Description=node exporter
Documentation=node exporter

[Service]
ExecStart=/usr/local/node_exporter/node_exporter
[Install]
WantedBy=multi-user.target
3.配置开机启动
[root@host-10-10-2-99 ~]# systemctl enable node_exporter
Created symlink from /etc/systemd/system/multi-user.target.wants/node_exporter.service to /etc/systemd/system/node_exporter.service.
[root@host-10-10-2-99 ~]# systemctl start node_exporter
4.修改Prometheus 配置文件Prometheus.yml,增加相关监控
如果你需要监控某台机器上CPU、内存、硬盘等系统信息都需要安装在对应的机器上安装Node_Exporter并且配置 prometheus.yml
[root@host-10-10-2-99 prometheus]# vim prometheus.yml
scrape_configs:
  #The job name is added as a label `job=` to any timeseries scraped from this config.
  - job_name: 'prometheus'

    #metrics_path defaults to '/metrics'
    #scheme defaults to 'http'.

    static_configs:
    - targets: ['localhost:9090']

  - job_name: 'linux'
    static_configs:
      - targets: ['本机ip:9100']
[root@host-10-10-2-99 prometheus]# systemctl restart prometheus
5.最后访问ip:9090

查看当前正在监控的服务或机器up表示监控正常

查看当前监控的数据
三.搭建Grafana可视化图形工具
1.什么是Grafana
Grafana是一个开源的度量分析和可视化工具,可以通过将采集的数据分 析,查询,然后进行可视化的展示,并能实现报警。
2.下载安装
官网地址 grafana下载rpm包
wget <.deb package url>   ##如果下载了就不需要执行这行命令
wget https://dl.grafana.com/oss/release/grafana_6.7.3_amd64.deb  ##下载地址
//安装grafana图形化界面   Ubuntu 安装
sudo apt-get install -y adduser libfontconfig1
sudo dpkg -i grafana<edition>_<version>_amd64.deb
3.开启服务
sudo systemctl daemon-reload
sudo systemctl start grafana-server
sudo systemctl status grafana-server
//开机自启
sudo systemctl enable grafana-server.service
//服务状态
sudo service grafana-server status
//更新grafana
sudo update-rc.d grafana-server defaults
4.访问grafana
通过浏览器访问 http:// grafana服务器IP:3000就到了登录界面,使用默 认的admin用户,admin密码就可以登陆了

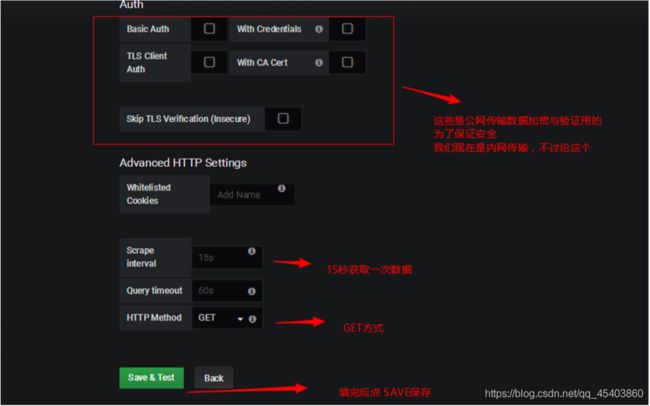
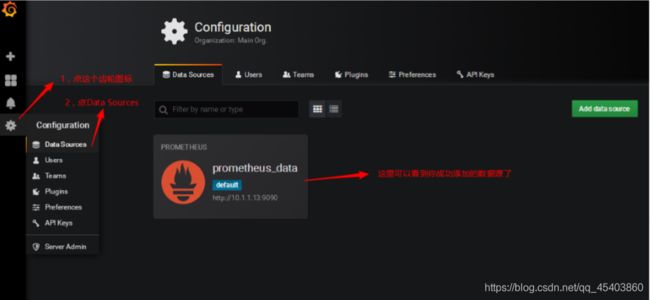
下面我们把prometheus服务器收集的数据做为一个数据源添加到 grafana,让grafana可以得到prometheus的数据(这一步必须要执行的)。


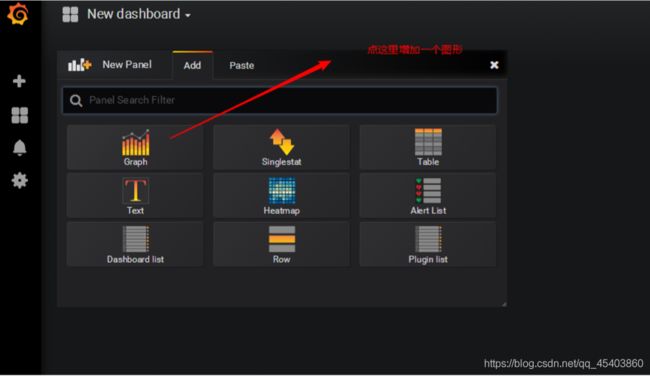
然后为添加好的数据源做图形显示


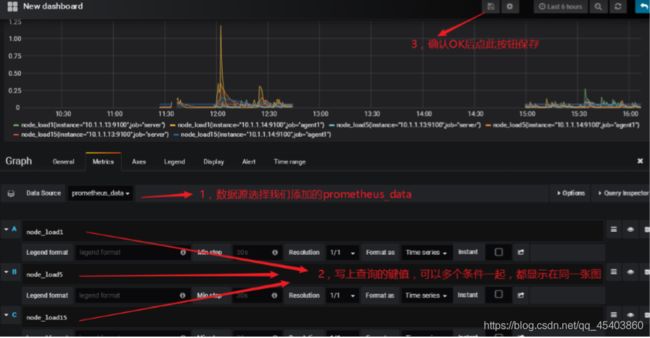


虽然可以自己定做图标但是不方便可以直接去官网引用别人的DashBoards


四.Prometheus+Alertmanager
1.Alertmanager安装:
[root@host-10-10-2-99 src]#
 wget https://github.com/prometheus/alertmanager/releases/download/v0.20.0/alertmanager-0.20.0.linux-amd64.tar.gz
[root@host-10-10-2-99 src]# tar -xf alertmanager-0.20.0.linux-amd64.tar.gz
[root@host-10-10-2-99 src]# ls
alertmanager-0.20.0.linux-amd64  alertmanager-0.20.0.linux-amd64.tar.gz  grafana-6.4.3-1.x86_64.rpm  prometheus-2.13.1  v0.5.0.tar.gz  v2.13.1.tar.gz  wget-log  wget-log.1
[root@host-10-10-2-99 src]# cd alertmanager-0.20.0.linux-amd64
[root@host-10-10-2-99 alertmanager-0.20.0.linux-amd64]# ll
alertmanager  alertmanager.yml  amtool  LICENSE  NOTICE
2.配置定义一下分组和路由:
[root@host-10-10-2-99 alertmanager-0.20.0.linux-amd64]# vim alertmanager.yml
global:
  resolve_timeout: 5m
  smtp_smarthost: 'smtp.qq.com:465'
  smtp_from: '[email protected]'
  smtp_auth_username: '[email protected]'  #你的账号
  smtp_auth_password: 'tygowyeqpjprbebd'   #需要开启邮件服务  163 qq都行 这里不是邮箱的登录密码 邮箱服务秘钥
  smtp_require_tls: false

route:  #默认路由
  group_by: ['instance','job']  #根据instance和job标签分组,同标签下的告警会在一个邮件中展现
  group_wait: 30s
  group_interval: 5m
  repeat_interval: 4h  #重复告警间隔
  receiver: 'email'  #默认接受者
  routes:  #子路由,不满足子路由的都走默认路由
  - match:  #普通匹配
      severity: critical
    receiver: leader
  - match_re:  #正则匹配
      severity: ^(warning|critical)$
    receiver: ops

receivers:  #定义三个接受者,和上面三个路由对应
- name: 'email'
  email_configs:
  - to: '[email protected]'
- name: 'leader'
  email_configs:
  - to: '[email protected]'
- name: 'ops'
  email_configs:
  - to: '[email protected]'
3.Alertmanager global:
定义全局配置:
smtp_auth_password: 为授权码,需要qq邮箱开通。
group_by: 对于消息进行分组,在同个标签下,合并在发送。
receiver:对应是下面定义的receivers的接收者,定义了三个,对应不同路由。
检查一下配置文件相关语法信息:
[root@host-10-10-2-99 alertmanager-0.20.0.linux-amd64]# ./amtool check-config alertmanager.yml
Checking 'alertmanager.yml'  SUCCESS
Found:
 - global config
 - route
 - 0 inhibit rules
 - 3 receivers
 - 0 templates
4.添加到启动项,并且启动、默认监听9093端口:
[root@host-10-10-2-99 alertmanager-0.20.0.linux-amd64]# vim /etc/systemd/system/alertmanager.service
[Unit]
Description=alertmanager System
Documentation=alertmanager System

[Service]
ExecStart=/usr/local/src/alertmanager-0.20.0.linux-amd64/alertmanager \
  --config.file=/usr/local/src/alertmanager-0.20.0.linux-amd64/alertmanager.yml

[Install]
WantedBy=multi-user.target
[root@host-10-10-2-99 alertmanager-0.20.0.linux-amd64]# systemctl start alertmanager
[root@host-10-10-2-99 alertmanager-0.20.0.linux-amd64]# systemctl enable alertmanager
Created symlink from /etc/systemd/system/multi-user.target.wants/alertmanager.service to /etc/systemd/system/alertmanager.service.
5.启动邮件报警服务
上面已经开启了服务不需要了下面是docker启动服务的命令如果不是docker跳过
docker run -d -p 9093:9093 -v /root/alertmanager/alertmanager.yml:/etc/alertmanager/config.yml --name alertmanager  prom/alertmanager


docker run -d -p 9093:9093 -v /root/alertmanager/alertmanager.yml:/etc/alertmanager/config.yml --name alertmanager docker.io/prom/alertmanager --config.file=


[root@host-10-10-2-99 alertmanager-0.20.0.linux-amd64]# netstat -ntlp
Active Internet connections (only servers)
Proto Recv-Q Send-Q Local Address           Foreign Address         State       PID/Program name
tcp        0      0 0.0.0.0:22              0.0.0.0:*               LISTEN      4323/sshd
tcp        0      0 127.0.0.1:25            0.0.0.0:*               LISTEN      4527/master
tcp6       0      0 :::9100                 :::*                    LISTEN      11531/node_exporter
tcp6       0      0 :::22                   :::*                    LISTEN      4323/sshd
tcp6       0      0 :::3000                 :::*                    LISTEN      10426/grafana-serve
tcp6       0      0 ::1:25                  :::*                    LISTEN      4527/master
tcp6       0      0 :::9090                 :::*                    LISTEN      22004/prometheus
tcp6       0      0 :::9093                 :::*                    LISTEN      25905/alertmanager
6.配置 prometheus 规则与alert:
1、修改prometheus.yml的alerting部分,让alertmangers能与Prometheus通信:
# Alertmanager configuration
alerting:
  alertmanagers:
  - static_configs:
    - targets:
       - 10.10.2.99:9093
2、定义告警文件:
# Load rules once and periodically evaluate them according to the global 'evaluation_interval'.
rule_files:
   - "rules/*.yml"
3、告警规则定义,这里简单的从主机down机简单写起:
[root@host-10-10-2-99 rules]# vim node_monitor.yml
groups:
- name: node-up #告警分组,一个组下的告警会整合在一个邮件中
  rules:
  - alert: node-up  #监控项名称
    expr: up{job="linux"} == 0 #正则表达式,up{job:"linux"} 可以在prometheus查询,自己定义监控状态
    for: 15s    #for选项定义表达式持续时长,0的话代表一满足就触发
    labels:
      severity: critical  #定义了一个标签,因为上面我们是基于标签进行路由
    annotations: #邮件注释内存,可引用变量
      summary: "{{ $labels.instance }} 已停止运行超过 15s!"
#说明:
1、Prometheus支持使用变量来获取指定标签中的值。比如 l a b e l s . < l a b e l n a m e > 变 量 可 以 访 问 当 前 告 警 实 例 中 指 定 标 签 的 值 。 labels.
2、在创建规则文件时,建议为不同对象建立不同的文件,比如web.yml、mysql.yml,这里我们监控主机状态,我们使用node_monitor.yml
3、expr是我们比较关注的内容,可以根据promql来写查询表达式:
4、保存退出,我们重启一下prometheus server的配置,然后测试一下关闭某台主机的监控:
[root@host-10-10-2-62 ~]# systemctl stop node_exporter
5、查看alstermanager的状态:
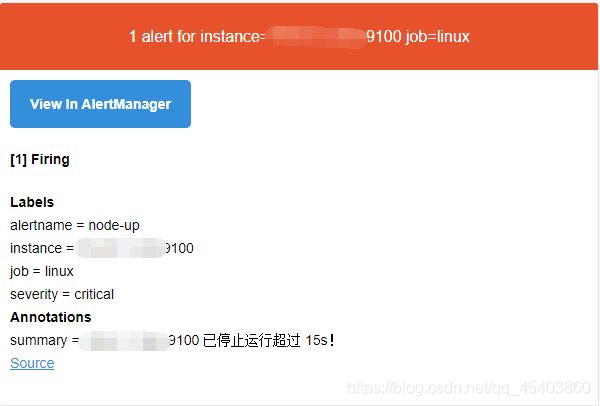
6、查看prometheus状态:
状态说明 Prometheus Alert 告警状态有三种状态:Inactive、Pending、Firing。
1、Inactive:非活动状态,表示正在监控,但是还未有任何警报触发。
2、Pending:表示这个警报必须被触发。由于警报可以被分组、压抑/抑制或静默/静音,所以等待验证,一旦所有的验证都通过,则将转到 Firing 状态。
3、Firing:将警报发送到 AlertManager,它将按照配置将警报的发送给所有接收者。一旦警报解除,则将状态转到 Inactive,如此循环。
4.定义告警模板:
然所有核心的信息已经包含了,但是邮件格式内容可以更优雅直观一些,那么,AlertManager 也是支持自定义邮件模板配置,
1、首先新建一个模板文件:
[root@host-10-10-2-99 alertmanager-0.20.0.linux-amd64]# vim email.tmpl
{{ define "email.to.html" }}
{{ range .Alerts }}
=========start==========<br>
告警程序: prometheus_alert <br>
告警级别: {{ .Labels.severity }} 级 <br>
告警类型: {{ .Labels.alertname }} <br>
故障主机: {{ .Labels.instance }} <br>
告警主题: {{ .Annotations.summary }} <br>
告警详情: {{ .Annotations.description }} <br>
触发时间: {{ .StartsAt }} <br>
=========end==========<br>
{{ end }}
{{ end }}
#文中定义了一个变量,email.to.html这个变量,可以在配置中引用:
2、修改配置文件,使用模板:
global:
  resolve_timeout: 5m
  smtp_smarthost: 'smtp.qq.com:465'
  smtp_from: '[email protected]'
  smtp_auth_username: '[email protected]'
  smtp_auth_password: 'tygowyeqpjprbebd'
  smtp_require_tls: false

templates:
  - '/usr/local/src/alertmanager-0.20.0.linux-amd64/email.tmpl'   #引用模板

receivers:  #定义三个接受者,和上面三个路由对应
- name: 'email'
  email_configs:
  - to: '[email protected]'
    html: '{{ template "email.to.html" . }}'    ##使用模板的方式发送
- name: 'leader'
  email_configs:
  - to: '[email protected]'
    html: '{{ template "email.to.html" . }}'   ##使用模板的方式发送
- name: 'ops'
  email_configs:
  - to: '[email protected]'
html: '{{ template "email.to.html" . }}'   ##使用模板的方式发送。
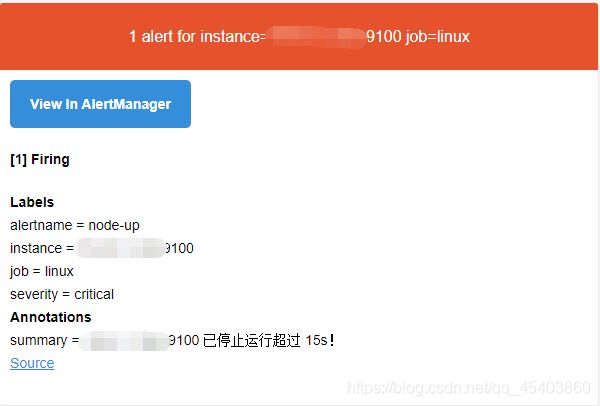
3、测试发送效果:
5.恢复告警通知:
在上面的时候,我们都是发生告警的时候,会送邮件,那么当恢复的时候,我们是否要发送邮件呢?回答当然是必须的,其实只是在配置的时候,加上:send_resolved: true
1、添加恢复消息:
receivers:  #定义三个接受者,和上面三个路由对应
- name: 'email'
  email_configs:
  - to: '[email protected]'
    html: '{{ template "email.to.html" . }}'
    send_resolved: true    #恢复的时候发送告警消息
- name: 'leader'
  email_configs:
  - to: '[email protected]'
    html: '{{ template "email.to.html" . }}'
    send_resolved: true
- name: 'ops'
  email_configs:
  - to: '[email protected]'
    html: '{{ template "email.to.html" . }}'
send_resolved: true
2、修改模板,添加恢复消息:
[root@host-10-10-2-99 alertmanager-0.20.0.linux-amd64]# vim email.tmpl
{{ define "email.to.html" }}
{{ if gt (len .Alerts.Firing) 0 }}{{ range .Alerts }}
@告警
告警程序: prometheus_alert <br>
告警级别: {{ .Labels.severity }} 级 <br>
告警类型: {{ .Labels.alertname }} <br>
故障主机: {{ .Labels.instance }} <br>
告警主题: {{ .Annotations.summary }} <br>
告警详情: {{ .Annotations.description }} <br>
触发时间: {{ .StartsAt  }} <br>
{{ end }}
{{ end }}
{{ if gt (len .Alerts.Resolved) 0 }}{{ range .Alerts }}
@恢复:
告警主机:{{ .Labels.instance }} <br>
告警主题:{{ .Annotations.summary }} <br>
恢复时间: {{ .EndsAt  }} <br>
{{ end }}
{{ end }}
{{ end }}
告警收敛(分组,抑制,静默)
1、分组(group): 将类似性质的警报合并为单个通知。
group_by: [‘alertname’] # 以标签作为分组依据
group_wait: 10s # 分组报警等待时间
group_interval: 10s # 发送组告警间隔时间
repeat_interval: 1h # 重复告警发送间隔时间
2、抑制(inhibition): 当警报发出后,停止重复发送由此警报引发的其他警报。可以消除冗余告警
inhibit_rules:
- source_match: # 当此告警发生,其他的告警被抑制
severity: ‘critical’
target_match: # 被抑制的对象
severity: ‘warning’
equal: [‘id’, ‘instance’]
#当同时发生warning和critical告警时候,会抑制掉warning的告警,只发送critical的信息。
3、静默(silences): 是一种简单的特定时间静音的机制。例如:服务器要升级维护可以先设置这个时间段告警静默。(类似zabbix 的维护周期):
可以看到我们没有添加告警静默的时候,这个时候是会收到多个消息。
1、在alertmanager添加静默:
2、创建:
当然你也可以用new silence来进行添加,不过这个需要自己手动去匹配,用上面的方式是最方便的。维护结束后,直接删除即可。
五.Grafana+onealert报警 (推荐使用但是免费版只能创建2个实例)
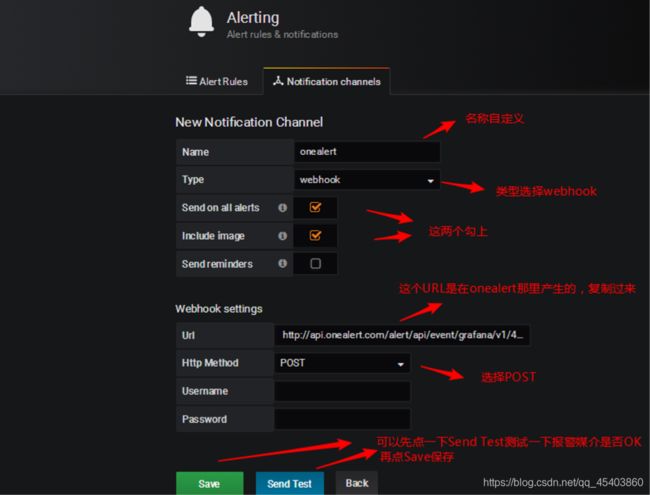
因为上面报警不太方便需要手动去修改配置文件prometheus报警需要使用alertmanager这个组件,而且报警规则需要手 动编写(对运维来说不友好)。所以我这里选用grafana+onealert报警。
1.去官网申请账号
2.创建告警实例
3.创建grafana告警通知


之后根据你的需求去告警这里已cpu负载为例

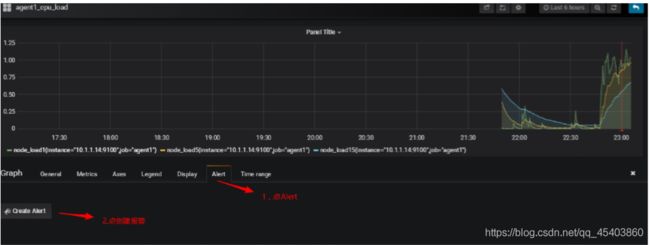


保存后就可以测试了看效果

六.mysql服务监控安装
1.概况
MySQL 是现而今最流行的开源关系型数据库服务器。很多主流的互联网公司都用来做主要的关系型数据库,mysql的稳定性也关系到很多公司的命门,下面我们一起来看下如何用prometheus来监控mysql.
2.安装mysqld_exporter用来监控mysql
1、安装exporter
[root@controller2 opt]# https://github.com/prometheus/mysqld_exporter/releases/download/v0.10.0/mysqld_exporter-0.10.0.linux-amd64.tar.gz
[root@controller2 opt]# tar -xf mysqld_exporter-0.10.0.linux-amd64.tar.gz
2、添加mysql 账户:
GRANT SELECT, PROCESS, SUPER, REPLICATION CLIENT, RELOAD ON *.* TO 'exporter'@'%' IDENTIFIED BY '123456';
flush privileges;
# 配置mysql用户名和密码
3、编辑配置文件:
[root@controller2 mysqld_exporter-0.10.0.linux-amd64]# vim /opt/mysqld_exporter-0.10.0.linux-amd64/.my.cnf
[client]
user=exporter
password=123456
4、设置配置文件:
[root@controller2 mysqld_exporter-0.10.0.linux-amd64]# cat /etc/systemd/system/mysql_exporter.service
[Unit]
Description=mysql Monitoring System
Documentation=mysql Monitoring System

[Service]
ExecStart=/opt/mysqld_exporter-0.10.0.linux-amd64/mysqld_exporter \
         -collect.info_schema.processlist \
         -collect.info_schema.innodb_tablespaces \
         -collect.info_schema.innodb_metrics  \
         -collect.perf_schema.tableiowaits \
         -collect.perf_schema.indexiowaits \
         -collect.perf_schema.tablelocks \
         -collect.engine_innodb_status \
         -collect.perf_schema.file_events \
         -collect.info_schema.processlist \
         -collect.binlog_size \
         -collect.info_schema.clientstats \
         -collect.perf_schema.eventswaits \
         -config.my-cnf=/opt/mysqld_exporter-0.10.0.linux-amd64/.my.cnf

[Install]
WantedBy=multi-user.target
5、添加配置到prometheus.yml
- job_name: 'mysql'
    static_configs:
     - targets: ['192.168.1.11:9104','192.168.1.12:9104'] #这里配置的是多台机器的mysql
6、测试看有没有返回数值:
http://ip:9104/metrics
正常我们通过mysql_up可以查询倒mysql监控是否已经生效,是否起起来
7、mysql告警规则
1.配置
groups:
- name: MySQL-rules
  rules:
  - alert: MySQL Status
    expr: up == 0
    for: 5s
    labels:
      severity: warning
    annotations:
      summary: "{{$labels.instance}}: MySQL has stop !!!"
      description: "检测MySQL数据库运行状态"

  - alert: MySQL Slave IO Thread Status
    expr: mysql_slave_status_slave_io_running == 0
    for: 5s
    labels:
      severity: warning
    annotations:
      summary: "{{$labels.instance}}: MySQL Slave IO Thread has stop !!!"
      description: "检测MySQL主从IO线程运行状态"

  - alert: MySQL Slave SQL Thread Status
    expr: mysql_slave_status_slave_sql_running == 0
    for: 5s
    labels:
      severity: warning
    annotations:
      summary: "{{$labels.instance}}: MySQL Slave SQL Thread has stop !!!"
      description: "检测MySQL主从SQL线程运行状态"

  - alert: MySQL Slave Delay Status
    expr: mysql_slave_status_sql_delay == 30
    for: 5s
    labels:
      severity: warning
    annotations:
      summary: "{{$labels.instance}}: MySQL Slave Delay has more than 30s !!!"
      description: "检测MySQL主从延时状态"


  - alert: Mysql_Too_Many_Connections
    expr: rate(mysql_global_status_threads_connected[5m]) > 200
    for: 2m
    labels:
      severity: warning
    annotations:
      summary: "{{$labels.instance}}: 连接数过多"
      description: "{{$labels.instance}}: 连接数过多,请处理 ,(current value is: {{ $value }})"

  - alert: Mysql_Too_Many_slow_queries
    expr: rate(mysql_global_status_slow_queries[5m]) > 3
    for: 2m
    labels:
      severity: warning
    annotations:
      summary: "{{$labels.instance}}: 慢查询有点多,请检查处理"
      description: "{{$labels.instance}}: Mysql slow_queries is more than 3 per second ,(current value is: {{ $value }})"
2、添加规则到prometheus:
rule_files:
  - "rules/*.yml"
3、重新启动prometheus:
3、打开web ui我们可以看到规则生效了:
七.Redis服务监控
1.安装redis_exporter插件
代理插件不一定非要安装在redis端
wget https://github.com/oliver006/redis_exporter/releases/download/v0.30.0/redis_exporter-v0.30.0.linux-amd64.tar.gz
tar xf redis_exporter-v0.30.0.linux-amd64.tar.gz
2.启动redis_exporter登陆redis
## 无密码
nohup ./redis_exporter -redis.addr ip:6379 &
## 有密码
nohup ./redis_exporter  -redis.addr ip:6379  -redis.password 123456
redis默认端口是6379
3.查看redis_exporte是否开启
netstat -lntp
tcp6       0      0 :::9121               :::*              LISTEN      32407/redis_exporte
4.修改prometheus配置文件
 vim prometheus.yml
 - job_name: 'redis'
    static_configs:
    - targets:
      - "ip:9121"   #redis_exporte在哪台服务器启动的就填哪台服务器ip
5.重启prometheus
nohup ./prometheus --config.file=./prometheus.yml &
#或者执行下面的命令重启
systemctl restart prometheus
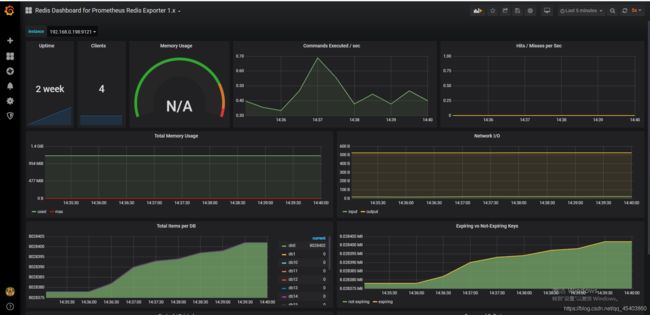
6.grafana可视化redis服务信息
八.kafka服务监控
1.安装kafka_exporter插件
wget https://github.com/danielqsj/kafka_exporter/releases/download/v1.2.0/kafka_exporter-1.2.0.linux-amd64.tar.gz

 tar -zxvf kafka_exporter-1.2.0.linux-amd64.tar.gz

 cd kafka_exporter-1.2.0.linux-amd64
2.启动kafka_exporter监控服务
./kafka_exporter --kafka.server=kafkaIP或者域名:9092 &
#9308是kafka_exporter的默认端口
3.查看kafka_exporter是否开启
netstat -lntp
tcp6       0      0 :::9308               :::*              LISTEN      32207/kafka_exporter
4.修改prometheus配置文件
  - job_name: 'kafka'
     static_configs:
      - targets: ['kafkaIP或者域名:9308']
        labels:
          instance: kafka@kafkaIP或者域名
5.重启prometheus
nohup ./prometheus --config.file=./prometheus.yml &
#或者执行下面的命令重启
systemctl restart prometheus
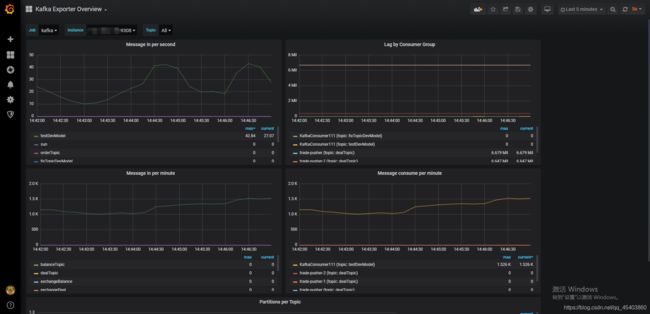
6.grafana可视化redis服务信息
九.Prometheus监控springboot项目
1. 项目整合
项目中需要引入两个依赖
    io.micrometer
    micrometer-registry-prometheus


    org.springframework.boot
    spring-boot-starter-actuator
2.修改配置文件
server:
  port: 8002   #  配置启动端口号


spring:
  application:
    name: springboot
  metrics:
    servo:
      enabled: false
management:
  endpoints:
    web:
      exposure:
        include: info, health, beans, env, metrics, mappings, scheduledtasks, sessions, threaddump, docs, logfile, jolokia,prometheus
      base-path: /actuator #默认/actuator 不更改可不用配置
      #CORS跨域支持
      cors:
        allowed-origins: http://example.com
        allowed-methods: GET,PUT,POST,DELETE
    prometheus:
      id: springmetrics
  endpoint:
    beans:
      cache:
        time-to-live: 10s #端点缓存响应的时间量
    health:
      show-details: always #详细信息显示给所有用户
  server:
    address: 127.0.0.1 #配置此项表示不允许远程连接

  #监测
  metrics:
    export:
      datadog:
        application-key: ${spring.application.name}
    web:
      server:
        auto-time-requests: false
下面测试两个接口并且在Grafana统计显示数据代码
//启动类
@SpringBootApplication
public class Application {
    public static void main(String[] args) {
        SpringApplication.run(Application.class,args);
    }

    @Bean
    MeterRegistryCustomizer<MeterRegistry> configurer(
            @Value("${spring.application.name}") String applicationName) {
        return (registry) -> registry.config().commonTags("application", applicationName);
    }
package com.xlf.springboot.controller;

import io.micrometer.core.instrument.Counter;
import io.micrometer.core.instrument.DistributionSummary;
import io.micrometer.core.instrument.MeterRegistry;
import org.springframework.beans.factory.annotation.Autowired;
import org.springframework.web.bind.annotation.RequestMapping;
import org.springframework.web.bind.annotation.RestController;

import javax.annotation.PostConstruct;
import java.util.Random;

@RequestMapping("/order")
@RestController
public class OrderController {

    @Autowired
    MeterRegistry registry;
    private Counter counter;
    private DistributionSummary summary;
    @PostConstruct
    private void init(){
        counter = registry.counter("requests_xlf_total","order","xlf");
        summary = registry.summary("order_amount_total","totalAmount","totalAmount");
    }

    @RequestMapping("/hello")
    public String hello(){
        return "hello";
    }

    @RequestMapping("/xlf")
    public String zhuyu(){
        counter.increment();
        return "xlf";
    }

    @RequestMapping("/order")
    public String order(){
        Random random = new Random();
        summary.record(random.nextInt(100));
        return "order";
    }

}
package com.xlf.springboot.Aop;

import io.micrometer.core.instrument.Counter;
import io.micrometer.core.instrument.MeterRegistry;
import org.aspectj.lang.JoinPoint;
import org.aspectj.lang.annotation.AfterReturning;
import org.aspectj.lang.annotation.Aspect;
import org.aspectj.lang.annotation.Before;
import org.aspectj.lang.annotation.Pointcut;
import org.springframework.beans.factory.annotation.Autowired;
import org.springframework.stereotype.Component;

import javax.annotation.PostConstruct;

@Component
@Aspect
public class AspectAop {
    @Pointcut("execution(public * com.xlf.springboot.controller.*.*(..))")
    public void pointCut(){}

    //统计请求的处理时间
    ThreadLocal<Long> startTime = new ThreadLocal<>();

    @Autowired
    MeterRegistry registry;
    private Counter counter;
    @PostConstruct
    private void init(){
        counter = registry.counter("requests_total","status","success");
    }

    @Before("pointCut()")
    public void doBefore(JoinPoint joinPoint) throws Throwable{
        startTime.set(System.currentTimeMillis());

        counter.increment(); //记录系统总请求数
    }

    @AfterReturning(returning = "returnVal" , pointcut = "pointCut()")
    public void doAfterReturning(Object returnVal){
        //处理完请求后
        System.out.println("方法执行时间:"+ (System.currentTimeMillis() - startTime.get()));
    }
}

测试之后就可以看到上面的结果以上只是简单的统计请求接口的次数所做出的埋点如果你想要的做其它的业务统计参考博客](https://www.cnblogs.com/rolandlee/p/11343848.html)
暴露服务端口(默认)
prometheus 负责收集信息 9090
node_exporter 采集信息并向prometheus暴露端口让prometheus能够采集到cpu等信息 9100
mysqld_exporter 监控mysql服务的组件 9104
grafana 负责把数据源prometheus的数据能够用图表的方式显示出来看板 端口3000 都是默认端口
redis_exporter 采集redis的数据 端口9121
kafka_exporter 采集kafka的数据 端口9308
