如何从Word,Excel和PowerPoint文档中提取图像,文本和嵌入式文件
Say someone sent you a Word document with a lot of images, and you want you to save those images on your hard drive. You can extract images from a Microsoft Office document with a simple trick.
假设有人向您发送了包含大量图像的Word文档,并且您希望将这些图像保存在硬盘上。 您可以使用简单的技巧从Microsoft Office文档中提取图像。
If you have a Word (.docx), Excel (.xlsx), or PowerPoint (.pptx) file with images or other files embedded, you can extract them (as well as the document’s text), without having to save each one separately. And best of all, you don’t need any extra software. The Office XML based file formats–docx, xlsx, and pptx–are actually compressed archives that you can open like any normal .zip file with Windows. From there, you can extract images, text, and other embedded files. You can use Windows’ built-in .zip support, or an app like 7-Zip if you prefer.
如果您的Word(.docx),Excel(.xlsx)或PowerPoint(.pptx)文件中嵌入了图像或其他文件,则可以提取它们(以及文档的文本),而不必分别保存每个文件。 最重要的是,您不需要任何其他软件。 实际上,基于Office XML的文件格式(docx,xlsx和pptx)是压缩的存档,您可以像在Windows中打开任何普通的.zip文件一样打开它们。 从那里,您可以提取图像,文本和其他嵌入式文件。 您可以使用Windows内置的.zip支持,也可以使用7-Zip之类的应用 。
If you need to extract files from an older office document–like a .doc, .xls, or .ppt file–you can do so with a small piece of free software. We’ll detail that process at the end of this guide.
如果您需要从旧版Office文档中提取文件(例如.doc,.xls或.ppt文件),则可以使用一小部分免费软件来提取。 我们将在本指南的结尾详细说明该过程。
如何提取较新的Office文件(.docx,.xlsx或.pptx)的内容 (How to Extract the Contents of a Newer Office File (.docx, .xlsx, or .pptx))
To access the inner contents of an XML based Office document, open File Explorer (or Windows Explorer in Windows 7), navigate to the file from which you want to extract the content, and select the file.
要访问基于XML的Office文档的内部内容,请打开“文件资源管理器”(或Windows 7中的Windows资源管理器),导航到要从中提取内容的文件,然后选择该文件。
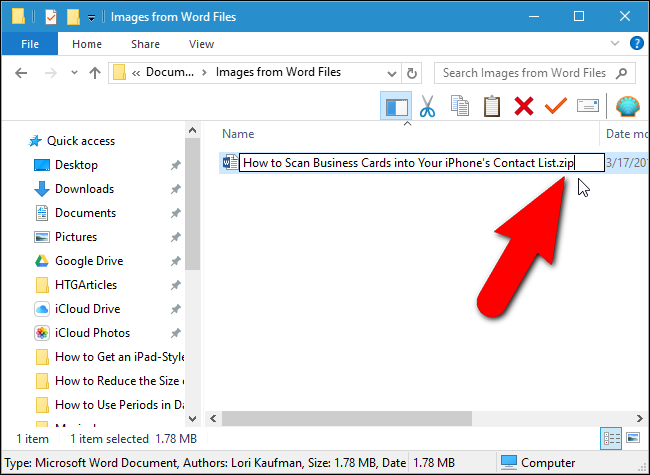
Press “F2” to rename the file and change the extension (.docx, .xlsx, or .pptx) to “.zip”. Leave the main part of the filename alone. Press “Enter” when you’re done.
按“ F2”重命名文件,并将扩展名(.docx,.xlsx或.pptx)更改为“ .zip”。 保留文件名的主要部分。 完成后按“ Enter”。
The following dialog box displays warning you about changing the file name extension. Click “Yes”.
以下对话框显示警告您更改文件扩展名。 点击“是”。
Windows automatically recognizes the file as a zipped file. To extract the contents of the file, right-click on the file and select “Extract All” from the popup menu.
Windows自动将文件识别为压缩文件。 要提取文件的内容,请右键单击该文件,然后从弹出菜单中选择“全部提取”。
On the “Select a Destination and Extract Files” dialog box, the path where the content of the .zip file will be extracted displays in the “Files will be extracted to this folder” edit box. By default, a folder with the same name as the name of the file (without the file extension) is created in the same folder as the .zip file. To extract the files to a different folder, click “Browse”.
在“选择目标并提取文件”对话框上,将在“文件将被提取到此文件夹”编辑框中显示将提取.zip文件的内容的路径。 默认情况下,在与.zip文件相同的文件夹中创建一个与文件名相同的文件夹(不带文件扩展名)。 要将文件提取到另一个文件夹,请单击“浏览”。
Navigate to where you want the content of the .zip file extracted, clicking “New folder” to create a new folder, if necessary. Click “Select Folder”.
导航到要提取.zip文件内容的位置,如有必要,单击“新建文件夹”以创建一个新文件夹。 点击“选择文件夹”。
To open a File Explorer (or Windows Explorer) window with the folder containing the extracted files showing once they are extracted, select the “Show extracted files when complete” check box so there is a check mark in the box. Click “Extract”.
要打开“文件资源管理器”(或Windows资源管理器)窗口,其中包含提取文件的文件夹将在提取后立即显示,请选中“完成后显示提取的文件”复选框,以便在该复选框中打勾。 点击“提取”。
如何访问提取的图像 (How to Access the Extracted Images)
Included in the extracted contents is a folder named “word”, if your original file is a Word document (or “xl” for an Excel document or “ppt” for a PowerPoint document). Double-click on the “word” folder to open it.
如果原始文件是Word文档(对于Excel文档为“ xl”,对于PowerPoint文档为“ ppt”),则提取的内容中将包含一个名为“ word”的文件夹。 双击“ word”文件夹以将其打开。
Double-click the “media” folder.
双击“媒体”文件夹。
All the images from the original file are in the “media” folder. The extracted files are the original images used by the document. Inside the document, there may be resizing or other properties set, but the extracted files are the raw images without these properties applied.
原始文件中的所有图像都位于“ media”文件夹中。 提取的文件是文档使用的原始图像。 在文档内部,可能设置了大小调整或其他属性,但是提取的文件是未应用这些属性的原始图像。
如何访问提取的文本 (How to Access the Extracted Text)
If you don’t have Office installed on your PC, and you need to extract text out of a Word (or Excel or PowerPoint) file, you can access the extracted text in the “document.xml” file in the “word” folder.
如果您的PC上未安装Office,并且需要从Word(或Excel或PowerPoint)文件中提取文本,则可以访问“ word”文件夹中“ document.xml”文件中的提取文本。
You can open this file in a text editor, such as Notepad or WordPad, but it’s easier to read in a special XML editor, such as the free program, XML Notepad. All the text from the file is available in chunks of plain text regardless of the style and/or formatting applied in the document itself. Of course, if you’re going to download free software to view this text, you might as well download LibreOffice, which can read Microsoft Office documents.
您可以在文本编辑器(例如Notepad或WordPad)中打开此文件,但是在特殊的XML编辑器(例如免费程序XML Notepad)中更容易阅读。 文件中的所有文本均以纯文本形式提供,而与文档本身中应用的样式和/或格式无关。 当然,如果您要下载免费软件以查看此文本,则不妨下载LibreOffice ,它可以读取Microsoft Office文档。
如何提取嵌入式OLE对象或附件 (How to Extract Embedded OLE Objects or Attached Files)
To access embedded files in a Word document when you don’t have access to Word, first open the Word file in WordPad (which comes built into Windows). You might notice that some of the embedded file icons do not display, but they’re still there. Some of the embedded files might have partial filenames. WordPad does not support all of Word’s features, so some content might be displayed improperly. But you should be able to access the files.
要在您无权访问Word时访问Word文档中的嵌入式文件,请首先在写字板(Windows内置)中打开Word文件。 您可能会注意到某些嵌入式文件图标未显示,但它们仍然存在。 一些嵌入式文件可能具有部分文件名。 写字板不支持Word的所有功能,因此某些内容可能显示不正确。 但是您应该能够访问文件。
If we right-click on one of the embedded files in our sample Word file, one of the options is “Open PDF Object”. This opens the PDF file in the default PDF reader program on your PC. From there, you can save the PDF file to your hard drive.
如果我们右键单击示例Word文件中的嵌入式文件之一,则选项之一是“打开PDF对象”。 这将在PC上默认的PDF阅读器程序中打开PDF文件。 从那里,您可以将PDF文件保存到硬盘中。
If WordPad doesn’t have an option for opening your file, make note of its file type here. For example, our second file in this document is a .mp3 file.
如果写字板没有打开文件的选项,请在此处记下其文件类型。 例如,我们在本文档中的第二个文件是.mp3文件。
Then, go back to your “Files from [Document]” folder and double-click the “embeddings” folder inside the “word” folder.
然后,返回到“ [Document]中的文件”文件夹,然后双击“ word”文件夹中的“ embedddings”文件夹。
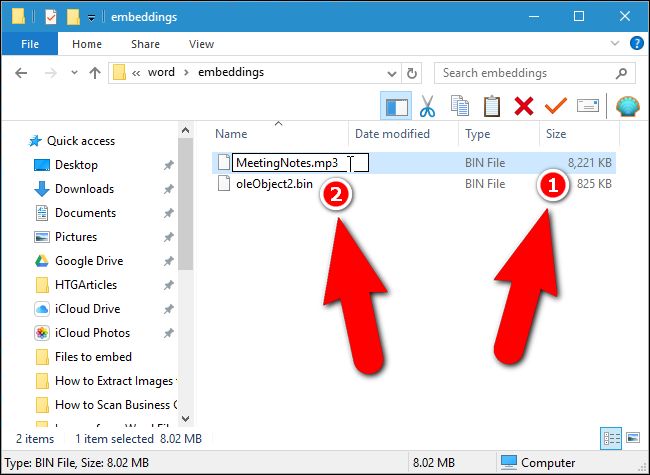
Unfortunately, the file types are not preserved in the filenames. They all have a “.bin” file extension instead. If you know what types of files are embedded in the file, you can probably deduce which file is which by the size of the file. In our example, we had a PDF file and an MP3 file embedded in our document. Because the MP3 file is most likely larger than the PDF file, we can figure out which file is which by looking at the sizes of the files and then rename them using the correct extensions. Below, we’re renaming the MP3 file.
不幸的是,文件类型没有保留在文件名中。 它们都具有“ .bin”文件扩展名。 如果您知道文件中嵌入了哪些类型的文件,则可以根据文件的大小推断出哪个文件是哪个文件。 在我们的示例中,我们的文档中嵌入了一个PDF文件和一个MP3文件。 因为MP3文件很可能大于PDF文件,所以我们可以通过查看文件的大小然后使用正确的扩展名来重命名哪个文件。 下面,我们正在重命名MP3文件。
Note that not all files will necessarily open using this process–for example, our PDF file opened correctly from WordPad, but we couldn’t get it to open by renaming its .bin file.
请注意,并非所有文件都必须使用此过程打开-例如,我们的PDF文件已从写字板中正确打开,但是我们无法通过重命名其.bin文件来使其打开。
Once you’ve extracted the content of the zipped file, you can revert the extension of the original file back to .docx, .xlsx, or .pptx. The file will remain intact and can be opened normally in the corresponding program.
提取压缩文件的内容后,可以将原始文件的扩展名恢复为.docx,.xlsx或.pptx。 该文件将保持不变,并且可以在相应程序中正常打开。
如何从较旧的Office文档(.doc,.xls或.ppt)中提取图像 (How to Extract Images from Older Office Documents (.doc, .xls, or .ppt))
If you need to extract images from an Office 2003 (or earlier) document, there’s a free tool called Office Image Extraction Wizard that makes this task easy. This program also allows you to extract images from multiple documents (of the same or different types) at once. Download the program and install it (there’s also a portable version available if you’d rather not install it).
如果您需要从Office 2003(或更早版本)的文档中提取图像,则有一个免费的工具称为Office Image Extraction Wizard ( Office图像提取向导) ,可以轻松完成此任务。 该程序还允许您一次从多个(相同或不同类型)文档中提取图像。 下载并安装程序(如果您不想安装它,也可以使用便携式版本)。
Run the program, and the Welcome screen displays. Click “Next”.
运行程序,并显示“欢迎”屏幕。 点击下一步”。
First, we need to select the file from which you want to extract the images. On the Input & Output screen, click the “Browse” (folder icon) button to the right of the Document edit box.
首先,我们需要选择要从中提取图像的文件。 在“输入和输出”屏幕上,单击“文档”编辑框右侧的“浏览”(文件夹图标)按钮。
Navigate to the folder containing the document you want, select it, and click “Open”.
导航到包含所需文档的文件夹,将其选中,然后单击“打开”。
The folder that contains the selected file automatically becomes the Output folder. To create a subfolder within that folder named the same as the selected file, click the “Create a folder here” check box so there is a check mark in the box. Then, click “Next”.
包含所选文件的文件夹将自动成为“输出”文件夹。 要在该文件夹中创建一个与所选文件相同的子文件夹,请单击“在此处创建文件夹”复选框,以使该复选框中有一个复选标记。 然后,单击“下一步”。
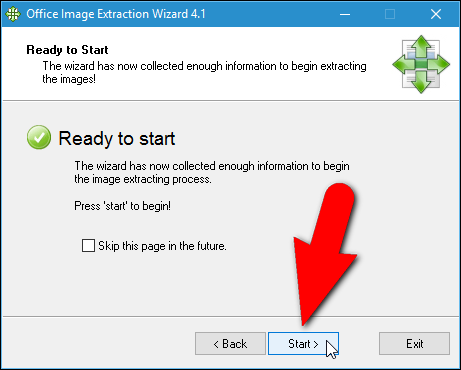
On the Ready to Start screen, click “Start” to begin extracting the images.
在“准备开始”屏幕上,单击“开始”以开始提取图像。
The following screen displays while the extraction processes.
提取过程中将显示以下屏幕。
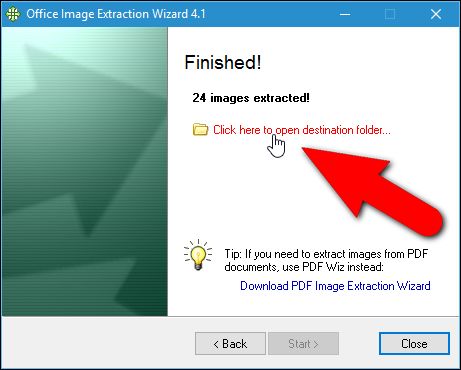
On the Finished screen, click the “Click here to open destination folder” to view the resulting image files.
在“完成”屏幕上,单击“单击此处以打开目标文件夹”以查看生成的图像文件。
Because we chose to create a subfolder, we get a folder containing the image files extracted from the file.
因为我们选择创建一个子文件夹,所以我们得到一个文件夹,其中包含从文件中提取的图像文件。
You will see all the images as numbered files.
您将看到所有图像作为编号文件。
You can also extract images from multiple files at once. To do this, on the Input & Output screen, click the “Batch Mode” check box so there is a check mark in the box.
您也可以一次从多个文件中提取图像。 为此,请在“输入和输出”屏幕上,单击“批处理模式”复选框,以使该复选框中有一个复选标记。
The Batch Input & Output screen displays. Click “Add Files”.
显示“批次输入和输出”屏幕。 点击“添加文件”。
On the Open dialog box, navigate to the folder containing any of the files from which you want to extract images, select the files using the “Shift” or “Ctrl” key to select multiple files, and click “Open”.
在“打开”对话框上,导航到包含要从中提取图像的任何文件的文件夹,使用“ Shift”或“ Ctrl”键选择文件以选择多个文件,然后单击“打开”。
You can add files from another folder by clicking “Add Files” again, navigating to the folder on the Open dialog box, selecting the desired files, and clicking “Open”.
您可以通过以下方式添加另一个文件夹中的文件:再次单击“添加文件”,导航到“打开”对话框上的文件夹,选择所需的文件,然后单击“打开”。
Once you’ve added all the files from which you want to extract images, you can choose to create a separate folder for each document within the same folder as each document into which the image files will be saved by clicking the “Create a folder for each document” check box so there is a check mark in the box.
添加了要从中提取图像的所有文件后,您可以选择在与要保存图像文件的每个文档相同的文件夹内为每个文档创建一个单独的文件夹,方法是单击“为每个文档”复选框,因此该复选框中有一个复选标记。
You can also specify the Output folder to be the “Same as each file’s input folder” or enter or select a custom folder using the edit box and “Browse” button below that option. Click “Next” once you have selected the options you want.
您还可以将“输出”文件夹指定为“与每个文件的输入文件夹相同”,或者使用该选项下的编辑框和“浏览”按钮输入或选择自定义文件夹。 选择所需选项后,单击“下一步”。
Click “Start” on the Ready to Start screen.
在“准备开始”屏幕上单击“开始”。
The following screen displays showing the extraction progress.
以下屏幕显示提取进度。
The number of images extracted displays on the Finished screen. Click “Close” to close the Office Image Extraction Wizard.
提取的图像数量显示在“完成”屏幕上。 单击“关闭”以关闭Office图像提取向导。
If you chose to create a separate folder for each document, you will see folders with the same names as the files containing the images, whichever output folder(s) you specified.
如果选择为每个文档创建一个单独的文件夹,则无论指定哪个输出文件夹,您都将看到与包含图像的文件同名的文件夹。
Again, we get all the images as numbered files for each document.
同样,我们将所有图像作为每个文档的编号文件获得。
Now you can rename the images, move them, and use them in your own documents. Just make sure you have the rights to use them legally.
现在,您可以重命名图像,移动它们并在您自己的文档中使用它们。 只要确保您有权合法使用它们即可。
翻译自: https://www.howtogeek.com/50628/easily-extract-images-text-and-embedded-files-from-an-office-2007-document/


