springBoot
文章目录
-
- 学习目标
- 一、SpringBoot简介
-
- 1. 入门案例
-
- 问题导入
- 1.1 入门案例开发步骤
- 1.2 基于SpringBoot官网创建项目
- 1.3 SpringBoot项目快速启动
- 2. SpringBoot概述
-
- 问题导入
- 2.1 起步依赖
- 2.2 辅助功能
- 二、基础配置
-
- 1. 配置文件格式
-
- 问题导入
- 1.0 初始环境
- 1.1 修改服务器端口
- 1.2 自动提示功能消失解决方案
- 1.3 SpringBoot配置文件加载顺序(了解)
- 2. yaml
-
- 问题导入
- 2.1 yaml语法规则
- 2.2 yaml数组数据
- 2.3 yaml数据读取
- 3. 多环境开发配置
-
- 问题导入
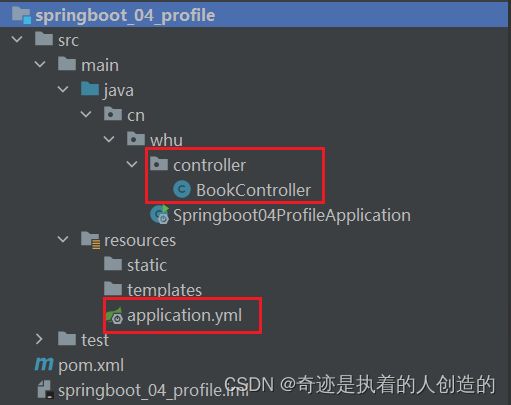
- 3.0 环境准备
- 3.1 多环境启动配置
- 3.2 多环境启动命令格式
- 3.3 多环境开发控制
- 4. 配置文件分类
-
- 问题导入
- 代码演示:
- 三、整合第三方技术
-
- 1. 整合JUnit
-
- 问题导入
- 1.1 Spring整合JUnit(复习)
- 1.2 SpringBoot整合JUnit
- 2. 基于SpringBoot实现SSM整合
-
- 问题导入
- 2.1 Spring整合MyBatis(复习)
- 2.2 SpringBoot整合MyBatis
- 2.3 案例-SpringBoot实现ssm整合
学习目标
- 基于SpringBoot框架的程序开发步骤
- 熟练使用SpringBoot配置信息修改服务器配置
- 基于SpringBoot的完成SSM整合项目开发
一、SpringBoot简介
1. 入门案例
问题导入
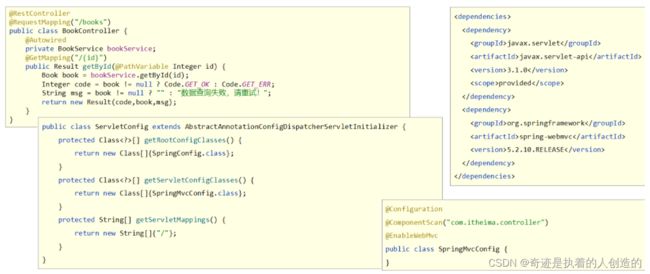
SpringMVC的HelloWord程序大家还记得吗?
-
SpringBoot是由Pivotal团队提供的全新框架,其设计目的是用来简化Spring应用的初始搭建以及开发过程
-
原生开发SpringMVC程序过程
1.1 入门案例开发步骤
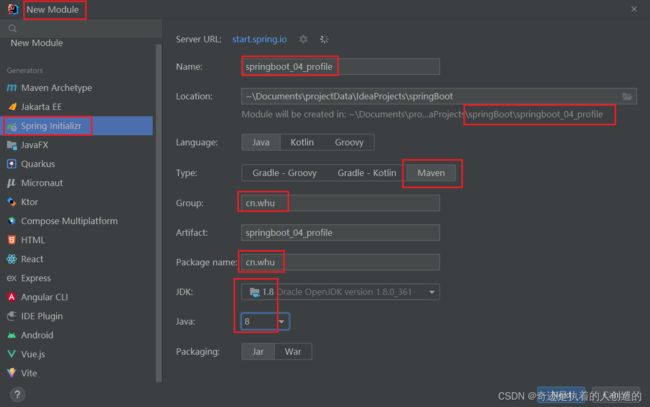
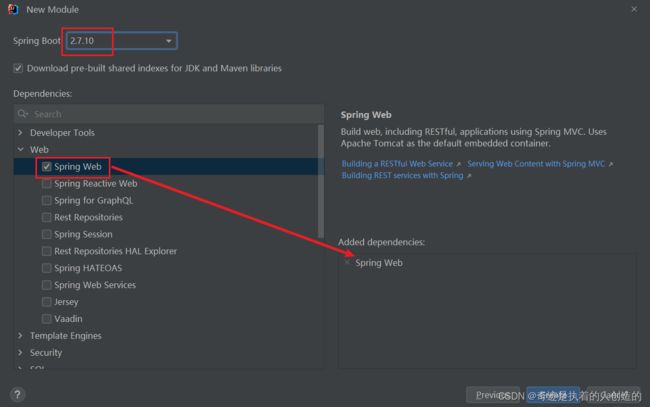
①:创建新模块,选择Spring初始化,并配置模块相关基础信息
先新建一个空项目作为容器,存放所有的springBoot案例module
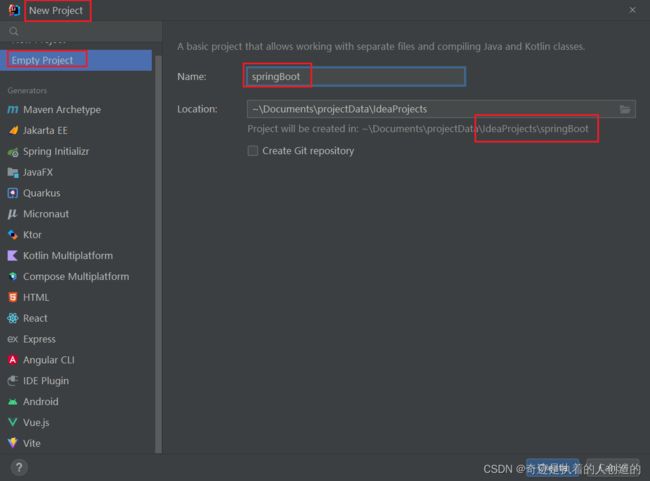
再添加新模块,当然是springBoot模块了

Next
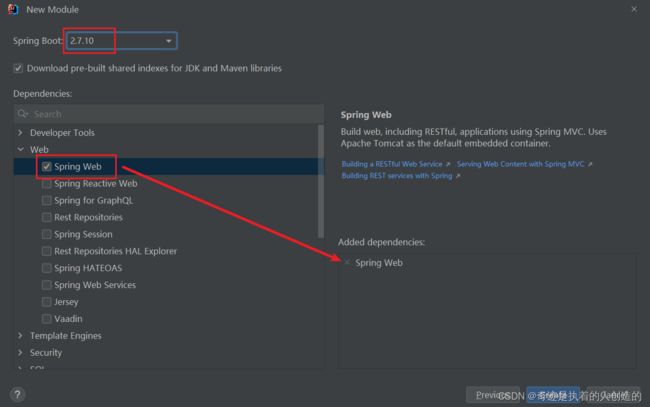
②:选择当前模块需要使用的技术集
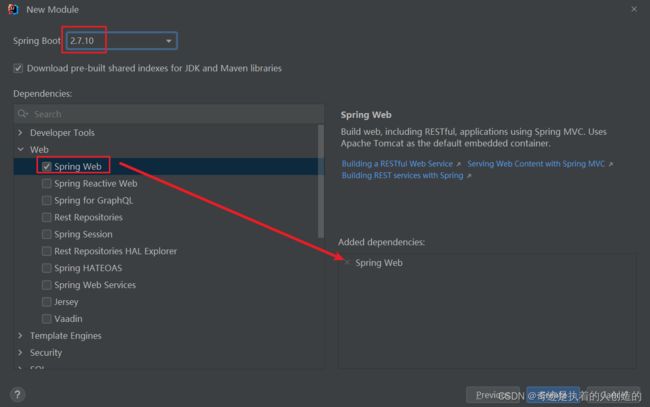
版本换一下,改成2.x版本,因为3.0版本开始最低jdk要求是17了(跟创建项目时的jdk版本不一样)
还是想用最常用的jdk8,就改成2.7版本吧
第一次创建项目别着急,要等maven下载一大堆的jar包
要是识别不了这是maven项目,IDEA右边没有maven模块按钮:
双击shift-》搜索maven-》点击Add Maven Project -》 选中pom.xml即可
展开目录发现,所有的东西都给你创建好了,目录也标记好了,该有的包也都有了。这竟然是初始环境,也太棒了吧!

③:开发控制器类
cn.whu包下新建controller包,创建BookController类
@RestController
@RequestMapping("/books")
public class BookController {
    @GetMapping("/{id}")
    public String getById(@PathVariable Integer id) {
        System.out.println("book getById & id = " + id);
        return "hello , spring boot!";
    }
}
④:运行自动生成的Springboot01QuickstartApplication类(main包下的,不是test包下的)
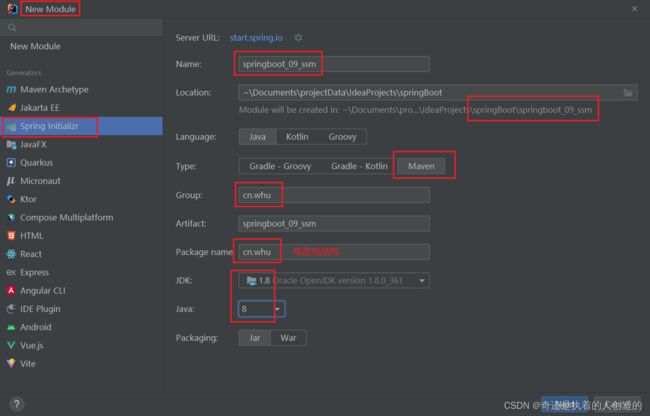
如果新建项目时,Package name 没有删掉多余的包,也就是没有改成cn.whu
会导致多一个包,从而Springboot01QuickstartApplication类和BookController类在两个不想干的包下,需要多一行配置
配置: 由于Springboot01QuickstartApplication类和BookController类不在同一个包下面,所以需要加一行扫描注解
@SpringBootApplication(scanBasePackages="cn.whu.controller")
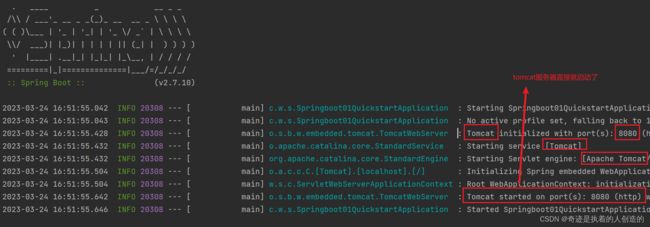
仔细观察,发现tomcat服务器已经启动了 SpringBoot直接内置了tomcat服务器了 (牛)
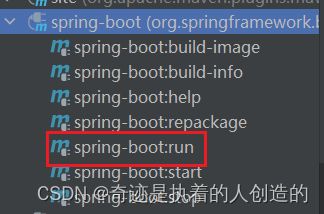
查看一下插件,果然有springBoot run (点它spring-boot:run 也能启动服务器 也是pom.xml最后一行插件)
- 最简SpringBoot程序所包含的基础文件 (一个parent继承 + 一个spring-boot-starter-web依赖)
配置文件删得只剩下这么多,依然可以正常访问服务器Controller
<project xmlns="http://maven.apache.org/POM/4.0.0" xmlns:xsi="http://www.w3.org/2001/XMLSchema-instance"
         xsi:schemaLocation="http://maven.apache.org/POM/4.0.0 https://maven.apache.org/xsd/maven-4.0.0.xsd">
    <modelVersion>4.0.0modelVersion>
    <parent>
        <groupId>org.springframework.bootgroupId>
        <artifactId>spring-boot-starter-parentartifactId>
        <version>2.5.0version>
    parent>
    <groupId>com.itheimagroupId>
    <artifactId>springboot-01-quickstartartifactId>
    <version>0.0.1-SNAPSHOTversion>
    <dependencies>
        <dependency>
            <groupId>org.springframework.bootgroupId>
            <artifactId>spring-boot-starter-webartifactId>

        dependency>
    dependencies>
project>
注意
@SpringBootApplication(scanBasePackages="cn.whu.controller")
public class Springboot01QuickstartApplication {
	public static void main(String[] args) {
		SpringApplication.run(Springboot01QuickstartApplication.class, args);
	}
}
- Spring程序与SpringBoot程序对比
注意事项:
基于idea开发SpringBoot程序需要确保联网且能够加载到程序框架结构
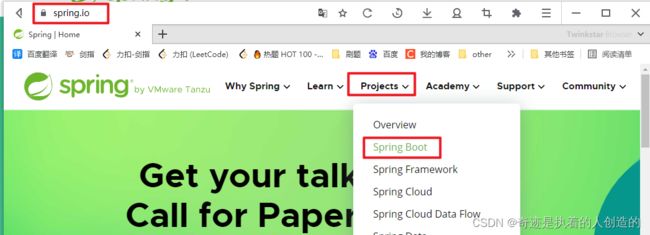
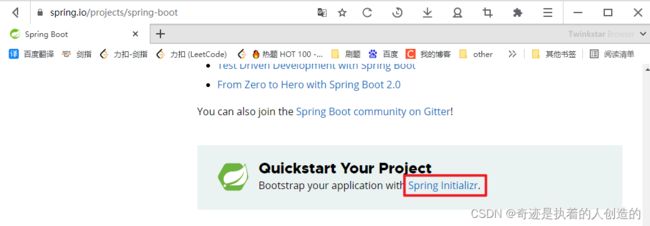
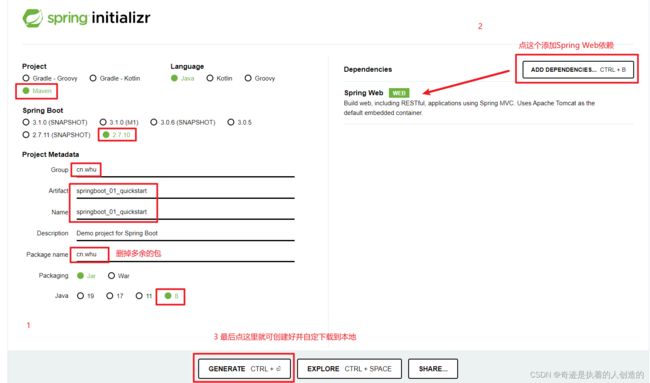
1.2 基于SpringBoot官网创建项目
就是可以在官网创建项目,然后下载下来,导入自己的IDE
1.3 SpringBoot项目快速启动
① 对SpringBoot项目打包(执行Maven构建指令package)


② 执行启动指令
java -jar springboot_01_quickstart-0.0.1-SNAPSHOT.jar # 项目的名称根据实际情况修改
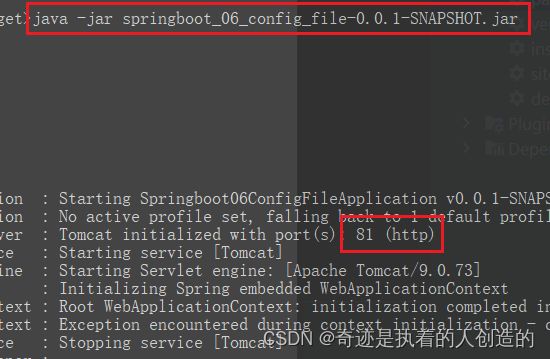
先关闭idea的服务器,再用命令启动jar
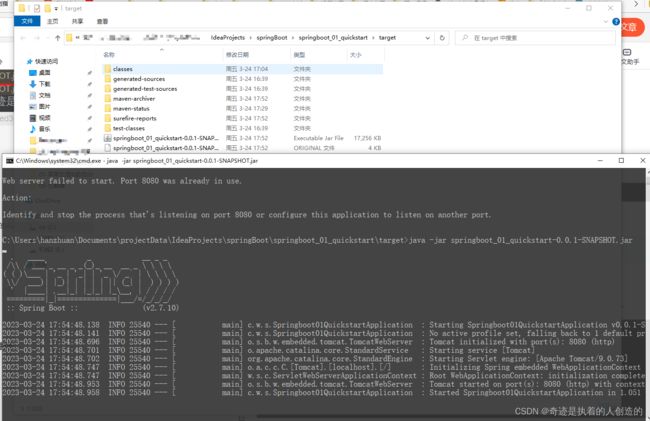
服务器已然通过jar启动了,可以用浏览器或者postman访问了
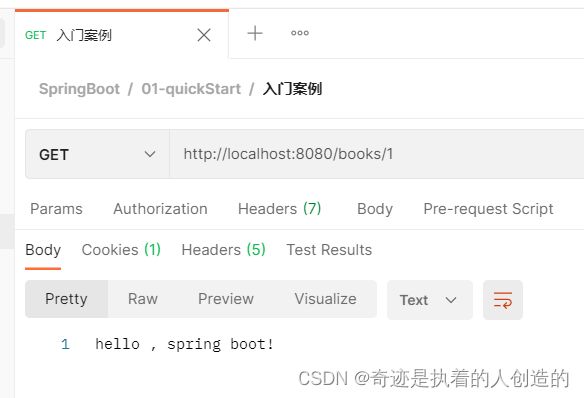

给一个jar包,就能启动服务器了,都不需要装tomcat, (访问数据库有数据库就行了)。springBoot太牛了
注意事项:
jar支持命令行启动需要依赖maven插件支持,请确认打包时是否具有SpringBoot对应的maven插件。
<build>
    <plugins>
        <plugin>
            <groupId>org.springframework.bootgroupId>
            <artifactId>spring-boot-maven-pluginartifactId>
        plugin>
    plugins>
build>
(以前的普通maven工程也能打jar包,但是那种jar包不支持上面这种命令行启动服务 都是上面插件的功劳,把需要用到所有jar包括服务器通信的jar都打包进来了)
2. SpringBoot概述
问题导入
学习了SpringBoot入门案例之后,感觉对比SpringMVC哪一个更加方便简洁?
- SpringBoot是由Pivotal团队提供的全新框架,其设计目的是用来简化Spring应用的初始搭建以及开发过程
- Spring程序缺点
- 配置繁琐
- 依赖设置繁琐
- SpringBoot程序优点
- 自动配置
- 起步依赖(简化依赖配置)
- 辅助功能(内置服务器,……)
2.1 起步依赖
- starter (名称中有starter的就是起步依赖)
- SpringBoot中常见项目名称,定义了当前项目使用的所有项目坐标,以达到减少依赖配置的目的
<project xmlns="http://maven.apache.org/POM/4.0.0" xmlns:xsi="http://www.w3.org/2001/XMLSchema-instance"
         xsi:schemaLocation="http://maven.apache.org/POM/4.0.0 https://maven.apache.org/xsd/maven-4.0.0.xsd">
    <modelVersion>4.0.0modelVersion>
    <parent>
        <groupId>org.springframework.bootgroupId>
        <artifactId>spring-boot-starter-parentartifactId>
        <version>2.5.0version>
    parent>
    <groupId>com.itheimagroupId>
    <artifactId>springboot-01-quickstartartifactId>
    <version>0.0.1-SNAPSHOTversion>
    <dependencies>
        <dependency>
            <groupId>org.springframework.bootgroupId>
            <artifactId>spring-boot-starter-webartifactId>

        dependency>
    dependencies>
project>
<project xmlns="http://maven.apache.org/POM/4.0.0"
         xsi:schemaLocation="http://maven.apache.org/POM/4.0.0 http://maven.apache.org/xsd/maven-4.0.0.xsd"
         xmlns:xsi="http://www.w3.org/2001/XMLSchema-instance">
    <modelVersion>4.0.0modelVersion>
    <groupId>org.springframework.bootgroupId>
    <artifactId>spring-boot-dependenciesartifactId>
    <version>2.5.0version>
    <packaging>pompackaging>
    <properties>
        <servlet-api.version>4.0.1servlet-api.version>
        ...
    properties>
project>
springboot_01_quickstart --继承–> spring-boot-starter-parent --继承–> spring-boot-dependencies
主要就是爷爷pom:spring-boot-dependencies这里,2937行,配置了几乎所有的jar包坐标,所有的版本
(boot项目里写依赖不需要写版本了,boot帮你管理最好的版本)
- parent
- 所有SpringBoot项目要继承的项目,定义了若干个坐标版本号(依赖管理,而非依赖),以达到减少依赖冲突的目的
- spring-boot-starter-parent(2.5.0)与 spring-boot-starter-parent(2.4.6)共计57处坐标版本不同
<project xmlns="http://maven.apache.org/POM/4.0.0"
         xsi:schemaLocation="http://maven.apache.org/POM/4.0.0 http://maven.apache.org/xsd/maven-4.0.0.xsd"
         xmlns:xsi="http://www.w3.org/2001/XMLSchema-instance">
    <modelVersion>4.0.0modelVersion>
    <parent>
        <groupId>org.springframework.bootgroupId>
        <artifactId>spring-boot-dependenciesartifactId>
        <version>2.5.0version>
    parent>
    <artifactId>spring-boot-starter-parentartifactId>
    <packaging>pompackaging>
    ...
project>
- 实际开发
- 使用任意坐标时,仅书写GAV中的G和A,V由SpringBoot提供 (再也不用自己管理版本了)
- 如发生坐标错误,再指定version(要小心版本冲突)
<dependency>
    <groupId>junitgroupId>
    <artifactId>junitartifactId>
    <version>${junit.version}version>
dependency>
<dependency>
    <groupId>javax.servletgroupId>
    <artifactId>javax.servlet-apiartifactId>
    <version>${servlet-api.version}version>
dependency>
<project xmlns="http://maven.apache.org/POM/4.0.0" xmlns:xsi="http://www.w3.org/2001/XMLSchema-instance"
         xsi:schemaLocation="http://maven.apache.org/POM/4.0.0 https://maven.apache.org/xsd/maven-4.0.0.xsd">
    <parent>
        <groupId>org.springframework.bootgroupId>
        <artifactId>spring-boot-starter-parentartifactId>
        <version>2.5.0version>
    parent>
    <dependencies>
        <dependency>
            <groupId>org.springframework.bootgroupId>
            <artifactId>spring-boot-starter-webartifactId>
        dependency>
        <dependency>
            <groupId>org.springframework.bootgroupId>
            <artifactId>spring-boot-starter-testartifactId>
            <scope>testscope>
        dependency>
    dependencies>
project>
2.2 辅助功能
- SpringBoot程序启动
@SpringBootApplication
public class Springboot01QuickstartApplication {
    public static void main(String[] args) {
        SpringApplication.run(Springboot01QuickstartApplication.class, args);
    }
}
- SpringBoot在创建项目时,采用jar的打包方式
- SpringBoot的引导类是项目的入口,运行main方法就可以启动项目
- 使用maven依赖管理变更起步依赖项
- Jetty比Tomcat更轻量级,可扩展性更强(相较于Tomcat),谷歌应用引擎(GAE)已经全面切换为Jetty
(tomcat功能全,不管你用不用都在。Jetty功能空,想要时再配上。 现阶段还是主要用Tomcat)
<dependencies>
    <dependency>


        <groupId>org.springframework.bootgroupId>
        <artifactId>spring-boot-starter-webartifactId>

        <exclusions>
            <exclusion>
                <groupId>org.springframework.bootgroupId>
                <artifactId>spring-boot-starter-tomcatartifactId>
            exclusion>
        exclusions>
    dependency>

    <dependency>
        <groupId>org.springframework.bootgroupId>
        <artifactId>spring-boot-starter-jettyartifactId>
    dependency>
dependencies>
再启动服务器就看到jetty了
 .   ____          _            __ _ _
 /\\ / ___'_ __ _ _(_)_ __  __ _ \ \ \ \
( ( )\___ | '_ | '_| | '_ \/ _` | \ \ \ \
 \\/  ___)| |_)| | | | | || (_| |  ) ) ) )
  '  |____| .__|_| |_|_| |_\__, | / / / /
 =========|_|==============|___/=/_/_/_/
 :: Spring Boot ::               (v2.7.10)

2023-03-24 19:37:48.222  INFO 39000 --- [           main] c.w.s.Springboot01QuickstartApplication  : Starting Springboot01QuickstartApplication using Java 1.8.0_361 on DESKTOP-FKHNPN0 with PID 39000 (C:\Users\hanzhuan\Documents\projectData\IdeaProjects\springBoot\springboot_01_quickstart\target\classes started by hanzhuan in C:\Users\hanzhuan\Documents\projectData\IdeaProjects\springBoot)
2023-03-24 19:37:48.223  INFO 39000 --- [           main] c.w.s.Springboot01QuickstartApplication  : No active profile set, falling back to 1 default profile: "default"
2023-03-24 19:37:48.560  INFO 39000 --- [           main] org.eclipse.jetty.util.log               : Logging initialized @855ms to org.eclipse.jetty.util.log.Slf4jLog
2023-03-24 19:37:48.613  INFO 39000 --- [           main] o.s.b.w.e.j.JettyServletWebServerFactory : Server initialized with port: 8080
2023-03-24 19:37:48.615  INFO 39000 --- [           main] org.eclipse.jetty.server.Server          : jetty-9.4.51.v20230217; built: 2023-02-17T08:19:37.309Z; git: b45c405e4544384de066f814ed42ae3dceacdd49; jvm 1.8.0_361-b09
2023-03-24 19:37:48.627  INFO 39000 --- [           main] o.e.j.s.h.ContextHandler.application     : Initializing Spring embedded WebApplicationContext
2023-03-24 19:37:48.627  INFO 39000 --- [           main] w.s.c.ServletWebServerApplicationContext : Root WebApplicationContext: initialization completed in 384 ms
2023-03-24 19:37:48.660  INFO 39000 --- [           main] org.eclipse.jetty.server.session         : DefaultSessionIdManager workerName=node0
2023-03-24 19:37:48.660  INFO 39000 --- [           main] org.eclipse.jetty.server.session         : No SessionScavenger set, using defaults
2023-03-24 19:37:48.660  INFO 39000 --- [           main] org.eclipse.jetty.server.session         : node0 Scavenging every 660000ms
2023-03-24 19:37:48.664  INFO 39000 --- [           main] o.e.jetty.server.handler.ContextHandler  : Started o.s.b.w.e.j.JettyEmbeddedWebAppContext@751e664e{application,/,[file:///C:/Users/hanzhuan/AppData/Local/Temp/jetty-docbase.8080.2250741838963725691/],AVAILABLE}
2023-03-24 19:37:48.664  INFO 39000 --- [           main] org.eclipse.jetty.server.Server          : Started @960ms
2023-03-24 19:37:48.781  INFO 39000 --- [           main] o.e.j.s.h.ContextHandler.application     : Initializing Spring DispatcherServlet 'dispatcherServlet'
2023-03-24 19:37:48.781  INFO 39000 --- [           main] o.s.web.servlet.DispatcherServlet        : Initializing Servlet 'dispatcherServlet'
2023-03-24 19:37:48.782  INFO 39000 --- [           main] o.s.web.servlet.DispatcherServlet        : Completed initialization in 1 ms
2023-03-24 19:37:48.791  INFO 39000 --- [           main] o.e.jetty.server.AbstractConnector       : Started ServerConnector@593e824f{HTTP/1.1, (http/1.1)}{0.0.0.0:8080}
2023-03-24 19:37:48.792  INFO 39000 --- [           main] o.s.b.web.embedded.jetty.JettyWebServer  : Jetty started on port(s) 8080 (http/1.1) with context path '/'
2023-03-24 19:37:48.797  INFO 39000 --- [           main] c.w.s.Springboot01QuickstartApplication  : Started Springboot01QuickstartApplication in 0.737 seconds (JVM running for 1.093)
二、基础配置
1. 配置文件格式
问题导入
框架常见的配置文件有哪几种形式?
1.0 初始环境
新建一个springBoot的module: springboot_02_base_config


这次Package Name 包名换成了cn.whu,则Springboot01QuickstartApplication启动类就在cn.whu包下,不需要加额外的扫描了,多好。一些按照规范来,才不会遇到麻烦
将Springboot01QuickstartApplication改名为Application

直接写controller.BookController
@RestController
@RequestMapping("/books")
public class BookController {
    @GetMapping("/{id}")
    public String getById(@PathVariable Integer id) {
        System.out.println("book getById & id = " + id);
        return "hello , spring boot!";
    }
}
然后直接运行Application.java
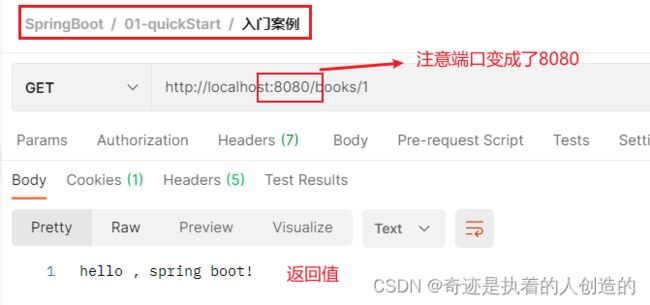
服务器正常启动,postman正常访问,oK~ 初始环境搭建完毕
就用tomcat 不用改服务器配置
1.1 修改服务器端口
http://localhost:8080/books/1 >>> http://localhost/books/1
SpringBoot提供了多种属性配置方式
- application.properties (resources根目录下直接就有这个文件)
server.port=80
- application.yml (自己在resources根目录下new File-> application.yml )
server:
  port: 81
port:和81中间必须要有一个空格
- application.yaml (自己在resources根目录下new File-> application.yaml )
server:
  port: 82
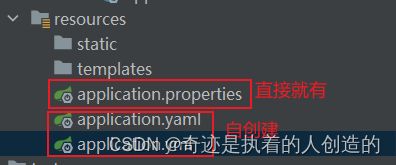
其中:application.properties resources根据目录下默认有 application.yml和application.yaml 默认没有,需要自己新建
分别注释掉其他两个,保留其中一个后启动服务器,观察端口即可知配置生效:

1.2 自动提示功能消失解决方案
操作步骤:
1、yml和yaml完全一样, 后缀名的两种写法而已
2、以后主要写的是yml配置文件
1.3 SpringBoot配置文件加载顺序(了解)
- 优先级别: application.properties > application.yml > application.yaml
有
application.properties就不会去加载application.yml和application.yaml
有application.yml就不会去加载application.yaml
只有application.yaml时,它才会被加载
注意事项:
- SpringBoot核心配置文件名为application
- SpringBoot内置属性过多,且所有属性集中在一起修改,在使用时,通过提示键+关键字修改属性
2. yaml
问题导入
什么是yaml,和properties有什么区别?
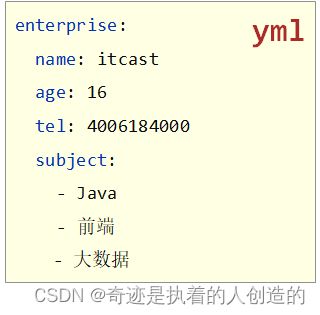
- YAML(YAML Ain’t Markup Language),一种数据序列化格式
- 优点:
- 容易阅读
- 容易与脚本语言交互
- 以数据为核心,重数据轻格式
- YAML文件扩展名
- .yml(主流)
- .yaml
2.1 yaml语法规则
- 大小写敏感
- 属性层级关系使用多行描述,每行结尾使用冒号结束
- 使用缩进表示层级关系,同层级左侧对齐,只允许使用空格(不允许使用Tab键)
- 属性值前面添加空格(属性名与属性值之间使用冒号+空格作为分隔)
- #表示注释
- 核心规则:数据前面要加空格与冒号隔开
2.2 yaml数组数据
- 数组数据在数据书写位置的下方使用减号作为数据开始符号,每行书写一个数据,减号与数据间空格分隔
2.3 yaml数据读取
新环境准备:
新建module springboot_03_read_data , 建议就不需要复制了,奇怪的问题,还是重新创建吧

删除多余的,创建两个类,修改1个后缀名,最终如下:
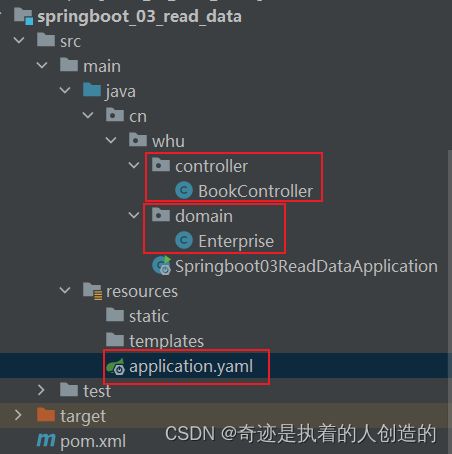
注意右下角将.yaml文件编码改成UTF-8,否则中文读取不了

pom.xml中引入lombok
<dependency>
    <groupId>org.projectlombokgroupId>
    <artifactId>lombokartifactId>
dependency>
BookController
@RestController
@RequestMapping("/books")
public class BookController {
    @GetMapping("/{id}")
    public String getById(@PathVariable Integer id) {
        System.out.println("book getById & id = " + id);
        return "hello , spring boot!";
    }
}
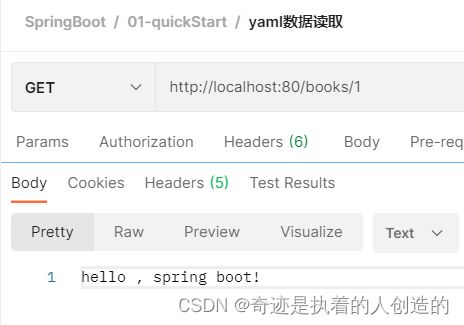
启动服务器,postman能访问到Controller,初始环境准备完毕
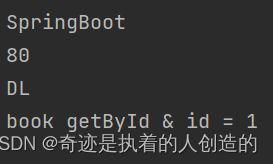
- 使用@Value读取单个数据,属性名引用方式:${一级属性名.二级属性名……}
@RestController
@RequestMapping("/books")
public class BookController {
    @Value("${lesson}")
    private String lesson;

    @Value("${server.port}")
    private Integer port;

    @Value("${enterprise.subject[0]}")
    private String subject_00;

    /*@Value("${enterprise.subject}")
    private String[] subject;*/ //异想天开 不行

    @GetMapping("/{id}")
    public String getById(@PathVariable Integer id) {
        System.out.println(lesson);
        System.out.println(port);
        System.out.println(Arrays.toString(subject_00));

        System.out.println("book getById & id = " + id);
        return "hello , spring boot!";
    }
}
- 封装全部数据到Environment对象
(springBoot提供的内置类Environment)
lesson: SpringBoot

server:
  port: 80

enterprise:
  name: whu
  age: 130
  tel: 123456
  subject:
    - DL
    - CS
    - 开发
@RestController
@RequestMapping("/books")
public class BookController {

    @Autowired
    private Environment env;//很好理解 IOC容器读取.yaml配置文件并封装到Environment对象,并以Bean的形式放到容器中管理

    @GetMapping("/{id}")
    public String getById(@PathVariable Integer id) {
        //env一次获取所有
        System.out.println(env.getProperty("lesson"));
        System.out.println(env.getProperty("server.port"));
        System.out.println(env.getProperty("enterprise.name"));
        System.out.println(env.getProperty("enterprise.age"));
        System.out.println(env.getProperty("enterprise.subject[0]"));
        System.out.println(env.getProperty("enterprise.subject[2]"));

        System.out.println("book getById & id = " + id);
        return "hello , spring boot!";
    }
}
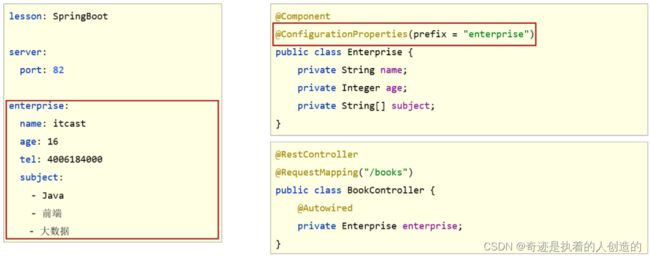
- 自定义POJO封装指定数据【常用】★
(先引入lombok插件,boot项目不需要写版本号,其实上面导入过了)
@Data //通过set方法注入内容
@ToString
@Component //启动类在其上级包下,能扫描到 (有固定配置数据的POJO也可以做成Bean)
@ConfigurationProperties(prefix = "enterprise") //指定读取配置文件里哪个对象
public class Enterprise {
    private String name;
    private Integer age;
    private String tel;
    private String[] subject;
}
@RestController
@RequestMapping("/books")
public class BookController {

    @Autowired
    private Enterprise enterprise;//自己写的POJO 并配置好了Bean

    @GetMapping("/{id}")
    public String getById(@PathVariable Integer id) {
        System.out.println(enterprise);

        System.out.println("book getById & id = " + id);
        return "hello , spring boot!";
    }
}
真好,以后mybatis信息可以写到yaml文件然后直接自动封装到Bean中了
- 自定义对象封装数据警告解决方案
<dependency>
    <groupId>org.springframework.bootgroupId>
    <artifactId>spring-boot-configuration-processorartifactId>
    <optional>trueoptional>
dependency>
3. 多环境开发配置
问题导入
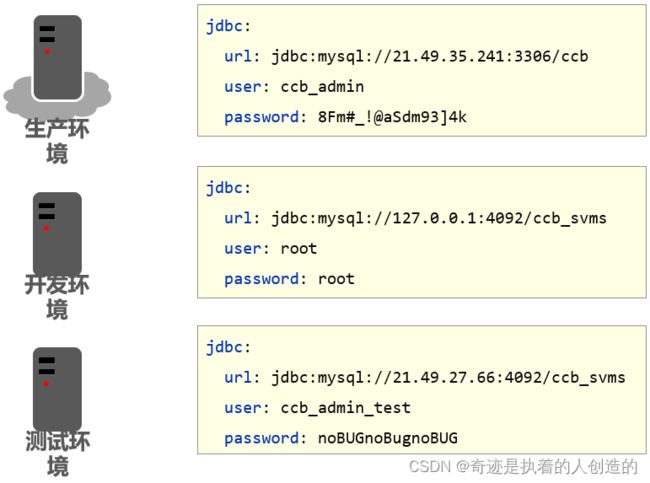
在实际开发中,项目的开发环境、测试环境、生产环境的配置信息是否会一致?如何快速切换?
3.0 环境准备
3.1 多环境启动配置
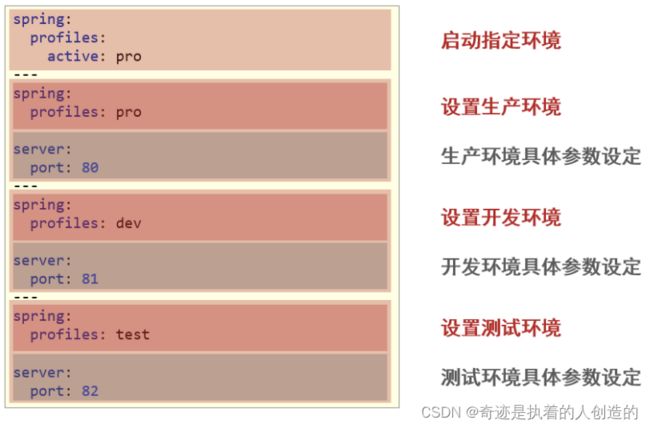
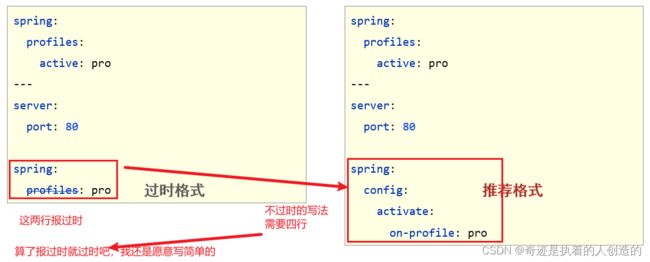
- yaml文件多环境启动
可以在yaml配置文件里写多个环境,但是多个环境之间要以3个减号
---分割开
# 设置启用的环境
spring:
  profiles:
    active: dev

---
# 开发环境
spring:
  profiles: dev
server:
  port: 80

---
# 生产环境
spring:
  profiles: pro
server:
  port: 81


---
# 测试环境
spring:
  profiles: test
server:
  port: 82
- properties文件多环境启动 (不常用 了解)
#主启动配置文件 application.properties
spring.profiles.active=pro
#环境分类配置文件 application-pro.properties
server.port=80
#环境分类配置文件 application-dev.properties
server.port=81
#环境分类配置文件application-test.properties
server.port=82
很麻烦,配一个环境就要一个单独文件,且文件名还有格式要求
3.2 多环境启动命令格式
开发默认环境是dev,交给测试时,万一忘记将active环境改成test,咋办呢?
答:不需要改,通过带参数启动SpringBoot就可以指定springBoot启动的环境,而无需修改配置
-
带参数启动SpringBoot
java –jar springboot.jar --spring.profiles.active=test java –jar springboot.jar --server.port=88 java –jar springboot.jar --server.port=88 --spring.profiles.active=test- 普通启动:
java -jar springboot_04_profile-0.0.1-SNAPSHOT.jar
yml里配置的active: dev 端口默认80

- 带参启动1:
java -jar springboot_04_profile-0.0.1-SNAPSHOT.jar --spring.profiles.active=test
端口82,说明确实是test环境,参数配置成功 (测试人员直接这么启动就行了)
- 带参启动2:
java -jar springboot_04_profile-0.0.1-SNAPSHOT.jar --server.port=88
指定启动参数配置,如端口88,(测试人员可以自己改端口了)

- 带参启动3:
java –jar springboot.jar --server.port=88 --spring.profiles.active=test
指定启动参数配置,如指定环境为test, 然后测试人员发现端口号冲突,当然还支持修改端口啦

- 普通启动:
-
参数加载优先顺序
- 参看文档:https://docs.spring.io/spring-boot/docs/current/reference/html/spring-boot-features.html#boot-features-external-config
优先级: 命令行>配置>默认
正因为优先级的存在,才使得命令行启动服务器时可以使用临时参数覆盖配置文件里的参数
3.3 多环境开发控制
Maven与SpringBoot多环境兼容(步骤)
Maven和SpringBoot都有profile配置文件时,我们应该以Maven的配置为主
所以正确的操作是让Maven控制版本,SpringBoot加载Maven设置的版本
(下面就按照这个标准这么来设置一次喽)
环境准备:
新建环境,和上面一摸一样,相当于复制,然后再在此基础上,在maven的pom.xml里添加配置

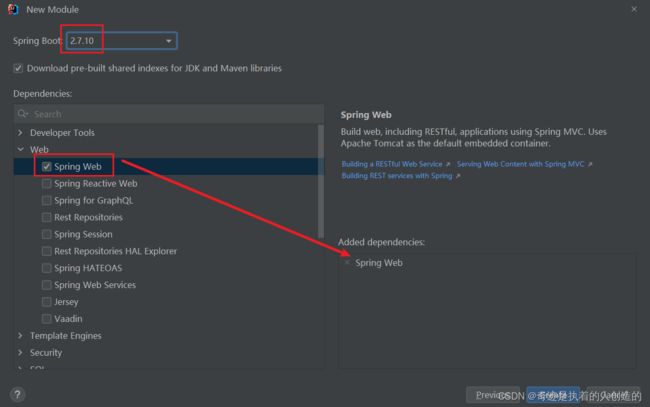
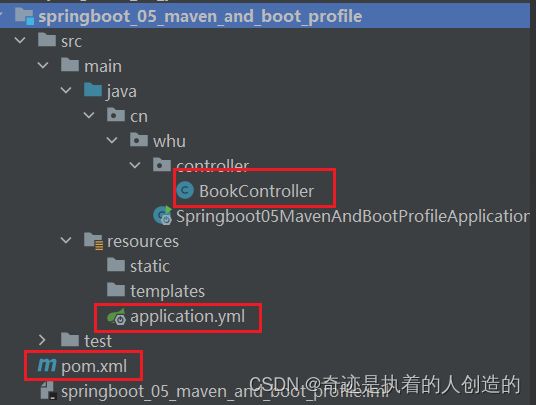
BookController (写不写其实无所谓)
@RestController
@RequestMapping("/books")
public class BookController {
    @GetMapping("/{id}")
    public String getById(@PathVariable Integer id) {
        System.out.println("id = " + id);
        return "hello , spring boot!";
    }
}
application.yml
# 设置启用的环境
spring:
  profiles:
    active: dev
---
# 开发环境
spring:
  profiles: dev
server:
  port: 80

---
# 生产环境
spring:
  profiles: pro
server:
  port: 81


---
# 测试环境
spring:
  profiles: test
server:
  port: 82
①:Maven中设置多环境属性
pom.xml
标签下面写
<profiles>
    <profile>
        <id>dev_envid>
        <properties>
            <profile.active>devprofile.active>
        properties>
    profile>
    <profile>
        <id>pro_envid>
        <properties>
            <profile.active>proprofile.active>
        properties>
        <activation>
            <activeByDefault>trueactiveByDefault>
        activation>
    profile>
    <profile>
        <id>test_envid>
        <properties>
            <profile.active>testprofile.active>
        properties>
    profile>
profiles>
②:SpringBoot中引用Maven属性
# 设置启用的环境
spring:
  profiles:
    active: ${profile.active}
---
# 开发环境
....省略....
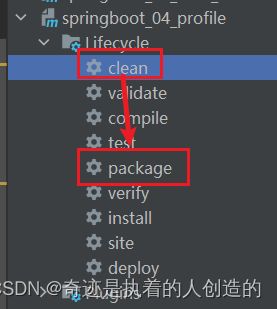
③:执行Maven打包指令
- Maven指令执行完毕后,生成了对应的包,其中类参与编译,但是配置文件并没有编译,而是复制到包中

编译之后active后面的值竟然没有编译出来,还是那个el表达式,这可不行,根本没被解析
- 解决思路:对于源码中非java类的操作要求加载Maven对应的属性,解析${}占位符 (pom.xml的build标签里面再配置一个插件即可,如下)
④:对资源文件开启对默认占位符的解析
<build>
    <plugins>
        <plugin>
            <artifactId>maven-resources-pluginartifactId>
            <configuration>
                <encoding>utf-8encoding>
                <useDefaultDelimiters>trueuseDefaultDelimiters>
            configuration>
        plugin>
    plugins>
build>
最后build和profiles的完整配置就是:
<build>
	<plugins>
		<plugin>
			<groupId>org.springframework.bootgroupId>
			<artifactId>spring-boot-maven-pluginartifactId>
		plugin>


		<plugin>
			<groupId>org.apache.maven.pluginsgroupId>
			<artifactId>maven-resources-pluginartifactId>
			<version>3.3.0version>
			<configuration>
				<encoding>UTF-8encoding>
				<useDefaultDelimiters>trueuseDefaultDelimiters>
			configuration>
		plugin>
	plugins>
build>

<profiles>
	<profile>
		<id>dev_envid>
		<properties>
			<profile.active>devprofile.active>
		properties>
	profile>

	<profile>
		<id>pro_envid>
		<properties>
			<profile.active>proprofile.active>
		properties>

		<activation>
			<activeByDefault>trueactiveByDefault>
		activation>
	profile>

	<profile>
		<id>test_envid>
		<properties>
			<profile.active>testprofile.active>
		properties>
	profile>
profiles>
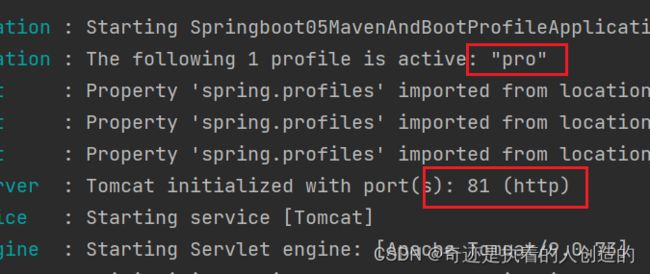
- Maven打包加载到属性,打包顺利通过
//TODO
4. 配置文件分类
问题导入
SpringBoot的配置文件可以放在项目的哪些地方?
java –jar springboot.jar --spring.profiles.active=test --server.port=85 --server.servlet.context-path=/heima --server.tomcat.connection-timeout=-1 ... ...
如上,需要临时配置的参数太多了,命令要写多长啊,还容易出错,咋办?那就对配置文件进行分级吧~
-
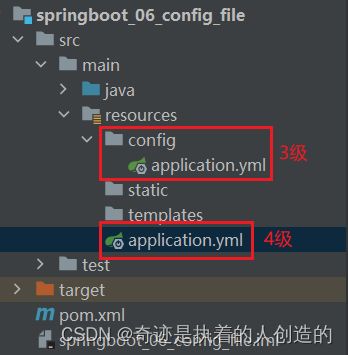
SpringBoot中4级配置文件
1级: file :config/application.yml 【最高】
2级: file :application.yml
3级:classpath:config/application.yml
4级:classpath:application.yml 【最低】
-
作用:
1级与2级留做系统打包后设置通用属性 (file指打包好的jar包所在目录)
3级与4级用于系统开发阶段设置通用属性 (classpath指IDEA的resources根目录)
代码演示:
-
server: port: 803级classpath:config/application.yml
server: port: 81 -
优先级测试
3、打包后加上2级配置
jar包所在根目录(file目录)写一个配置文件,就是2级配置

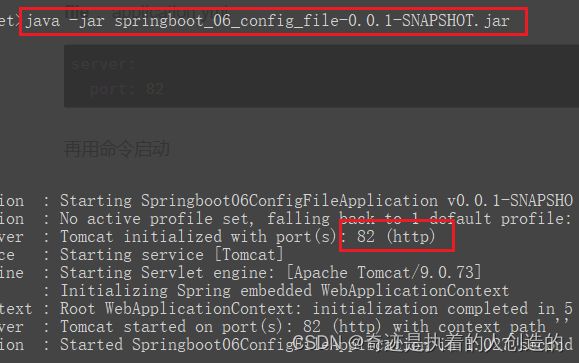
file :application.ymlserver: port: 82再用命令启动: 不用加任何参数,2级配置自动生效(测试人员启动命令行启动服务器时,不用写复杂参数覆盖我们的配置了,只用自己写配置文件覆盖)
4、打包后加上1级配置
同理,jar所在根目录(file目录)下新建config目录,config目录下的配置为1级(最高级),覆盖一切配置
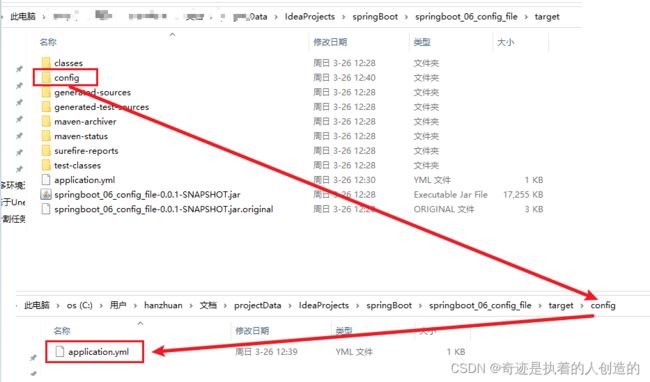
file :config/application.ymlserver: port: 85
三、整合第三方技术
1. 整合JUnit
问题导入
回忆一下Spring整合JUnit的步骤?
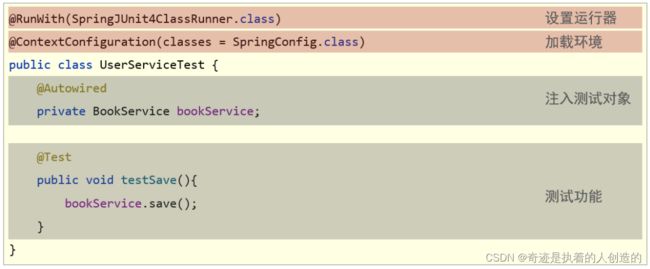
1.1 Spring整合JUnit(复习)
1.2 SpringBoot整合JUnit
-
环境准备

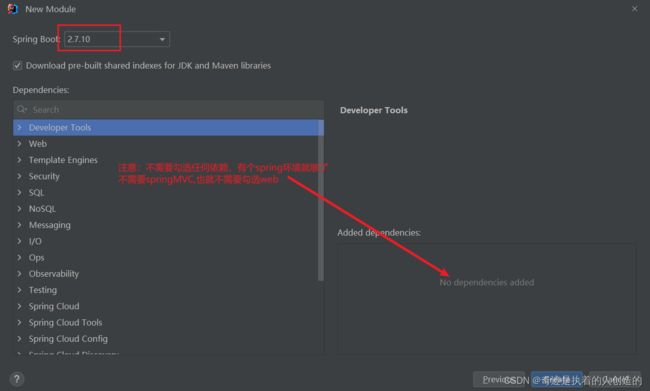
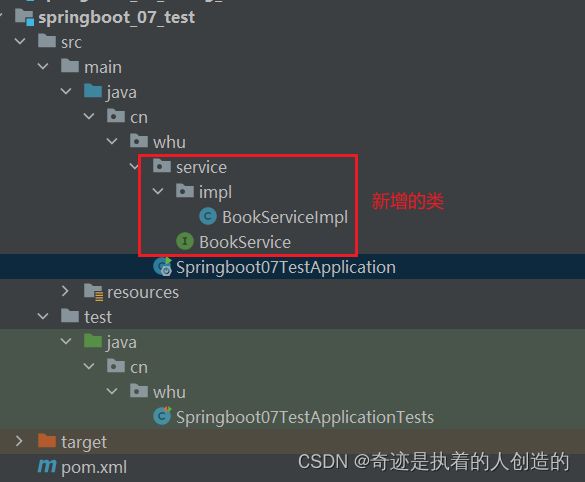
新建boot项目后,整合junit的起步依赖,默认就有了,打开pom.xml看一下<dependency> <groupId>org.springframework.bootgroupId> <artifactId>spring-boot-starter-testartifactId> <scope>testscope> dependency>public interface BookService { void save(); } @Service public class BookServiceImpl implements BookService { @Override public void save() { System.out.println("保存图书"); } } -
开始测试
直接在他生成的测试类下面注入service,然后就可以直接测试方法了@SpringBootTest//自动帮你做好了运行器,并加载好了配置文件 class Springboot07TestApplicationTests { @Autowired private BookService bookService; @Test void contextLoads() {//方法名称可以改 bookService.save(); } }如何加载的Sping核心配置文件?
第一:boot项目的引导类其实就相当于核心配置文件,引导类就是java包下自动生成的那个类
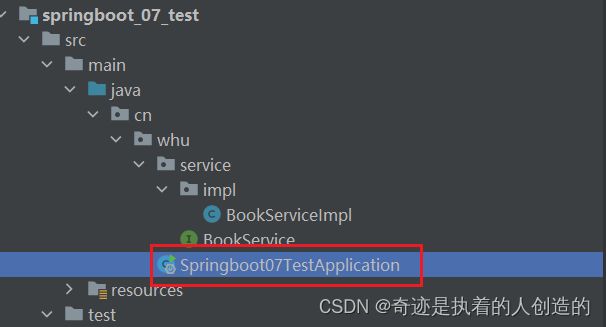

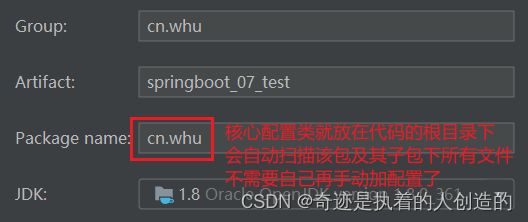
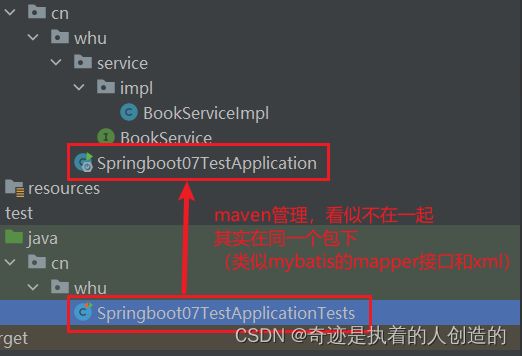
这个引导类起到了SpringConfig配置类的作用(加载Spring环境),这个类在哪,就会把它所在的包及其子包全部扫描一遍
所以新建项目时,要你删掉多余的那个包,使得:我们写的代码一定在其默认扫描范围内,如service.xxx
cn.whu.Springboot07TestApplication测试类 默认会自动加载引导类cn.whu.Springboot07TestApplicationTests,因为他们的包结构一样,都是cn.whu
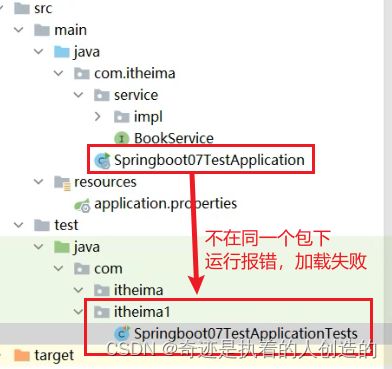
eg:不在同一个包下,加载失败,运行报错
这个时候需要手动指定这个类:
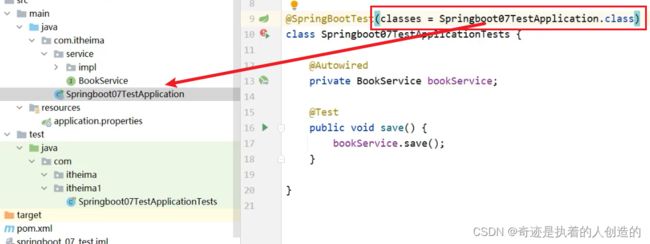
当然,基本没人会这么麻烦地干
2. 基于SpringBoot实现SSM整合

SpringBoot就是对Spring的封装,所以不存在整合Spring和SpringMVC,只有mybatis需要整合
问题导入
回忆一下Spring整合MyBatis的核心思想?
2.1 Spring整合MyBatis(复习)
- SpringConfig
- 导入JdbcConfig
- 导入MyBatisConfig
@Configuration
@ComponentScan("cn.whu")
@PropertySource("classpath:jdbc.properties")
@Import({JdbcConfig.class, MyBatisConfig.class})
public class SpringConfig {

}
- JDBCConfig
- 定义数据源(加载properties配置项:driver、url、username、password)
#jdbc.properties
jdbc.driver=com.mysql.jdbc.Driver
jdbc.url=jdbc:mysql://localhost:3306/spring_db
jdbc.username=root
jdbc.password=itheima
public class JdbcConfig {
    @Value("${jdbc.driver}")
    private String driver;
    @Value("${jdbc.url}")
    private String url;
    @Value("${jdbc.username}")
    private String userName;
    @Value("${jdbc.password}")
    private String password;

    @Bean
    public DataSource getDataSource() {
        DruidDataSource ds = new DruidDataSource();
        ds.setDriverClassName(driver);
        ds.setUrl(url);
        ds.setUsername(userName);
        ds.setPassword(password);
        return ds;
    }
}
- MyBatisConfig
- 定义SqlSessionFactoryBean
- 定义映射配置
@Bean
public SqlSessionFactoryBean getSqlSessionFactoryBean(DataSource dataSource) {
    SqlSessionFactoryBean ssfb = new SqlSessionFactoryBean();
    ssfb.setTypeAliasesPackage("cn.whu.domain"); // mapper方法里的所有返回值全部加载 所以这里也不用写了
    ssfb.setDataSource(dataSource);
    return ssfb;
}
@Bean
public MapperScannerConfigurer getMapperScannerConfigurer() {
    MapperScannerConfigurer msc = new MapperScannerConfigurer();
    msc.setBasePackage("cn.whu.dao"); // 这个没办法省略了 也是唯一需要配置的
    return msc;
}
2.2 SpringBoot整合MyBatis
- SpringBoot整合Spring(不存在)
- SpringBoot整合SpringMVC(不存在)
- SpringBoot整合MyBatis(主要)
①:创建新模块,选择Spring初始化,并配置模块相关基础信息
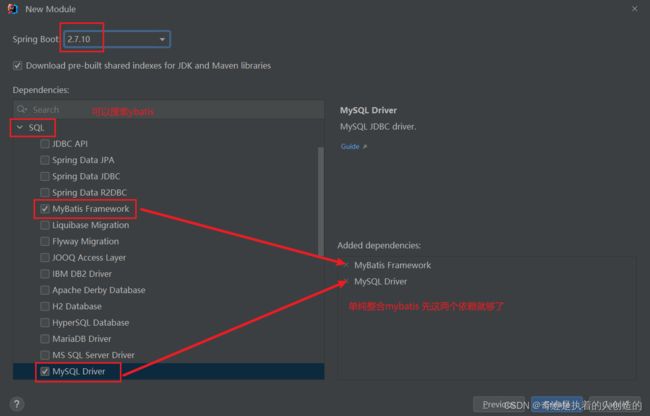
②:选择当前模块需要使用的技术集(MyBatis、MySQL)
pom.xml加上lombok插件
<dependency>
	<groupId>org.projectlombokgroupId>
	<artifactId>lombokartifactId>
dependency>
domain.Book
@Data
@ToString
public class Book {
    private Integer id;
    private String name;
    private String type;
    private String description;
}
dao.BookDao 接口
注解boot不需要配置扫描mapper,而是直接使用@mapper注解即可
@Mapper //一行注解 boot就自动帮你创建代理对象 (boot项目的注解)(以前是扫描包 现在是加注解 又方便了不少)
public interface BookDao {
    @Select("select * from tbl_book where id = #{id}")
    Book getById(Integer id);
}
④:设置数据源参数
application.yml
(可以配置成模版文件)
spring:
  datasource:
    driver-class-name: com.mysql.jdbc.Driver
    url: jdbc:mysql://localhost:3306/ssm_db
    username: root
    password: 1234
注意事项:
- SpringBoot版本低于2.4.3(不含),Mysql驱动版本大于8.0时,需要在url连接串中配置时区,或在MySQL数据库端配置时区解决此问题
jdbc:mysql://localhost:3306/ssm_db?serverTimezone=UTC
上面那么写是默认的内置数据源,当然也可以写自己的数据源,例如想用druid:
先加依赖,再多写一行配置即可:
pom.xml添加druid依赖: 记得添加完后刷新maven
<dependency>
	<groupId>com.alibabagroupId>
	<artifactId>druidartifactId>
	<version>1.1.16version>
dependency>
spring:
  datasource:
    driver-class-name: com.mysql.cj.jdbc.Driver
    url: jdbc:mysql://localhost:3306/ssm_db
    username: root
    password: 1234
    type: com.alibaba.druid.pool.DruidDataSource
④:定义数据层接口与映射配置
@Mapper
public interface UserDao {
    @Select("select * from tbl_book where id=#{id}")
    Book getById(Integer id);
}
⑤:测试类中注入dao接口,测试功能
@SpringBootTest
class Springboot08MybatisApplicationTests {
	@Autowired
	private BookDao bookDao;
	@Test
	void testGetById() {
		Book book = bookDao.getById(1);
		System.out.println("book = " + book);
	}
}
boot整合mybatis就 一个配置文件写jdbc连接 和一个@mapper注解
2.3 案例-SpringBoot实现ssm整合
pom.xml添加 druid 和 lombok 依赖
<dependency>
	<groupId>com.alibabagroupId>
	<artifactId>druidartifactId>
	<version>1.1.16version>
dependency>
<dependency>
	<groupId>org.projectlombokgroupId>
	<artifactId>lombokartifactId>
	<version>1.18.26version>
dependency>
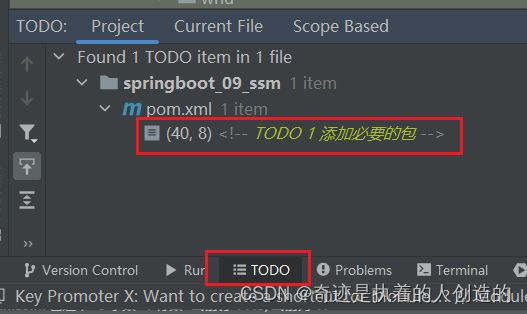
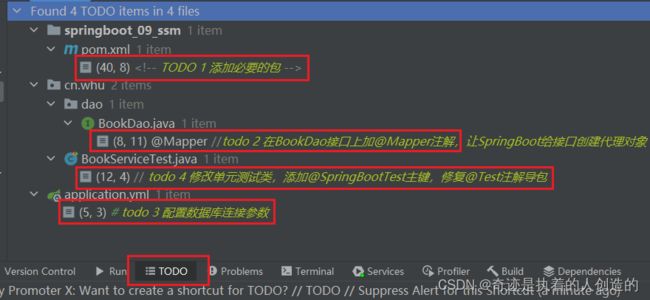
写TODO的好处,可以在下面TODO窗口下快速查看(定位)
【第二步】复制springmvc_10_ssm_result_exception_page工程各种资源(主java类、页面、测试类)
链接:https://pan.baidu.com/s/1aCNtu4Kd3l6hx8vgzZEr5g
提取码:fei2
可以先导入IDEA,然后再逐个对应复制
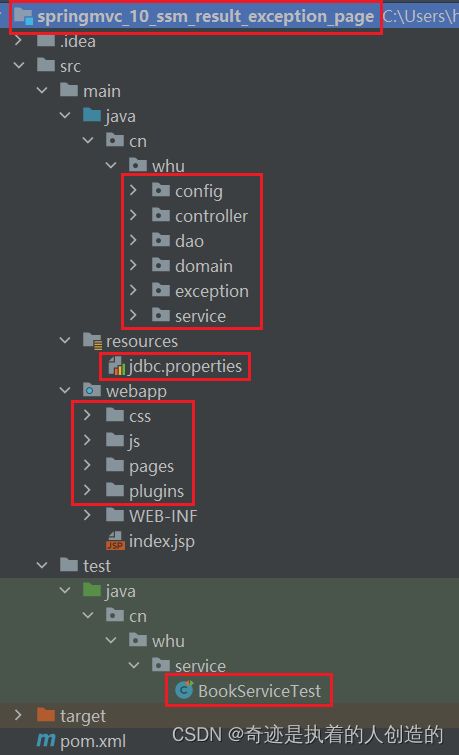
除了项目名,其他红圈圈出来的文件先直接复制到新module对应位置,其中css、js、pages、plugins页面这4个目录复制到resources/static目录,刚复制好肯定有错误,先不管,待会儿再逐一修改
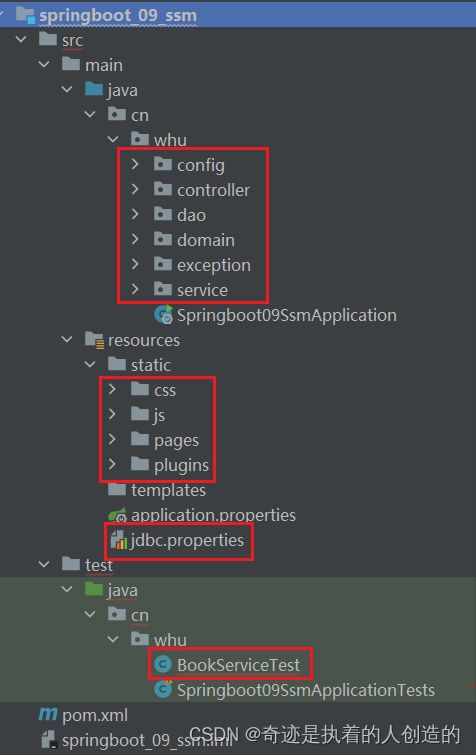
【第三步】删除整个config包,在BookDao接口上加@Mapper注解
//todo 2 在BookDao接口上加@Mapper注解,让SpringBoot给接口创建代理对象
@Mapper
public interface BookDao {
    //...
}
【第四步】将application.properties修改成application.yml,根据jdbc.properties配置端口号和连接参数
配置完可以删除jdbc.properties了 resources根目录下配置文件就只有application.yml了
server:
  port: 80
# todo 4 配置数据库连接参数
spring:
  datasource:
    driver-class-name: com.mysql.cj.jdbc.Driver
    url: jdbc:mysql://localhost:3306/ssm_db
    username: root
    password: 1234
    type: com.alibaba.druid.pool.DruidDataSource
【第五步】修改BookServiceTest配置类,进行配置
删除顶部的@Runwith和@ContextConfiguration两个注解,改成@SpringBootApplication即可
然后删除@Test和对应的包,重新导一下boot的@Test对应的包
// todo 4 修改单元测试类,添加@SpringBootTest主键,修复@Test注解导包
@SpringBootTest
public class BookServiceTest {

    @Autowired
    private BookService service;

    @Test
    public void testSave() {
        Book book = new Book();
        book.setType("计算机");
        book.setName("springMVC入门");
        book.setDescription("小试牛刀");
        service.save(book);
    }

    @Test
    public void testGetById(){
        Book book = service.getById(1);
        System.out.println(book);
    }

    @Test
    public void testGetAll(){
        List<Book> books = service.getAll();
        System.out.println(books);
    }
}
分别执行3个方法,均正常执行,后台没问题啦~
原来的测试类Springboot09SsmApplicationTests可以删啦~
【第六步】在static目录中提供index.html页面,跳转到"pages/books.html"
<script>
    location.href="pages/books.html"
script>
最后:运行引导类即可访问
直接访问 http://localhost/ 竟然直接就跳转到主页了:
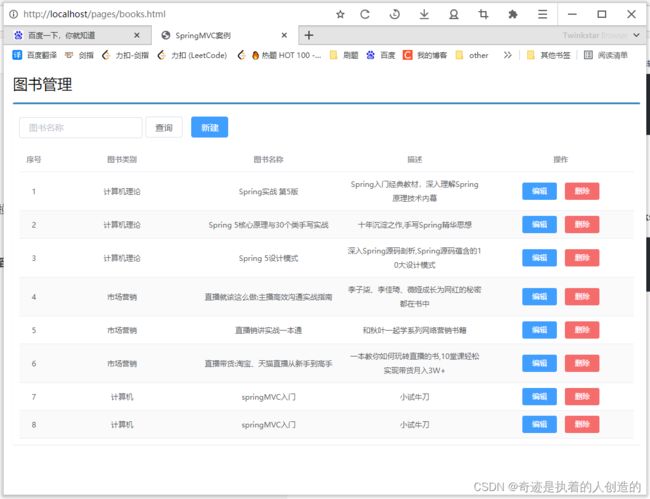
静态资源没有被拦截,也太好了吧,拦截器,过滤器,放行啥的都不用自己配了,这些基础的他都帮你做好了
使用CRUD那些功能,也都是好的~
还有注意下页面要放到resources/static目录下
