python处理word_python操作word,自动化办公
**安装依赖:**
```
pip install python-docx
```
**简单的写入一点内容:**
```
import docx
file=docx.Document() #创建内存中的word文档对象
file.add_paragraph("窗前明月光") #写入若干段落
file.add_paragraph("疑是地上霜")
file.add_paragraph("举头望明月")
file.add_paragraph("低头思故乡")
file.save("E:\静夜思.docx") #保存才能看到结果
```
**添加的时候可以写入样式,表格等**:
```
#插入有序列表,段落的前面会有序号123
doc2.add_paragraph('把冰箱门打开',style='List Number')
doc2.add_paragraph('把大象装进去',style='List Number')
doc2.add_paragraph('把冰箱门关上',style='List Number')
#插入无序列表,段落的前面没有序号
doc2.add_paragraph('AA',style='List Bullet')
doc2.add_paragraph('BB',style='List Bullet')
doc2.add_paragraph('CC',style='List Bullet')
#插入一个6行6列的表格
table=doc2.add_table(rows=6,cols=6,style='Table Grid')
for i in range(0,6):
for j in range(0,6):
table.cell(i,j).text="第{i}行{j}列".format(i=i+1,j=j+1)
#插入照片
doc2.add_picture('FLAMING MOUNTAIN.JPG',width=docx.shared.Inches(5))
```
**添加段落的样式有这么多可以选择的,具体的效果大家可以试试:**
```
Normal
Body Text
Body Text 2
Body Text 3
Caption
Heading 1
Heading 2
Heading 3
Heading 4
Heading 5
Heading 6
Heading 7
Heading 8
Heading 9
Intense Quote
List
List 2
List 3
List Bullet
List Bullet 2
List Bullet 3
List Continue
List Continue 2
List Continue 3
List Number
List Number 2
List Number 3
List Paragraph
Macro Text
No Spacing
Quote
Subtitle
TOCHeading
Title
```
段落样式,表格样式等官方文档:
https://python-docx.readthedocs.io/en/latest/user/styles-understanding.html
**设置页眉:**
```
file=docx.Document() #创建内存中的word文档对象
head=file.sections[0].header
head.paragraphs[0].text="Left Text\tCenter Text\tRight Text"
head.paragraphs[0].style =file.styles["Header"]
head.is_linked_to_previous=False
```
设置页眉的官方文档:
https://python-docx.readthedocs.io/en/latest/user/hdrftr.html
**设置字体样式(字体与大小)**
```
from docx.shared import Pt
file=docx.Document() #创建内存中的word文档对象
#设置字体样式(字体大小与)
mystyle = file.styles["Header"]
font = mystyle.font
font.size = Pt(10.5)
font.name = '宋体'
head.paragraphs[0].style = mystyle
```
其中字号与数字的对应如下:
>初号=42磅 小初=36磅 一号=26磅 小一=24磅?二号=22磅 小二=18磅 三号=16磅 小三=15磅?四号=14磅 小四=12磅 五号=10.5磅 小五=9磅?六号=7.5磅 小六=6.5磅 七号=5.5磅 八号=5磅?
tn> 注意设置中文字体的时候直接是不行的
需要使用如下的写法,两个一起用
```
#这里需要引入一个qn
from docx.oxml.ns import qn
mystyle = file.styles["Normal"]
font = mystyle.font
font.size = Pt(10.5)
font.name = u'宋体'
font._element.rPr.rFonts.set(qn('w:eastAsia'), u'宋体')
head.paragraphs[0].style = mystyle
```
当然如果想全局设置字体的话可以这样做
```
from docx.oxml.ns import qn
document.styles['Normal'].font.name = u'宋体'
document.styles['Normal']._element.rPr.rFonts.set(qn('w:eastAsia'), u'宋体')
```
>docx内置的样式都可以通过document.styles取到。
正文是Normal, 标题样式根据标题声明的基本,分别从Heading 1 到Heading 9, 另外还有table、list等各种word对应的样式。可以通过遍历document.styles查看。
**标题与字体**
```
# 导入库
from docx import Document
from docx.shared import Pt
from docx.shared import Inches
from docx.oxml.ns import qn
from docx.shared import RGBColor
# 新建空白文档
doc1 = Document()
# 新增文档标题
doc1.add_heading('如何使用 Python 创建 Word',0)
# 创建段落描述
doc1.add_paragraph('我们平时使用 Word 用来做文章的处理,可能没想过它可以用 Python 生成,下面我们就介绍具体如何操作……')
# 创建一级标题
doc1.add_heading('安装 python-docx 库',1)
# 创建段落描述
doc1.add_paragraph('现在开始我们来介绍如何安装 python-docx 库,具体需要以下两步操作:')
# 创建二级标题
doc1.add_heading('第一步:安装 Python',2)
# 创建段落,添加文档内容
paragraph = doc1.add_paragraph('这是第一步的安装描述!')
# 段落中增加文字,并设置字体字号
run = paragraph.add_run('(注意:这里设置了字号为20)')
run.font.size = Pt(20)
# 设置英文字体
run = doc1.add_paragraph('这里设置英文字体:').add_run('This Font is Times New Roman ')
run.font.name = 'Times New Roman'
# 设置中文字体
run = doc1.add_paragraph('这里设置中文字体:').add_run('当前字体为黑体')
run.font.name='黑体'
r = run._element
r.rPr.rFonts.set(qn('w:eastAsia'), '黑体')
# 设置斜体
run = doc1.add_paragraph('这段设置:').add_run('文字的是斜体 ')
run.italic = True
# 设置粗体
run = doc1.add_paragraph('这段再设置:').add_run('这里设置粗体').bold = True
# 设置字体带下划线
run = doc1.add_paragraph('这段为下划线:').add_run('这里设置带下划线').underline = True
# 设置字体颜色
run = doc1.add_paragraph('这段字体为红色:').add_run('这里设置字体为红色')
run.font.color.rgb = RGBColor(0xFF, 0x00, 0x00)
# 增加引用
doc1.add_paragraph('axj', style='Intense Quote')
# 保存文件
doc1.save('myword.docx')
```
官方文档:
https://python-docx.readthedocs.io/en/latest/user/styles-using.html
**设置段落行高与对齐方式等**
对齐方式修改
```
from docx.enum.text import WD_ALIGN_PARAGRAPH
paragraph.alignment=WD_ALIGN_PARAGRAPH.CENTER # 居中对齐
```
> paragraph.alignment=对齐方式,可选的对齐方式:LEFT、CENTER、RIGHT、JUSTIFY、DISTRIBUTE、JUSTIFY_MED、JUSTIFY_HI、JUSTIFY_LOW、THAI_JUSTIFY,具体的效果自己尝试
行间距设置
```
paragraph.paragraph_format.line_spacing=2.0 # 修改行间距
```
>使用paragraph.paragraph_format.line_spacing=2.0的方法,修改行间距,使用浮点数,2.0就表示两倍行间距!
修改段落间距
```
paragraph.paragraph_format.space_before=Pt(12)
paragraph.paragraph_format.space_after=Pt(10)
```
> 修改段前和段后间距,使用以上代码。Pt(12)表示12磅
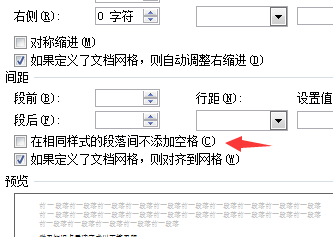
注意设置了行间距后要把:在相同样式的段落间不添加空格勾勾去掉才能起作用,不然会有问题的

tn> 设置样式这些还没有玩得很转,不然配合python强大的爬虫能力真的可以减少好多工作量
**其他的可以参考一下官方文档**:
https://python-docx.readthedocs.io/en/latest/