微服务集群简单搭建(Eureka)
本文仅仅是简单搭建微服务集群和工具使用,开发微服务建议使用Spring Cloud Alibaba生态。注意:Eureka已经停止更新,当下服务治理组件可以选择nacos。
1 软件版本
SpringCloud的版本和SpringBoot的版本选择很重要,慎重选择版本,不然会很痛苦!
版本选择参见官网: Spring Cloud
我的框架版本如下:
JDK: 11;
Spring Boot(spring-boot-starter-parent):2.2.10.RELEASE;
Spring Cloud(spring-cloud-dependencies): Hoxton.RELEASE;
mvn插件(spring-boot-maven-plugin): 2.3.1.RELEASE;
2 idea中同时启动多个application
我的软件版本是:IntelliJ IDEA 2021.1.1 (Community Edition)
2.1 添加多个应用
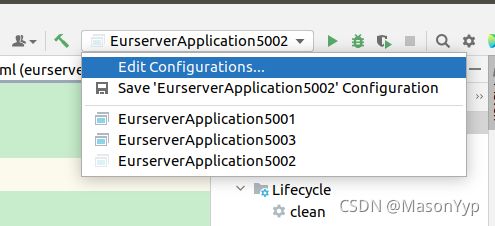
(1)在窗口右上角点击“Eidt Configurations”出现弹框;
(2)点击弹框左上角的 “+”可以添加多个不同的应用,注意在"Build and run"中"Modify options" 一定要选择“Open run/debug tool window when started"和”Allow multiple instances“。
(3)添加运行时参数,在Idea中运行多个不同配置的微服务,还需要指定运行时配置文件。
2.2 同时运行多个应用
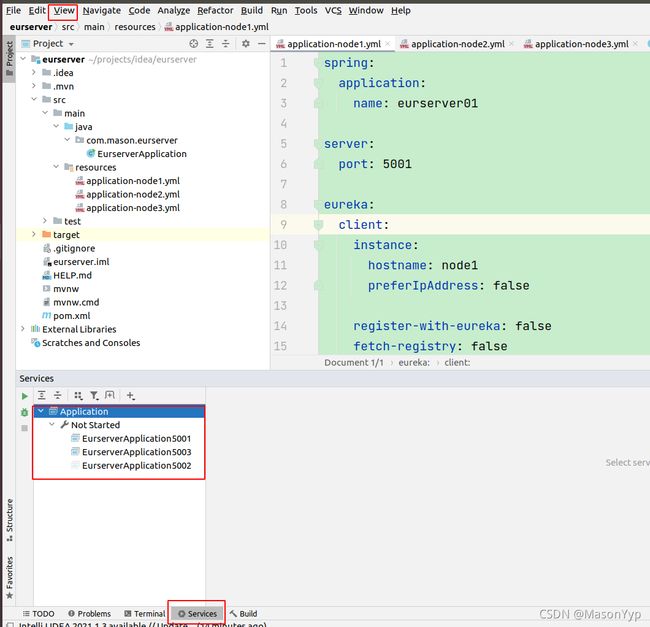
一般会在idea左下角有个services按钮,点击services可以弹出下面的Services框。如果没有Services按钮,可以点击左上角View→Tool Windows→Services调出Services框。
2.3 添加域名解析
在Ubuntu中输入命令:“sudo vim /etc/hosts”,添加以下信息。
127.0.0.1 node1
127.0.0.1 node2
127.0.0.1 node3
在浏览器中输入:http://localhost 与 http://node1、http://node2、http://node3能达到一样的结果,表明设置成功。
3 创建服务治理中心
3.1 选择组件
(1)选择Spring Assistant创建Springboot应用,工程名写成为“eursurver”;
(2)选择Spring Boot 版本,如果没有想要的版本,可以在生成完工程后,在pom文件中修改为相应的版本即可;
(3)选择“Spring Cloud Discovery”下的“Eureka Server”,依赖如下:
    org.springframework.cloud
    spring-cloud-starter-netflix-eureka-server
(4)生成服务治理中心的工程;
3.2 配置服务治理集群
在resources目录下,删除application.properties文件,创建application-node1.yml,application-node2.yml,application-node3.yml三个文件。注意:三个文件name必须相同,表示同一个服务,不同的地方只有port和 defaultZone。
三个文件的内容如下:
application-node1.yml
spring:
  application:
    name: eurserver01

server:
  port: 5001

eureka:
  client:
    instance:
      hostname: node1
      preferIpAddress: false

    register-with-eureka: false
    fetch-registry: false
    service-url:
      defaultZone: http://node1:5002/,http://node3:5003/
application-node2.yml
spring:
  application:
    name: eurserver01

server:
  port: 5002

eureka:
  client:
    instance:
      hostname: node2
      preferIpAddress: false

    register-with-eureka: false
    fetch-registry: false
    service-url:
      defaultZone: http://node1:5001/,http://node3:5003/
application-node3.yml
spring:
  application:
    name: eurserver01

server:
  port: 5003

eureka:
  client:
    instance:
      hostname: node3

    register-with-eureka: false
    fetch-registry: false
    service-url:
      defaultZone: http://node1:5001/,http://node2:5002/
3.3 查看服务治理结果
启动服务后,在地址兰中输入以下地址查看结果:http://node1:5001/ , http://node2:5002/ , http://node3:5003/
4 创建服务发现(服务提供者)
4.1 选择组件
(1)选择Spring Assistant创建Springboot应用,工程名写成为“eurprovider”;
(2)选择Spring Boot 版本;
(3)选择“Web”下的“Spring Web”,为其他组件提供服务;
(4)选择“Spring Cloud Discovery”下的“Eureka Discovery Client”,依赖如下:
	org.springframework.boot
	spring-boot-starter-web


	org.springframework.cloud
	spring-cloud-starter-netflix-eureka-client
(5)生成服务发现工程;
4.2 配置服务发现集群
在resources目录下,删除application.properties文件,创建application-node1.yml,application-node2.yml两个文件。注意:三个文件name必须相同,表示同一个服务,不同的地方只有port。
application-node1.yml
spring:
  application:
    name: eurprovider01

server:
  port: 6001

eureka:
  client:
    serviceUrl:
      defaultZone: http://127.0.0.1:5001/eureka/,http://127.0.0.1:5002/eureka/,http://127.0.0.1:5003/eureka/
application-node2.yml
spring:
  application:
    name: eurprovider01

server:
  port: 6002

eureka:
  client:
    serviceUrl:
      defaultZone: http://127.0.0.1:5001/eureka/,http://127.0.0.1:5002/eureka/,http://127.0.0.1:5003/eureka/
4.3 提供服务的代码
在工程下创建“contorller”目录,在名目录下创建 SearchData类,如下:
import org.springframework.web.bind.annotation.GetMapping;
import org.springframework.web.bind.annotation.RequestMapping;
import org.springframework.web.bind.annotation.RestController;

@RestController
@RequestMapping("/search")
public class SearchData {

    @GetMapping("/getData")
    public String getData(){
        return "Hello Word";
    }

}
4.4 查看服务发现结果
启动服务后,在地址栏中输入:http://localhost:6001/search/getData
5 服务消费者
5.1 选择组件
(1)选择Spring Assistant创建Springboot应用,工程名写成为“feignconsumer”;
(2)选择Spring Boot 版本;
(3)选择“Web”下的“Spring Web”,为其他组件提供服务;
(4)选择“Spring Cloud Discovery”下的“Eureka Discovery Client”;
(5)选择“Spring Cloud Routing”下的“OpenFeign”,依赖如下:
    org.springframework.boot
    spring-boot-starter-web


    org.springframework.cloud
    spring-cloud-starter-netflix-eureka-client


    org.springframework.cloud
    spring-cloud-starter-openfeign
(6)生成工程;
5.2 配置消费者
修改resources目录下的application.properties。
spring:
  application:
    name: feignconsumer

server:
  port: 8080

eureka:
  client:
    register-with-eureka: false
    serviceUrl:
      defaultZone: http://127.0.0.1:5001/eureka/,http://127.0.0.1:5002/eureka/,http://127.0.0.1:5003/eureka/
5.3 创建java代码
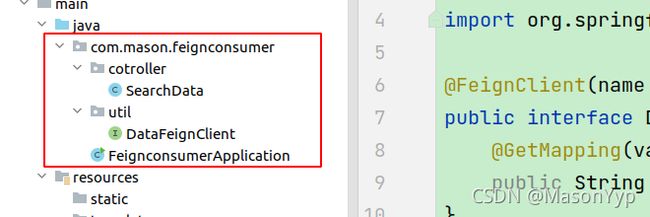
在工程下创建两个文件如下:
(1)FeignconsumerApplication.java
import org.springframework.boot.SpringApplication;
import org.springframework.boot.autoconfigure.SpringBootApplication;
import org.springframework.cloud.openfeign.EnableFeignClients;

@SpringBootApplication
@EnableFeignClients
public class FeignconsumerApplication {

	public static void main(String[] args) {
		SpringApplication.run(FeignconsumerApplication.class, args);
	}

}
(2)DataFeignClient.java
import org.springframework.cloud.openfeign.FeignClient;
import org.springframework.web.bind.annotation.GetMapping;

@FeignClient(name = "eurprovider01")
public interface DataFeignClient {
    @GetMapping(value = "/search/getData")
    public String getData();
}
(3)SearchData.java
import com.mason.feignconsumer.util.DataFeignClient;
import org.springframework.beans.factory.annotation.Autowired;
import org.springframework.web.bind.annotation.GetMapping;
import org.springframework.web.bind.annotation.RestController;

@RestController
public class SearchData {

    @Autowired
    private DataFeignClient dataFeignClient;

    @GetMapping("/search/getData")
    public String getData(){
        return dataFeignClient.getData();
    }

}
5.4 查看服务消费者结果
启动服务后,在地址栏中输入:http://localhost:8080/search/getData


