Node.js到底是什么?
前言
Node.js是一个基于Chrome V8引擎的JavaScript运行环境。
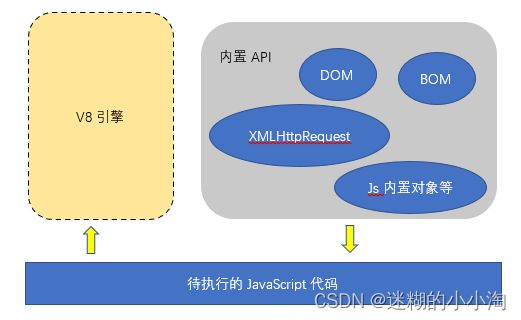
JavaScript是脚本语言,脚本语言需要一个解析器(运行环境)才能运行,若运行在浏览器中,则浏览器就是JavaScript的解析器(运行环境),而对于独立运行的js,Node.js就是一个解析器(运行环境);
以CHrome浏览器为例,JavaScript运行环境如下:
而在Node.js中,JavaScript运行环境如下:
Node.js通过Chrome V8将js翻译成c或c++代码,供底层使用;
与浏览器运行环境相比,nodejs缺少了对dom的操作,增加了跨域请求/文件读写等功能;
传统服务器每次产生一个请求时,则会生成一个线程(进程);这样就会产生一个问题:
由于请求的速度由用户决定,响应的速度可以通过提升带宽等方法来提升速度。但是i/o的输入输出速度是比较难提升的。而每一个请求都会产生一个线程(橙色框),数据请求又比较慢就会出现很多线程在缓存中等待,从而造成大量的内存浪费。
node服务器则采用单线程模式(橙色框),即不管产生多少请求都只有一个线程,这样就可以大大节省内存,降低成本;
传统服务器处理(java服务器),橙色框表示线程(多线程)
node服务器处理 橙色框表示线程(单线程)
node特点如下:
- 异步非阻塞的I/O(I/O线程池)
- 特别适用于I/O密集型应用
- 事件循环机制
- 单线程(处理不好cpu密集型任务)
- 跨平台
- 回调函数嵌套过多(不足)
- node中的全局对象是global,使用common.js模块化方法
总而言之,
- 当JavaScript作为前端开发语言来说,需要在浏览器的环境上进行
- 当JavaScript作为后端开发语言来说, 需要在node.js的环境上进行
npm
npm全称是Node Package Manager,即Node的包管理器(安装完node后自动安装npm);通过npm可以对Node的包进行搜索/下载/安装/删除/上传等操作;
npm的包服务器是https://registry.npmjs.org
npm init // 初始化项目等package.json文件
npm search 包名// 搜索指定的包
npm install 包名// 安装指定包
npm install 包名 --save 或 npm install 包名 -S// 安装指定包并添加到项目的生产依赖中
npm install 包名 --save-dev 或 npm install 包名 -D// 安装指定包并添加到项目的开发依赖中
npm install 包名 --g // 全局安装指定包
npm install XXX@YYY // 安装XXX包的YYY版本
npm install  // 安装项目package.json中的所有依赖
npm remove 包名  // 删除指定包,同时会移除package.json中的声明
cnpm
因为npm的远程服务器在国外,所以会遇到访问过慢或无法访问的情况,所以淘宝搭建了一个国内的npm服务器,它每隔10分钟将国外npm服务器的所有内容搬运回国内的服务器上,这样我们就可以直接访问淘宝的国内服务器了。镜像地址是:https://registry.npm.taobao.org/
使用时将npm地址改为淘宝镜像,命令依然使用与上述npm讲解的命令;
npm config set registry https://registry.npm.taobao.org // 设置为淘宝镜像
npm config get registry  // 查看npm地址是否设置成功,若为上面地址则设置成功
yarn
yarn的查找算法要比npm更精准,使用的依然是npm仓库,在业界口碑更好;
npm install -g yarn // 全局安装yarnyarn的全局安装位置与npm不同,要配置yarn的全局安装路径到环境变量中,否则全局安装的包不起作用,具体操作如下:
yarn global dir // 查看全局安装的yarn所在位置
yarn global bin // 查看全局安装的yarn bin所在位置
将上述两个命令的地址添加到环境变量中即可;
yarn操作包的指令如下:
yarn init // 初始化项目
yarn // 安装项目package.json中所有依赖
yarn add xxx@yyy // 安装xxx包的yyy版本
yarn add xxx@yyy -D // 下载指定开发依赖
yarn global add xxx // 全局下载指定包
yarn remove xxx // 删除指定依赖包
yarn global remove xxx // 全局删除指定依赖包
Buffer缓冲器
Buffer是一个和数组类似的对象,不同的是Buffer是专门用来保存二进制数据的;
特点:
- 大小固定:在创建时就确定了,且无法调整;
- 性能较好:直接对计算机的内存进行操作,效率高,存储和读取很快;
- 每个元素大小为1字节(byte)---8bit
- Buffer是Node中非常核心的模块,无需下载,无需引入,直接即可使用;
创建Buffer
创建Buffer有三种方式:
let buff1 = Buffer.alloc(10); // 直接在堆里开辟一块没人用过的空间
console.log(buff1); //  Buffer存储的是二进制,但是输出时以16进制展示

let buff2 = Buffer.allocUnsafe(10); // 在堆里开辟空间(该空间可能包含有被弃用的数据),性能好,但是容易造成数据泄露
console.log(buff2); //

let buff3 = Buffer.from('hello, Buffer');
// 将数据存入一个Buffer实例
console.log(buff3); //
文件系统
所谓文件系统,就是对计算机的文件进行增删改查等操作;Node提供了fs模块专门用于操作文件;fs模块是Node的核心模块,只需引入即可使用;
文件写入
- writeFile(file, data[, options], callback)异步简单文件写入方式
// file 为要写入的文件路径+文件名+文件后缀
// data 为要写入的数据
// options 配置项(可选参数), 包括:
      // encoding: 字符串格式,默认是'utf8'
      // mode: 整数格式, 默认是0o666 = 0o222+0o444
           // 0o111: 文件可被执行的权限
           // 0o222: 文件可被写入的权限
           // 0o444: 文件可被读取的权限
      // flag: 标识(打开文件要执行的操作),默认是'w'
           // w(写入,即覆盖)
           // a(追加)
// callback 回调函数,传入错误对象err,若写入成功,则err为空
let fs = require('fs') // node使用commonJs模块方式
fs.writeFile(__dirname + '/1.txt', 'hello, node', (err) => {
if (err) {
console.log('写入失败');
} else {
console.log('写入成功'); // 则在当前文件夹下会生成1.txt文件,内容为hello, node
}
})
let fs = require('fs') // node使用commonJs模块方式
fs.writeFile(__dirname + '/1.txt', 'hello, Thuesday', {flag: 'a'},  (err) => {
    if (err) {
        console.log('写入失败');
    } else {
        console.log('写入成功'); // 则在当前文件夹下会追加生成1.txt文件,内容为hello, nodehello, Thuesday(因为1.txt中原本内容为hello, node)
    }
})- createWriteStream(path[, options]) 异步流式文件写入
// path 为要写入的文件路径+文件名+文件后缀
// options 配置项(可选参数), 包括:
      // encoding: 字符串格式,默认是'utf8'
      // mode: 整数格式, 默认是0o666 = 0o222+0o444
           // 0o111: 文件可被执行的权限
           // 0o222: 文件可被写入的权限
           // 0o444: 文件可被读取的权限
      // flags: 标识(打开文件要执行的操作),默认是'w'
           // w(写入,即覆盖)
           // a(追加)
      // fd: 文件统一标识符,linux下文件标识符,默认是null
      // autoClose: 自动关闭文件,默认是true
      // emitClose: 默认是false
      // start: 开始写入的位置
let fs = require('fs') // node使用commonJs模块方式
let ws = fs.createWriteStream(__dirname + '/2.txt')
// 监视写入流打开或关闭状态
ws.on('open', () => {
console.log('写入流打开了');
})
ws.on('close', () => {
console.log('写入流关闭了');
})
ws.write('hello, new day') // 写入数据,成功后,在当前文件夹下会生成2.txt文件,内容为hello, new day
ws.write('ok, fine')
ws.close() // 在node8版本中,使用close关闭会导致数据丢失,一般使用end()关闭流读取文件
- readFile(path[, options], callback) 异步读取简单文件
// path 为要写入的文件路径+文件名+文件后缀
// options 配置项(可选参数), 包括:
      // encoding: 字符串格式,默认是'utf8'
      // mode: 整数格式, 默认是0o666 = 0o222+0o444
           // 0o111: 文件可被执行的权限
           // 0o222: 文件可被写入的权限
           // 0o444: 文件可被读取的权限
      // flag: 标识(打开文件要执行的操作),默认是'w'
           // w(写入,即覆盖)
           // a(追加)
// callback 回调函数,传入错误对象err和成功数据data
let fs = require('fs')
fs.readFile(__dirname + '/1.txt', (err, data) => {
if (err) {
console.log('读取失败',err);
} else {
console.log('读取成功', data); // 读取成功
}
}) fs读出来的data数据是Buffer格式(因为不一定全是字符串格式,也有可能是流媒体格式,存成Buffer后面好使用);
let fs = require('fs')
fs.readFile(__dirname + '/1.txt', (err, data) => {
    if (err) {
        console.log('读取失败',err);
    } else {
        console.log('读取成功', data); // 读取成功
        fs.writeFile(__dirname+'/3.txt', data, (err) => {
            if (err) {
               console.log('写入失败');
            } else {
               console.log('写入成功');
            }
        })
    }
}) - createReadStream(path[, options]) 流式文件读取
// path 为要写入的文件路径+文件名+文件后缀
// options 配置项(可选参数), 包括:
      // encoding: 字符串格式,默认是'utf8'
      // mode: 整数格式, 默认是0o666 = 0o222+0o444
           // 0o111: 文件可被执行的权限
           // 0o222: 文件可被写入的权限
           // 0o444: 文件可被读取的权限
      // flags: 标识(打开文件要执行的操作),默认是'w'
           // w(写入,即覆盖)
           // a(追加)
      // fd: 文件统一标识符,linux下文件标识符,默认是null
      // autoClose: 自动关闭文件,默认是true
      // emitClose: 默认是false
      // start: 开始读取的位置
      // end: 停止读取的位置
      // highWaterMark: 每次读取数据的大小,默认是64*1024
let fs = require('fs') // node使用commonJs模块方式
let rs = fs.createReadStream(__dirname + '/1.txt')
let ws = fs.createWriteStream(__dirname + '/4.txt')
rs.on('open', () => {
console.log('可读流打开了');
})
rs.on('close', () => {
console.log('可读流关闭了');
ws.end() // 关闭写入流,在可读流读完的时候,会自动关闭,此时关闭写入流最为合适
})
ws.on('open', () => {
console.log('写入流打开了');
})
ws.on('close', () => {
console.log('写入流关闭了');
})
rs.on('data', (data) => {
// 对data事件进行监控,可以看到每次读取的data是啥
console.log(data, '每次读取的data是啥');
ws.write(data) // 写入每次读取的数据
})
简单文件写入和简单文件读取,都是一次性将所有要读取或写入的内容加到内存中去,容易造成内存泄露~
http服务
node自带有http模块,可以直接引入使用即可;
分为三个步骤:
- 引入node内置的http模块
let http = require('http')- 创建服务对象
let server = http.createServer(function(request, response) {
  // 其中request是请求对象, response是响应对象
  response.setHeader('content-type', 'text/html;charset=utf8') // 可设置响应头
  response.end('返回的数据在这里传回')
})- 指定服务器运行的端口号并绑定监听
server.listen(端口号, function(err) {
    if(!err) console.log('服务器启动成功')
    else console.log(err)
})
Express
node作为一个JavaScript运行环境,提供了很多基础的功能和API,基于node.js也衍生出了很多框架,如Express是一个基于Node.js平台的极简、灵活的web应用开发框架,它提供一系列强大的特性,帮助快速创建各种web和移动设备应用,官网见Express - Node.js web application framework
Express 框架核心特性:
- 可设置中间件来响应HTTP请求;
- 定义了路由表用于执行不同的HTTP请求动作;
- 可通过向模板传递参数来动态渲染HTML页面
基本使用方式如下:
const express = require('express') // 引入express
const app = express() // 创建app服务对象

// 配置理由,发送请求
app.get('xxx路由', function(request, response) {
    response.send('这里是后台要返回的数据')
})
// 通过app.get发送get请求,通过app.post发送post请求
//  response.send中返回后台数据
// 指定服务器运行的端口号并监听
app.listen(端口号, function(err) {
    if(!err) console.log('服务器启动成功了')
    else console.log(err)
})
请求方法
express支持所有http请求方法,如get、post、delete、put以及all方法(用以支持restful API)等
app.METHOD(path, callback [, callback ...]) // 可传入多个回调示例:
app.all('/secret', (req, res, next) => {
  console.log('Accessing the secret section ...')
  next() // pass control to the next handler
})
在路径path中可以包含限定字符? (匹配前面字符零次或一次)、+(匹配前面字符一次或多次) *(任意字符) 以及括号();
app.get('/ab?cd', (req, res) => { // 匹配路径/acd与/abcd
  res.send('ab?cd')
})

app.get('/ab+cd', (req, res) => { // 匹配路径/abcd、/abbcd、/abbbcd等等
  res.send('ab+cd')
})

app.get('/ab*cd', (req, res) => { // 匹配路径/abcd /abxcd /ab1cd /ab1234cd等等
  res.send('ab*cd')
})

app.get('/ab(cd)?e', (req, res) => { // 匹配路径/abe与/abcde
  res.send('ab(cd)?e')
})
可支持多个回调函数调用,但在每个回调结束记得要指定next(),此方法类似于后面要讲的中间件方法~
app.get('/example/b', (req, res, next) => {
  console.log('the response will be sent by the next function ...')
  next()
}, (req, res) => {
  res.send('Hello from B!')
})
Request对象
Request对象是express中路由回调函数中的第一个参数,代表了用户发送给服务器的请求信息;
| 属性/方法 | 描述 |
| request.query | 可获取get请求查询字符串的参数,拿到的是一个对象, 如路由为/demo?name="team"&age="12",则request.query是{ name: "'team'", age: "'12'" } |
| request.params | 可以获取get请求参数路由的参数,拿到的是一个对象 如路由为/demo/team/28,则request.params是{ name: 'team', age: '28' } |
| request.body | 可以获取post请求体,拿到的是一个对象(不可以直接用,要借助中间件) |
| request.get(xxx) | 获取请求头中指定key对应的value, 如console.log(request.get('HOST')), 输出为localhost:3000 |
Response对象
| 属性/方法 | 描述 |
| response.send() | 给浏览器的响应 |
| response.end() | 结束响应进程 |
| response.download() | 给浏览器一个文件 |
| response.sendFile() | 给浏览器发送文件 |
| response.redirect() | 重定向到一个新的地址(url) |
| response.set(key, value) | 自定义响应头key-value |
| response.get() | 获取响应头指定key值 |
| response.status() | 设置响应状态码(一般不设置,由http自动设置) |
| response.json() | 返回json格式响应 |
| response.jsonp() | 返回jsonp处理的json格式响应 |
中间件
中间件本质上就是一个函数,包含三个参数:request, response, next,其作用是:
- 执行任何代码
- 修改请求和响应对象
- 终结请求-响应循环(让一次请求得到响应)
- 调用堆栈中的下一个中间件或路由
分为四种:
- 应用(全局)级中间件(用于过滤非法的请求,如防盗链)
第一种写法:app.use((request, response, next) => { }) ,使用这种方式的中间件,则每个请求都会经过此中间件进行过滤
// demo.js
const express = require('express')

const app = express()

// 利用中间件防止盗链
app.use((request, response, next) => {
  if (request.get('Referer')) {
    const testReferer = request.get('Referer')
    console.log(testReferer)
    if (testReferer !== '要校验的某网站') {
      next()
    } else {
      response.send('无权使用该网站的图片')
    }
  } else {
    // 若没有网站来源,也放行
    next()
  }
})
app.get('/', function(request, response) {
  response.redirect('https://www.baidu.com')
})
第二种写法: 使用函数定义,该种方法较为灵活,可灵活用在某个需要的地方
// demo.js
const express = require('express')

const app = express()

// 函数式中间件
function guard(request, response, next) {
  request.demo = 123 // 给request设置字段demo为123
  if (request.get('Referer')) {
    const testReferer = request.get('Referer')
    console.log(testReferer)
    if (testReferer !== '要校验的某网站') {
      next()
    } else {
      response.send('无权使用该网站的图片')
    }
  } else {
    next()
  }
}
app.get('/', guard, function(request, response) {
  console.log(request.demo, 'request.demo')  // 123
  response.redirect('https://www.baidu.com')
})- 第三方中间件(通过包管理工具下载的中间件,如body-parser)
如app.use(bodyParser.urlencoded({extended: true})),该中间件用于解析post请求中的请求body;
npm install cookie-parser // 安装第三方中间件

const express = require('express')
const app = express()
const cookieParser = require('cookie-parser')

// load the cookie-parsing middleware
app.use(cookieParser()) // 使用第三方- 内置中间件(express内置封装好的中间件)
如app.use(express.urlencoded({extended: true})),与body-parser中间件功能一样,用于解析post请求中的请求体参数
app.use(express.static('public')) ,用于暴露静态资源
- 路由器中间件Router
Router是一个完整的中间件和路由系统,也可以看做是一个小型的app对象;它的存在是为了更好的管理路由对象;
使用express.Router()可以创建模块化路由,然后作为中间件加载,如下示例:
// 子模块路由,SubRouter.js
const express = require('express')
const router = express.Router()

// middleware that is specific to this router
router.use((req, res, next) => {
  console.log('Time: ', Date.now())
  next()
})
// define the home page route
router.get('/', (req, res) => {
  res.send('Birds home page')
})
// define the about route
router.get('/about', (req, res) => {
  res.send('About birds')
})

module.exports = router
//app.js 在app.js引入子路由模块
const birds = require('./birds')
// ...
app.use('/birds', birds)备注:在express中,定义路由和中间件的时候,根据定义的顺序(代码的顺序),将定义的每一个中间件或路由,放在一个类似于数组的容器中,当请求过来的时候,依次从容器中取出中间件和路由进行匹配,若匹配成功,则交由该路由或中间件处理;
对于服务器来说,一次请求,只有一个请求对象,只有一个响应对象,其它任何的request和response都是对二者的引用;


