Python+Requests+PyTest+Excel+Allure接口自动化测试
Python+Requests+PyTest+Excel+Allure接口自动化测试实战
目录
前言
一、项目结构
三、测试数据&&类读写excel
四、打印日志类
五、测试用例编写
六、断言
七、生成报告
八、优缺点分析
九、持续集成
前言
采用数据驱动进行设计,根据数据进行测试。将用例写入excel文件,用代码读取文件中的数据,从而实现自动化测试。
一、项目结构
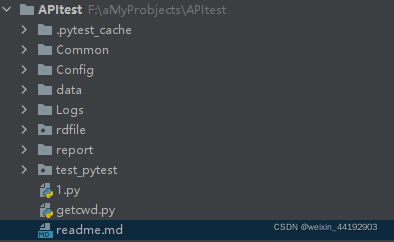
common:存放一些公共方法、封装
config:存放配置文件。
data:存放测试数据。
logs:存放日志。
rdfile:封装读取文件的类
report:存放报告。
test_pytest:存放用例。
readme:用于说明文档。
二、封装请求方法以及登录获取token
2.1、请求使用的是requests,其大抵有两种使用方式:
requests.request()
requests.get()
但其是等效的,因为在源代码中requests.get()是调用的requests.request()
此处我的源码为:
import requests
import json
class ApiRequest(object):
    #-----将method传到参数里面
    def send_requests(self,method,url,data=None,params=None,headers=None,cookies=None,json=None,files=None,timeout=None):
        self.r=requests.request(method,url,data=data,params=params,headers=headers,cookies=cookies,json=json,files=files,timeout=timeout)
        return self.r
2.2 获取token,处理数据依赖
通过请求:我的的登录接口:http://localhost:999/bi/api?action=login。
使用正则表达式匹配token,返回token,即可处理接口依赖
此处需要注意头部信息:
{'content-type': 'application/x-www-form-urlencoded'}def login(self):
'''
:return: 这一步是登录
'''
res = self.request.post(self.url, headers=self.headers, data=self.data)
token = re.search('(.*?) ', res.text, re.M | re.I)
print("token值等于", token.group(1))
token = token.group(1)
return token三、测试数据&&类读写excel
设计测试数据,以分享报告和checkNote为例:
只写了正向用例,异常用例亦可
此处需要注意:
{'content-type': 'application/xml'}
因为ip和端口不经常变更,写在conf.ini文件,excel只写path
现在有了测试数据,需要定义读取数据的类和方法。
关键代码如下:
class read_excel():

    def __init__(self, xls, sheet):
        '''
        @param xls: 传入excel的名字
        @param sheet: 传入sheet的名字,注意大小写
        '''
        self.excelpath = os.path.join(path, 'data/' + xls)
        # 打开excel
        self.book = xlrd.open_workbook(self.excelpath)
        # 获取excel
        self.sheet = self.book.sheet_by_name(sheet)

    # 以列表形式读取出所有数据
    def getExceldatas(self):
        data = []
        title = self.sheet.row_values(0)
        # 0获取第一行也就是表头
        print("表格总行数为", self.sheet.nrows)
        for row in range(0, self.sheet.nrows):  # 从第一行包括表头开始获取
            row_value = self.sheet.row_values(row)
            data.append(dict(zip(title, row_value)))  # 将读取出每一条用例作为一个字典存放进列表
        return data
四、打印日志类
一个完整的框架必须包含日志相关,篇幅过长 ,略
在测试用例中输出日志即可
log1.info("正在测试的接口编号是:%s,名称是%s" %(c_bh, name))
log1.error("当前接口运行有误,其编号是%s"%c_bh)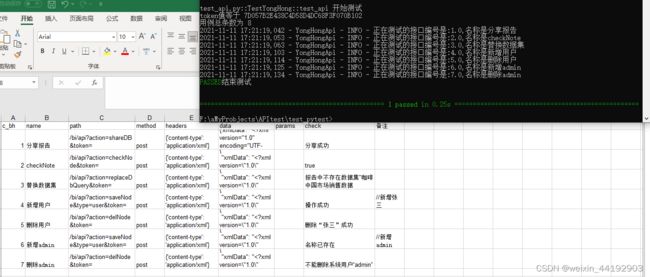
五、测试用例编写
从ini、excel读出内容,拼装url和token
对拼装好的接口,进行发送请求
ip = read_ini('url', 'ip')
port = read_ini('url', 'port')
datatable = read_excel('a.xls', 'Sheet1')
data = datatable.getExceldatas()
token = cookie().login()
url = 'http://' + ip + ':' + port + path + token
# 拼装最终url
log1.info("正在测试的接口编号是:%s,名称是%s" %(c_bh, name))
ApiRequest().send_requests(method=method, url=url, headers=eval(headers), data=eval(body))
# eval将str转为字典
六、断言
datatable = read_excel('a.xls', 'Sheet1')
data = datatable.getExceldatas()
checkpoint = data[i]['check']
assert checkpoint in res.text, '响应内容错误'
七、生成报告
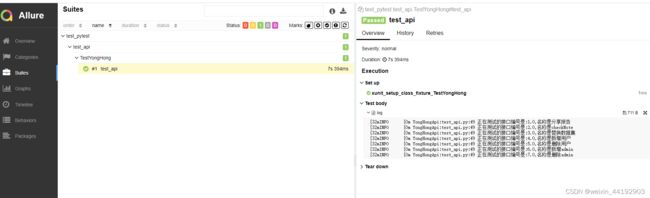
使用allure生成美观的测试报告
if __name__ == '__main__':
    pytest.main(['-s', '-v', '--clean-alluredir', '--alluredir', '../report/allure_result'])
    os.system(r'allure serve ../report/allure_result')
报告展示:
 八、优缺点分析
优点:数据与用例分离,管理接口方便、后续填充excel即可
缺点:
1、必须要严格按照模板进行填充数据,excel格式可能会影响读取
2、接口虽多,实际上只有一条测试用例,将数据参数化了
3、断言单一、未加邮件
九、持续集成
pass