【Android车载系列】第4章 Activity启动到渲染到SurfaceFlinger流程
1 Activity的创建
ActivityThread对于App进程来说,它是App的入口。此外ActivityThread还实现了创建主线程Looper、dump应用内存使用情况、获取应用包名等接口。我们看看ActivityThread对于四大组件的作用,一句话概括,ActivityThread管理着四大组件的生命周期方法的调用。
AMS服务进程发出信号触发App内的ActivityThread通过反射实例化Activity并启动Activity,然后调用activity的attach()方法。
private Activity performLaunchActivity(ActivityClientRecord r, Intent customIntent) {
    //...
   ContextImpl appContext = createBaseContextForActivity(r);
        Activity activity = null;
        try {
            java.lang.ClassLoader cl = appContext.getClassLoader();
            // 通过反射创建Activity
            activity = mInstrumentation.newActivity(
                    cl, component.getClassName(), r.intent);
            StrictMode.incrementExpectedActivityCount(activity.getClass());
            r.intent.setExtrasClassLoader(cl);
            r.intent.prepareToEnterProcess();
            if (r.state != null) {
                r.state.setClassLoader(cl);
            }
        } catch (Exception e) {
            if (!mInstrumentation.onException(activity, e)) {
                throw new RuntimeException(
                    "Unable to instantiate activity " + component
                    + ": " + e.toString(), e);
            }
        }


    //调用activity的attach方法
   activity.attach(appContext, this, getInstrumentation(), r.token,
                        r.ident, app, r.intent, r.activityInfo, title, r.parent,
                        r.embeddedID, r.lastNonConfigurationInstances, config,
                        r.referrer, r.voiceInteractor, window, r.configCallback,
                        r.assistToken);

    //...
}
然后开始了Activity的生命周期。执行onCreate()-onStart()-onResume(),onResume()执行时页面还不可见,onResume()完全执行完之后的第一个VSYNC信号后页面才可见。onResume()将DecorView添加到WindowManagerGlobal中。
 @Override
    public void handleResumeActivity(IBinder token, boolean finalStateRequest, boolean isForward,
            String reason) {
        // ...
        // The window is now visible if it has been added, we are not
        // simply finishing, and we are not starting another activity.
        if (r.window == null && !a.mFinished && willBeVisible) {
            // 获取到PhoneWindow和DecorView
            r.window = r.activity.getWindow();
            View decor = r.window.getDecorView();
            decor.setVisibility(View.INVISIBLE);
            ViewManager wm = a.getWindowManager();
            WindowManager.LayoutParams l = r.window.getAttributes();
            a.mDecor = decor;
            l.type = WindowManager.LayoutParams.TYPE_BASE_APPLICATION;
            l.softInputMode |= forwardBit;
            if (r.mPreserveWindow) {
                a.mWindowAdded = true;
                r.mPreserveWindow = false;
                // Normally the ViewRoot sets up callbacks with the Activity
                // in addView->ViewRootImpl#setView. If we are instead reusing
                // the decor view we have to notify the view root that the
                // callbacks may have changed.
                ViewRootImpl impl = decor.getViewRootImpl();
                if (impl != null) {
                    impl.notifyChildRebuilt();
                }
            }
            if (a.mVisibleFromClient) {
                if (!a.mWindowAdded) {
                    a.mWindowAdded = true;
                    // wm是WindowManagerImpl,
                    // 将DecorView add到App的单例WindowManagerGlobal中
                    wm.addView(decor, l);
                } else {
                    // The activity will get a callback for this {@link LayoutParams} change
                    // earlier. However, at that time the decor will not be set (this is set
                    // in this method), so no action will be taken. This call ensures the
                    // callback occurs with the decor set.
                    a.onWindowAttributesChanged(l);
                }
            }

            // If the window has already been added, but during resume
            // we started another activity, then don't yet make the
            // window visible.
        } else if (!willBeVisible) {
            if (localLOGV) Slog.v(TAG, "Launch " + r + " mStartedActivity set");
            r.hideForNow = true;
        }
    }
2 Activity的渲染
Activity的attach()方法内会初始化一个PhoneWindow对象(一个Activity对应一个PhoneWindow对象)。
Android系统AMS服务通过Binder与ActivityThread进行通讯,ActivityThread将App内所有Activity的页面进行管理。每个Activity中有一个对应的PhoneWindow,每个PhoneWindow有对应的DecorView,DecorView是布局内layout的容器

3 WindowManagerGlobal
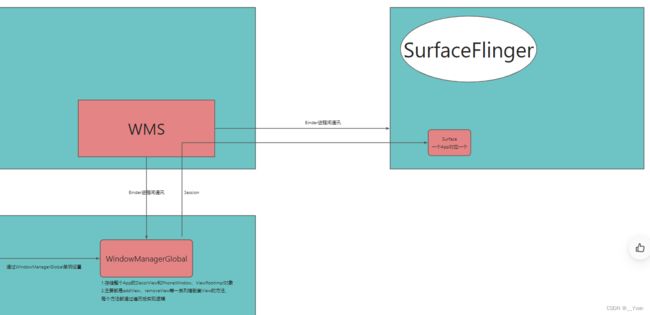
每个App都只有一个WindowManagerGlobal对象,App层的单例对象。ActivityThread通过WindowManagerImpl与WindowManagerGlobal实现通讯,WindowManagerGlobal用于缓存所有页面的PhoneWindow、DecorView、ViewRootImpl等界面相关的数据。
WindowManagerGlobal内部有addView()、removeView()等增删查的所有方法都是通过遍历的形式进行逻辑处理,对外提供服务。
主要给WMS提供管理所有View的便利。由于与WMS是SystemServer进程中,和App属于不同进程,所有使用的是Binder进程间通讯。
4 WindowManagerService
WindowManagerService窗口管理服务简称WMS,一台设备只有一个WMS。WMS管理所有App的全部PhoneWindow。
WindowManagerGlobal利用Session跨进程通过WMS与SurfaceFlinger通讯。根据每个不同的应用一一对应创建一个Surface,用于该应用的渲染。

5 建立Surface和SurfaceFlinger连接
SurfaceFlinger服务主要实现了两个Binder service用于App连接:
1) SurfaceFlinger
派生自BnSurfaceComposer,是SurfaceFlinger程序的主服务,在程序启动时就被构造并添加到servicemanager,相关代码在main_surfaceflinger.cpp,服务名为”SurfaceFlinger”
2) Client
派生自BnSurfaceComposerClient,在SurfaceFlinger:: createConnection的时候被创建,对应一个App Client连接
然后App启动后,需要通过如下操作和SurfaceFlinger建立会话:
1)通过servicemanager获取服务SurfaceFlinger的BpBinder,然后转换成BpSurfaceComposer
2)调用BpsurfaceComposer.createConnection建立连接,然后将返回的BpBinder转换成BpSurfaceComposeClient
Android接着提供了两个类用于简化App端的操作,主要包括:
1)ComposerService
单列类,主要封装跟SurfaceFlinger的连接,在构造时调用connectlocaked成员函数连接
“SurfaceFlinger”然后将BpSurfaceCompose保存到成员变量mComposerService
2)SurfaceComposerClient
封装跟SurfaceFlinger建立会话连接的操作,在onFirstRef时调用createConnection建立
会话并将BpSurfaceComposerClient保存到成员变量mClient
3)Composer
单列类,主要封装对Layer数据配置相关操作
接下去基于代码来分析,封装好后,App初始化连接很简单
sp session= new SurfaceComposerClient();
就一行代码,接着看构造函数
SurfaceComposerClient::SurfaceComposerClient()
    : mStatus(NO_INIT), mComposer(Composer::getInstance()){
}
获取Composer单例对象并保存到mComposer,由于SurfaceComposerClient派生自RefBase
class SurfaceComposerClient : public RefBase
所以在其构造时,会调用incStrong第一次增加强引用计数,同时onFirstRef会被调用
void SurfaceComposerClient::onFirstRef() {
    sp sm(ComposerService::getComposerService());
    if (sm != 0) {
        sp conn = sm->createConnection();
        if (conn != 0) {
            mClient = conn;
            mStatus = NO_ERROR;
        }
    }
}
这个函数完成了连接的最终操作,先是通过ComposerService::getComposerService()生成
ComposeService单列,并调用其connectLocked连接SurfaceFlinger返回BpSurfaceComposer,接着调用sm->createConnection()创建会话并保存到mClient。接下来看看SurfaceFlinger.createConnection的代码
sp SurfaceFlinger::createConnection()
{
    sp bclient;
    sp client(new Client(this));
    status_t err = client->initCheck();
    if (err == NO_ERROR) {
        bclient = client;
    }
    return bclient;
}
很简单,就是创建Client本地对象并返回
到这里,App跟SurfaceFlinger的初始化连接已经结束,接下去就是基于会话对象,创建绘图表面了
