SpringCloud入门(四)
前言:本课程是在慕课网上学习Spring Cloud微服务实战 第7章 消息和异步 时所做的笔记,供本人复习之用.
代码地址https://github.com/springcloud-demo
目录
第一章 异步的常见形态
第二章 MQ的应用场景
第三章 rabbitMQ的基本使用
3.1 rabbitMQ的安装
3.2 创建队列发送消息
3.3 exchange和Queue绑定
3.4 Spring Cloud Stream
3.4.1 Stream的基本使用
3.4.2 查看传递的信息
3.4.3 消息回复
第五章 在商品于订单服务中使用MQ
5.1 消息的发送与接收
5.2 将商品服务结果存储到redis中
5.3 优化商品消息请求
第六章 异步扣库存分析
6.1 订单入库变成异步
6.2 扣库存与订单入库都变成异步
第一章 异步的常见形态
前面我们讲的是同步的操作,这里我们说异步操作.
异步就是客户端请求不会阻塞进程,服务端的响应可以是非即时的.
常见形态有:
通知:这是一个单向请求,你对它放电,它却对你绝缘
请求/异步响应:客户端发送请求到服务端,服务端异步响应请求,客户端不会阻塞,而且被设计成默认响应不会立刻送达.
以上两种是比较常见的一对一的交互模式.
消息:利用消息可以实现一对多形态的交互,比如发布订阅模式下,客户端发送消息通知,被零个或者多个感兴趣的服务消费,再比如客户端发送请求消息然后等待服务发回的响应.
第二章 MQ的应用场景
异步处理: 比如用户注册后需要发短信和加积分,用户信息写入数据库后,通过异步消息让短信和积分服务去做它们的事,这样就能提升用户体验.
流量削峰: 这个最常见的就是秒杀场景,因为流量过大,可能会导致应用挂掉,为解决这个问题,一般会在应用前端加入消息队列,从而控制活动的人数,假如消息队列长度超过最大数量,应该直接抛弃用户请求或者跳转到错误的页面,秒杀业务根据消息队列中的请求信息,再做其它的处理.
日志处理:通过日志采集定时写入kafka队列,然后kafka消息队列对日志进行接收储存和转发.
应用解耦:比如用户下单后需要通知商品系统,我们前面做的是订单服务调用商品服务的接口.这样订单服务和商品服务是耦合的,考虑使用MQ,订单入库后,将消息写入消息队列,返回用户下单成功.商品服务来订阅下单的消息.采用拉或者推的方式来获得下单信息,商品系统根据下单信息进行商品库存相关的操作.如果商品服务不能正常使用也没有关系,这也不会影响正常下单,因为下单信息写入消息队列后就不再关心后续的操作了.这样就实现了订单服务与商品服务的应用解耦.
第三章 rabbitMQ的基本使用
3.1 rabbitMQ的安装
在windows中安装rabbitMQ,我这里是用docker 安装的.

安装rabbitMQ并启动,通过192.168.99.100:15672可以访问管理界面

账号密码都是guest,输入可登陆

3.2 创建队列发送消息
这个应用的服务是之前用到的订单服务.
引入依赖:
      org.springframework.boot
      spring-boot-starter-amqp
在application.properties中写MQ配置
spring.rabbitmq.host=192.168.99.100
spring.rabbitmq.port=5672
spring.rabbitmq.username=guest
spring.rabbitmq.password=guest
接收myQueue队列中的消息:
@Slf4j
@Component
public class MqReceiver {
    @RabbitListener(queues = "myQueue")
        public void process(String message){
        log.info("MqReceiver:{}",message);
    }

}
发送方:
我们可以把发送方写到test中
@RunWith(SpringRunner.class)
@SpringBootTest
public class MqSenderTest extends OrderApplicationTests {
    @Autowired
    private AmqpTemplate amqpTemplate;

    @Test
    public void send(){
        amqpTemplate.convertAndSend("myQueue","now"+new Date());
    }
}
直接运行test中的代码会报错,会显示没有myQueue队列,可以进入管理界面手动创建队列,也可以换一个能自动创建队列的注解.
这里把能自动创建队列的注解代码列下.
@Slf4j
@Component
public class MqReceiver {
    @RabbitListener(queuesToDeclare = @Queue("myQueue"))
        public void process(String message){
        log.info("MqReceiver:{}",message);
    }

}
再运行test就可以接收到消息了.
3.3 exchange和Queue绑定

这里创建Exchange myOrder,绑定两个队列fruitOrder与computerOrder.通过key fruit与computer.进行映射.
@RabbitListener(bindings = @QueueBinding(
            exchange = @Exchange("myOrder"),
            key = "fruit",
            value=@Queue("fruitOrder")
    ))
    public void process(String message){
        log.info("fruit MqReceiver:{}",message);
    }

    @RabbitListener(bindings = @QueueBinding(
            exchange = @Exchange("myOrder"),
            key = "computer",
            value=@Queue("computerOrder")
    ))
    public void processComputer(String message){
        log.info("computer MqReceiver :{}",message);
    }
运行项目,打开控制界面看生成的结果.

发送电脑相关的消息:
@Test
    public void sendOrder(){
        amqpTemplate.convertAndSend("myOrder","computer","now 1"+new Date());
    }
接收的消息:
2019-06-27 11:24:44.613 INFO 14316 --- [tContainer#1-12] com.imooc.order.message.MqReceiver : computer MqReceiver :now 1Thu Jun 27 11:24:44 CST 20193.4 Spring Cloud Stream
Spring Cloud Stream(简称Stream)是一个为微服务应用构建消息驱动的框架,应用程序通过input或者output来与Stream中binder交互,而Stream中的Binder则与中间件交互,Binder是一个抽象概念,是应用于消息中间件间的粘合剂,是用Stream最大的方便之处莫过于对消息中间件的进一步封装,可以做到代码层面对消息中间件无感知,甚至于动态的切换中间件.切换topic.目前只支持rabbitMQ和kafka.
3.4.1 Stream的基本使用
引入依赖
     org.springframework.cloud
     spring-cloud-starter-stream-rabbit
新建接口:
public interface StreamClient {
    String INPUT = "myMessageIn";
    String OUTPUT = "myMessageOut";
    @Input(StreamClient.INPUT)
    SubscribableChannel input();

    @Output(StreamClient.OUTPUT)
    MessageChannel output();
}
接收端:
@Slf4j
@Component
@EnableBinding(StreamClient.class)
public class StreamReceiver {
    @StreamListener(StreamClient.OUTPUT)
    public void process(Object message){
        log.info("StreamReceiver:{}",message);
    }
}
发送端:
@RestController
public class SendMessageController {
    @Autowired
    private StreamClient streamClient;
    @GetMapping("/sendMessage")
    public void process(){
        OrderDTO orderDTO = new OrderDTO();
        orderDTO.setOrderId("123456");
        streamClient.output().send(MessageBuilder.withPayload(orderDTO).build());
    }
}
运行项目,可以在queue中看到stream为你创建的queue.

接收到的消息为:
StreamReceiver:{"orderId":"123456","buyerName":null,"buyerPhone":null,"buyerAddress":null,"buyerOpenid":null,"orderAmount":null,"orderStatus":null,"payStatus":null,"createTime":null,"updateTime":null,"orderDetailList":null}3.4.2 查看传递的信息
可以在rabbitMQ控制台的queue下面查看消息队列中的信息.
我们正常查看的消息是采用base64编码过的.即下图的payload.

如果能看到是json化的字符串,我们会比较方便.我们虽然可以在进行传递时候将传递的对象转成json,再在接收端反序列化成对象.但是比较麻烦.可以在配置里进行配置.
spring.cloud.stream.bindings.myMessageIn.content-type = application/json然后就可以看到对象的json串

3.4.3 消息回复
加上一个注解@sendTo即可实现回复功能,return 后面就是我们要回复的消息.
这里模拟process收到消息,利用return进行回复,回复给INPUT2,process2监听到INPUT2的消息(即回复的消息).
@Slf4j
@Component
@EnableBinding(StreamClient.class)
public class StreamReceiver {

    @StreamListener(StreamClient.OUTPUT)
    @SendTo(StreamClient.INPUT2)
    public String process(OrderDTO message){
        log.info("StreamReceiver:{}",message);
        return "已经收到";
    }

    @StreamListener(StreamClient.INPUT2)
    public void process2(String message){
        log.info("StreamReceiver:{}",message);
    }
}
可以看到消息日志,上面是第一次接收到的,下面是回复的.
2019-06-27 12:42:45.148  INFO 11200 --- [nio-8081-exec-6] com.imooc.order.message.StreamReceiver   : StreamReceiver:OrderDTO(orderId=123456, buyerName=null, buyerPhone=null, buyerAddress=null, buyerOpenid=null, orderAmount=null, orderStatus=null, payStatus=null, createTime=null, updateTime=null, orderDetailList=null)
2019-06-27 12:42:45.149  INFO 11200 --- [nio-8081-exec-6] com.imooc.order.message.StreamReceiver   : StreamReceiver:已经收到
第五章 在商品于订单服务中使用MQ
要实现商品库存变化时通知订单服务,订单服务更改redis里的库存.

5.1 消息的发送与接收
在商品服务中发送消息.
@Override
    @Transactional
    public void decreaseStock(List decreaseStockInputList) {
        for(DecreaseStockInput decreaseStockInput:decreaseStockInputList){
            //从数据库中找到对应商品
            Optional productInfoOptional = productInfoRepository.findById(decreaseStockInput.getProductId());
            //数据校验
               ......
            //更改商品库存
            productInfo.setProductStock(result);
            productInfoRepository.save(productInfo);
            log.info("商品减少服务结束");
            try {
                //封装对象,并且向订单服务发送商品数量变化的消息
                ProductInfoOutput productInfoOutput = new ProductInfoOutput();
                BeanUtils.copyProperties(productInfo,productInfoOutput);
                log.info(objectMapper.writeValueAsString(productInfoOutput));
                //将对象转成json并进程发送
                amqpTemplate.convertAndSend("productInfo", objectMapper.writeValueAsString(productInfoOutput));


            } catch (JsonProcessingException e) {
                e.printStackTrace();
            }
        }

    }
在订单服务中接收消息.
@Slf4j
@Component
public class ProductInfoReceiver {
    @RabbitListener(queuesToDeclare = @Queue("productInfo"))
    public void process(String message){
        log.info(message);
        //将json字符串转成对象
        ProductInfoOutput productInfoOutput = (ProductInfoOutput)JsonUtil.fromJson(message, ProductInfoOutput.class);
        log.info("从队列[{}]接收到消息{}","productInfo",productInfoOutput);
    }
}
运行eureka注册中心与两个服务(订单,商品),发送库存减少消息json消息
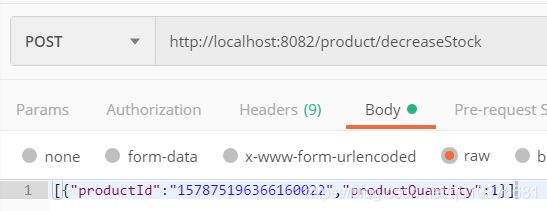
order中接收到的结果为
2019-06-27 18:37:27.279  INFO 11200 --- [ntContainer#2-1] c.i.order.message.ProductInfoReceiver    : {"productId":"157875196366160022","productName":"皮蛋粥","productPrice":0.01,"productStock":21,"productDescription":"好吃的皮蛋粥","productIcon":"//fuss10.elemecdn.com/0/49/65d10ef215d3c770ebb2b5ea962a7jpeg.jpeg","productStatus":0,"categoryType":1}
2019-06-27 18:37:27.289  INFO 11200 --- [ntContainer#2-1] c.i.order.message.ProductInfoReceiver    : 从队列[productInfo]接收到消息ProductInfoOutput(productId=157875196366160022, productName=皮蛋粥, productPrice=0.01, productStock=21, productDescription=好吃的皮蛋粥, productIcon=//fuss10.elemecdn.com/0/49/65d10ef215d3c770ebb2b5ea962a7jpeg.jpeg, productStatus=0, categoryType=1)
5.2 将商品服务结果存储到redis中
引入依赖
      org.springframework.boot
      spring-boot-starter-data-redis
进行配置
spring.redis.host=localhost
spring.redis.port=6379
代码书写,将库存结果以product_stock_id为key存储到数据库中.
@Slf4j
@Component
public class ProductInfoReceiver {

    private static final String PRODUCT_STOCK_TEMPLATE="product_stock_%s";
    @Autowired
    private StringRedisTemplate stringRedisTemplate;
    @RabbitListener(queuesToDeclare = @Queue("productInfo"))
    public void process(String message){
        log.info(message);
        ProductInfoOutput productInfoOutput = (ProductInfoOutput)JsonUtil.fromJson(message, ProductInfoOutput.class);
        log.info("从队列[{}]接收到消息{}","productInfo",productInfoOutput);
    //存储到redis中的代码
        stringRedisTemplate.opsForValue().set(String.format(PRODUCT_STOCK_TEMPLATE,productInfoOutput.getProductId()),
                String.valueOf(productInfoOutput.getProductStock()));
    }
}
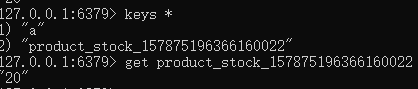
运行上面的减少库存请求,打开redis库,查看结果
5.3 优化商品消息请求
可以看到上面的代码中我们的商品发送库存变更请求的时候是循环发送的.即对于一系列商品的变更请求,我循环每个商品,每个商品扣完库存后就发送消息.这样带来一个问题,即如果循环到某个商品扣库存失败,要回滚时将很难实现,因为前面的商品对应的库存消息已经发完了.
@Override
    @Transactional
    public void decreaseStock(List decreaseStockInputList) {
        for(DecreaseStockInput decreaseStockInput:decreaseStockInputList){
            //减少库存代码...
            //发送库存变更代码...
        }
    }
我们应该先减少库存,确认无误后再发送库存变更.即
@Override
    @Transactional
    public void decreaseStock(List decreaseStockInputList) {
        for(DecreaseStockInput decreaseStockInput:decreaseStockInputList){
            //减少库存代码...
        }
       //发送库存变更代码...
    }
我们最终这样实现,将减少库存代码提取到decreaseStockProcess方法中.然后decreaseStock调用它,调用无误后,再发送库存减少的消息,因为我们是库存减少已做完,所以我们发送List过去.
商品服务代码:
@Override
    public void decreaseStock(List decreaseStockInputList) {
        List productInfoList = decreaseStockProcess(decreaseStockInputList);
        List productInfoOutputList = productInfoList.stream().map(e -> {
            ProductInfoOutput productInfoOutput = new ProductInfoOutput();
            BeanUtils.copyProperties(e, productInfoOutput);
            return productInfoOutput;
        }).collect(Collectors.toList());
        try {
            amqpTemplate.convertAndSend("productInfo", objectMapper.writeValueAsString(productInfoOutputList));
        } catch (JsonProcessingException e) {
            e.printStackTrace();
        }

    }

    @Transactional
    public List decreaseStockProcess(List decreaseStockInputList) {
        List productInfoList = new ArrayList<>();
        for(DecreaseStockInput decreaseStockInput:decreaseStockInputList){
            Optional productInfoOptional = productInfoRepository.findById(decreaseStockInput.getProductId());
            //判断商品是否存在
            if(!productInfoOptional.isPresent()){
                throw new ProductException(ResultEnum.PRODUCT_NOT_EXIST);
            }
            ProductInfo productInfo = productInfoOptional.get();
            Integer result = productInfo.getProductStock() - decreaseStockInput.getProductQuantity();
            if(result<0){
                throw new ProductException(ResultEnum.PRODUCT_STOCK_ERROR);
            }
            productInfo.setProductStock(result);
            productInfoRepository.save(productInfo);
            log.info("商品减少服务结束");
            productInfoList.add(productInfo);
        }
        return productInfoList;
    }
订单服务代码:
因为我们上面是传入了List,所以我们在订单中也要用List接收.
@Slf4j
@Component
public class ProductInfoReceiver {
private static final String PRODUCT_STOCK_TEMPLATE="product_stock_%s";
@Autowired
private StringRedisTemplate stringRedisTemplate;
@RabbitListener(queuesToDeclare = @Queue("productInfo"))
public void process(String message){
log.info(message);
List productInfoOutputList = (List)JsonUtil.fromJson(message,
new TypeReference>(){} );
//存储到redis中还是存单个,这里要遍历一下
productInfoOutputList.forEach(e->{
stringRedisTemplate.opsForValue().set(String.format(PRODUCT_STOCK_TEMPLATE,e.getProductId()),
String.valueOf(e.getProductStock()));
});
}
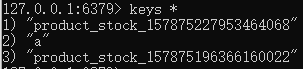
} 发送请求:

回应的结果:
数据库中多出了一个key,证明减少成功了.
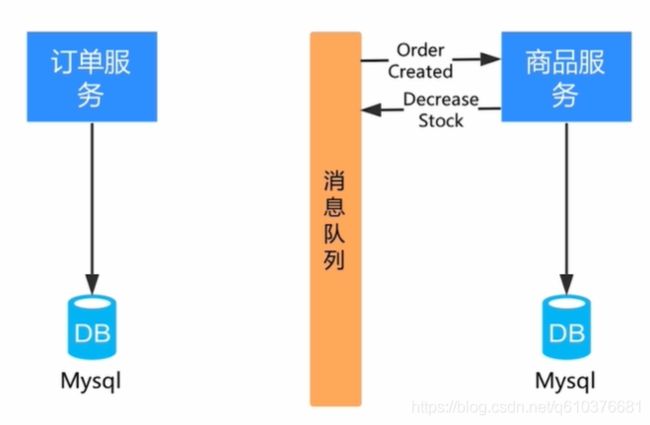
第六章 异步扣库存分析
以下面的通路进一步看看更多需要考虑的点.
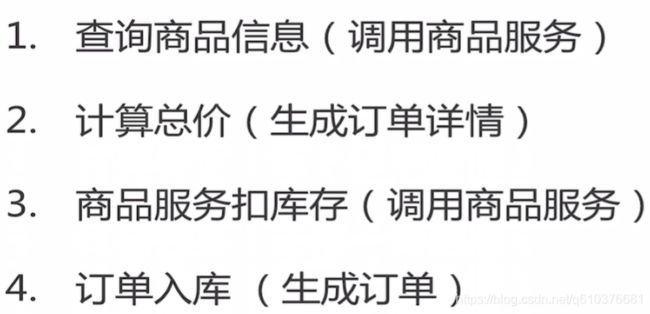
注意不同的服务不要去读不同服务的库.
6.1 订单入库变成异步
我们可以将第4步改成异步的,123还保持原来的逻辑,理论上并发能够提高,因为2,4都是操作数据库的,第四步变成不等待了,123步成功后就立刻回复了用户,之后通过消息让订单服务异步下单.如果第四步异步下单失败了,那就重试.不处理成功MQ的消息就一直存在.
6.2 扣库存与订单入库都变成异步
如果3,4步都变成异步,那就会量变引起质变,让问题马上变得复杂起来,库存扣减与订单入库分别属于商品与订单服务,很可能这两个操作是在两个机器上,如果订单服务创建成功,而商品扣减库存失败,要如何回滚订单呢?
[注1]订单创建完成后,订单的状态是在排队中,然后发送一个Order Created事件到MQ上,意思就是订单服务向外界宣布一个消息,说我创建订单了,由MQ转发给订阅该消息的服务,如果商品服务收到创建订单消息后执行扣库存操作,这里扣库存因为某些原因可能扣失败,不管成功或失败商品服务都会发送一个扣库存的消息给队列.消息里的内容是扣库存的结果,订单服务来订阅扣库存的结果.接收到该消息后,如果扣库存成功,将订单的状态改为已确认(下单成功),如果失败则把订单置为已取消.
要成功实现此思路,需要一定的依赖.
可靠的消息投递.
接受用户体验的变化:在这种情况下,用户不能马上知道下单的成功与否的结果,好比到12306上买票的时候,得到的很可能是一个排队中,所以改成异步扣库存需要前台更改一定的逻辑.
真实的业务中是保持原有业务不变,还是只是第4步改成异步,还是3,4都改成异步,要根据实际的业务场景来.
大概实现思路:

第四步就是上面注1中说过的那样.