windows下的WSL开发环境配置以及相关工具、插件
最近在自己的X1上捣鼓Django框架的编程,windows环境使用起来确实让人痛苦,因此决定还是在Linux系统下进行Django框架的编程,跟朋友交流了一下,最终敲定了以下方案并把中间使用的一些插件记录下来。
思路:WSL环境 + vscodeIDE + windows terminal
部分插件:zsh(很好用的shell工具)、Remote-WSL(vscode的远程插件,默认识别本机的WSL)
1. WSL安装
推荐使用WSL2。
WSL2和WSL1的比较
截取比较关键的文字: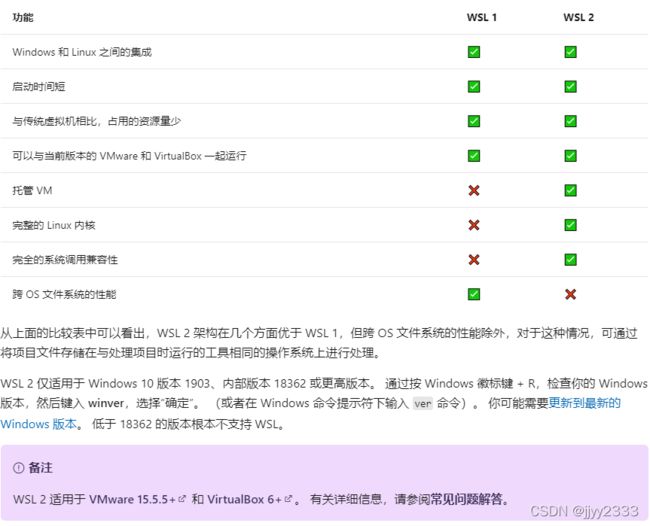
WSL 1 和 WSL 2 之间的主要区别在于,在托管 VM 内使用实际的 Linux 内核、支持完整的系统调用兼容性以及跨 Linux 和 Windows 操作系统的性能,也因此WSL2可以跑容器。
原文连接:https://docs.microsoft.com/zh-cn/windows/wsl/compare-versions
1.0. 安装linux内核,设置WSL默认版本为2
首先在官网下载安装WSL2需要使用的linux内核:https://docs.microsoft.com/zh-cn/windows/wsl/install-manual#step-4—download-the-linux-kernel-update-package
1.1. 使用管理员身份打开powershell,设置WSL默认版本为WSL2
使用管理员身份打开powershell,在powershell窗口键入:
start-process PowerShell -verb runas
然后输入:
wsl --set-default-version 2
1.2. 打开windows商店,安装wsl
这里提供一些链接,单击以下链接会打开每个分发版的 Microsoft Store 页面:
Ubuntu 18.04 LTS:https://www.microsoft.com/store/apps/9N9TNGVNDL3Q
Ubuntu 20.04 LTS:https://www.microsoft.com/store/apps/9n6svws3rx71
openSUSE Leap 15.1:https://www.microsoft.com/store/apps/9NJFZK00FGKV
SUSE Linux Enterprise Server 12 SP5:https://www.microsoft.com/store/apps/9MZ3D1TRP8T1
SUSE Linux Enterprise Server 15 SP1:https://www.microsoft.com/store/apps/9PN498VPMF3Z
Kali Linux:https://www.microsoft.com/store/apps/9PKR34TNCV07
Debian GNU/Linux:https://www.microsoft.com/store/apps/9MSVKQC78PK6
Fedora Remix for WSL:https://www.microsoft.com/store/apps/9n6gdm4k2hnc
Pengwin:https://www.microsoft.com/store/apps/9NV1GV1PXZ6P
Pengwin Enterprise:https://www.microsoft.com/store/apps/9N8LP0X93VCP
Alpine WSL:https://www.microsoft.com/store/apps/9p804crf0395
Raft(免费试用版):https://www.microsoft.com/store/apps/9msmjqd017x7
首次启动新安装的 Linux 分发版时,将打开一个控制台窗口,系统会要求你等待一分钟或两分钟,以便文件解压缩并存储到电脑上。 未来的所有启动时间应不到一秒。
然后设置用户和密码。
安装完成后,可在powershell窗口使用查看WSL版本命令 wsl -l -v 查看安装的版本,为2代表安装正确。
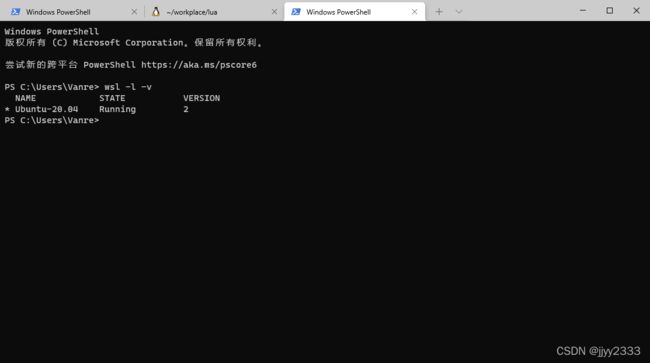
PS:过程中如果出现报错可通过错误码搜索解决办法。
1.3. 设置WSL默认启动路径为用户目录~
//wsl$/Ubuntu-20.04/home/vanre
两种修改方式:
- 在windows terminal的设置中修改
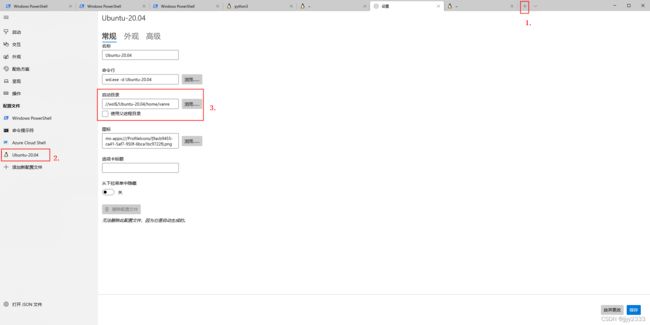
- 在settings.json中修改
搜索关键字:startingDirectory,
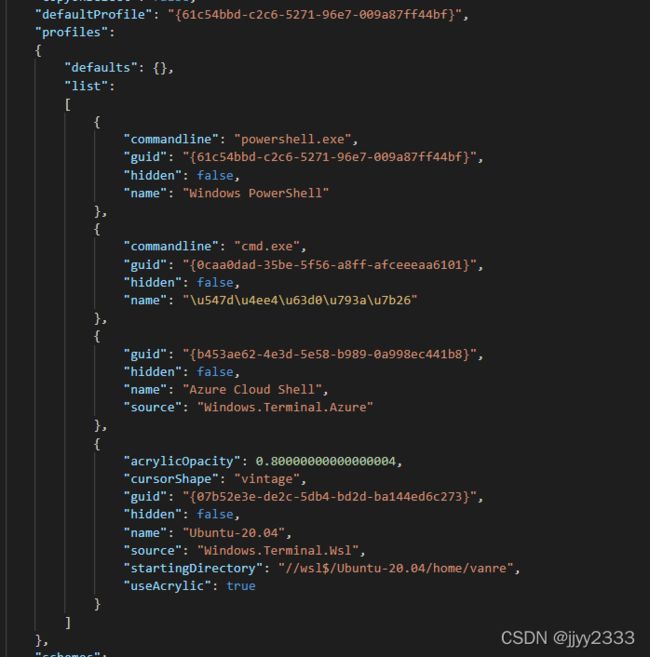
其中20.04修改为你安装的ubuntu的版本号,例如18.04。
之后每次打开就默认是在~目录下。

PS:WSL还可以通过安装nautilus使用GUI操作,但是windows家庭版不能安装nautilus,所以有兴趣的同学们可以自己尝试下。
安装步骤参考链接:https://docs.microsoft.com/zh-cn/windows/wsl/install
网络连接报错问题:
使用apt-get install命令时遇到报错:Err:1 http://archive.ubuntu.com/ubuntu focal/main amd64 python3-appdirs all 1.4.3-2.1 Temporary failure resolving ‘archive.ubuntu.com’

"nameserver 8.8.8.8" | sudo tee /etc/resolv.conf > /dev/null
sudo apt-get update
2. oh-my-zsh的安装
oh-my-zsh是一款极其好用的shell命令工具,集成了多种主题、命令记忆提示(划重点)、定制快捷输入、自动提示git分支信息等。
安装oh-my-zsh之前,需先安装zsh:
// Linux
sudo yum install zsh    (Fedora和RedHat以及SUSE中)或
sudo apt-get install zsh    (Debian系列,Ubuntu )
sudo apt install zsh    (Debian系列,Ubuntu )

// macOS 系统自带了zsh, 一般不是最新版,如果需要最新版可通过Homebrew来安装(确认安装了Homebrew)
brew install zsh zsh-completions

// 或者也可以使用MacPorts(包管理工具)
sudo port install zsh zsh-completions
在安装zsh的时候,github一直连接不上去,检查发现跟dns的host信息污染有关,所以在WSL上加上了github的一些主机信息
打开 /etc/hosts/,在末尾添加:
#*********************github 2021-11-20 update********************
#******* get latest hosts: http://blog.yoqi.me/lyq/16489.html
151.101.65.194 github.global.ssl.fastly.net
2606:50c0:8001::153 assets-cdn.github.com
185.199.109.153 documentcloud.github.com
192.30.255.112 gist.github.com
185.199.110.133 gist.githubusercontent.com
185.199.111.154 github.githubassets.com
185.199.109.154 help.github.com
192.30.255.121 nodeload.github.com
185.199.110.133 raw.github.com
140.82.113.17 status.github.com
2606:50c0:8002::153 training.github.com
185.199.108.133 avatars.githubusercontent.com
185.199.109.133 avatars0.githubusercontent.com
185.199.108.133 avatars1.githubusercontent.com
185.199.110.133 avatars2.githubusercontent.com
185.199.108.133 avatars3.githubusercontent.com
185.199.110.133 avatars4.githubusercontent.com
185.199.108.133 avatars5.githubusercontent.com
185.199.110.133 avatars6.githubusercontent.com
185.199.111.133 avatars7.githubusercontent.com
185.199.108.133 avatars8.githubusercontent.com
185.199.111.133 favicons.githubusercontent.com
192.30.255.120 codeload.github.com
52.216.226.160 github-cloud.s3.amazonaws.com
52.217.72.92 github-com.s3.amazonaws.com
52.216.130.3 github-production-release-asset-2e65be.s3.amazonaws.com
52.216.242.172 github-production-user-asset-6210df.s3.amazonaws.com
54.231.133.41 github-production-repository-file-5c1aeb.s3.amazonaws.com
185.199.110.153 githubstatus.com
64.71.144.202 github.community
185.199.109.133 media.githubusercontent.com
185.199.111.133 camo.githubusercontent.com
185.199.111.133 raw.githubusercontent.com
185.199.111.133 cloud.githubusercontent.com
185.199.110.133 user-images.githubusercontent.com
2606:50c0:8001::153 customer-stories-feed.github.com
2606:50c0:8002::153 pages.github.com
192.30.255.116 api.github.com
140.82.113.26 live.github.com
140.82.114.29 githubapp.com
52.151.41.89 github.dev
192.30.255.112 github.com
然后执行命令
sh -c "$(curl -fsSL https://raw.githubusercontent.com/robbyrussell/oh-my-zsh/master/tools/install.sh)"
![]()
还有一个自定义同义词的alias命令。
3. 在VScode下安装远程连接工具
VSCODE下载地址:https://code.visualstudio.com/
vscode我感觉它就像是一个全能的六边形战士,可能每科都考不到100分,但每科都能考90分。适配所有语言,丰富的插件库。
在插件商店搜索安装:remote development

安装完之后在左边会出现这个logo,通过点击的方式可以直连本地的WSL环境。因为是本地直连且做了很多优化,在实际使用中你甚至感觉不到你是在远程开发,常见的远程开发经常出现的连接中断、重输密码等问题基本不会在这里出现。

4. git log的显示优化
git config --global alias.lg "log --color --graph --pretty=format:'%Cred%h%Creset -%C(yellow)%d%Creset %s %Cgreen(%cr) %C(bold blue)<%an>%Creset' --abbrev-commit"
效果:输入git lg

设置进入git文件夹显示分支名称
’
black=KaTeX parse error: Undefined control sequence: \[ at position 2: '\̲[̲\e[1;30m\]' red…‘[\e[1;31m]’
green=KaTeX parse error: Undefined control sequence: \[ at position 2: '\̲[̲\e[1;32m\]' yel…‘[\e[1;33m]’
blue=KaTeX parse error: Undefined control sequence: \[ at position 2: '\̲[̲\e[1;34m\]' mag…‘[\e[1;35m]’
cyan=KaTeX parse error: Undefined control sequence: \[ at position 2: '\̲[̲\e[1;36m\]' whi…‘[\e[1;37m]’
normal=$‘[\e[m]’
USER=“root” #自定义
function precmd {
cd KaTeX parse error: Double superscript at position 72: …' | sed -e '/^[^̲*]/d' -e 's/* \…white[KaTeX parse error: Can't use function '\u' in math mode at position 8: magenta\̲u̲white@ g r e e n green greenUSER w h i t e : white: white:cyan\w y e l l o w yellow yellowGITBRANCH$white]$ $normal"
}
alias cd=precmd
’
