谷歌云GCP
感谢公司赞助了Google Cloud Platform(GCP) Coursera课程:https://www.coursera.org/,包括云基础设施,应用开发,数据湖和数据仓库相关知识。
其中谷歌云的实验操作平台是:https://www.qwiklabs.com/,获得的谷歌云Coursera认证(该认证包括Qwiklabs平台的实验)如下:
| 2020/3/26-2020/4/1 | Essential Google Cloud Infrastructure: Core Services | Certificated |
| 2020/4/2-2020/4/5 | Essential Google Cloud Infrastructure: Foundation | Certificated |
| 2020/4/6-2020/4/11 | Essential Google Cloud Infrastructure: Core Services | Certificated |
| 2020/4/12-2020/4/16 | Elastic Google Cloud Infrastructure: Scaling and Automation | Certificated |
| 2020/4/17-2020/4/21 | Reliable Google Cloud Infrastructure: Design and Process | Certificated |
| 2020/4/22-2020/4/26 | Getting Started With Application Development | Certificated |
| 2020/4/24-2020/5/10 | Modernizing Data Lakes and Data Warehouses with GCP | Certificated |
| Building Batch Data Pipelines on GCP |
也推荐 John J. Geewax 写的《Google Cloud Platform in Action》这本书作为参考阅读
目录
什么是云计算
云计算特点
云计算分类
Region and Zone
IAM
VPC Network
GCP服务
Computing
Google Kubernetes Engine (GKE)
Cloud Storage
Data & Analytics
Cloud SQL
Cloud Spanner
DataStore
Bigtable
BigQuery
Dataproc
Cloud Pub/Sub
Datalab
Comparing
Cloud Composer & Apache Airflow
Data Catalog
Google Data Studio
Monitoring
Logging
Machine Learning
Cloud Build
Cloud Run & Cloud Functions & App Engine
Management Tool
Pricing
谷歌云首页:https://cloud.google.com/
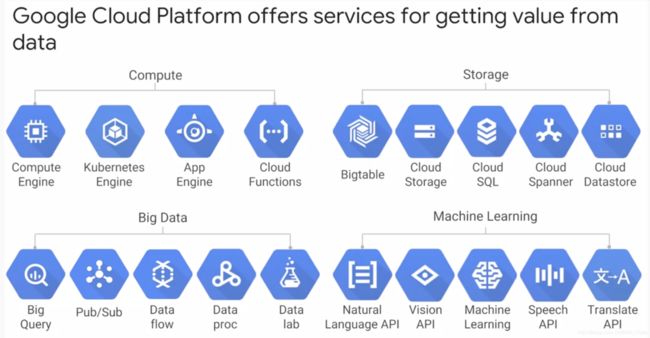
首先,GCP是Google Cloud Platform,谷歌云平台的缩写,GCP主要包括 Compute,Storage,Big Data ,Machine Learning (AI) 四大类服务,其他还有Networking,Pricing,SDK,Management Tool,IoT,Mobile 等分类。
什么是云计算
云计算特点

- 按需自助服务
- 无处不在的网络访问
- 与位置无关的资源池
- 快速弹性
- 按使用交费
云计算分类
按照云计算的服务模式,大体可以分为:IaaS、PaaS、SaaS三层
- IaaS: Infrastructure as a Servic
基础设施即服务,通过网络向用户提供IT基础设施能力的服务(计算,存储,网络等)。
- PaaS: Platform as a Service
平台即服务,指的是在云计算基础设施之上,为用户提供应用软件部署和运行环境的服务。
- SaaS: Software as a Service
软件即服务,是指基于网络提供软件服务的软件应用模式。
用盖房子打个比方:IaaS就好比只提供一片土地,用户买下之后,所有的工作还得用户自己去做,PaaS就好比在这片土地上给用户建好了楼,用户入住之前只需要自己装修一下,而SaaS不仅帮用户把楼建好,还装修好,用户买下即可拎包入住。
按照云计算的目标用户,分为公有云、私有云、混合云和行业云(专有云)
- 公有云:一般由云计算服务商构建,面向公众、企业提供公共服务,由云计算服务商运营
- 私有云:由企业自身构建,为内部使用的云服务
- 混合云:当企业既有私有云又采用公有云服务时,这两种云之间形成内外数据和应用的互动
- 行业云:由利益相关、业务相近的组织掌控和使用,例如某省各级政府机关和事业单位共同利用政务专有云进行日常办公及服务大众。
Region and Zone
地域与分区。每个地域下有不同的分区,同一地域内的网络延迟通常在5毫秒以下。为了容灾,可以把我们的应用分布在多个地域。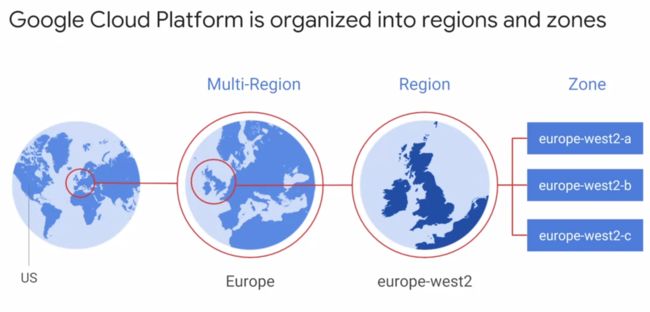
IAM
Identity and Access Management,即身份识别和访问管理。
它包括三个部分:
Who:
可以通过google account, google group, service account定义。
Can do what: 可以通过 IAM role 定义,它是一个 permissions 的集合。
有三种类型的角色:
-
Primitive role
-
Predefined role
-
Custom role: can only be defined in organization or project, but not in folders
On which resource
GCP资源架构:
polices can define in organization, folder, project, they are inherited in the hierarchy.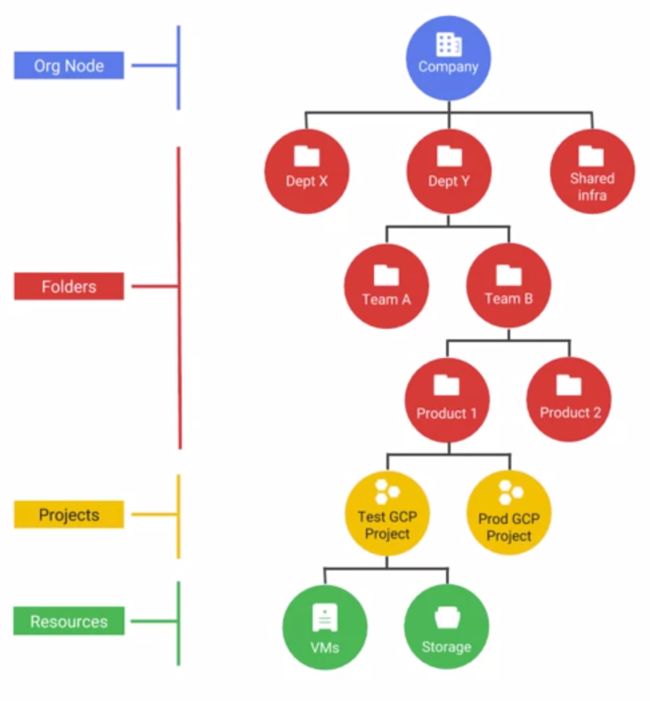
Projects are the main way you organise your gcp resources.
每个 Project 有:
-
Project ID: 不可变的 (assigned by you)
-
Project Name: 可变的 (assigned by you)
-
Project number: 不可变的 (assigned by GCP)
Policies defined in organisation level can be inherited to all children.
GCP use least privilege in managing any kind of compute infrastructure.
The policies implemented at a higher level in this hierarchy can’t take away access that’s granted at a lower level
Eg: if you grant Editor role to Organisation and Viewer role to the folder, then the folder is granted the Editor role.
Projects can have different owners and users - they are built separately and managed separately.
When using GCP, it handles most of the lower security layer, the upper layers remain the customer’s responsibility

VPC Network
Virtual Private Cloud: it connects your GCP resources to each other and to the internet.
In the example below, us-east1-b and us-east1-c are on the same subnet but in different zones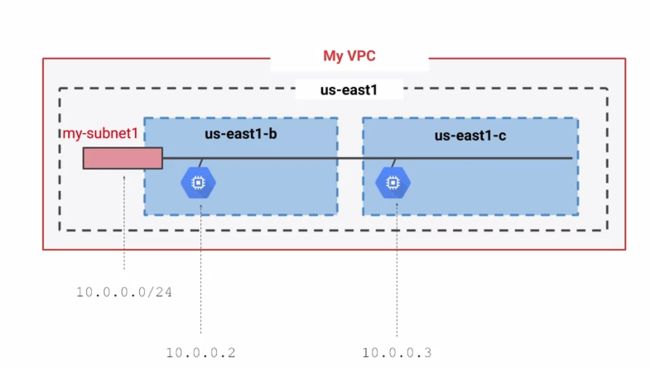
VPCs have routing tables, you can define firewall rules in terms of tags on compute engine.
VPC Peering: establish a peering relationship between projects
Shared VPC: you can use IAM to control
GCP服务
1. GCP四大类服务如下:
2. 有四种方式与 GCP 交互:
-
GCP console
https://cloud.google.com/console
-
Cloud Shell and Cloud SDK
包括: gcloud, gsutil (Cloud Storage), bq (BigQuery) 等。

如上图所示,点击用户头像旁的激活 Cloud Shell 图标, 会在 web 控制台下方出现 shell 命令行。
![]()
可以点击“打开编辑器”:

点击“打开终端”按钮即可回到命令行界面。
本地的话,在https://cloud.google.com/sdk/docs/install下载官方Google Cloud SDK程序,Windows需要配置bin路径到PATH,其他系统也需要配置环境变量。
初始化SDK:gloud init
gcloud config list
gcloud info
gcloud compute instances list
gcloud components list
gcloud components update
gcloud auth list
export GOOGLE_APPLICATION_CREDENTIALS等。
-
API
APIs Explorer is an interface tool that let you easily try GCP APIs using a browser
https://developers.google.com/apis-explorer
-
Use libraries within your code
-
Cloud Client Libraries: https://cloud.google.com/apis/docs/cloud-client-libraries
-
Google API Client Libraries: https://developers.google.com/api-client-library
-
-
Cloud Console Mobile App
3. Cloud MarketPlace (Cloud Launcher)
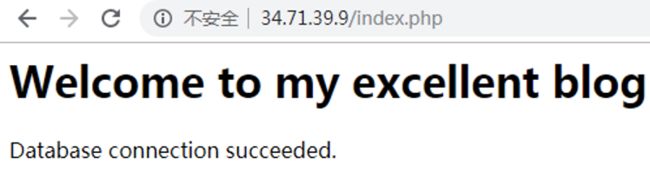
可以在 GCP 上很快部署软件包,比如LAMP (Linux+Apache+MySQL+PHP) 应用。
搭建了 LAMP (Linux + Apache + MySQL + PHP) 的博客案例,最终效果图如下:
Computing
谷歌提供的云计算服务中,归类如下:

Compute Engine属于IaaS,Kubernetes Engine属于Hybrid,App Engine属于PaaS,Cloud Functions属于Serverless。
Google Kubernetes Engine (GKE)
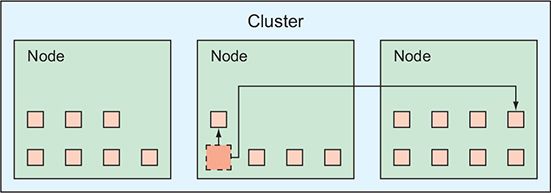
容器编排,可以管理和扩展应用等。Pod 是 Kubernetes 中最小的可部署单元。
In GCP, node is VM running in Compute Engine. The smallest deployable unit in Kubernetes. It has 1 container often, but it could have multiple containers, where the containers
will share the networking and have the same disk storage volume.
Demo及常用命令可查看官方文档 Deploying a containerized web application: https://cloud.google.com/kubernetes-engine/docs/tutorials/hello-app
- 构建 (build) 和标记 (tag) Docker 映像:
docker build -t gcr.io/${PROJECT_ID}/hello-app:v1 .运行 docker images 命令以验证构建是否成功:
docker images- 本地运行容器(可选)
-
使用本地 Docker 引擎测试容器映像:
docker run --rm -p 8080:8080 gcr.io/${PROJECT_ID}/hello-app:v1- 将 Docker 映像推送到 Container Registry
必须将容器映像上传到 Registry,以便 GKE 集群可以下载并运行该容器映像。在 Google Cloud 中,Container Registry 默认处于启用状态。
-
为您正在使用的 Google Cloud 项目启用 Container Registry API:
gcloud services enable containerregistry.googleapis.com -
配置 Docker 命令行工具以向 Container Registry 进行身份验证:
gcloud auth configure-docker -
将刚刚构建的 Docker 映像推送到 Container Registry:
docker push gcr.io/${PROJECT_ID}/hello-app:v1
- 创建 GKE 集群
-
创建名为
hello-cluster的集群:-
标准集群:
gcloud container clusters create hello-cluster -
Autopilot 集群:
gcloud container clusters create-auto hello-cluster
-
-
创建 GKE 集群并进行运行状况检查需要几分钟的时间。
-
该命令运行完后,请运行以下命令以查看集群的三个工作器虚拟机实例:
gcloud compute instances list
- 将应用部署到 GKE
可以将构建的 Docker 映像部署到 GKE 集群。
-
为
hello-appDocker 映像创建 Kubernetes 部署。kubectl create deployment hello-app --image=gcr.io/${PROJECT_ID}/hello-app:v1以前老版本是 kubectl run
-
将部署副本的基准数量设置为 3。
kubectl scale deployment hello-app --replicas=3 -
为您的部署创建一个 HorizontalPodAutoscaler 资源。
kubectl autoscale deployment hello-app --cpu-percent=80 --min=1 --max=5 -
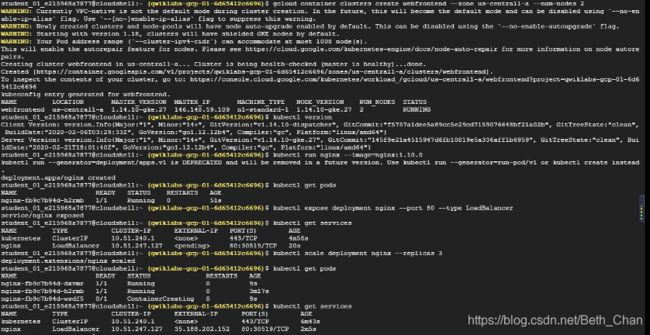
如需查看已创建的 Pod,请运行以下命令:
输出:kubectl get podsNAME READY STATUS RESTARTS AGE hello-app-784d7569bc-hgmpx 1/1 Running 0 10s hello-app-784d7569bc-jfkz5 1/1 Running 0 10s hello-app-784d7569bc-mnrrl 1/1 Running 0 15s
- 部署应用
-
使用
kubectl expose命令为hello-app部署生成 Kubernetes 服务。kubectl expose deployment hello-app --name=hello-app-service --type=LoadBalancer --port 80 --target-port 8080此处,--port 标志指定在负载平衡器上配置的端口号,--target-port 标志指定hello-app容器正在侦听的端口号。 -
运行以下命令以获取
hello-app-service的服务详情。kubectl get service -
将
EXTERNAL_IP地址复制到剪贴板(例如:203.0.113.0)。注意:预配负载平衡器可能需要几分钟的时间。 在预配负载平衡器之前,您可能会看到
现在,hello-app Pod 已通过 Kubernetes 服务公开发布到互联网,您可以打开新的浏览器标签页,然后导航到先前复制到剪贴板中的服务 IP 地址。您会看到一条 Hello, World! 消息以及一个 Hostname 字段。Hostname 对应于向浏览器传送 HTTP 请求的三个 hello-app Pod 中的一个。
- 部署新版本应用
在本部分中,您将通过构建新的 Docker 映像并将其部署到 GKE 集群,来将 hello-app 升级到新版本。
GKE 的滚动更新功能让您可以在不停机的情况下更新部署。在滚动更新期间,GKE 集群将逐步将现有 hello-app Pod 替换为包含新版本的 Docker 映像的 Pod。在更新期间,负载平衡器服务仅将流量路由到可用的 Pod。
-
返回到 Cloud Shell,现在您已在其中克隆了 hello 应用源代码和 Dockerfile。 更新项目里的文件为新版本
2.0.0。 -
构建并标记新的
hello-appDocker 映像。docker build -t gcr.io/${PROJECT_ID}/hello-app:v2 . -
将映像推送到 Container Registry。
docker push gcr.io/${PROJECT_ID}/hello-app:v2
现在,您可以更新 hello-app Kubernetes 部署来使用新的 Docker 映像。
-
通过更新映像,对现有部署进行滚动更新:
kubectl set image deployment/hello-app hello-app=gcr.io/${PROJECT_ID}/hello-app:v2 -
运行
v1映像的 Pod 停止运行后,系统会启动运行v2映像的新 Pod
输出:watch kubectl get podsNAME READY STATUS RESTARTS AGE hello-app-89dc45f48-5bzqp 1/1 Running 0 2m42s hello-app-89dc45f48-scm66 1/1 Running 0 2m40s -
在单独的标签页中,再次导航到
hello-app-service外部 IP。您现在应该看到Version被设置为2.0.0.。
清理
为避免因本教程中使用的资源导致您的 Google Cloud 帐号产生费用,请删除包含这些资源的项目,或者保留项目但删除各个资源。
-
删除 Service:此步骤将取消并释放为 Service 创建的 Cloud Load Balancer:
kubectl delete service hello-app-service -
删除集群:此步骤将删除构成集群的资源,如计算实例、磁盘和网络资源:
gcloud container clusters delete hello-cluster -
删除容器映像:此操作会删除推送到 Container Registry 的 Docker 映像。
 gcloud container images delete gcr.io/${PROJECT_ID}/hello-app:v1  --force-delete-tags --quiet
 gcloud container images delete gcr.io/${PROJECT_ID}/hello-app:v2  --force-delete-tags --quiet
以下是我的一个小试验:
在 VM instances里可以看到:

结果如下:

Cloud Storage
对象存储,有 unique key 可以访问对应对象。在 Cloud Storage 中,每个对象都有一个 URL,并且该 URL 不可变。
Cloud Storage 保留修改历史,存储对象历史,我们可以查看版本列表,还原或者删除。
Cloud Storage 提供生命周期管理,比如你可以删除 5 天以前的对象。

用途:
-
serving website content
-
storing data for archival and disaster recovery
-
distributing large data objects to your end users via direct download
For most case, IAM is sufficient, but if you need finer control, you can create ACLs (access control lists).
每个访问控制列表包括:
-
a user or group
-
a permission
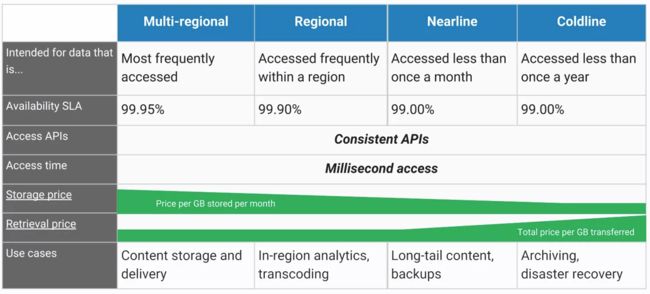
Cloud Storage 有不同的存储类型: Multi-Regional, Regional, Nearline, Coldline
3 Ways to bring data into Cloud Storage:
-
Online Transfer
-
Storage Transfer Service
-
Transfer Appliance
Data & Analytics
Cloud SQL
RDBMS,目前支持 MySQL,PostgreSQL 和 SQL Server 关系型数据库。数据大小最大是 10 TB,如果数据量大于10 TB,建议选择 Cloud Spanner
Cloud Spanner
horizontally scalable RDBMS
什么时候使用?
- A relational database that need strong transactional consistency (ACID)
- Wide scale
- Higher workload than Cloud SQL
Spanner vs Cloud SQL
Spanner 对 MySQL/PostgreSQL/SQL Server 不兼容
Spanner architecture

- Nodes handle computation, each node serves up to 2 TB of storage
- Storage is replicated across zones, compute and storage are separated
- Replication is automatic
DataStore
- NoSQL
- Flexible structure/relationship
- No Ops
- No provisioning of instances
- Compute layer is abstracted away
- Scalable
- Multi-regions access
- Sharding/replication automatic
-
每个项目只能有 1 个 Datastore
什么时候使用 Datastore
-
应用需要扩展
-
ACID 事务,eg: transferring funds
用例:产品目录 - 实时库存;User profiles - 手机应用;游戏存储状态。
什么时候不使用 Datastore
- 需要分析 (full SQL semantics),最好使用 Big Query/Cloud Spanner
- 需要读写能力 (每秒10M+ read/writes),最好使用 Bigtable
- 不需要 ACID时,最好使用 Bigtable
- 需要迁移比如MySQL时,最好使用 Cloud SQL
- 要求延迟性比较小,最好使用内存数据库,比如 Redis
Relational Database vs Datastore
Entities can be hierarchical
查询和索引
查询
- retrieve entity from datastore
- query methods
- programmatic
- web console
- GQL (Google Query Language)
索引
-
queries get results from indexes
- index type
- Built-in: Allows single property queries
- Composite: use index.yaml
注意事项:避免过度使用index
-
solutions:
- 使用 index.yaml 缩小 index 范围
- 不需要 索引时,不使用 index properties
数据一致性
Performance vs Accuracy
- Strongly Consistent
- Parallel processes with orders guaranteed
- Use case: financial transaction
- Eventually Consistent
- Parallel processes not with orders guaranteed
- 用例:人口普查 (顺序不重要)
以下是 Entity 详情示例:


可以看到程序返回的JSON结构是:
![]()
结果如下:

Bigtable
NoSQL. 读写都支持高吞吐性. 低延迟。Google Analytics, Gmail 等主要产品都使用了Bigtable。
Bigtable的层次结构,涉及实例,集群和节点,而每个实例的数据模型涉及表,行,列族和列限定符。
表的设计如图所示:
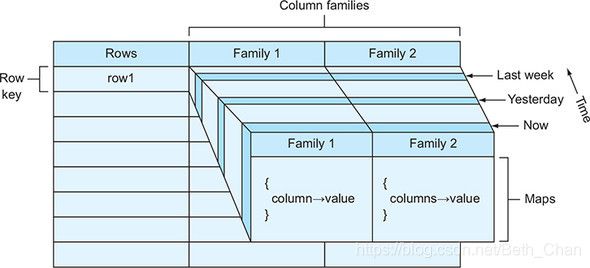
Row key is only indexed item.
It offers similar API as HBase,我们都知道 HBase 是在 Google Bigtable 2006年发表的论文里的设计后开源出来的
区别:
-
Bigtable can scale and manage fast and easily (Bigtable 能够更轻松地扩展到更大数量的节点,从而可以处理给定实例的更多整体吞吐量。HBase 的设计需要一个主节点来处理故障转移和其他管理操作,这意味着随着您添加越来越多的节点(成千上万个)来处理越来越多的请求,主节点将成为性能瓶颈)
-
Bigtable encrypts data in-flight and at rest
-
Bigtable can be controlled access with IAM
Bigtable infrastructure


- Front-end server pool serves requests to nodes
- Compute and Storage are separate, No data is stored on the node except for metadata to direct requests to the correct tablet
- Tables are shards into tablets. They are stored on Colossus, google’s filesystem. as storage is separate from compute node,
replication and recovery of node data is very fast, as only metadata/pointers need to be updated - Tablets are a way of referencing chunks of data that live on a particular node. The cool thing about tablets is that they can be split, combined, and moved around to other nodes to keep access to data spread evenly across the available capacity.
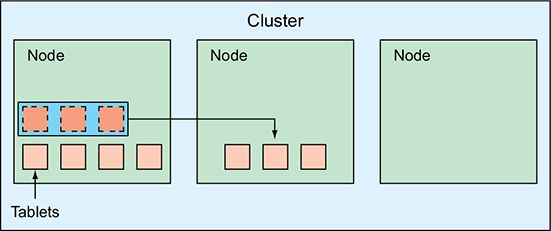
首次开始写入数据时,Bigtable集群可能会将大多数数据放在单个节点上。
启动时,Bigtable可能会将数据放在单个节点上。

随着更多 Tablet 在单个节点上积累,集群可能会将其中一些 Tablet 重新放置到另一个节点上,以更平衡的方式重新分配数据:
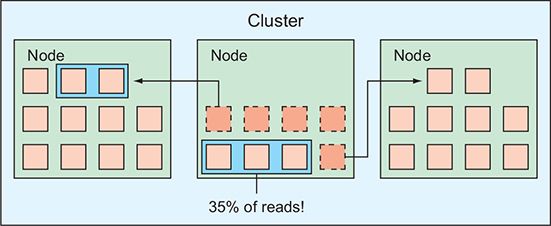
随着时间的推移写入的数据越来越多,某些 Tablet 的访问频率可能会比其他平板电脑更高。如下图所示,三个 Tablet 负责整个系统中所有读取查询的35%。

在这样的场景中,几个 hot Tablet 位于一个节点上,Bigtable 通过将一些访问频率较低的 Tablet 转移到其他容量更大的节点来重新平衡集群,以确保三个节点中的每个节点都能看到三分之一的总流量:
它也可能是一个单一的 Tablet 变得 too hot(它被写入或过于频繁地读取)。将 Tablet 原样移动到另一个节点并不能解决问题。相反,Bigtable的可 split 分裂这个 Tablet ,然后重新平衡:

最重要的事情是谨慎选择行键 rowkey,这样它们就不会将流量集中在一个地方。
上手练习:
界面操作:
Cloud Console 控制台左侧导航栏导航到Bigtable,创建实例

填写 Instance ID 等相关信息后:
以 Node.js 方式时,在编写一些代码以与Cloud Bigtable进行交互之前,您需要通过运行 npm install @google-cloud/[email protected] 来安装客户端。
客户端安装后,您可以通过列出实例和集群来对其进行测试,如下所示:
const bigtable = require('@google-cloud/bigtable')({
  projectId: 'your-project-id'
});

const instance = bigtable.instance('test-instance');

instance.createTable('todo', {
  families: ['completed']
}).then((data) =>
  const table = data[0];
  console.log('Created table', table.id);
});
命令行操作:
install cbt in Google Cloud SDK
gcloud components update
gcloud components install cbt
set env variable
|
|
create table
|
|
list table
|
|
add column family
|
|
list column family
|
|
add value to row1, column family cf1, column qualifier c1
|
|
read table
|
|
delete table
|
|
BigQuery
数据仓库,接近实时的 PB 级数据库的分析
How BigQuery works
- 列式存储
- 不更新现有记录
- 无事务性
Structure
- Dataset: contains tables/views
- Table: collections of columns
- Job: long running action/query
IAM
- can control by project, dataset, view
- cannot control at table level
命令行模式:

BigQuery案例
Find correlation between rain and bicycle rentals
How about joining the bicycle rentals data against weather data to learn whether there are fewer bicycle rentals on rainy days?
采用GCP提供的数据集:
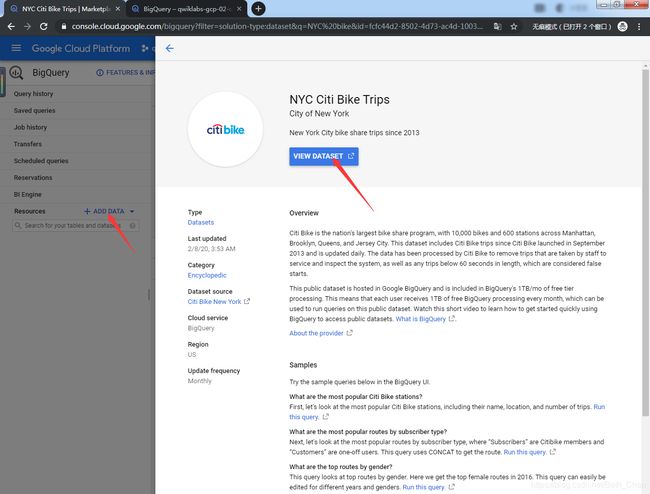
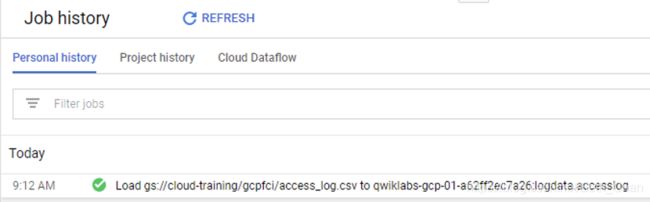
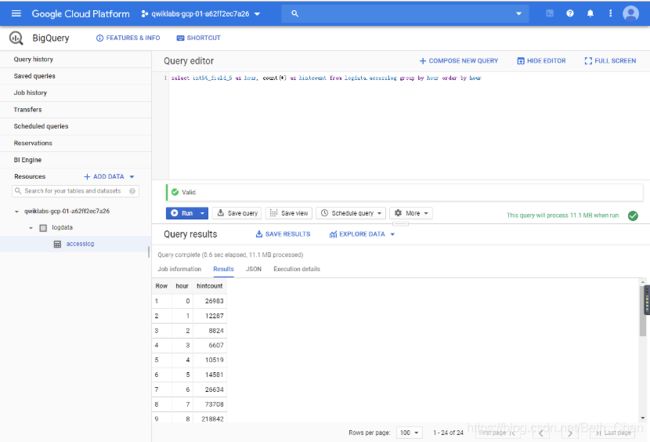
数据导入成功后,在SQL输入框中写以下SQL:
WITH bicycle_rentals AS (
SELECT
COUNT(starttime) as num_trips,
EXTRACT(DATE from starttime) as trip_date
FROM `bigquery-public-data.new_york_citibike.citibike_trips`
GROUP BY trip_date
),
rainy_days AS
(
SELECT
date,
(MAX(prcp) > 5) AS rainy
FROM (
SELECT
wx.date AS date,
IF (wx.element = 'PRCP', wx.value/10, NULL) AS prcp
FROM
`bigquery-public-data.ghcn_d.ghcnd_2015` AS wx
WHERE
wx.id = 'USW00094728'
)
GROUP BY
date
)
SELECT
ROUND(AVG(bk.num_trips)) AS num_trips,
wx.rainy
FROM bicycle_rentals AS bk
JOIN rainy_days AS wx
ON wx.date = bk.trip_date
GROUP BY wx.rainy
执行结果是:

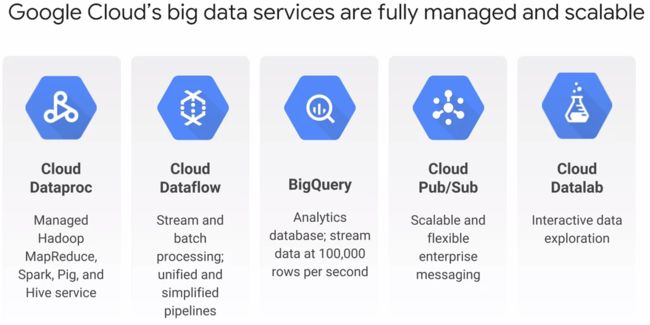
Dataproc
- Fully managed: managed way to run Hadoop, Spark/Hive/Pig on GCP
- Fast and Scalable: Quickly scale clusters up and down even when jobs are running (90 seconds or less on average)
- Open source ecosystem: Easily migrate on-premises Hadoop/Spark jobs to the cloud (it's possible to move existing projects or ETL pipelines without redeveloping any code)
- Cost effective: Cloud Dataproc is priced at $0.01 per virtual CPU per cluster per hour on top of any other GCP resources you use. And save money with preemptible instances (short-lived if you don't need them)
- Versioning: image versioning allows you to switch between different versions of Apache Spark, Apache Hadoop and other tools.
- Integrated: It's integrated, it has built-in integration with Cloud Storage, BigQuery and Cloud Big Table to ensure data will never be lost.
This together with StackDriver Logging and StackDriver Monitoring provides a complete data platform,
Cloud Dataproc has two ways to customize clusters, optional components and initialization actions. Pre-configured optional components can be selected when deployed via the console or the command line and include Anaconda Jupyter notebook, Zeppelin notebook, Presto and Zookeeper.

Setup(Create a cluster):
- console
- gcloud command/YAML file
- Deployment Manager template
- Cloud SDK REST API
Configure:

For configuration the cluster can be set up as a single VM, which is usually to keep costs down for development and experimentation. Standard is with a single master node and high availability has three master nodes. You can choose between a region and a zone or select the global region and allow the service to choose the zone for you. The cluster defaults to a global endpoint but defining a regional endpoint may offer increased isolation and in certain cases lower latency. The master node is where the HDFS name node runs as well as the yarn node and job drivers. HDFS replication defaults to to in Cloud Dataproc. Optional components from the Hadoop ecosystem include Anaconda, which is your Python distribution in package manager, Web H CAD, Jupyter Notebook and Zeppelin Notebook as well. Cluster properties are runtime values that can be used by configuration files for more dynamic startup options. And user labels can be used to tag your cluster for your own solutions or your reporting purposes. The master node, worker nodes and preemptible worker nodes if enabled have separate VM options such as vCPU, memory and storage. Preemptible nodes include yarn node manager, but they don't run HDFS. There are a minimum number of worker nodes. The default is two, the maximum number of worker knows is determined by a quota and the number of SS Divs attached to each worker. You can also specify initialization actions such as an initialization script that we saw earlier. It can further customize your worker nodes on startup. And metadata can be defined, so the VM share state information between each other. This may be the first time you saw a preemptible nodes as an option for your cluster.
Optimize:

the main reason to use preemptible VMs or PVMs is to lower costs for fault-tolerant workloads. PVMs can be pulled from service at any time within 24 hours. But if your workload in your cluster architecture is a healthy mix of VMs and PVMs, you may be able to withstand the interruption and get a great discount in the cost of running your job. Custom machine types allow you to specify the balance of memory and CPU to tune the VM to the load, so you're not wasting resources. A custom image can be used to pre-install software. So it takes less time for the customized node become operational, then if you install the software boot time using an initialization script. You can get a persistent SSD boot disk for faster cluster startup.
Dataproc performance optimization
- Keep your data close to your cluster
- Place Dataproc cluster in same region as storage bucket
- Larger persistent disk = better performance
- Using SSD over HDD
- Allocate more VMs
- Use preemptible VM to save on costs
Utilize: (how do you submit a job to Cloud Dataproc for processing? )
- console
- gcloud command
- Orchestration services: Cloud Dataproc Workflow Templates; Cloud Composer
- REST API
Monitoring:
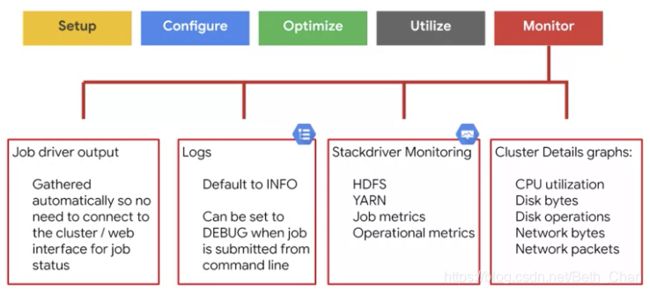
Using StackDriver. Or you can also build a custom dashboard with graphs and set up monitoring of alert policies to send emails for example, where you can notify if incidents happen.
Any details from HDFS, YARN, metrics about a particular job or overall metrics for the cluster like CPU utilization, disk and network usage can all be monitored and alerted on with StackDriver.
Cloud Dataproc Initialization Actions
可参照:https://github.com/GoogleCloudDataproc/initialization-actions
There are a lot of pre-built startup scripts that you can leverage for common Hadoop cluster set of tasks like Flink, Jupyter and more.
use initializeion actions to add other software to cluster at startup
gcloud dataproc clusters create --initialication-actions gs://$MY_BUCKET/hbase/hbase.sh --num-masters 3 --num-workers 2 
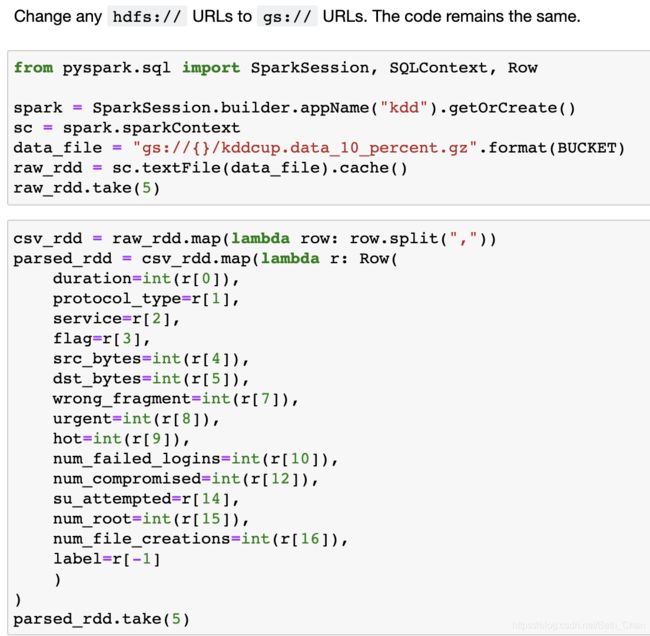
It's pretty easy to adapt existing Hadoop code to use GCS instead of HDFS. It's just a matter of changing the prefix for this storage from hdfs// to gs//.
Converting from HDFS to Google Cloud Storage
- Copy data to GCS
- Install connector or copy manually
- Update file prefix in scripts
- From hdfs:// to gs://
- Use Dataproc and run against/output to GCS
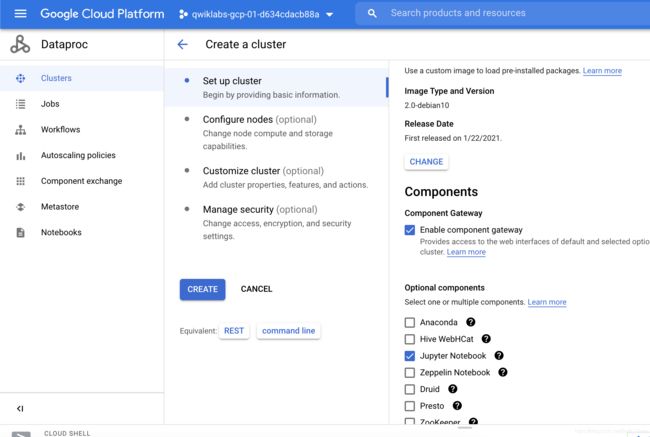
创建Dataproc集群:
Cluster Name输入sparktodp,选择Image Type and Version,勾上Enable Gateway,Optional Components勾上Jupyter Notebook:
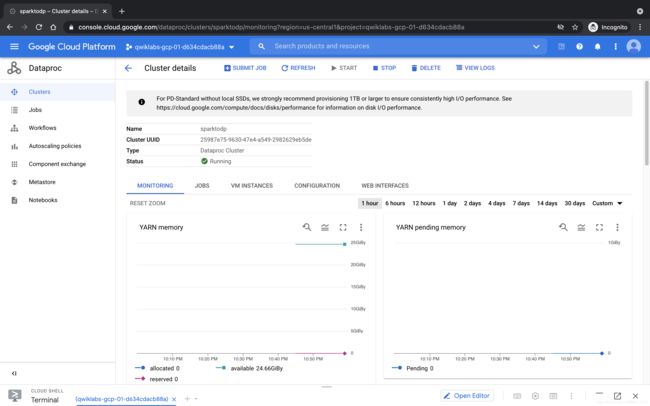
点击Notebook:

点击 "OPEN JUPYTERLAB" 打开Jupyter,运行01_spark.ipynb(Run All,或者一步步一个个Cell来),先把数据读到HDFS里,可以看到:

读数据:


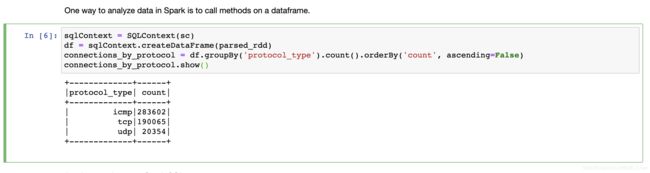
Spark 分析:
一种就是调用DataFrame:
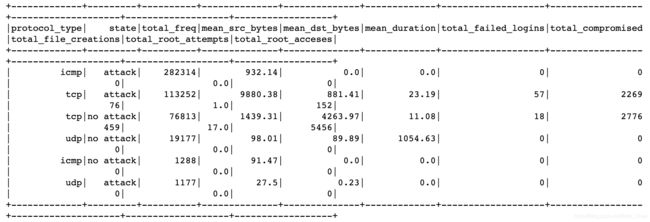
另一种就是使用Spark SQL:
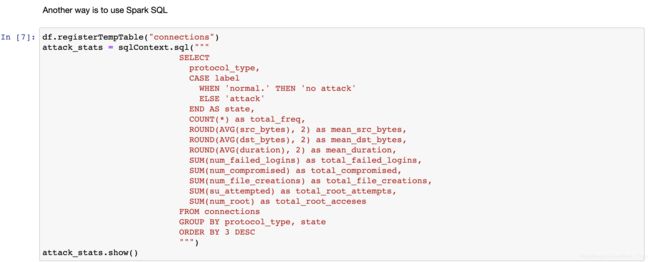
执行结果:
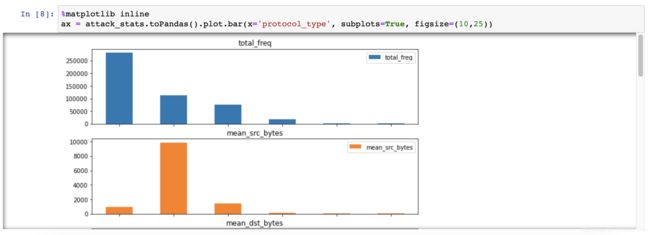
最后可以通过matplotlib画图,把上面的attack_stats结果展示出来:
Replace HDFS by Google Cloud Storage
Load csv to BigQuery
bq mk sparktobqBUCKET='cloud-training-demos-ml' # CHANGE
bq --location=US load --autodetect --source_format=CSV sparktobq.kdd_cup_raw gs://$BUCKET/kddcup.data_10_percent.gzUsing Cloud Functions, launch analysis every time there is a new file in the bucket. (serverless)
%%bash
wget http://kdd.ics.uci.edu/databases/kddcup99/kddcup.data_10_percent.gz
gunzip kddcup.data_10_percent.gz
BUCKET='cloud-training-demos-ml'  # CHANGE
gsutil cp kdd* gs://$BUCKET/
bq mk sparktobq
%%writefile main.py
from google.cloud import bigquery
import google.cloud.storage as gcs
import tempfile
import os
def create_report(BUCKET, gcsfilename, tmpdir):
"""
Creates report in gs://BUCKET/ based on contents in gcsfilename (gs://bucket/some/dir/filename)
"""
# connect to BigQuery
client = bigquery.Client()
destination_table = 'sparktobq.kdd_cup'
# Specify table schema. Autodetect is not a good idea for production code
job_config = bigquery.LoadJobConfig()
schema = [
bigquery.SchemaField("duration", "INT64"),
]
for name in ['protocol_type', 'service', 'flag']:
schema.append(bigquery.SchemaField(name, "STRING"))
for name in 'src_bytes,dst_bytes,wrong_fragment,urgent,hot,num_failed_logins'.split(','):
schema.append(bigquery.SchemaField(name, "INT64"))
schema.append(bigquery.SchemaField("unused_10", "STRING"))
schema.append(bigquery.SchemaField("num_compromised", "INT64"))
schema.append(bigquery.SchemaField("unused_12", "STRING"))
for name in 'su_attempted,num_root,num_file_creations'.split(','):
schema.append(bigquery.SchemaField(name, "INT64"))
for fieldno in range(16, 41):
schema.append(bigquery.SchemaField("unused_{}".format(fieldno), "STRING"))
schema.append(bigquery.SchemaField("label", "STRING"))
job_config.schema = schema
# Load CSV data into BigQuery, replacing any rows that were there before
job_config.create_disposition = bigquery.CreateDisposition.CREATE_IF_NEEDED
job_config.write_disposition = bigquery.WriteDisposition.WRITE_TRUNCATE
job_config.skip_leading_rows = 0
job_config.source_format = bigquery.SourceFormat.CSV
load_job = client.load_table_from_uri(gcsfilename, destination_table, job_config=job_config)
print("Starting LOAD job {} for {}".format(load_job.job_id, gcsfilename))
load_job.result() # Waits for table load to complete.
print("Finished LOAD job {}".format(load_job.job_id))
# connections by protocol
sql = """
SELECT COUNT(*) AS count
FROM sparktobq.kdd_cup
GROUP BY protocol_type
ORDER by count ASC
"""
connections_by_protocol = client.query(sql).to_dataframe()
connections_by_protocol.to_csv(os.path.join(tmpdir,"connections_by_protocol.csv"))
print("Finished analyzing connections")
# attacks plot
sql = """
SELECT
protocol_type,
CASE label
WHEN 'normal.' THEN 'no attack'
ELSE 'attack'
END AS state,
COUNT(*) as total_freq,
ROUND(AVG(src_bytes), 2) as mean_src_bytes,
ROUND(AVG(dst_bytes), 2) as mean_dst_bytes,
ROUND(AVG(duration), 2) as mean_duration,
SUM(num_failed_logins) as total_failed_logins,
SUM(num_compromised) as total_compromised,
SUM(num_file_creations) as total_file_creations,
SUM(su_attempted) as total_root_attempts,
SUM(num_root) as total_root_acceses
FROM sparktobq.kdd_cup
GROUP BY protocol_type, state
ORDER BY 3 DESC
"""
attack_stats = client.query(sql).to_dataframe()
ax = attack_stats.plot.bar(x='protocol_type', subplots=True, figsize=(10,25))
ax[0].get_figure().savefig(os.path.join(tmpdir,'report.png'));
print("Finished analyzing attacks")
bucket = gcs.Client().get_bucket(BUCKET)
for blob in bucket.list_blobs(prefix='sparktobq/'):
blob.delete()
for fname in ['report.png', 'connections_by_protocol.csv']:
bucket.blob('sparktobq/{}'.format(fname)).upload_from_filename(os.path.join(tmpdir,fname))
print("Uploaded report based on {} to {}".format(gcsfilename, BUCKET))
def bigquery_analysis_cf(data, context):
# check that trigger is for a file of interest
bucket = data['bucket']
name = data['name']
if ('kddcup' in name) and not ('gz' in name):
filename = 'gs://{}/{}'.format(bucket, data['name'])
print(bucket, filename)
with tempfile.TemporaryDirectory() as tmpdir:
create_report(bucket, filename, tmpdir)# test that the function works
import main as bq
BUCKET='cloud-training-demos-ml' # CHANGE
try:
bq.create_report(BUCKET, 'gs://{}/kddcup.data_10_percent'.format(BUCKET), "/tmp")
except Exception as e:
print(e.errors)gcloud functions deploy bigquery_analysis_cf --runtime python37 --trigger-resource $BUCKET --trigger-event google.storage.object.finalizeVerify that the Cloud Function is being run. You can do this from the Cloud Functions part of the GCP Console.
Once the function is complete (in about 30 seconds), see if the output folder contains the report:
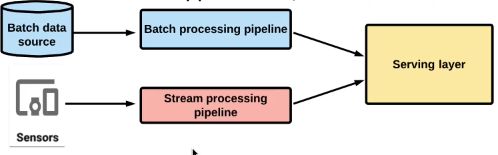
gsutil ls gs://$BUCKET/sparktobqDataflow
is managed data pipelines
-
Processes data using Compute Engine
-
Clusters are sized for you
-
Automated scaling
-
-
Write code for batch and streaming
-
Auto scaling, No-Ops, Stream and Batch Processing
-
Built on Apache Beam
-
Pipelines are regional-based
Why use Cloud Dataflow?
-
ETL
-
Data analytics: batch or streaming
-
Orchestration: create pipelines that coordinate services, including external services
-
Integrates with GCP services
Data Processing
Solution:
Apache Beam + Cloud Dataflow
Data Transformation

Cloud Dataproc vs Cloud Dataflow

Key Terms
-
Element : single entry of data (eg. table row)
-
PCollection: Distributed data set, input and output
-
Transform: Data processing in pipeline
-
ParDo: Type of Transform

Cloud Pub/Sub
is scalable, reliable messaging
-
Supports many-to-many asynchronous messaging
-
Push/pull to topics
-
Support for offline consumers
-
At least once delivery policy
-
Global scale messaging buffer/coupler
-
No-ops
-
Decouples senders and receivers
-
Equivalent to Kafka
-
At-least-once delivery
Pub/Sub overview

-
Topic: publisher sends messages to topic
-
Messages are stored in message store until they are delivered and acknowledged by subscribers
-
Pub/Sub forwards messages from a topic to subscribers. messages can be pushed by Pub/Sub to subscriber or pulled by subscribers from Pub/Sub
-
Subscriber receives pending messages from subscription and acknowledge to Pub/Sub
-
After message is acknowledged by the subscriber, it is removed from the subscription’s queue of messages.
Push and Pull
-
Push = lower latency, more real-time
-
Push subscribers must be Webhook endpoints that accept POST over HTTPS
-
Pull ideal for large volume of messages - batch delivery
Demo: how to publish and receive messages in PubSub with Java
-
create topic
1gcloud pubsub topics create my-topic -
create subscription to this topic
1gcloud pubsub subscriptions create my-sub --topic my-topic -
git clone project into cloud shell
1git clone https://github.com/googleapis/java-pubsub.git -
go into the sample
1cd samples/snippets/ -
modify PublisherExample.java and SubscribeAsyncExample.java to put the right project id, topic id and subscription id
-
compile project
1mvn clean install -DskipTests -
run subscriber
1mvn exec:java -Dexec.mainClass="pubsub.SubscribeAsyncExample" -
run publisher in another screen and observe subscriber
1mvn exec:java -Dexec.mainClass="pubsub.PublisherExample"
Datalab
interactive data exploration (Notebook)
Built on Jupyter (formerly IPython)
Easily deploy models to BigQuery. You can visualize data with Google Charts or map plot line
Comparing
Relational database: “Consistency and Reliability over Performance”
Non-Relational Database: “Performance over Consistency”


How to choose the right storage

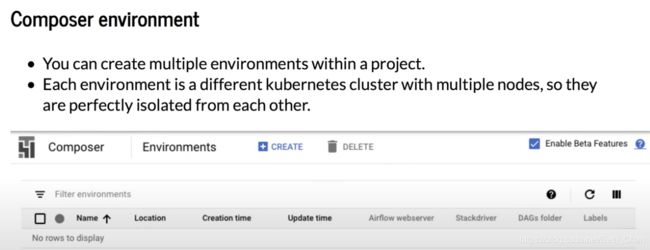
Cloud Composer & Apache Airflow
Orchestrating work between GCP services with Cloud Composer

使用谷歌云上的Cloud Composer,就可以不用自己装Airflow,只需要关注workflow。
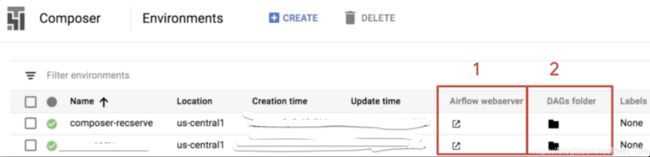
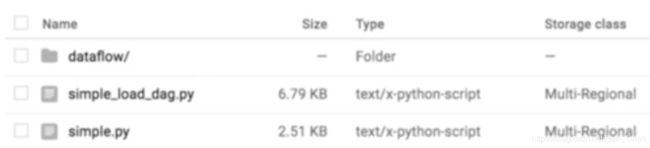
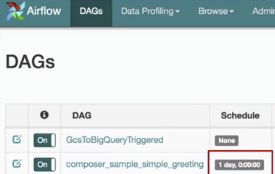
Cloud Composer用GCS(Google Cloud Storage)存储Apache Airflow DAGs,可以在我们的环境里新增,更新,删除DAGs。
The DAGs folder is simply a GCS bucket where you will load your pipeline code. a GCS bucket that is automatically created for when you launch your Cloud Composer Instance.
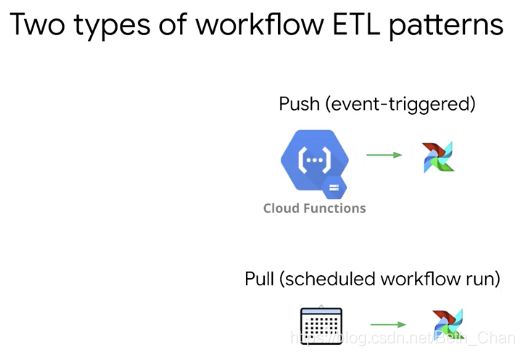
通过Cloud Functions去event trigger,或者通过schedule去周期性执行
Monitoring and Logging等都可以点击对应的Job详情查看Job的运行情况和细节。
Airflow官网:https://airflow.incubator.apache.org/
Airflow是开源的:https://github.com/apache/airflow
Airflow官方文档:https://airflow.incubator.apache.org/docs/apache-airflow/stable/index.html
Cloud Composer 是基于 Apache Airflow 构建的全代管式工作流编排服务。
端到端地集成多种 Google Cloud 产品,包括 BigQuery、Dataflow、Dataproc、Datastore、Cloud Storage、Pub/Sub 和 AI Platform,让用户可以灵活自由地全方位编排流水线(data pipeline),编写、安排(schedule)和监控(monitor)工作流(workflow)。

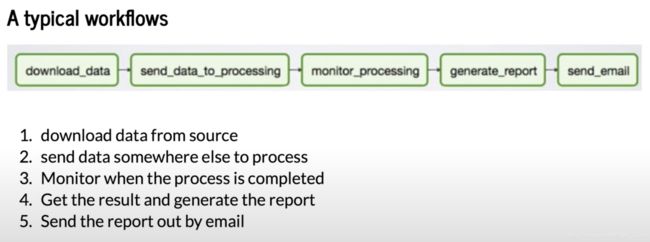
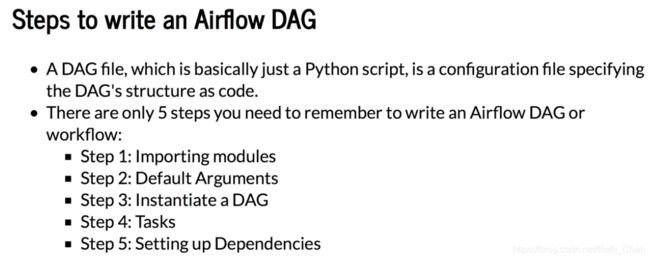
What is a Workflow?
- a sequence of tasks
- started on a schedule or triggered by an event
- frequently used to handle big data processing pipelines

安装及使用 Airflow:
pip3 install apache-airflowairflow db initairflow webserver -p 8080airflow users create --role Admin --username admin --email admin --firstname admin --lastname admin --password admin访问 http://localhost:8080/,输入username和password均为admin即可登录成功:

Graph View:
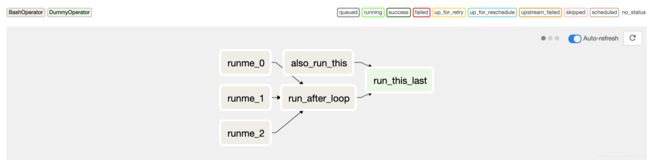
example_bash_operator:
#
# Licensed to the Apache Software Foundation (ASF) under one
# or more contributor license agreements.  See the NOTICE file
# distributed with this work for additional information
# regarding copyright ownership.  The ASF licenses this file
# to you under the Apache License, Version 2.0 (the
# "License"); you may not use this file except in compliance
# with the License.  You may obtain a copy of the License at
#
#   http://www.apache.org/licenses/LICENSE-2.0
#
# Unless required by applicable law or agreed to in writing,
# software distributed under the License is distributed on an
# "AS IS" BASIS, WITHOUT WARRANTIES OR CONDITIONS OF ANY
# KIND, either express or implied.  See the License for the
# specific language governing permissions and limitations
# under the License.

"""Example DAG demonstrating the usage of the BashOperator."""

from datetime import timedelta

from airflow import DAG
from airflow.operators.bash import BashOperator
from airflow.operators.dummy import DummyOperator
from airflow.utils.dates import days_ago

args = {
    'owner': 'airflow',
}

dag = DAG(
    dag_id='example_bash_operator',
    default_args=args,
    schedule_interval='0 0 * * *',
    start_date=days_ago(2),
    dagrun_timeout=timedelta(minutes=60),
    tags=['example', 'example2'],
    params={"example_key": "example_value"},
)

run_this_last = DummyOperator(
    task_id='run_this_last',
    dag=dag,
)

# [START howto_operator_bash]
run_this = BashOperator(
    task_id='run_after_loop',
    bash_command='echo 1',
    dag=dag,
)
# [END howto_operator_bash]

run_this >> run_this_last

for i in range(3):
    task = BashOperator(
        task_id='runme_' + str(i),
        bash_command='echo "{{ task_instance_key_str }}" && sleep 1',
        dag=dag,
    )
    task >> run_this

# [START howto_operator_bash_template]
also_run_this = BashOperator(
    task_id='also_run_this',
    bash_command='echo "run_id={{ run_id }} | dag_run={{ dag_run }}"',
    dag=dag,
)
# [END howto_operator_bash_template]
also_run_this >> run_this_last

if __name__ == "__main__":
    dag.cli()
Trigger DAG 后可以 View Logs。
或者通过 docker 装 airflow:
docker-compose.yml
version: '3'
services:
  postgres:
    image: postgres:9.6
    environment:
      - POSTGRES_USER=airflow
      - POSTGRES_PASSWORD=airflow
      - POSTGRES_DB=airflow
    ports:
      - "5432:5432"

  webserver:
    image: puckel/docker-airflow:1.10.1
    build:
      context: https://github.com/puckel/docker-airflow.git#1.10.1
      dockerfile: Dockerfile
      args:
        AIRFLOW_DEPS: gcp_api,s3
        PYTHON_DEPS: sqlalchemy==1.2.0
    restart: always
    depends_on:
      - postgres
    environment:
      - LOAD_EX=n
      - EXECUTOR=Local
      - FERNET_KEY=jsDPRErfv8Z_eVTnGfF8ywd19j4pyqE3NpdUBA_oRTo=
    volumes:
      - ./examples/intro-example/dags:/usr/local/airflow/dags
      # Uncomment to include custom plugins
      # - ./plugins:/usr/local/airflow/plugins
    ports:
      - "8080:8080"
    command: webserver
    healthcheck:
      test: ["CMD-SHELL", "[ -f /usr/local/airflow/airflow-webserver.pid ]"]
      interval: 30s
      timeout: 30s
      retries: 3
docker-compose up
即可在http://localhost:8080/看到 airflow web ui
docker-compose logs
docker-compose down
或者通过下面这种Dockerfile:
# Base Image
FROM python:3.7-slim-buster

# Arguments that can be set with docker build
ARG AIRFLOW_VERSION=1.10.1
ARG AIRFLOW_HOME=/usr/local/airflow

# Export the environment variable AIRFLOW_HOME where airflow will be installed
ENV AIRFLOW_HOME=${AIRFLOW_HOME}

ENV AIRFLOW_GPL_UNIDECODE=1

# Install dependencies and tools
RUN apt-get update -yqq && \
    apt-get upgrade -yqq && \
    apt-get install -yqq --no-install-recommends \
    wget \
    libczmq-dev \
    curl \
    libssl-dev \
    git \
    inetutils-telnet \
    bind9utils freetds-dev \
    libkrb5-dev \
    libsasl2-dev \
    libffi-dev libpq-dev \
    freetds-bin build-essential \
    default-libmysqlclient-dev \
    apt-utils \
    rsync \
    zip \
    unzip \
    gcc \
    locales \
    procps \
    && apt-get clean

# Load custom configuration
COPY ./airflow.cfg ${AIRFLOW_HOME}/airflow.cfg

# Upgrade pip
# Create airflow user
# Install apache airflow with subpackages
RUN pip install --upgrade pip && \
    useradd -ms /bin/bash -d ${AIRFLOW_HOME} airflow && \
    pip install apache-airflow==${AIRFLOW_VERSION} --constraint "https://raw.githubusercontent.com/apache/airflow/constraints-1.10.1/constraints-3.7.txt"

# Copy the entrypoint.sh from host to container (at path AIRFLOW_HOME)
COPY ./entrypoint.sh /entrypoint.sh

# Set the entrypoint.sh file to be executable
RUN chmod +x ./entrypoint.sh

# Set the owner of the files in AIRFLOW_HOME to the user airflow
RUN chown -R airflow: ${AIRFLOW_HOME}

# Set the username to use
USER airflow

# Set workdir (it's like a cd inside the container)
WORKDIR ${AIRFLOW_HOME}

# Create the dags folder which will contain the DAGs
RUN mkdir dags

# Expose the webserver port
EXPOSE 8080

# Execute the entrypoint.sh
ENTRYPOINT [ "/entrypoint.sh" ]
entrypoint.sh:
#!/usr/bin/env bash

# Initiliaze the metadata database
airflow initdb

# Run the scheduler in background
airflow scheduler &> /dev/null &

# Run the web server in foreground (for docker logs)
exec airflow webserver
然后 Build the Airflow image
docker build --tag airflow .Run the Airflow container
docker run --name my_airflow -it -d -p 8080:8080 airflowVerify that your Airflow container is running and healthy:
docker psCheck out the logs:
docker logs my_airflowmount /xxx目录下python文件写成的DAG到AIRFLOW_HOME目录下的dags目录:
docker run --name my_airflow -it -d -p 8080:8080 --mount type=bind,source=/xxx/my_dag.py,target=/usr/local/airflow/dags/my_dag.py airflow进入验证my_dag在dags目录下:
docker exec -it my_airflow ls /usr/local/airflow/dagsexec into the container to access the shell.
docker exec -it my_airflow bashNext, make sure the DAG was parsed correctly:
python dags/my_dag.py

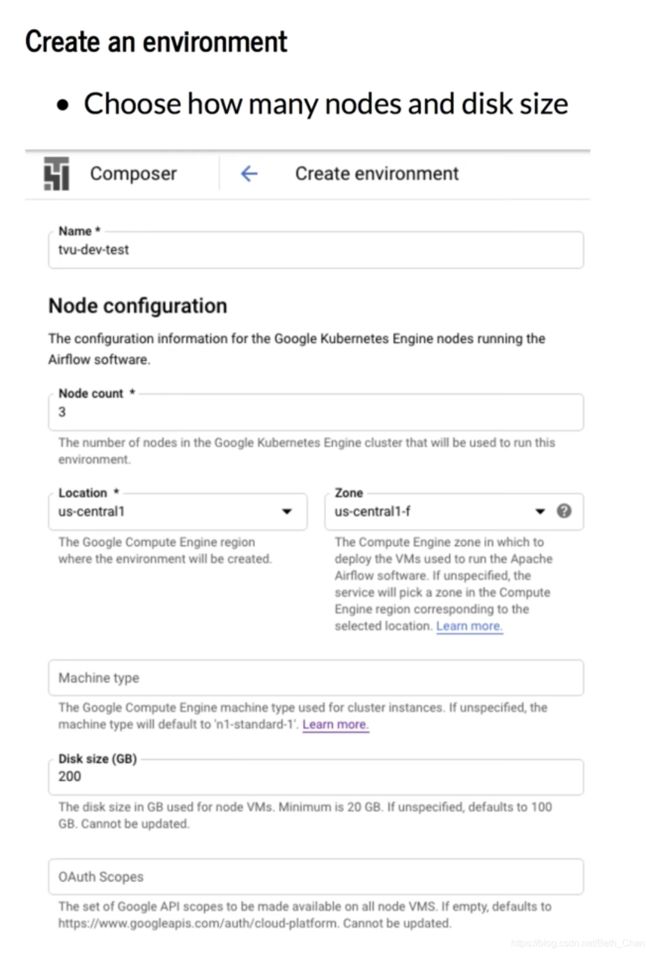
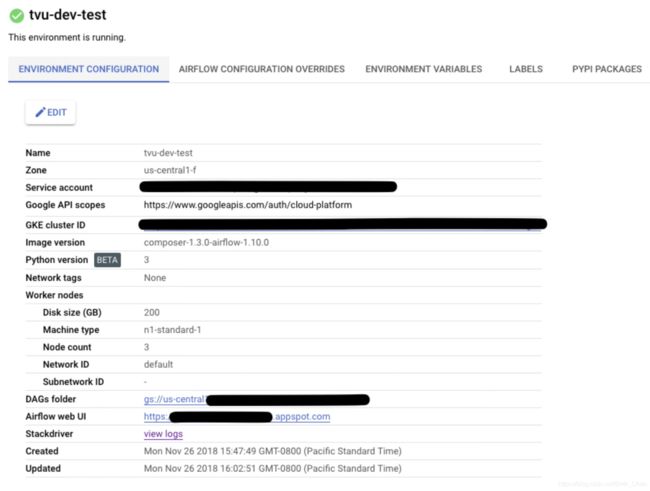
选择Airflow和Python版本,点击创建,即可成功创建env。

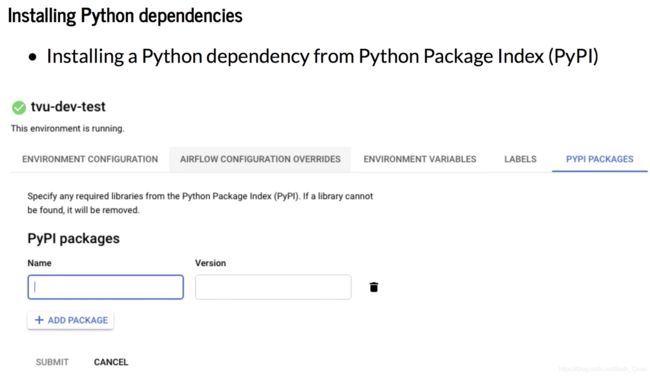
还可以安装Python依赖:
接下来,我们就可以参照上面的 example_bash_operator 写 DAG:
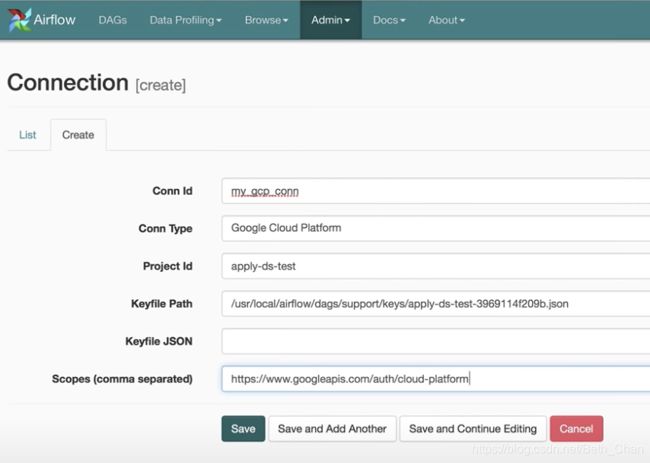
跟 BigQuery 集成可以用 bigquery_operator,并且在 Web UI 上设置 Connection,从而操作 BigQuery 里的 Dataset,在 task 里可以写 sql 或者指明 sql 文件。
Airflow 还有另一个比较常用的是 Variables,它就是 key-value 键值对。
推荐以下 Airflow 中文文档:
https://www.kancloud.cn/luponu/airflow-doc-zh/889656
及以下 Youtube视频:
Airflow tutorial 1: Introduction to Apache Airflow
Airflow tutorial 2: Set up airflow environment with docker
Airflow tutorial 3: Set up airflow environment using Google Cloud Composer
Airflow tutorial 4: Writing your first pipeline
Airflow tutorial 5: Airflow concept
Airflow tutorial 6: Build a data pipeline using Google Bigquery
Airflow tutorial 7: Airflow variables
Data Catalog
元数据管理
(1) System: BIGQUERY
Type: Dataset, Table
Resource URL: link to BigQuery URL
Tags
Schema and column tags: Name, Type (NUMBERIC, STRING, etc) , Mode (eg: NULLABLE), Column tags, Policy tags, Description list
(2) System: CLOUD_PUBSUB
Resource URL: link to Cloud Pub/Sub URL
Tags
Cloud Pub/Sub里的详情有Topics,Subscriptions(Delivery type: Pull等),View Message,Publish message request count/sec图表,Publish message operation count/sec图表等。
(3)GCS
Entry group, Entries, Bucket, Type: FILESET, etc
Google Data Studio
连接数据源,BI report可视化报表,可以share report,也可以查看shared with me/owned by me的report
Monitoring
Incident, Dashboards, Alerting等
Logging
Logs explorer, Logs Dashboard, Logs Storage retention period等
Machine Learning
-
TensorFlow
-
Cloud ML
-
Machine Learning APIs
Why use CLoud Machine Learning Platform?
-
For structured data
-
Classification and regression
-
Recommendation
-
Anomaly detection
-
-
For unstructured data
-
Image and video analytics
-
Text analytics
-
-
Gain insight from images
-
Detect inappropriate content
-
Analyze sentiment
-
Extract text
Cloud Natural Language API
-
can return text in real time
-
Highly accurate, even in noisy environments
-
Access from any device
Cloud Translation API
-
Translate strings
-
Programmatically detect a document’s language
-
Support for dozen’s languages
Cloud Video Intelligence API
-
Annotate the contents of video
-
Detect scene changes
-
Flag inappropriate content
-
Support for a variety of video formats
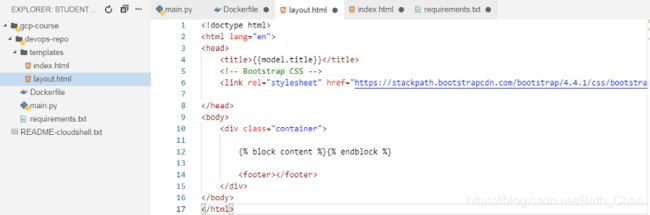
Cloud Build
Run Infrastructure as a code. Let you orchestrate build steps that run as container images and automate Terraform workflow.
可参照https://github.com/agmsb/googlecloudbuild-terraform
Cloud Build 可以从各种代码库或云存储空间导入源代码,根据您的规范执行构建,并生成诸如 Docker 容器或 Java 归档的软件工件。
可以通过 Google Cloud Console、gcloud 命令行工具或 Cloud Build 的 REST API 使用 Cloud Build。
在 Cloud Console 中,您可以通过构建记录页面查看 Cloud Build 构建结果,并通过构建触发器进行自动构建。
您可以使用 gcloud 工具创建和管理构建,并可以运行命令来执行提交构建、列出构建和取消构建等任务。
您可以使用 Cloud Build REST API 请求构建。
与其他 Cloud Platform API 一样,您必须使用 OAuth2 授予访问权限。获得访问授权后,您可以使用 API 启动新构建、查看构建状态和详情、列出每个项目的构建并取消当前正在进行的构建。
构建配置和构建步骤
可以编写构建配置,向 Cloud Build 提供有关执行什么任务的说明。可以将构建配置为提取依赖项,运行单元测试、静态分析和集成测试,并使用 docker、gradle、maven、bazel 和 gulp 等构建工具创建软件工件。
Cloud Build 将构建作为一系列构建步骤执行,其中的每个构建步骤都在 Docker 容器中运行。执行构建步骤类似于在脚本中执行命令。
您可以使用 Cloud Build 和 Cloud Build 社区提供的构建步骤,也可以编写自己的自定义构建步骤:
-
Cloud Build 提供的构建步骤:Cloud Build 发布了一组适用于常用语言和任务的受支持开源构建步骤。
-
社区提供的构建步骤:Cloud Build 用户社区提供了开源构建步骤。
-
自定义构建步骤:您可以自行创建要在自己的构建中使用的构建步骤。
每个构建步骤都通过其连接到本地 Docker 网络(名为 cloudbuild)的容器运行。这使构建步骤可以相互通信并共享数据。
您可以在 Cloud Build 中使用标准 Docker Hub 映像,例如 Ubuntu 和 Gradle。
构建的工作原理
以下步骤描述了一般而言的 Cloud Build 构建生命周期:
- 准备应用代码及任何所需资源。
- 创建 YAML 或 JSON 格式的构建配置文件,其中包含 Cloud Build 的说明。
- 将构建提交到 Cloud Build。
- Cloud Build 根据您提供的构建配置执行构建。
- 如果适用,构建的所有映像都将推送到 Container Registry。Container Registry 可在 Google Cloud 上提供安全、私密的 Docker 映像存储空间。


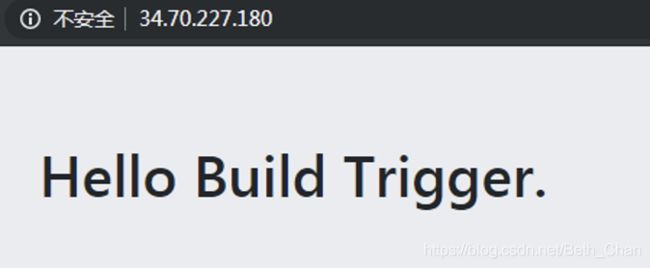
程序运行结果:
Cloud Run & Cloud Functions & App Engine

以下是Java code部署的场景例子,更多场景可以查看其他官方文档:
使用 App Engine:https://cloud.google.com/appengine/docs/flexible/java/quickstart
使用 Compute Engine:https://cloud.google.com/java/getting-started/getting-started-on-compute-engine
使用 Jib 构建 Java 容器:https://cloud.google.com/java/getting-started/jib
https://cloud.tencent.com/developer/news/612944
Management Tool
Deployment Manager

输入以下命令即可看到创建my-vm成功:

my-vm详情如下:

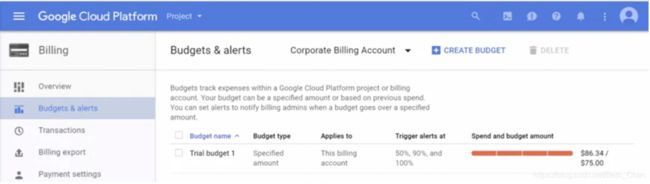
Pricing
Budget and Alerts
基于 GCP project上的 billing 账户,可以定义在 50%,90% 和 100% 时触发 alerts,可导出账单详情,在 Report 上可看出支出详情。Quotas 可用来预防过度消费资源,有速率分额限制和分配数量限制,比如 Kubernetes services 可设定分额为每 100 秒最多 1000 个调用,每个 project 最多 5 个 VPN。