商场项目技术点-2
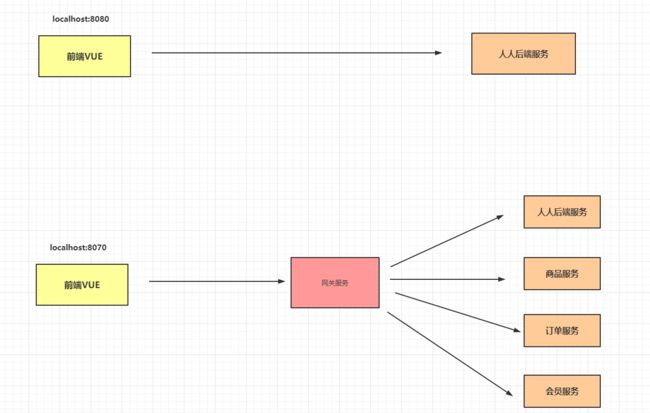
1.将前端的接口分配给后端的各个模块
1.1通过网关可以将url地址转发到其他功能模块
spring:
  application:
    name: mall-gateway
  cloud:
    nacos:
      discovery:
        server-addr: 192.168.56.100:8848
    gateway:
      routes:
        - id: route1
          uri: http://www.baidu.com
          predicates:
            - Query=url,baidu
        - id: route2
          uri: http://www.jd.com
          predicates:
            - Query=url,jd
        - id: product_route1
          uri: lb://mall-product
          predicates:
            - Path=/app/product/** #允许带app的url进行路由
          filters:
            - RewritePath=/app/?(?.*), /$\{segment} #将app的url路径换成空
        - id: app_route
          uri: lb://renren-fast
          predicates:
            - Path=/app/** #允许带app的url进行路由
          filters:
            - RewritePath=/app/?(?.*), /renren-fast/$\{segment} #将app的url路径换成renren-fast
1.2网关服务中会根据loadbanlance负载均衡路由到renren-fast但是缺少了对应的依赖,在Gateway服务中添加即可
            org.springframework.cloud
            spring-cloud-starter-loadbalancer
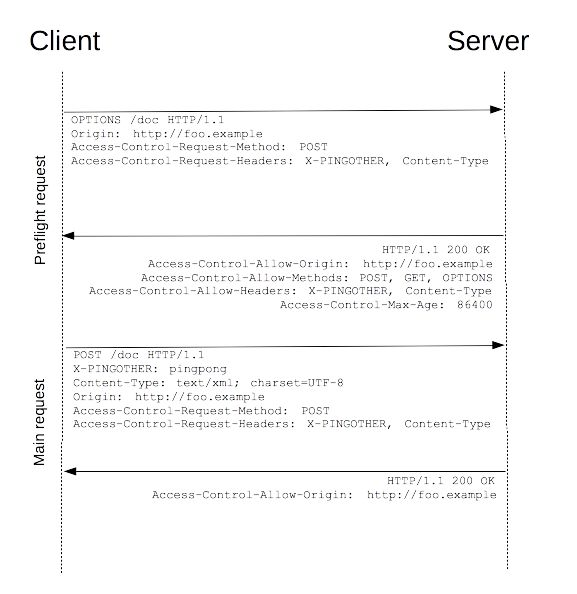
2.跨域问题的解决
同源策略
> 由于浏览器的同源策略,即属于不同域的页面之间不能相互访问各自的页面内容
> `注`:同源策略,单说来就是同协议,同域名,同端口
URL 说明 是否允许通信
http://www.a.com/a.js
http://www.a.com/b.js 同一域名下 允许
http://www.a.com/lab/a.js
http://www.a.com/script/b.js 同一域名下不同文件夹 允许
http://www.a.com:8000/a.js
http://www.a.com/b.js 同一域名,不同端口 不允许
http://www.a.com/a.js
https://www.a.com/b.js 同一域名,不同协议 不允许
http://www.a.com/a.js
http://70.32.92.74/b.js 域名和域名对应ip 不允许
http://www.a.com/a.js
http://script.a.com/b.js 主域相同,子域不同 不允许
http://www.a.com/a.js
http://a.com/b.js 同一域名,不同二级域名(同上) 不允许(cookie这种情况下也不允许访问)
http://www.cnblogs.com/a.js
http://www.a.com/b.js 不同域名 不允许
跨域网站介绍:https://developer.mozilla.org/zh-CN/docs/Web/HTTP/CORS
对于跨域问题的解决我们统一在Gateway中设定。注意删除掉在renren-fast中配置的跨域问题
package com.msb.mall.gateway.config;

import org.springframework.context.annotation.Bean;
import org.springframework.context.annotation.Configuration;
import org.springframework.web.cors.CorsConfiguration;
import org.springframework.web.cors.reactive.CorsConfigurationSource;
import org.springframework.web.cors.reactive.CorsWebFilter;
import org.springframework.web.cors.reactive.UrlBasedCorsConfigurationSource;

@Configuration
public class MallCorsConfiguration {

    @Bean
    public CorsWebFilter corsWebFilter(){
        UrlBasedCorsConfigurationSource source = new UrlBasedCorsConfigurationSource();
        CorsConfiguration configuration = new CorsConfiguration();
        // 配置跨域的信息
        configuration.addAllowedHeader("*");
        configuration.addAllowedMethod("*");
        // SpringBoot升级到2.4.0 之后需要使用该配置
        configuration.addAllowedOriginPattern("*");
        configuration.setAllowCredentials(true);
        source.registerCorsConfiguration("/**",configuration);
        return new CorsWebFilter(source);
    }
}
3.使用labmad展示三级列表
在controller中创建方法
    /**
     * 查询三级产品列表
     */
    @GetMapping("/listTree")
    public R listTree(@RequestParam Map params){
        List entities = categoryService.listTree(params);
        return R.ok().put("data",entities);
    }
具体代码实现
    @Override
    public List listTree(Map param) {
        // 1.查询所有的商品分类信息
        List categoryEntities = baseMapper.selectList(null);
        // 2.将商品分类信息拆解为树形结构【父子关系】
        // 第一步遍历出所有的大类  parent_cid = 0
        List list = categoryEntities.stream().filter(categoryEntity -> categoryEntity.getParentCid() == 0)
                .map(categoryEntity -> {
                    // 根据大类找到多有的小类  递归的方式实现
                    categoryEntity.setChildrens(getCategoryChildrens(categoryEntity,categoryEntities));
                    return categoryEntity;
                }).sorted((entity1, entity2) -> {
                    return (entity1.getSort() == null ? 0 : entity1.getSort()) - (entity2.getSort() == null ? 0 : entity2.getSort());
                }).collect(Collectors.toList());
        // 第二步根据大类找到对应的所有的小类
        return list;
}
    @Override
    public void removeCategoryByIds(List ids) {
        baseMapper.deleteBatchIds(ids);
    }

    private List getCategoryChildrens(CategoryEntity categoryEntity, List categoryEntities) {
        List collect = categoryEntities.stream().filter(entity -> {
            // 根据大类找到他的直属的小类
            return entity.getParentCid() == categoryEntity.getCatId();
        }).map(entity -> {
            // 根据这个小类递归找到对应的小小类
            entity.setChildrens(getCategoryChildrens(entity, categoryEntities));
            return entity;
        }).sorted((entity1, entity2) -> {
            return (entity1.getSort() == null ? 0 : entity1.getSort()) - (entity2.getSort() == null ? 0 : entity2.getSort());
        }).collect(Collectors.toList());
        return collect;
}
4.实现后台服务逻辑删除的操作
在实际开发中针对数据删除这块我们一般都会采用逻辑删除的方法来操作。在本项目中我们可以通过mybatis-Puls中提供的逻辑删除方式来实现
mybatis-plus:https://mp.baomidou.com/guide/
首先配置全局的逻辑删除逻辑
mybatis-plus:
  mapper-locations: classpath*:/mapper/**/*.xml
  global-config:
    db-config:
      id-type: auto #????
      logic-delete-field: showStatus # 全局逻辑删除的实体字段名(since 3.3.0,配置后可以忽略不配置步骤2)
      logic-delete-value: 1 # 逻辑已删除值(默认为 1)
      logic-not-delete-value: 0 # 逻辑未删除值(默认为 0)
在对应的字段上面添加注解
	/**
	 * 是否显示[0-不显示,1显示]
	 */
	@TableLogic(value = "1",delval = "0")//1表示不删除0表示删除
	private Integer showStatus;
代码实现逻辑删除
    @Override
    public void removeCategoryByIds(List ids) {
        baseMapper.deleteBatchIds(ids);
    }
5. 图片的管理以及上传
5.1文件存储的几种方式
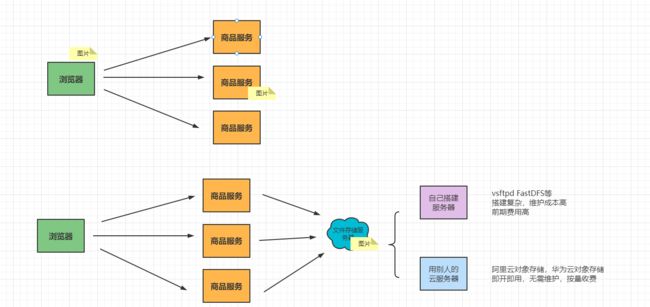
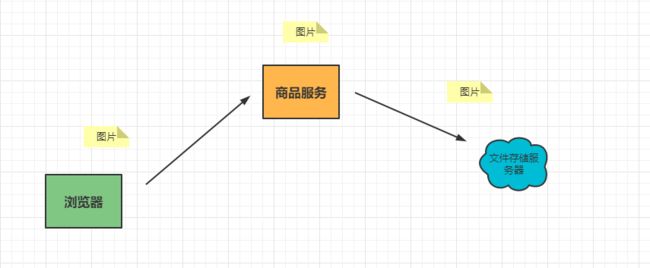
1.单体架构可以直接把图片存储在服务器中
但是在分布式环境下面直接存储在WEB服务器中的方式就不可取了,这时我们需要搭建独立的文件存储服务器。
5.2 使用阿里云服务
针对本系统中的相关的文件,图片,文本等统一的交给云服务器管理。阿里云服务地址:https://www.aliyun.com/activity/daily/award?utm_content=se_1010784590
5.2.1阿里云OSS简介
阿里云对象存储服务(Object Storage Service,简称OSS),是阿里云对外提供的海量、安全、低成本、高可靠的云存储服务。您可以通过本文档提供的简单的REST接口,在任何时间、任何地点、任何互联网设备上进行上传和下载数据。基于OSS,您可以搭建出各种多媒体分享网站、网盘、个人和企业数据备份等基于大规模数据的服务。
5.3阿里云API使用
最终我们是需要通过服务代码将图片上传到阿里云OSS服务中,接下来看下代码API如何使用。Java操作的API文档地址:https://help.aliyun.com/document_detail/32008.htmlspm=5176.208357.1107607.21.3476390f9Pqw6K
1.添加相关的依赖
    com.aliyun.oss
    aliyun-sdk-oss
    3.10.2
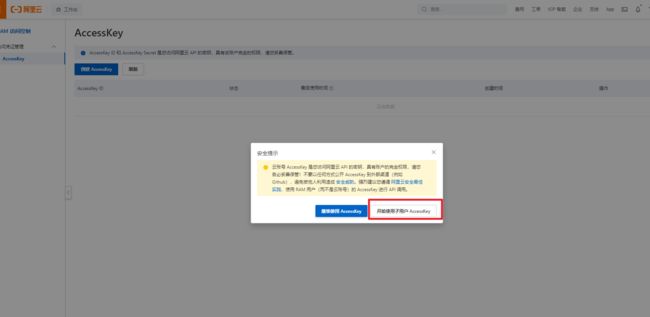
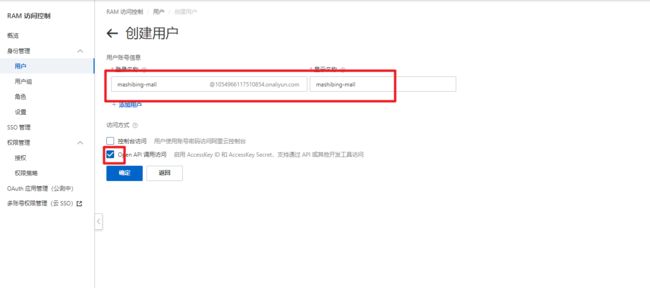
2.创建AccessKey
3. 创建用户
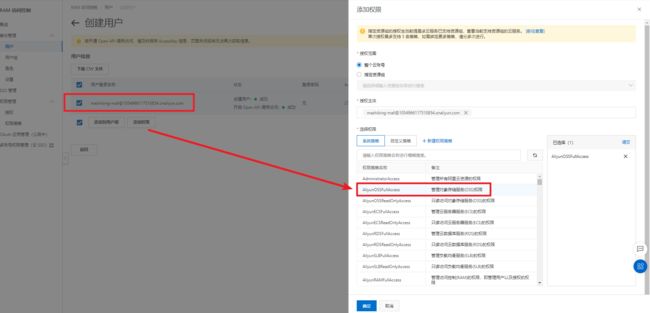
4.添加权限
5.通过官方的案例代码测试上传操作
    @Test
    public void testUploadFile() throws FileNotFoundException {
        // yourEndpoint填写Bucket所在地域对应的Endpoint。以华东1(杭州)为例,Endpoint填写为https://oss-cn-hangzhou.aliyuncs.com。
        String endpoint = "oss-cn-guangzhou.aliyuncs.com";
        // 阿里云账号AccessKey拥有所有API的访问权限,风险很高。强烈建议您创建并使用RAM用户进行API访问或日常运维,请登录RAM控制台创建RAM用户。
        String accessKeyId = "LTAI5tBPqoroToQNyrHpYJLR";
        String accessKeySecret = "3GnWaRhcBW3gUDhNSVr23fSrM6A0Q4";

        // 创建OSSClient实例。
        OSS ossClient = new OSSClientBuilder().build(endpoint, accessKeyId, accessKeySecret);

        // 填写本地文件的完整路径。如果未指定本地路径,则默认从示例程序所属项目对应本地路径中上传文件流。
        InputStream inputStream = new FileInputStream("C:\\Users\\dpb\\Downloads\\1111.jpg");
        // 依次填写Bucket名称(例如examplebucket)和Object完整路径(例如exampledir/exampleobject.txt)。Object完整路径中不能包含Bucket名称。
        ossClient.putObject("mashibing-mall", "1111.jpg", inputStream);

        // 关闭OSSClient。
        ossClient.shutdown();
        System.out.println("长传图片成功...");
    }
6. 图片上传的方式
第一种方式:表单提交同步将表单数据和图片都提交到后端服务器中,然后在后端服务器中将图片再上传到阿里云服务中。
但是这种方式的缺点是要做两次上传操作,还有就是将图片和正常的表单信息一起提交影响正常业务的效率。
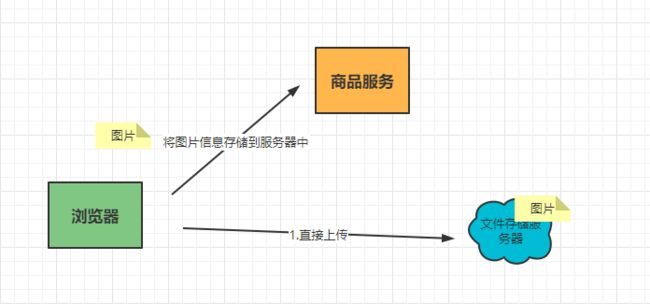
第二种方式就是在客户端直接将图片上传到阿里云服务器中,返回访问的url地址,然后将url访问地址传递到后端服务进而保存在数据库中。
这种方式的缺点是在客户端需要获取AccessKey和SecuretKey,这样将相关的核心数据暴露在前端不安全。
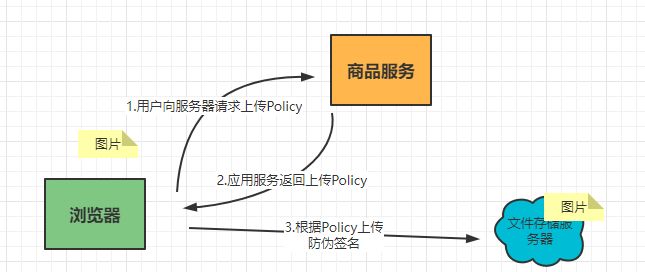
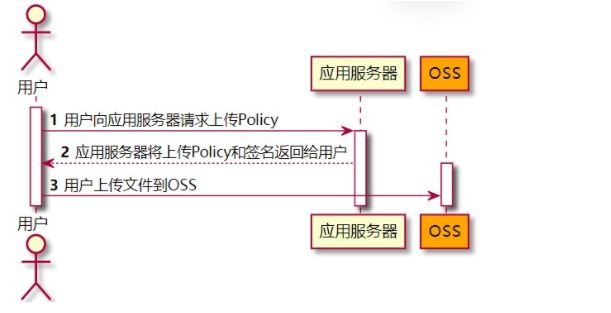
第三种方式就是客户端向服务器获取阿里云的防伪签名,然后直接将图片通过防伪签名上传到阿里云服务器中。这样既提高了效率又保证了安全。
7.AlibabaOSS服务(cloud的图片上传服务)
直接通过阿里云提供的API操作相对的复杂一些,这时我们可以通过SpringCloudAlibaba OSS服务来简化开发,添加对应的依赖
1.在通用模块中添加依赖
            com.alibaba.cloud
            spring-cloud-starter-alicloud-oss
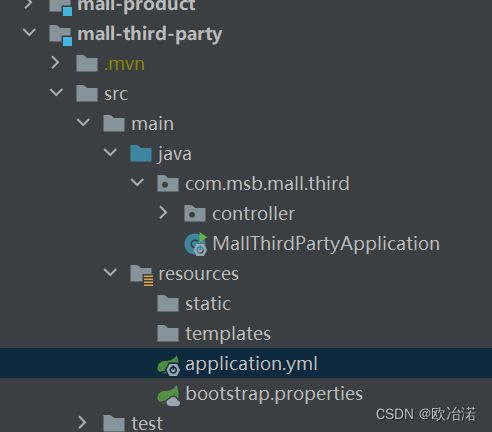
2.创建三方服务模块
3在属性文件中配置对应的AccessKey,SecurtKey和Endpoint
# 数据库的连接新
spring:
  cloud:
    nacos:
      discovery:
        server-addr: 192.168.56.100:8848
    alicloud:
      access-key: LTAI5tJ1fWC78ezrvUhVHeb8
      secret-key: 6C7HoUNRtpyWDoq6Uhu0rMRiSuRa4V
      oss:
        endpoint: oss-cn-beijing.aliyuncs.com
        bucket: msb-mall-q
    application:
      name: mall-third
server:
  port: 8090
4. 服务端生成签名
生成签名地址:https://help.aliyun.com/document_detail/31926.htmspm=a2c4g.11186623.0.0.2688566aJheBNk#concept-en4-sjy-5db
直接通过案例代码改造即可:https://help.aliyun.com/document_detail/91868.htm?spm=a2c4g.11186623.0.0.49c1344eaX3VCA#concept-ahk-rfz-2fb
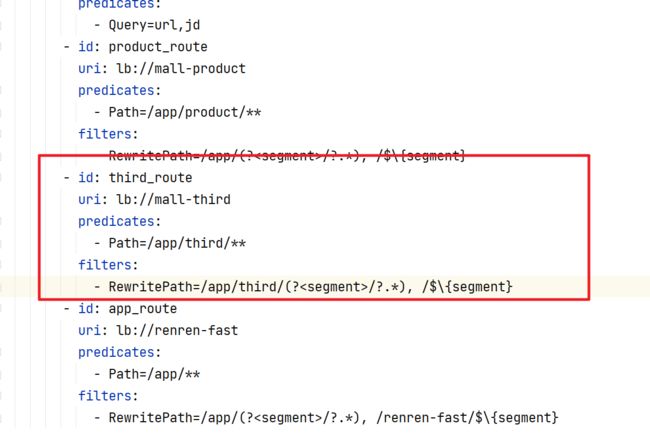
5.客户端获取服务签名的时候肯定是走的网关路由,所以我们还需要在网关中添加Third服务的路由:
package com.msb.mall.third.controller;

import com.aliyun.oss.OSSClient;
import com.aliyun.oss.common.utils.BinaryUtil;
import com.aliyun.oss.model.MatchMode;
import com.aliyun.oss.model.PolicyConditions;
import com.msb.common.utils.R;
import org.springframework.beans.factory.annotation.Autowired;
import org.springframework.beans.factory.annotation.Value;
import org.springframework.web.bind.annotation.RequestMapping;
import org.springframework.web.bind.annotation.RestController;

import javax.annotation.Resource;
import java.io.FileInputStream;
import java.text.SimpleDateFormat;
import java.util.Date;
import java.util.LinkedHashMap;
import java.util.Map;

@RestController
public class OssController {

    @Resource
    private OSSClient ossClient;
    @Value("${spring.cloud.alicloud.oss.endpoint}")
    private String endpoint;
    @Value("${spring.cloud.alicloud.oss.bucket}")
    private String bucket;
    @Value("${spring.cloud.alicloud.access-key}")
    private String accessId;

    @RequestMapping("/oss/policy")
    public R getPoilcy(){
            String host = "https://" + bucket + "." + endpoint; // host的格式为 bucketname.endpoint
            // callbackUrl为上传回调服务器的URL,请将下面的IP和Port配置为您自己的真实信息。
            String format = new SimpleDateFormat("yyyy-MM-dd").format(new Date());
            String dir = format+"/"; // 用户上传文件时指定的前缀。

            // 创建OSSClient实例。
            //OSS ossClient = new OSSClientBuilder().build(endpoint, accessId, accessKey);
            Map respMap = null;
            try {
                long expireTime = 30;
                long expireEndTime = System.currentTimeMillis() + expireTime * 1000;
                Date expiration = new Date(expireEndTime);
                // PostObject请求最大可支持的文件大小为5 GB,即CONTENT_LENGTH_RANGE为5*1024*1024*1024。
                PolicyConditions policyConds = new PolicyConditions();
                policyConds.addConditionItem(PolicyConditions.COND_CONTENT_LENGTH_RANGE, 0, 1048576000);
                policyConds.addConditionItem(MatchMode.StartWith, PolicyConditions.COND_KEY, dir);

                String postPolicy = ossClient.generatePostPolicy(expiration, policyConds);
                byte[] binaryData = postPolicy.getBytes("utf-8");
                String encodedPolicy = BinaryUtil.toBase64String(binaryData);
                String postSignature = ossClient.calculatePostSignature(postPolicy);

                respMap = new LinkedHashMap();
                respMap.put("accessid", accessId);
                respMap.put("policy", encodedPolicy);
                respMap.put("signature", postSignature);
                respMap.put("dir", dir);
                respMap.put("host", host);
                respMap.put("expire", String.valueOf(expireEndTime / 1000));
                // respMap.put("expire", formatISO8601Date(expiration));


            } catch (Exception e) {
                // Assert.fail(e.getMessage());
                System.out.println(e.getMessage());
            } finally {
                ossClient.shutdown();
            }
            return R.ok().put("data",respMap);
        }

}
