LAMT架构
部署LAMT
实验环境:
| 系统 | 主机IP | 服务 |
|---|---|---|
| centos7 | 192.168.201.140 | httpd2.4 mysql5.7 tomcat9.0 |
安装httpd
//创建apache服务的用户和组
[root@wnz ~]# groupadd -r apache
[root@wnz ~]# useradd -r -M -s /sbin/nologin -g apache apache

//安装依赖包
[root@wnz ~]# yum -y install openssl-devel pcre-devel expat-devel libtool gcc gcc-c++

//下载和安装apr以及apr-util
[root@wnz ~]# wget http://mirror.bit.edu.cn/apache/apr/apr-1.7.0.tar.gz http://mirror.bit.edu.cn/apache/apr/apr-util-1.6.1.tar.gz
[root@wnz ~]# tar xf apr-1.7.0.tar.gz
[root@wnz ~]# tar xf apr-util-1.6.1.tar.gz
[root@wnz ~]# cd apr-1.7.0
[root@wnz apr-1.7.0]# vim configure
...
    cfgfile=${ofile}T
    trap "$RM \"$cfgfile\"; exit 1" 1 2 15
    $RM "$cfgfile"    //将此行注释或者删除
...
[root@wnz apr-1.7.0]# ./configure --prefix=/usr/local/apr
[root@wnz apr-1.7.0]# make && make install
[root@wnz apr-1.7.0]# cd ../apr-util-1.6.1
[root@wnz apr-util-1.6.1]# ./configure --prefix=/usr/local/apr-util --with-apr=/usr/local/apr
[root@wnz apr-util-1.6.1]# make && make install

//下载和安装httpd
[root@wnz ~]# wget http://mirror.bit.edu.cn/apache/httpd/httpd-2.4.43.tar.gz
[root@wnz ~]# tar xf httpd-2.4.43.tar.gz
[root@wnz ~]# cd httpd-2.4.43
[root@wnz httpd-2.4.43]# ./configure --prefix=/usr/local/apache \
> --sysconfdir=/etc/httpd24 \
> --enable-proxy \
> --enable-proxy-connect \
> --enable-so \
> --enable-ssl \
> --enable-cgi \
> --enable-rewrite \
> --with-zlib \
> --with-pcre \
> --with-apr=/usr/local/apr \
> --with-apr-util=/usr/local/apr-util/ \
> --enable-modules=most \
> --enable-mpms-shared=all \
> --with-mpm=prefork
[root@wnz httpd-2.4.43]# make && make install

//安装后配置
[root@wnz ~]# echo 'export PATH=/usr/local/apache/bin:$PATH' > /etc/profile.d/httpd.sh
[root@wnz ~]# source /etc/profile.d/httpd.sh
[root@wnz ~]# ln -s /usr/local/apache/include/ /usr/include/httpd
[root@wnz ~]# echo 'MANPATH /usr/local/apache/man' >> /etc/man_db.conf

//取消ServerName前面的注释
[root@wnz ~]# sed -i '/#ServerName/s/#//g' /etc/httpd24/httpd.conf

//启动apache
[root@wnz ~]# apachectl start
[root@wnz ~]# ss -antl
State      Recv-Q Send-Q  Local Address:Port                 Peer Address:Port
LISTEN     0      128                 *:22                              *:*
LISTEN     0      100         127.0.0.1:25                              *:*
LISTEN     0      128              [::]:80                           [::]:*
LISTEN     0      128              [::]:22                           [::]:*
LISTEN     0      100             [::1]:25                           [::]:*
安装mysql
//安装依赖包
[root@wnz ~]# yum -y install libaio ncurses-devel openssl-devel openssl cmake mariadb-devel

//创建用户和组
[root@wnz ~]# groupadd -r -g 306 mysql
[root@wnz ~]# useradd -r -M -s /sbin/nologin -g 306 -u 306 mysql

//下载二进制格式的mysql软件包
[root@wnz ~]# wget https://dev.mysql.com/get/Downloads/MySQL-5.7/mysql-5.7.30-linux-glibc2.12-x86_64.tar.gz
[root@wnz ~]# tar xf mysql-5.7.30-linux-glibc2.12-x86_64.tar.gz -C /usr/local/

//创建软连接,修改文件属主
[root@wnz ~]# cd  /usr/local/
[root@wnz local]# ln -s mysql-5.7.30-linux-glibc2.12-x86_64/ mysql
[root@wnz local]# chown -R mysql.mysql mysql*

//添加环境变量
[root@wnz ~]# echo 'export PATH=/usr/local/mysql/bin:$PATH' > /etc/profile.d/mysql.sh
[root@wnz ~]# source /etc/profile.d/mysql.sh

//建立数据存放目录
[root@wnz ~]# mkdir /opt/data
[root@wnz ~]# chown -R mysql.mysql /opt/data

//初始化数据库
[root@wnz ~]# /usr/local/mysql/bin/mysqld --initialize-insecure --user=mysql --datadir=/opt/data
2020-08-02T09:06:50.282457Z 0 [Warning] TIMESTAMP with implicit DEFAULT value is deprecated. Please use --explicit_defaults_for_timestamp server option (see documentation for more details).
2020-08-02T09:06:50.658872Z 0 [Warning] InnoDB: New log files created, LSN=45790
2020-08-02T09:06:50.713399Z 0 [Warning] InnoDB: Creating foreign key constraint system tables.
2020-08-02T09:06:50.917912Z 0 [Warning] No existing UUID has been found, so we assume that this is the first time that this server has been started. Generating a new UUID: 80830099-d49f-11ea-9871-000c2956da10.
2020-08-02T09:06:50.918917Z 0 [Warning] Gtid table is not ready to be used. Table 'mysql.gtid_executed' cannot be opened.
2020-08-02T09:06:51.506040Z 0 [Warning] CA certificate ca.pem is self signed.
2020-08-02T09:06:51.844726Z 1 [Warning] root@localhost is created with an empty password ! Please consider switching off the --initialize-insecure option.

//配置mysql
[root@wnz ~]# ln -sv /usr/local/mysql/include/ /usr/local/include/mysql
‘/usr/local/include/mysql’ -> ‘/usr/local/mysql/include/’
[root@wnz ~]# echo '/usr/local/mysql/lib' > /etc/ld.so.conf.d/mysql.conf
[root@wnz ~]# ldconfig

//生成配置文件
[root@wnz ~]# cat > /etc/my.cnf < [mysqld]
> basedir = /usr/local/mysql
> datadir = /opt/data
> socket = /tmp/mysql.sock
> port = 3306
> pid-file = /opt/data/mysql.pid
> user = mysql
> skip-name-resolve
> EOF

//配置服务启动脚本
[root@wnz ~]# cp -a /usr/local/mysql/support-files/mysql.server /etc/init.d/mysqld
[root@wnz ~]# sed -ri 's#^(basedir=).*#\1/usr/local/mysql#g' /etc/init.d/mysqld
[root@wnz ~]# sed -ri 's#^(datadir=).*#\1/opt/data#g' /etc/init.d/mysqld

//设置开机自启
[root@wnz ~]# chkconfig --add mysqld
[root@wnz ~]# chkconfig --list

Note: This output shows SysV services only and does not include native
      systemd services. SysV configuration data might be overridden by native
      systemd configuration.

      If you want to list systemd services use 'systemctl list-unit-files'.
      To see services enabled on particular target use
      'systemctl list-dependencies [target]'.

mysqld         	0:off	1:off	2:on	3:on	4:on	5:on	6:off
netconsole     	0:off	1:off	2:off	3:off	4:off	5:off	6:off
network        	0:off	1:off	2:on	3:on	4:on	5:on	6:off

//启动mysql
[root@wnz ~]# service mysqld start
Starting MySQL.Logging to '/opt/data/wnz.err'.
 SUCCESS!
[root@wnz ~]# ss -antl
State      Recv-Q Send-Q  Local Address:Port                 Peer Address:Port
LISTEN     0      128                 *:22                              *:*
LISTEN     0      100         127.0.0.1:25                              *:*
LISTEN     0      80               [::]:3306                         [::]:*
LISTEN     0      128              [::]:80                           [::]:*
LISTEN     0      128              [::]:22                           [::]:*
LISTEN     0      100             [::1]:25                           [::]:*

//修改密码
[root@wnz ~]# mysql -e "set password = password('wang123')"
安装tomcat
//安装JDK
[root@wnz ~]# yum -y install java-1.8.0-openjdk java-1.8.0-openjdk-devel

//安装tomcat
[root@wnz ~]# wget https://archive.apache.org/dist/tomcat/tomcat-9/v9.0.37/bin/apache-tomcat-9.0.37.tar.gz
[root@wnz ~]# tar -xf apache-tomcat-9.0.37.tar.gz -C /usr/local/

//创建软连接
[root@wnz ~]# cd /usr/local/
[root@wnz local]# ln -s apache-tomcat-9.0.37 tomcat

//启动tomcat
[root@wnz ~]# /usr/local/tomcat/bin/startup.sh
Using CATALINA_BASE:   /usr/local/tomcat
Using CATALINA_HOME:   /usr/local/tomcat
Using CATALINA_TMPDIR: /usr/local/tomcat/temp
Using JRE_HOME:        /usr
Using CLASSPATH:       /usr/local/tomcat/bin/bootstrap.jar:/usr/local/tomcat/bin/tomcat-juli.jar
Tomcat started.
[root@wnz ~]# ss -antl
State      Recv-Q Send-Q  Local Address:Port                 Peer Address:Port
LISTEN     0      128                 *:22                              *:*
LISTEN     0      100         127.0.0.1:25                              *:*
LISTEN     0      1      [::ffff:127.0.0.1]:8005                         [::]:*
LISTEN     0      80               [::]:3306                         [::]:*
LISTEN     0      100              [::]:8080                         [::]:*
LISTEN     0      128              [::]:80                           [::]:*
LISTEN     0      128              [::]:22                           [::]:*
LISTEN     0      100             [::1]:25                           [::]:*

配置apache
//启动代理模块
[root@wnz ~]# vim /etc/httpd24/httpd.conf
//将下面三行取消注释
LoadModule proxy_module modules/mod_proxy.so
LoadModule proxy_connect_module modules/mod_proxy_connect.so
LoadModule proxy_http_module modules/mod_proxy_http.so

//配置虚拟主机
[root@wnz ~]# vim /etc/httpd24/httpd.conf
//在最后添加

    DocumentRoot "/usr/local/apache/htdocs"
    ProxyPass / http://192.168.201.140:8080/
    ProxyPassReverse / http://192.168.201.140:8080/

        Options none
        AllowOverride none
        Require all granted


把所有http的请求代理到 http://192.168.201.140:8080/ ,也就是 Tomcat 的访问地址

//重启apache
[root@wnz ~]# apachectl restart
[root@wnz ~]# ss -antl
State      Recv-Q Send-Q  Local Address:Port                 Peer Address:Port
LISTEN     0      128                 *:22                              *:*
LISTEN     0      100         127.0.0.1:25                              *:*
LISTEN     0      1      [::ffff:127.0.0.1]:8005                         [::]:*
LISTEN     0      80               [::]:3306                         [::]:*
LISTEN     0      100              [::]:8080                         [::]:*
LISTEN     0      128              [::]:80                           [::]:*
LISTEN     0      128              [::]:22                           [::]:*
LISTEN     0      100             [::1]:25                           [::]:*
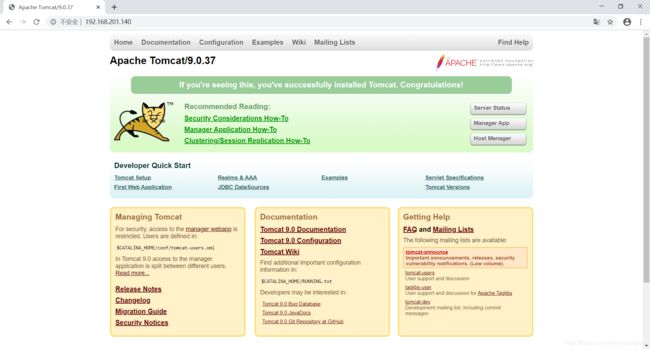
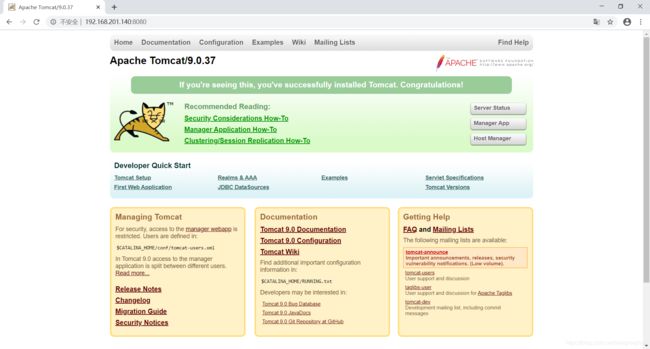
访问80端口时,转到了8080: