CentOS7自签名SSL证书并给nginx配置https
CentOS7自签名SSL证书并给nginx配置https
-
- 生成SSL证书
-
- 安装依赖包
- 生成私钥
- 生成CSR(Certificate Signing Request 证书签名请求 )
- 取消私钥当中的密码
- 生成自签名SSL证书
- 使用ssl给nginx配置https
-
- 安装nginx
- 请求http的80端口自动跳转到https的443端口
- 添加https的vhost配置文件
- 开启访问
生成SSL证书
详细步骤如下
安装依赖包
需要安装 openssl 之后才能生成ssl证书
yum install -y openssl openssl-devel
生成私钥
这一步会让你输入一个 4~2048 位的密码,你需要暂时记住这个密码
openssl genrsa -des3 -out server.key 2048
输入两遍相同的密码:

.png)]
生成CSR(Certificate Signing Request 证书签名请求 )
输入以下命令:
openssl req -new -key server.key -out server.csr
同时填写一些信息:
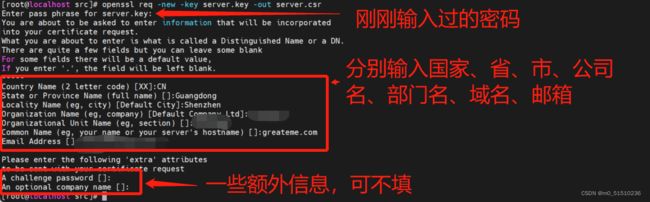
信息说明:
[root@localhost src]# openssl req -new -key server.key -out server.csr
Enter pass phrase for server.key: 在这里输入您刚刚输入的密码
You are about to be asked to enter information that will be incorporated
into your certificate request.
What you are about to enter is what is called a Distinguished Name or a DN.
There are quite a few fields but you can leave some blank
For some fields there will be a default value,
If you enter '.', the field will be left blank.
-----
Country Name (2 letter code) [XX]:国家简称,中国是CN
State or Province Name (full name) []:省份拼音
Locality Name (eg, city) [Default City]:城市拼音
Organization Name (eg, company) [Default Company Ltd]:公司英文名
Organizational Unit Name (eg, section) []:部门英文名
Common Name (eg, your name or your server's hostname) []:域名
Email Address []:邮箱

Please enter the following 'extra' attributes
to be sent with your certificate request
A challenge password []:密码,可不填
An optional company name []:公司名称,可不填
取消私钥当中的密码
openssl rsa -in server.key -out server.key
只需要输入一遍密码就好了:

生成自签名SSL证书
openssl x509 -req -days 3650 -in server.csr -signkey server.key -out server.crt

使用ssl给nginx配置https
详细步骤
安装nginx
可参考文档:https://blog.csdn.net/m0_51510236/article/details/115637918
请求http的80端口自动跳转到https的443端口
在 nginx.conf 配置中加上这样一个server配置,这会让所有的http访问到的80端口自动转向https的请求方式
server {
    listen       80;
    server_name  localhost;

    rewrite ^(.*)$ https://$host$1 permanent;
}
然后我们在http块中加上一行代码,表示引入 vhost 下面所有的 .conf 文件
include vhost/*.conf;
整体的 nginx.conf 文件的内容如下:
worker_processes  1;

events {
    worker_connections  1024;
}

http {
    include       mime.types;
    default_type  application/octet-stream;

    sendfile        on;

    keepalive_timeout  65;

    server {
        # 这里是只要遇到请求http的80端口的请求,全部从定向到https
        listen       80;
        server_name  localhost;

        rewrite ^(.*)$ https://$host$1 permanent;
    }

    include vhost/*.conf;

}
添加https的vhost配置文件
在 nginx 的 conf 文件夹下创建两个文件夹,分别为 vhost 和 ssl
- vhost: 虚拟主机的配置路径,上面的引入的配置文件也是来自这个文件夹下
- ssl: 用于存储我们之前使用到的证书
创建文件夹的命令(nginx的安装目录当中):
mkdir conf/{vhost,ssl}
然后将之前生成的 server.crt 和 server.key 复制到 ssl 文件夹当中:

再在 vhost 文件夹当中创建 域名.conf 的nginx配置文件,我演示时候使用的域名是 greateme.com 所以我的文件名是 greateme.com.conf:
server {
    listen       443 ssl;
    server_name  greateme.com;

    ssl_certificate /opt/server/nginx/conf/ssl/server.crt;
    ssl_certificate_key /opt/server/nginx/conf/ssl/server.key;
    ssl_session_timeout 5m;
    ssl_ciphers ECDHE-RSA-AES128-GCM-SHA256:ECDHE:ECDH:AES:HIGH:!NULL:!aNULL:!MD5:!ADH:!RC4;
    ssl_protocols TLSv1 TLSv1.1 TLSv1.2;
    ssl_prefer_server_ciphers on;

    location / {
        root   html;
        index  index.html index.htm;
    }
}
大致的目录结构是:
nginx
  |- sbin
  |   └─ nginx
  └─ conf
      |─ nginx.conf
      |─ vhost
      |   └─ greateme.com.conf
      └─ ssl
          |- server.crt
          └─ server.key
需要注意的地方:

开启访问
因为是自签名,所以会抛出不安全,如果需要安全则需要去证书服务商那购买证书:

点击确定不安全,然后就是通过https访问的nginx了:

注意如果是 MacOS 则需要输入 thisisunsafet (浏览器界面直接输入)来确定这个界面不安全之后才能访问