Python环境安装GDAL和OpenCV库及例子
Python环境安装GDAL和OpenCV库
- 1. 简介
- 2. 通过命令安装
-
- 2.1 安装GDAL
- 2.2 安装Opencv
- 3. 创建虚拟环境后的Pycharm设置
- 4. 测试
-
- 4.1 测试OpenCV
- 4.2 测试GDAL
- 5. 出现错误及解决方法
- 6. GDAL使用例子
1. 简介
这两个库如果使用pip安装或者conda安装特别容易安装出现错误,一旦出现错误将很难再安装成功。这里记录一下自己的安装过程。
2. 通过命令安装
这是一种最简单的安装方式,也是推荐的一种方式。
2.1 安装GDAL
使用pip安装
pip install gdal
如果你是使用conda环境,就用下面的命令安装即可。这里首推安装conda环境,Linux Anaconda使用、离线安装包及其依赖库。
conda install -c conda-forge gdal
conda-forge是一个由社区维护的conda软件包频道,提供了许多流行的Python库。这个命令会自动解决依赖关系并安装最新版本的库。
如果如上命令没有成功,那么接下来直接上终极大招。使用conda创建一个新的虚拟环境并在其中安装gdal,安装conda后,依次执行如下命令:
conda create -n gdal_env python=3.8
conda activate gdal_env
conda install -c conda-forge gdal
安装成功。查看gdal版本:
conda list gdal
或者
pip show gdal
2.2 安装Opencv
conda install -c conda-forge opencv
或者
pip install opencv-python
软件的包最好统一用一种方式(pip或者conda)进行安装即可。
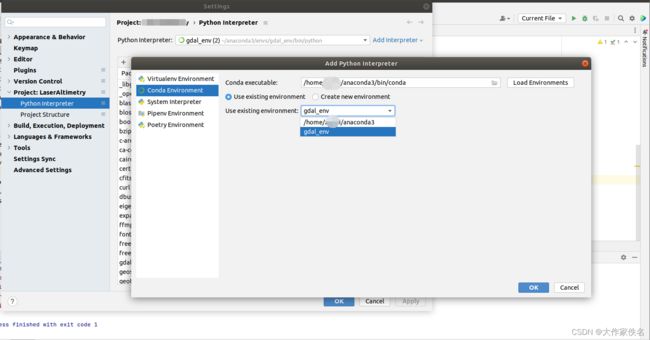
3. 创建虚拟环境后的Pycharm设置
- 点击 “File” 菜单,然后选择 “Settings”(在 macOS 上是 “Preferences”)。
- 在 “Settings” 对话框中,展开 “Project: <您的项目名称>”,然后点击 “Python Interpreter”。
- 在 “Python Interpreter” 页面中,点击右上角的齿轮图标,然后选择 “Add”。
- 在 “Add Python Interpreter” 对话框中,点击左侧的 “Conda Environment”。
- 选择 “Existing environment”,浏览到的 gdal_env 环境的解释器。
- 确认选择了正确的解释器后,点击 “OK”。

4. 测试
4.1 测试OpenCV
import cv2

# 读取图像
img = cv2.imread('test_image.jpg')

# 显示图像
cv2.imshow('image', img)

# 等待键盘输入,按下任意键关闭窗口
cv2.waitKey(0)
cv2.destroyAllWindows()
4.2 测试GDAL
from osgeo import gdal

# 打开文件
filename = 'test_image.tif'
dataset = gdal.Open(filename)

# 输出数据集信息
print('Driver: {}/{}'.format(dataset.GetDriver().ShortName,
                             dataset.GetDriver().LongName))
print('Size: {}x{}x{}'.format(dataset.RasterXSize,
                              dataset.RasterYSize,
                              dataset.RasterCount))
print('Projection: {}'.format(dataset.GetProjection()))
print('GeoTransform: {}'.format(dataset.GetGeoTransform()))

# 获取数据集的第一个波段
band = dataset.GetRasterBand(1)

# 获取波段的统计信息
min = band.GetMinimum()
max = band.GetMaximum()
if not min or not max:
    (min, max) = band.ComputeRasterMinMax(1)
print('Min={:.3f}, Max={:.3f}'.format(min, max))

# 读取波段数据
data = band.ReadAsArray(0, 0, dataset.RasterXSize, dataset.RasterYSize, dataset.RasterXSize, dataset.RasterYSize)

# 关闭数据集
dataset = None
5. 出现错误及解决方法
/home/anaconda3/envs/gdal_env/bin/python /home/PycharmProjects/LaserAltimetry/Dense_matching/test4.py
Traceback (most recent call last):
File "/home/anaconda3/envs/gdal_env/lib/python3.8/site-packages/osgeo/__init__.py", line 30, in swig_import_helper
return importlib.import_module(mname)
File "/home/anaconda3/envs/gdal_env/lib/python3.8/importlib/__init__.py", line 127, in import_module
return _bootstrap._gcd_import(name[level:], package, level)
File "" , line 1014, in _gcd_import
File "" , line 991, in _find_and_load
File "" , line 975, in _find_and_load_unlocked
File "" , line 657, in _load_unlocked
File "" , line 556, in module_from_spec
File "" , line 1166, in create_module
File "" , line 219, in _call_with_frames_removed
ImportError: libpoppler.so.126: cannot open shared object file: No such file or directory
During handling of the above exception, another exception occurred:
Traceback (most recent call last):
File "/home/PycharmProjects/LaserAltimetry/Dense_matching/test4.py", line 1, in <module>
from osgeo import gdal
File "/home/anaconda3/envs/gdal_env/lib/python3.8/site-packages/osgeo/__init__.py", line 46, in <module>
_gdal = swig_import_helper()
File "/home/anaconda3/envs/gdal_env/lib/python3.8/site-packages/osgeo/__init__.py", line 43, in swig_import_helper
return importlib.import_module('_gdal')
File "/home/anaconda3/envs/gdal_env/lib/python3.8/importlib/__init__.py", line 127, in import_module
return _bootstrap._gcd_import(name[level:], package, level)
ModuleNotFoundError: No module named '_gdal'
Process finished with exit code 1
解决方法1(该方法没有解决我的问题):
conda install "poppler<0.62"
解决方法2(成功解决我的问题):
这个方法依托Anaconda,新建另一个虚拟环境,依次执行下面命令,创建一个名为myenv的虚拟环境,激活它,在这个环境安装gdal和poppler。
conda create --name myenv python=3.8
conda activate myenv
conda install gdal poppler
接下来就使用这个环境就可以解决gdal出现上述错误的问题了。如果使用的不是Anaconda,解决这个问题估计会特别麻烦。Anaconda使用、离线安装包及其依赖库。
6. GDAL使用例子
[1] Python 利用GDAL对图像进行几何校正
[2] 使用Python+Gdal进行批量的影像RPC正射校正
[3] 将ENVI自带的全球jp2格式DEM转为tif格式
from osgeo import gdal

def convert_jp2_to_geotiff(input_jp2, output_tif):
    dataset = gdal.Open(input_jp2)
    gdal.Translate(output_tif, dataset, format='GTiff')

input_jp2 = "./Image/GMTED2010.jp2"
output_tif = "./Image/GMTED2010.tif"

convert_jp2_to_geotiff(input_jp2, output_tif)