用SpringBoot快速搭建一个后端项目
如果我们需要开发一个简单的后端服务,只包含对mysql的简单操作,那么该如何搭建呢?
项目源码
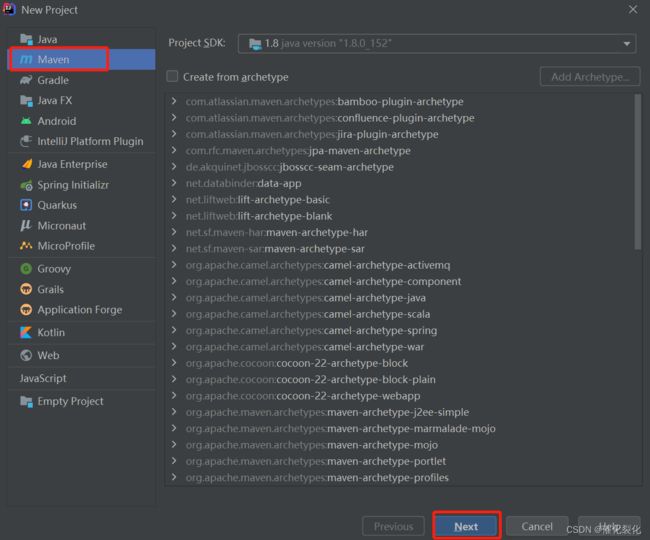
1.创建一个maven项目
首先,新建一个maven项目,点击next。

输入项目名,点击Finish。

2. 引入父模块和相关依赖
<parent>
    <groupId>org.springframework.bootgroupId>
    <artifactId>spring-boot-starter-parentartifactId>
    <version>2.5.0version>
    <relativePath/>
parent>

<dependencies>
    <dependency>
       <groupId>org.springframework.bootgroupId>
       <artifactId>spring-boot-starter-webartifactId>
    dependency>

    <dependency>
        <groupId>org.projectlombokgroupId>
        <artifactId>lombokartifactId>
        <optional>trueoptional>
    dependency>

    <dependency>
        <groupId>com.baomidougroupId>
        <artifactId>mybatis-plus-boot-starterartifactId>
        <version>3.2.0version>
    dependency>

    <dependency>
        <groupId>org.springframework.bootgroupId>
        <artifactId>spring-boot-starter-freemarkerartifactId>
    dependency>

    <dependency>
        <groupId>mysqlgroupId>
        <artifactId>mysql-connector-javaartifactId>
        <scope>runtimescope>
    dependency>

    <dependency>
        <groupId>com.baomidougroupId>
        <artifactId>mybatis-plus-generatorartifactId>
        <version>3.2.0version>
    dependency>
 dependencies>
3. 编写配置文件
配置文件主要包含了数据库的连接信息
# DataSource Config
spring:
  datasource:
    driver-class-name: com.mysql.cj.jdbc.Driver
    url: jdbc:mysql://192.168.56.102:3306/oauth?useUnicode=true&useSSL=false&characterEncoding=utf8&serverTimezone=Asia/Shanghai
    username: root
    password: root

mybatis-plus:
  mapper-locations: classpath*:/mapper/**Mapper.xml

server:
  port: 8080
4.逆向工程生成代码
创建一个表sys_user,下面以该表为例
DROP TABLE IF EXISTS `sys_user`;
CREATE TABLE `sys_user`  (
  `id` varchar(64) CHARACTER SET utf8mb4 COLLATE utf8mb4_bin NOT NULL,
  `name` varchar(32) CHARACTER SET utf8mb4 COLLATE utf8mb4_bin NOT NULL,
  `gender` char(2) CHARACTER SET utf8mb4 COLLATE utf8mb4_bin NULL DEFAULT NULL,
  `age` int(11) NULL DEFAULT NULL,
  `phone` varchar(32) CHARACTER SET utf8mb4 COLLATE utf8mb4_bin NULL DEFAULT NULL,
  `create_time` datetime NULL DEFAULT NULL,
  PRIMARY KEY (`id`) USING BTREE
) ENGINE = InnoDB CHARACTER SET = utf8mb4 COLLATE = utf8mb4_bin ROW_FORMAT = Compact;

-- ----------------------------
-- Records of sys_user
-- ----------------------------
INSERT INTO `sys_user` VALUES ('70d1ee011f9c4683b738545707e0754d', 'zhangsan', 'm', 20, '13211112222', '2022-07-04 20:20:54');
INSERT INTO `sys_user` VALUES ('82ea0c42890344ba8dae61ea26b99b62', 'lisi', 'm', 22, '13222221111', '2022-07-04 20:21:30');
逆向工程的代码如下
// 演示例子,执行 main 方法控制台输入模块表名回车自动生成对应项目目录中
public class CodeGenerator {

    /**
     *
     * 读取控制台内容
     *
     */
    public static String scanner(String tip) {
        Scanner scanner = new Scanner(System.in);
        StringBuilder help = new StringBuilder();
        help.append("请输入" + tip + ":");
        System.out.println(help.toString());
        if (scanner.hasNext()) {
            String ipt = scanner.next();
            if (StringUtils.isNotEmpty(ipt)) {
                return ipt;
            }
        }
        throw new MybatisPlusException("请输入正确的" + tip + "!");
    }

    public static void main(String[] args) {
        // 代码生成器
        AutoGenerator mpg = new AutoGenerator();

        // 全局配置
        GlobalConfig gc = new GlobalConfig();
        String projectPath = System.getProperty("user.dir");
        gc.setOutputDir(projectPath + "/src/main/java");
        // gc.setOutputDir("D:\\test");
        gc.setAuthor("mazi");
        gc.setOpen(false);
        // gc.setSwagger2(true); 实体属性 Swagger2 注解
        gc.setServiceName("%sService");
        mpg.setGlobalConfig(gc);

        // 数据源配置 数据库名 账号密码
        DataSourceConfig dsc = new DataSourceConfig();
        dsc.setUrl("jdbc:mysql://192.168.56.102:3306/oauth?useUnicode=true&useSSL=false&characterEncoding=utf8&serverTimezone=UTC");
        // dsc.setSchemaName("public");
        dsc.setDriverName("com.mysql.cj.jdbc.Driver");
        dsc.setUsername("root");
        dsc.setPassword("root");
        mpg.setDataSource(dsc);

        // 包配置
        PackageConfig pc = new PackageConfig();
        pc.setModuleName(null);
        pc.setParent("com.mazi.springboot");
        mpg.setPackageInfo(pc);

        // 自定义配置
        InjectionConfig cfg = new InjectionConfig() {
            @Override
            public void initMap() {
                // to do nothing
            }
        };

        // 如果模板引擎是 freemarker
        String templatePath = "/templates/mapper.xml.ftl";
        // 如果模板引擎是 velocity
        // String templatePath = "/templates/mapper.xml.vm";

        // 自定义输出配置
        List<FileOutConfig> focList = new ArrayList<>();
        // 自定义配置会被优先输出
        focList.add(new FileOutConfig(templatePath) {
            @Override
            public String outputFile(TableInfo tableInfo) {
                // 自定义输出文件名 , 如果你 Entity 设置了前后缀、此处注意 xml 的名称会跟着发生变化!
                return projectPath + "/src/main/resources/mapper/"
                        + "/" + tableInfo.getEntityName() + "Mapper" + StringPool.DOT_XML;
            }
        });

        cfg.setFileOutConfigList(focList);
        mpg.setCfg(cfg);

        // 配置模板
        TemplateConfig templateConfig = new TemplateConfig();

        templateConfig.setXml(null);
        mpg.setTemplate(templateConfig);

        // 策略配置
        StrategyConfig strategy = new StrategyConfig();
        strategy.setNaming(NamingStrategy.underline_to_camel);
        strategy.setColumnNaming(NamingStrategy.underline_to_camel);
        strategy.setEntityLombokModel(true);
        strategy.setRestControllerStyle(true);
        strategy.setInclude(scanner("表名,多个英文逗号分割").split(","));
        strategy.setControllerMappingHyphenStyle(true);
        strategy.setTablePrefix("m_");
        mpg.setStrategy(strategy);
        mpg.setTemplateEngine(new FreemarkerTemplateEngine());
        mpg.execute();
    }
}
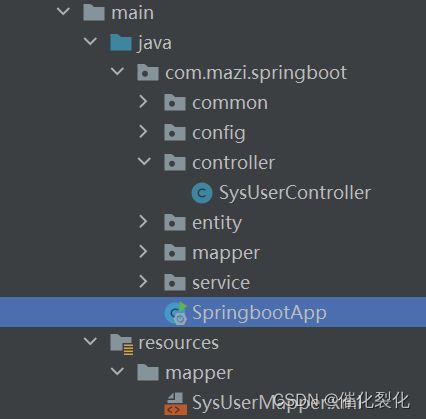
修改数据库连接配置,然后运行main方法。在控制台输入表名,最后回车,即可看到逆向工程生成的文件。


5.编写启动类
@SpringBootApplication
@MapperScan("com.mazi.springboot.mapper")
public class SpringbootApp {
    public static void main(String[] args) {
        SpringApplication.run(SpringbootApp.class);
    }
}
6.编写统一返回类
@Data
public class Result implements Serializable {
    private String code;
    private String msg;
    private Object data;

    public static Result succ(Object data) {
        Result m = new Result();
        m.setCode("0");
        m.setData(data);
        m.setMsg("操作成功");
        return m;
    }

    public static Result succ(String mess, Object data) {
        Result m = new Result();
        m.setCode("0");
        m.setData(data);
        m.setMsg(mess);
        return m;
    }

    public static Result fail(String mess) {
        Result m = new Result();
        m.setCode("-1");
        m.setData(null);
        m.setMsg(mess);
        return m;
    }

    public static Result fail(String mess, Object data) {
        Result m = new Result();
        m.setCode("-1");
        m.setData(data);
        m.setMsg(mess);
        return m;
    }
}
6.测试
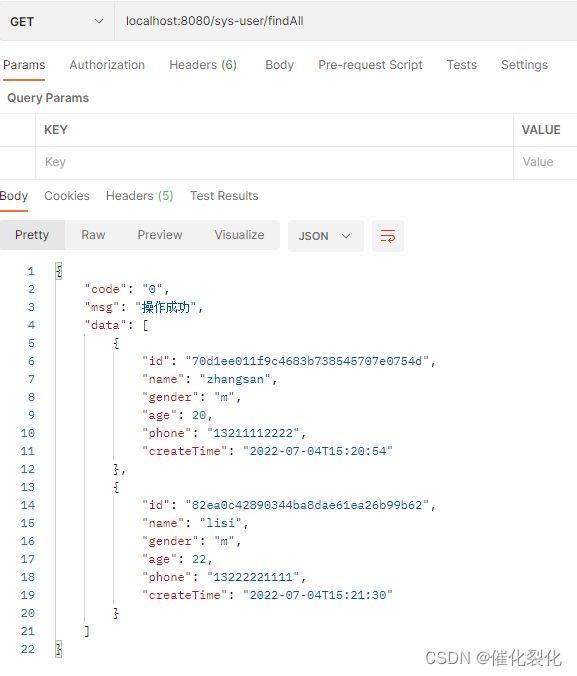
到这里,我们已经搭建起了一套脚手架。下面我们来写个测试接口。
@RestController
@RequestMapping("/sys-user")
public class SysUserController {

    @Autowired
    SysUserService sysUserService;

    @GetMapping("findAll")
    public Result findAll() {
        List<SysUser> list = sysUserService.list();
        return Result.succ(list);
    }

}
7.部署
SpringBoot默认打jar包,引入打包插件,在pom.xml文件中增加插件。
<build>
    <plugins>
        <plugin>
            <groupId>org.springframework.boot</groupId>
            <artifactId>spring-boot-maven-plugin</artifactId>
        </plugin>
    </plugins>
</build>
运行命令mvn clean package

打包完毕后在target目录下可以看到打包完毕的jar包

在windows环境下运行该jar包:
在jar包所在目录下,打开cmd窗口,输入命令 java -jar springBoot-demo-1.0-SNAPSHOT.jar

可以看到,这里打印的信息和我们在idea上运行打印的信息一样,此时服务已经启动,同样可以在postman上测试接口。
在linux上运行同理。
