e.k7p.work index.php,搭建高可用wordpress(keepalived+lvs)
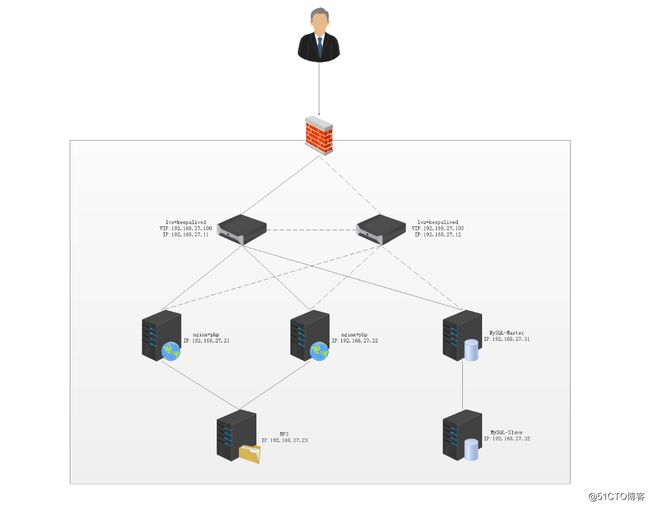
搭建高可用wordpress(keepalived+lvs)
搭建MYSQL主从
分别在两台MySQL主机上安装MySQL
1.使用一键安装脚本安装MySQL
[root@master ~]# tar xf mysql-5.6.34-onekey-install.tar.gz
[root@master ~]# vim mysql-install.sh
配置MySQL-Master
1.修改配置文件
[root@master ~]# vim /etc/my.cnf
[mysqld]
datadir=/data/mysql
log-bin=/data/bin/mysql-bin
binlog-format=row
server-id=1
2.创建二进制日志目录修改权限
[root@master ~]# mkdir /data/bin
[root@master ~]# chmod -R 700 /data/bin
[root@master ~]# chown -R mysql.mysql /data/bin
3.启动MySQL
[root@master ~]# service mysqld start
Starting MySQL... SUCCESS!
4.授权主从复制账户
[root@master ~]# mysql -e "GRANT REPLICATION SLAVE ON *.* TO 'repluser'@'192.168.27.%' IDENTIFIED BY '111111';"
5.查看二进制日志位置
[root@master~]# mysql -e "SHOW MASTER LOGS;"
+------------------+-----------+
| Log_name | File_size |
+------------------+-----------+
| mysql-bin.000001 | 334 |
+------------------+-----------+
配置MySQL-Slave
1.修改配置文件
[root@slave ~]# vim /etc/my.cnf
[mysqld]
server-id=2
read-only
2.启动服务
[root@slave ~]# service mysqld start
3.change master to
mysql> CHANGE MASTER TO MASTER_HOST='192.168.27.31', MASTER_USER='repluser', MASTER_PASSWORD='111111', MASTER_PORT=3306, MASTER_LOG_FILE='mysql-bin.000001', MASTER_LOG_POS=1;
4.启动复制线程
mysql> START SALVE;
测试
在主服务器上导入测试数据库
[root@master ~]# mysql < hellodb_innodb.sql
查看从服务器是否复制数据
mysql> show databases;
+--------------------+
| Database |
+--------------------+
| information_schema |
| hellodb |
| mysql |
| performance_schema |
| test |
+--------------------+
5 rows in set (0.00 sec)
主从配置完毕
配置web服务器
分别在2台web服务器上安装nginx和php-fpm
安装编译所需的各种软件
yum install -y gcc gcc-c++ glibc glibc-devel pcre pcre-devel openssl openssl-devel systemd-devel bzip2 vim lrzsz tree screen lsof tcpdump wget ntpdate net-tools iotop bc zip unzip nfs-utils expat-devel bison bison-devel zlib-devel libcurl-devel libarchive-devel boostdevel cmake ncurses-devel gnutls-devel libxml2-devel libevent-devel libaio-devel
编译安装nginx
1.解压nginx源码包
[root@web1 ~]# tar xf nginx-1.14.2.tar.gz
2.检查编译环境
[root@web1 ~]# cd nginx-1.14.2
[root@web1 nginx-1.14.2]# ./configure --prefix=/apps/nginx --user=nginx --group=nginx --with-http_ssl_module --with-http_v2_module --with-http_realip_module --with-http_stub_status_module --with-http_gzip_static_module --with-pcre --with-stream --with-stream_ssl_module --with-stream_realip_module
3.编译安装
[root@web1 nginx-1.14.2]# make && make install
4.为应用程序文件建立软连接
[root@web1 nginx-1.14.2]# ln -s /apps/nginx/sbin/nginx /sbin/nginx
5.配置服务启动脚本
[root@web1 nginx-1.14.2]# vim /lib/systemd/system/nginx.service
[Service]
Type=forking
PIDFile=/apps/nginx/logs/nginx.pid
ExecStart=/apps/nginx/sbin/nginx -c /apps/nginx/conf/nginx.conf
ExecReload=/bin/kill -s HUP $MAINPID
ExecStop=/bin/kill -s TERM $MAINPID
[Install]
WantedBy=multi-user.target
6.创建启动用户
[root@web1 nginx-1.14.2]# useradd -u2000 www
7.修改配置文件
[root@web1 nginx-1.14.2]# vim /apps/nginx/conf/nginx.conf
user www; #服务启动时以www用户为工作进程
pid /apps/nginx/logs/nginx.pid;
8.启动服务
[root@web1 nginx-1.14.2]# nginx
编译安装php-fpm
1.解压缩源码包
[root@web1 ~]# tar xf php-7.1.30.tar.gz
2.检查编译环境
[root@web1 ~]# cd php-7.1.30
[root@web1 php-7.1.30]# ./configure --prefix=/apps/php --enable-mysqlnd --with-mysqli=mysqlnd --with-pdo-mysql=mysqlnd --with-openssl --with-freetype-dir --with-jpeg-dir --with-png-dir --with-zlib --with-libxml-dir=/usr --with-config-file-path=/etc --with-config-file-scan-dir=/etc/php.d --enable-mbstring --enable-xml --enable-sockets --enable-fpm --enable-maintainer-zts --disable-fileinfo
3.编译模块并复制模块到指定目录
[root@web1 php-7.1.30]# make && make install
4.复制环境配置文件,修改时区
[root@web1 php-7.1.30]# cp php.ini-production /etc/php.ini
[root@web1 php-7.1.30]# sed -i '/;date.tim/s@.*@data.timezone = "Asia/Shanghai"@' /etc/php.ini
5.配置服务启动脚本
[root@web1 php-7.1.30]# cp sapi/fpm/init.d.php-fpm /etc/init.d/php-fpm
[root@web1 php-7.1.30]# chmod +x /etc/init.d/php-fpm
[root@web1 php-7.1.30]# chkconfig --add php-fpm
6.复制模板配置文件
[root@web1 php-7.1.30]# cp /apps/php/etc/php-fpm.conf.default /apps/php/etc/php-fpm.conf
[root@web1 php-7.1.30]# cp /apps/php/etc/php-fpm.d/www.conf.default /apps/php/etc/php-fpm.d/www.conf
配置nginx+php
1.修改nginx主配置文件导入其他配置文件
[root@web1 ~]# vim /apps/nginx/conf/nginx.conf
include /apps/nginx/conf/server/*.conf;
2.创建新的server段配置文件
[root@web1 ~]# mkdir /apps/nginx/conf/server
[root@web1 ~]# vim /apps/nginx/conf/server/mylinuxops.conf
server {
server_name www.mylinuxops.com;
listen 80;
location / {
root /data/www;
index index.php index.html;
}
location ~ \.php$ {
root /data/www;
fastcgi_pass 127.0.0.1:9000;
fastcgi_index index.php;
fastcgi_param SCRIPT_FILENAME $document_root$fastcgi_script_name;
include fastcgi_params;
}
}
3.修改php-fpm配置文件
[root@web1 ~]# vim /apps/php/etc/php-fpm.d/www.conf
user = www
group = www
listen = 127.0.0.1:9000
4.重启服务
[root@web1 ~]# nginx -s reload
[root@web1 ~]# service php-fpm start
Starting php-fpm done
测试
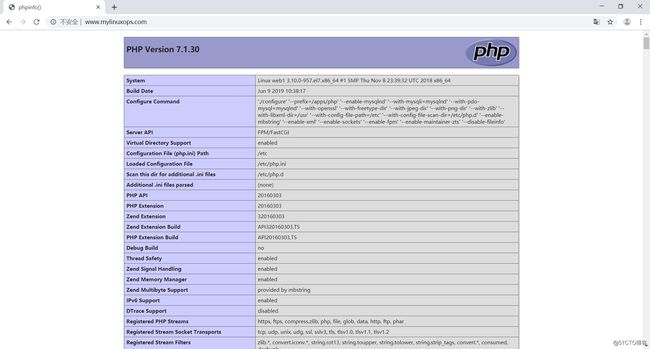
创建测试页面
[root@web1 ~]# mkdir /data/www
[root@web1 ~]# vim /data/www/index.php
phpinfo();
?>
浏览器访问
配置keepalived+lvs
配置keepalived+lvs1
1.安装keepalived
[root@lvs1 ~]# yum install keepalived -y
2.修改配置文件
[root@lvs1 ~]# cat /etc/keepalived/keepalived.conf
! Configuration File for keepalived
global_defs {
}
notification_email_from [email protected]
smtp_server 127.0.0.1
smtp_connect_timeout 30
router_id s1.mylinuxops.com
vrrp_skip_check_adv_addr
vrrp_iptables
#vrrp_strict
vrrp_garp_interval 0
vrrp_gna_interval 0
}
vrrp_instance VI_1 {
state MASTER
interface ens33
virtual_router_id 27
priority 100
advert_int 2
authentication {
auth_type PASS
auth_pass 1111
}
virtual_ipaddress {
192.168.27.100 dev ens33 label ens33:0
192.168.27.101 dev ens33 label ens33:1
}
unicast_src_ip 192.168.27.11
unicast_peer {
192.168.27.12
}
}
virtual_server 192.168.27.100 80 {
delay_loop 5
lb_algo wrr
lb_kind DR
protocol TCP
real_server 192.168.27.21 80 {
weight 1
TCP_CHECK {
connect_port 80
connect_timeout 5
retry 3
delay_before_retry 3
}
}
real_server 192.168.27.22 80 {
weight 1
TCP_CHECK {
connect_port 80
connect_timeout 5
retry 3
delay_before_retry 3
}
}
}
virtual_server 192.168.27.101 3306 {
delay_loop 5
lb_algo wrr
lb_kind DR
protocol TCP
real_server 192.168.27.31 3306 {
weight 1
TCP_CHECK {
connect_port 3306
connect_timeout 5
retry 3
delay_before_retry 3
}
}
}
重启服务
[root@lvs1 ~]# systemctl restart keepalived
查看是否存在lvs规则
[root@lvs1 ~]# ipvsadm -Ln
IP Virtual Server version 1.2.1 (size=4096)
Prot LocalAddress:Port Scheduler Flags
-> RemoteAddress:Port Forward Weight ActiveConn InActConn
TCP 192.168.27.100:80 wrr
-> 192.168.27.21:80 Route 1 0 0
-> 192.168.27.22:80 Route 1 0 0
TCP 192.168.27.101:3306 wrr
-> 192.168.27.31:3306 Route 1 0 1
配置keepalived+lvs2
[root@lvs2 ~]# cat /etc/keepalived/keepalived.conf
! Configuration File for keepalived
global_defs {
}
notification_email_from [email protected]
smtp_server 127.0.0.1
smtp_connect_timeout 30
router_id s1.mylinuxops.com
vrrp_skip_check_adv_addr
vrrp_iptables
#vrrp_strict
vrrp_garp_interval 0
vrrp_gna_interval 0
}
vrrp_instance VI_1 {
state BACKUP
interface ens33
virtual_router_id 27
priority 80
advert_int 2
authentication {
auth_type PASS
auth_pass 1111
}
virtual_ipaddress {
192.168.27.100 dev ens33 label ens33:0
192.168.27.101 dev ens33 label ens33:1
}
unicast_src_ip 192.168.27.12
unicast_peer {
192.168.27.11
}
}
virtual_server 192.168.27.100 80 {
delay_loop 5
lb_algo wrr
lb_kind DR
protocol TCP
real_server 192.168.27.21 80 {
weight 1
TCP_CHECK {
connect_port 80
connect_timeout 5
retry 3
delay_before_retry 3
}
}
real_server 192.168.27.22 80 {
weight 1
TCP_CHECK {
connect_port 80
connect_timeout 5
retry 3
delay_before_retry 3
}
}
}
virtual_server 192.168.27.101 3306 {
delay_loop 5
lb_algo wrr
lb_kind DR
protocol TCP
real_server 192.168.27.31 3306 {
weight 1
TCP_CHECK {
connect_port 3306
connect_timeout 5
retry 3
delay_before_retry 3
}
}
}
重启服务
[root@lvs2 ~]# systemctl restart keepalived
查看是否存在lvs规则
[root@lvs1 ~]# ipvsadm -Ln
IP Virtual Server version 1.2.1 (size=4096)
Prot LocalAddress:Port Scheduler Flags
-> RemoteAddress:Port Forward Weight ActiveConn InActConn
TCP 192.168.27.100:80 wrr
-> 192.168.27.21:80 Route 1 0 0
-> 192.168.27.22:80 Route 1 0 0
TCP 192.168.27.101:3306 wrr
-> 192.168.27.31:3306 Route 1 0 1
在后端web服务器及MySQL-master上配置vip
在web1、web2、mysql分别执行lvs_dr_rs脚本
[root@web1 ~]# bash lvs_dr_rs.sh start
脚本内容
#!/bin/bash
vip=192.168.27.100 #mysql将地址改为 192.168.27.101
mask='255.255.255.255'
dev=lo:1
case $1 in
start)
echo 1 > /proc/sys/net/ipv4/conf/all/arp_ignore
echo 1 > /proc/sys/net/ipv4/conf/lo/arp_ignore
echo 2 > /proc/sys/net/ipv4/conf/all/arp_announce
echo 2 > /proc/sys/net/ipv4/conf/lo/arp_announce
ifconfig $dev $vip netmask $mask #broadcast $vip up
#route add -host $vip dev $dev
echo "The RS Server is Ready!"
;;
stop)
ifconfig $dev down
echo 0 > /proc/sys/net/ipv4/conf/all/arp_ignore
echo 0 > /proc/sys/net/ipv4/conf/lo/arp_ignore
echo 0 > /proc/sys/net/ipv4/conf/all/arp_announce
echo 0 > /proc/sys/net/ipv4/conf/lo/arp_announce
echo "The RS Server is Canceled!"
;;
*)
echo "Usage: $(basename $0) start|stop"
exit 1
;;
esac
测试
分别在后端服务器上创建测试页面
[root@web1 ~]# echo "
`hostname`
" > /data/www/index.html客户端上测试
[root@localhost ~]# curl www.mylinuxops.com/index.html
web1
[root@localhost ~]# curl www.mylinuxops.com/index.html
web2
暂停lvs1上的keepalived测试vip漂移
[root@lvs1 ~]# systemctl stop keepalived
查看lvs2上是否有vip
[root@lvs2 ~]# ifconfig
ens33:0: flags=4163 mtu 1500
inet 192.168.27.100 netmask 255.255.255.255 broadcast 0.0.0.0
ether 00:0c:29:00:a5:1d txqueuelen 1000 (Ethernet)
测试访问是否正常
[root@localhost ~]# curl www.mylinuxops.com/index.html
web2
[root@localhost ~]# curl www.mylinuxops.com/index.html
web1
测试数据连接
[root@localhost ~]# mysql -urepluser -p111111 -h192.168.27.101 -P3306
Welcome to the MariaDB monitor. Commands end with ; or \g.
Your MySQL connection id is 143
Server version: 5.6.34-log MySQL Community Server (GPL)
Copyright (c) 2000, 2018, Oracle, MariaDB Corporation Ab and others.
Type 'help;' or '\h' for help. Type '\c' to clear the current input statement.
创建存放图片的nfs服务器
创建出需要共享的目录,并对其进行配置
[root@image ~]# mkdir /data/upload
[root@image ~]# vim /etc/exports
/data/upload *(rw,no_root_squash)
设置为开机启动
[root@image ~]# systemctl enable nfs
Created symlink from /etc/systemd/system/multi-user.target.wants/nfs-server.service to /usr/lib/systemd/system/nfs-server.service.
安装wordpress
1.在MySQL-Master上授权一个用于数据库操作的账户,创建一个wordpress的数据库
[root@master ~]# mysql -e "GRANT ALL PRIVILEGES ON wordpress.* TO 'wpuser'@'192.168.27.%' IDENTIFIED BY'111111';"
[root@master ~]# mysql -e "CREATE DATABASE wordpress;"
[root@master ~]# mysql -e "show databases;"
+--------------------+
| Database |
+--------------------+
| information_schema |
| hellodb |
| mysql |
| performance_schema |
| test |
| wordpress |
+--------------------+
2.分别在后端两个web服务器上解压wordpress
[root@web1 ~]# tar xf wordpress-5.0.1-zh_CN.tar.gz
3.将解压后的数据复制到站点目录
[root@web1 ~]# cp -a wordpress/* /data/www/
4.复制work
[root@web1 ~]# cp /data/www/{wp-config-sample.php,wp-config.php}
[root@web1 ~]# vim /data/www/wp-config.php
// ** MySQL 设置 - 具体信息来自您正在使用的主机 ** //
/** WordPress数据库的名称 */
define('DB_NAME', 'wordpress');
/** MySQL数据库用户名 */
define('DB_USER', 'wpuser');
/** MySQL数据库密码 */
define('DB_PASSWORD', '111111');
/** MySQL主机 */
define('DB_HOST', '192.168.27.100');
/** 创建数据表时默认的文字编码 */
define('DB_CHARSET', 'utf8');
/** 数据库整理类型。如不确定请勿更改 */
define('DB_COLLATE', '');
/**#@+
* 身份认证密钥与盐。
*
* 修改为任意独一无二的字串!
* 或者直接访问{@link https://api.wordpress.org/secret-key/1.1/salt/ WordPress.org密钥生成服务}
* 任何修改都会导致所有cookies失效,所有用户将必须重新登录。
*
* @since 2.6.0
*/
define('AUTH_KEY', 'Q8B&gE6k?}}bh|:23l/8Pq;#q$?4HT^-riv^Tnk5UcwDIf#g`I3+RJ~^+O7>nUk6');
define('SECURE_AUTH_KEY', '?{2tjkt_KN(+:d|tWA}Th5fi!-y$xVO^sk#>F~{?B$X|#9)6S(~h`0KY?6CY|0jL');
define('LOGGED_IN_KEY', 'v:_a0a:2Eh^fj9-`&P+.i*V0#-M#jGjw<1*p/9Tea7y=q}R=Hy,Q,9qBX5Kx!ybV');
define('NONCE_KEY', '^5g3j_7:H,_=m/T/ mB`JQxUgXFFjEkhJ)OV qy&|W}aoxQ11t_j;D;yl(w;MV46');
define('AUTH_SALT', '8ZW}E[tXfRDd}$h02-hAgG]zZg4/NX}kM(K_M_Y|[fUz/C!.9|:lfcexu91kIe5q');
define('SECURE_AUTH_SALT', ']r+bt+7&_KkBE~!V+;}8fw|a8,B+-H.ELKN.}!qhFL,LZ+Vj=p0@y5gi5Fo^F');
define('LOGGED_IN_SALT', 'jGwl&sWdAh.dNiGSy`qV.-6,DzaFYE;xG;Js*ZgM(E|7a57y(_?]^-u7>;)R
define('NONCE_SALT', '*Zl:=N-W!+B8kbaoY`-q)Mq8r7xK|I1^IT0;.ZMiB-Fh$?OtmD/+[![`I@)p~~Lw');
/**#@-*/
将此文件复制到web2服务器上
[root@web1 ~]# scp /data/www/wp-config.php 192.168.27.22:/data/www
分别在web服务器上挂载nfs,将图片存储到nfs上
[root@web1 ~]# mkdir /data/www/wp-content/uploads
[root@web1 ~]# mount 192.168.27.23:/data/upload /data/www/wp-content/uploads
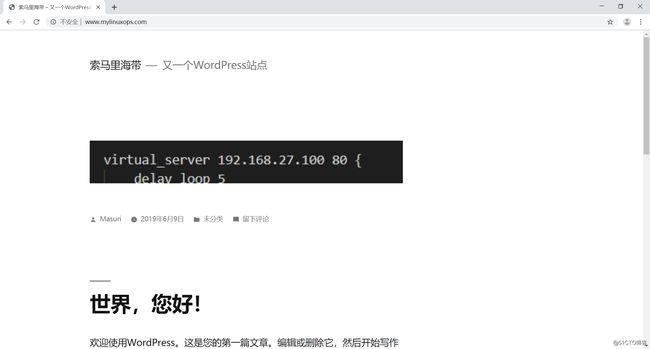
测试登录


