RestTemplate的用法
人生有涯,学海无涯
一、简介
spring框架提供的RestTemplate类可用于在应用中调用rest服务,它简化了与http服务的通信方式,统一了RESTful的标准,封装了http链接,我们只需要传入url及返回值类型即可。相较于之前常用的HttpClient,RestTemplate是一种更优雅的调用RESTful服务的方式。
RestTemplate默认依赖JDK提供http连接的能力(HttpURLConnection),如果有需要的话也可以通过setRequestFactory方法替换为例如Apache HttpComponents、Netty或OkHttp等其它HTTP library。
其实spring并没有真正的去实现底层的http请求(3次握手),而是集成了别的http请求,spring只是在原有的各种http请求进行了规范标准,让开发者更加简单易用,底层默认用的是jdk的http请求。
1.1 restTemplate的类结构
可以看出它继承自HttpAccessor这个统一的处理器,然后再继承自InterceptingHttpAccessor,这个拦截转换器,最终RestTemplate实现了封装httpClient的模板工具类。
1.2 restTemplate的方法
以下是http方法和restTempalte方法的比对映射,可以看出restTemplate提供了操作http的方法,其中exchange方法可以用来做任何的请求,一般我们都是用它来封装不同的请求方式。
| Http方法 | restTemplate的方法 |
|---|---|
| DELETE | delete |
| GET | getForObject / getForEntity |
| POST | postForObject / postForEntity |
| PUT | put |
| HEAD | headForHeaders |
| OPTIONS | optionsForAllow |
| 任何 | exchange / execute |
1.3 RestTemplate的优缺点:
优点:连接池、超时时间设置、支持异步、请求和响应的编解码
缺点:依赖别的spring版块、参数传递不灵活
二、springboot中使用RestTemplate
2.1 配置类
package com.cn.config;

import org.springframework.context.annotation.Bean;
import org.springframework.context.annotation.Configuration;
import org.springframework.http.client.ClientHttpRequestFactory;
import org.springframework.http.client.SimpleClientHttpRequestFactory;
import org.springframework.web.client.RestTemplate;

@Configuration
public class RestTemplateConfig {

    @Bean
    public RestTemplate restTemplate(ClientHttpRequestFactory factory) {
        return new RestTemplate(factory);
    }

    @Bean
    public ClientHttpRequestFactory simpleClientHttpRequestFactory() {
        SimpleClientHttpRequestFactory factory = new SimpleClientHttpRequestFactory();
        factory.setReadTimeout(10000);// 设置读取超时,单位毫秒
        factory.setConnectTimeout(15000);// 设置连接超时,单位毫秒
        return factory;
    }
}
2.2 restUtil工具类
package com.cn.utils;

import org.springframework.beans.factory.annotation.Autowired;
import org.springframework.http.HttpEntity;
import org.springframework.http.HttpHeaders;
import org.springframework.http.HttpMethod;
import org.springframework.http.ResponseEntity;
import org.springframework.stereotype.Component;
import org.springframework.web.client.RestTemplate;
import sun.misc.BASE64Encoder;

import java.io.UnsupportedEncodingException;
import java.security.MessageDigest;
import java.security.NoSuchAlgorithmException;
import java.util.HashMap;
import java.util.Map;


@Component
public class RestUtil {

    @Autowired
    private RestTemplate restTemplate;

    //一些自定义的请求头参数
    public static final String supplierID = "";
    public static final String interfacekey = "";

    /**
     * DLT专用执行方法
     *
     * @param param  请求参数:可以添加一些常量请求值
     * @param url    访问的url
     * @param method 请求的方法
     * @return
     */
    public String execute(Map<String, Object> param, String url, HttpMethod method) {
        HttpHeaders headers = this.getDefaultHeader();
        Map<String, Object> requestor = this.getDefaultParam();
        param.put("requestor", requestor);
        param.put("supplierID", supplierID);
        HttpEntity<Map<String, Object>> requestEntity = new HttpEntity<>(param, headers);
        ResponseEntity<String> response = restTemplate.exchange(url, method, requestEntity, String.class);
        return response.getBody();
    }

    /**
     * 获取默认的头请求信息
     *
     * @return
     */
    public HttpHeaders getDefaultHeader() {
        String timestamp = "" + System.currentTimeMillis();
        String signature = EncoderByMd5(supplierID + timestamp + interfacekey);
        HttpHeaders headers = new HttpHeaders();
        headers.add("signature", signature);
        headers.add("timestamp", timestamp);
        return headers;
    }


    /**
     * 获取默认的参数
     *
     * @return
     */
    public Map<String, Object> getDefaultParam() {
        Map<String, Object> defParam = new HashMap<>();
        defParam.put("invoker", "xx");
        defParam.put("operatorName", "xx");
        return defParam;
    }


    /**
     * 通过MD5加密
     *
     * @param str
     * @return
     */
    public static String EncoderByMd5(String str) {
        if (str == null) {
            return null;
        }
        try {
            // 确定计算方法
            MessageDigest md5 = MessageDigest.getInstance("MD5");
            BASE64Encoder base64en = new BASE64Encoder();
            // 加密后的字符串
            return base64en.encode(md5.digest(str.getBytes("utf-8"))).toUpperCase();
        } catch (NoSuchAlgorithmException | UnsupportedEncodingException e) {
            return null;
        }
    }


    /**
     * get请求
     *
     * @param url      请求的url
     * @param jsonData 请求的json
     * @return
     */
    public String restGet(String url, String jsonData) {
        return request(url, jsonData, HttpMethod.GET);
    }

    /**
     * @param url        请求的url
     * @param jsonData   json数据
     * @param httpMethod
     * @return
     */
    private String request(String url, String jsonData, HttpMethod httpMethod) {
        ResponseEntity<String> response = null;
        try {
            HttpEntity<String> requestEntity = new HttpEntity<String>(jsonData);
            response = restTemplate.exchange(url, httpMethod, requestEntity, String.class);
        } catch (Exception ex) {
            ex.printStackTrace();
            return "";
        }
        return response.getBody().toString();
    }

    /**
     * Get请求获取实体类
     *
     * @param url          请求的url
     * @param responseType 返回的类型
     * @param parms        不限定个数的参数
     * @param           泛型
     * @return
     */
    public <T> T getForEntity(String url, Class<T> responseType, Object... parms) {
        return (T) restTemplate.getForEntity(url, responseType, parms);
    }

    /**
     * Get请求
     *
     * @param url
     * @param parm
     * @return
     */
    public String get(String url, Map<String, Object> parm) {
        return restTemplate.getForEntity(url, String.class, parm).getBody();
    }

}
2.3 测试demo
首先需要一个接口,我这里随便用了一个项目中的接口来作为示例:
package com.cn.controller;

import com.cn.annotation.SysAnnotation;
import com.cn.common.ResultModel;
import com.cn.model.UserInfo;
import com.cn.service.UserService;
import org.springframework.beans.factory.annotation.Autowired;
import org.springframework.web.bind.annotation.*;

import java.util.List;

@RestController
public class UserController {

    @Autowired
    private UserService userService;

    @SysAnnotation(operation = "查询用户",exceptionMessage = "查询用户失败")
    @GetMapping(value = "/getList")
    public List<UserInfo> getList(){
       return userService.getList();
    }
}
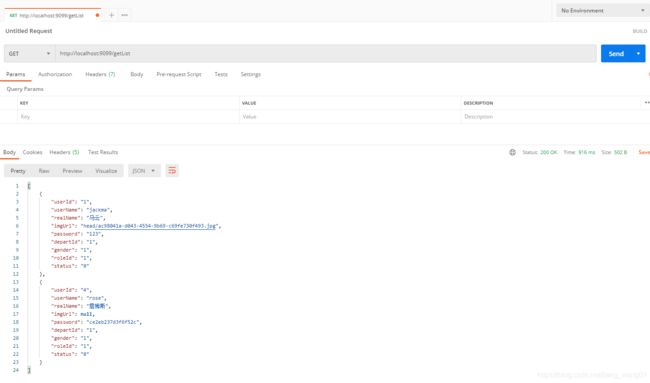
用postman测试一下,结果如下:
在springboot自带的测试类中测试:
@SpringBootTest
class SpringbootConfigApplicationTests {

    @Autowired
    RestUtil restUtil;

    @Test
    public void test01(){
        String url="http://localhost:9099/getList";
        //组装请求参数
        Map<String,Object> parmMap =new HashMap<String,Object>();
        String result = restUtil.get(url, parmMap);
        System.out.println(result);
    }

}
结果如下,和postman测试的结果一致,说明请求的接口正确
总结:
RestTemplate的作为一款非常不错的rest请求工具,屏蔽了复杂的HttpClient的实现细节,向外暴露出简单、易于使用的接口,使得我们的开发工作越来越简单、高效,更多的方法工具可以研究一下restTemplate的具体Api,打开源码,一切都了如指掌。


