LAMP环境搭建(CenterOS7)
本文介绍如何使用云服务器ECS实例搭建LAMP平台,其中LAMP分别代表Linux、Apache、MySQL和PHP。
背景信息
操作时,请您以实际软件版本为准。
- Apache:2.4.6
- MySQL:5.7.31
- PHP:7.0.33
- phpMyAdmin:4.0.10.20
本文主要说明手动安装LAMP平台的操作步骤,以便快速建站。
步骤一:准备工作
1、运行命令cat /etc/redhat-release查看系统版本。
2、关闭防火墙
2.1运行systemctl status firewalld命令查看当前防火墙的状态。
- 如果防火墙的状态参数是inactive,则防火墙为关闭状态。
- 如果防火墙的状态参数是active,则防火墙为开启状态。本示例中防火墙为开启状态,因此需要关闭防火墙。
2.2关闭防火墙。如果防火墙为关闭状态,请忽略此步骤。
i.如果您想临时关闭防火墙,运行命令systemctl stop firewalld。
ii.如果您想永久关闭防火墙,运行命令systemctl disable firewalld。
3、关闭SELinux (如果不关闭SELinux,后边安装phpMyAdim时会报错,如果不想安装phpMyAdmin可以忽略次步骤)。
i.运行getenforce命令查看SELinux的当前状态。
- 如果SELinux状态参数是Disabled, 则SELinux为关闭状态。
- 如果SELinux状态参数是Enforcing,则SELinux为开启状态。本示例中SELinux为开启状态,因此需要关闭SELinux。i
ii.关闭SELinux。如果SELinux为关闭状态,请忽略此步骤。
: 如果您想临时关闭SELinux,运行命令setenforce 0。
:如果您想永久关闭SELinux,运行命令vi /etc/selinux/config编辑SELinux配置文件。回车后,把光标移动到SELINUX=enforcing这一行,按i键,将其修改为SELINUX=disabled, 按Esc键,然后输入:wq并回车以保存并关闭SELinux配置文件。 最后重启系统使设置生效。
步骤二:安装Apache
1.运行以下命令安装Apache服务及扩展包。
yum -y install httpd httpd-manual mod_ssl mod_perl mod_auth_mysql2.运行httpd -v命令可查看Apache的版本号。
3.依次运行以下命令启动Apache服务并设置服务开机自启动。
systemctl start httpd
systemctl enable httpd
4.查看安装结果。
在本地机器的浏览器地址栏中,输入http://IP地址并按Enter键。若返回页面如下图所示,说明Apache服务启动成功。
步骤三:安装并配置安装Mariadb(或者安装MySQL)
如果安装已经Mysql,忽略次步骤
1.Mariadb安装
yum -y install mariadb-server mariadb

systemctl start/restart/stop/status  mariadb

systemctl enable mariadb

ps -ef | grep msyqld
mysql_secure_installation
mysql -v
2.Mysql安装
运行以下命令更新YUM源。
rpm -Uvh http://dev.mysql.com/get/mysql57-community-release-el7-9.noarch.rpm运行以下命令安装MySQL。
yum -y install mysql-community-server运行以下命令查看MySQL版本号。
mysql -V返回结果如下所示,表示MySQL安装成功。
mysql Ver 14.14 Distrib 5.7.31, for Linux (x86_64) using EditLine wrapper
运行以下命令启动MySQL
systemctl start mysqld
依次运行以下命令设置开机启动MySQL。
systemctl enable mysqld
systemctl daemon-reload
运行以下命令查看MySQL的初始密码。
grep "password" /var/log/mysqld.log 返回结果示例如下,本示例中初始密码为+47,uijcojcU。
2022-03-28T03:01:49.848762Z 1 [Note] A temporary password is generated for root@localhost: +47,uijcojcU
运行以下命令配置MySQL的安全性。
mysql_secure_installation安全性的配置包含以下五个方面:
1.重置root账号的密码。
Enter password for user root: #输入上一步获取的root用户初始密码。 The existing password for the user account root has expired. Please set a new password. New password: #输入新密码,长度为8至30个字符,必须同时包含大小写英文字母、数字和特殊符号。特殊符号可以是()` ~!@#$%^&*-+=|{}[]:;‘<>,.?/ Re-enter new password: #重复输入新密码。 The 'validate_password' plugin is installed on the server. The subsequent steps will run with the existing configuration of the plugin. Using existing password for root. Estimated strength of the password: 100 Change the password for root ? ((Press y|Y for Yes, any other key for No) :Y #按Y,并再次输入上步已设置的密码。 New password: #再次输入新密码。 Re-enter new password: #重复输入新密码。 Estimated strength of the password: 100 Do you wish to continue with the password provided?(Press y|Y for Yes, any other key for No) :Y #按Y使用新密码。
2. 输入Y删除匿名用户账号。
By default, a MySQL installation has an anonymous user, allowing anyone to log into MySQL without having to have a user account created for them. This is intended only for testing, and to make the installation go a bit smoother. You should remove them before moving into a production environment. Remove anonymous users? (Press y|Y for Yes, any other key for No) : Y #是否删除匿名用户,输入Y Success.
3.输入y禁止root账号远程登录
Normally, root should only be allowed to connect from 'localhost'. This ensures that someone cannot guess at the root password from the network. Disallow root login remotely? (Press y|Y for Yes, any other key for No) : Y #禁止root远程登录,输入Y Success.
4. 输入Y删除test库以及对test库的访问权限。
By default, MySQL comes with a database named 'test' that anyone can access. This is also intended only for testing, and should be removed before moving into a production environment. Remove test database and access to it? (Press y|Y for Yes, any other key for No) : Y #是否删除test库和对它的访问权限,输入Y - Dropping test database... Success. - Removing privileges on test database... Success.
5 输入Y重新加载授权表。
Reloading the privilege tables will ensure that all changes made so far will take effect immediately. Reload privilege tables now? (Press y|Y for Yes, any other key for No) : Y #是否重新加载授权表,输入Y Success. All done!
步骤四:安装PHP
1.更新YUM源。
运行以下命令添加epel源。
yum install -y \
https://repo.ius.io/ius-release-el7.rpm \
https://dl.fedoraproject.org/pub/epel/epel-release-latest-7.noarch.rpm
运行以下命令添加Webtatic源。
rpm -Uvh https://mirror.webtatic.com/yum/el7/webtatic-release.rpm2.运行以下命令安装PHP。
yum -y install php70w-devel php70w.x86_64 php70w-cli.x86_64 php70w-common.x86_64 php70w-gd.x86_64 php70w-ldap.x86_64 php70w-mbstring.x86_64 php70w-mcrypt.x86_64 php70w-pdo.x86_64 php70w-mysqlnd php70w-fpm php70w-opcache php70w-pecl-redis php70w-pecl-mongodb3.运行以下命令查看PHP版本。
php -v返回结果如下所示,表示安装成功。
PHP 7.0.33 (cli) (built: Dec 6 2018 22:30:44) ( NTS ) Copyright (c) 1997-2017 The PHP Group Zend Engine v3.0.0, Copyright (c) 1998-2017 Zend Technologies with Zend OPcache v7.0.33, Copyright (c) 1999-2017, by Zend Technologies
4.运行以下命令,在Apache网站根目录创建测试文件。
echo "" > /var/www/html/phpinfo.php5. 运行以下命令重启Apache服务。
systemctl restart httpd6. 在本地机器的浏览器地址栏中,输入http://ip地址/phpinfo.php并按Enter键。
显示如下页面表示安装成功。
步骤五:安装phpMyAdmin
如果不想远程管控SQL,可以忽略次步骤。
phpMyAdmin是一个MySQL数据库管理工具,通过Web接口管理数据库方便快捷。
1.运行以下命令准备phpMyAdmin数据存放目录。
mkdir -p /var/www/html/phpmyadmin2. 运行以下命令下载phpMyAdmin压缩包并解压。
i.进入自己需要保持安装文件的目录并下载phpMyAdmin压缩包。(下载地址时间久可能会失效,自行查找能下载的地址)
wget --no-check-certificate https://files.phpmyadmin.net/phpMyAdmin/4.0.10.20/phpMyAdmin-4.0.10.20-all-languages.zipii.依次运行以下命令,安装unzip工具并解压phpMyAdmin压缩包。
yum install -y unzip
unzip phpMyAdmin-4.0.10.20-all-languages.zip
3.运行以下命令复制phpMyAdmin文件到准备好的数据存放目录。
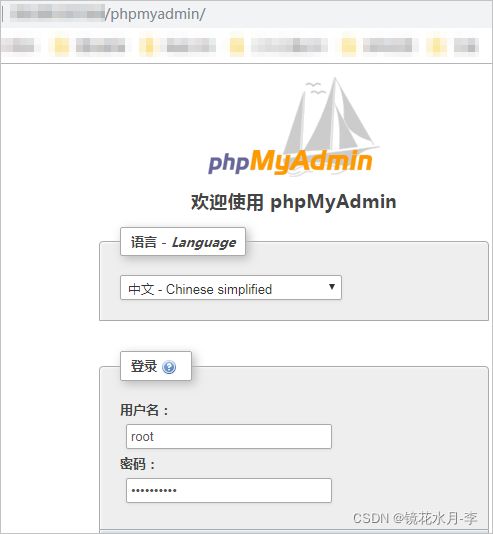
mv phpMyAdmin-4.0.10.20-all-languages/* /var/www/html/phpmyadmin4. 在本地机器浏览器地址栏,输入http://ip地址/phpmyadmin并按Enter键,访问phpMyAdmin登录页面。若返回页面如下图所示,说明phpMyAdmin安装成功。
5.输入MySQL的用户名和密码,单击执行,如果出现以下页面,说明MySQL连接成功。


