消息中间件----rabbitmq 镜像队列集群
文章目录
- 停止集群
- 镜像队列
- 负载均衡
-
- HAProxy安装
- 客户端使用
- HAProxy的高可用
- 安装keepalived
停止集群
依次停止各个节点,再次启动时,最后关闭的节点要最先启动。
- 变更节点类型(ram&disc)
# 停止应用
rabbitmqctl stop_app
# 变更本节点类型 ram内存节点  disc磁盘节点
rabbitmqctl change_cluster_node_type ram
# 重启应用
rabbitmqctl start_app
- 清除节点配置
# 删除节点配置
rm -rf /var/lib/rabbitmq/mnesia
镜像队列
普通的集群,只是同步元数据到其他节点,并没有同步消息数据,存储消息的节点故障仍会造成数据丢失,非高可用;
将存储消息的队列,复制到其他节点,实现消息数据冗余,即使个别节点故障,还有其他的节点可以正常提供消息数据,从而实现高可用。
- 命令行设置镜像队列
$ rabbitmqctl set_policy  name  pattern  definition

# name 自定义策略名称
# pattern 队列匹配  ^匹配所有队列  ^lauf匹配lauf开头的队列
# definition 定义的内容
# ha-mode:
	## all  在所有节点上镜像
	## exactly 在指定个数的节点上镜像
	## nodes  在指定的节点上镜像
# ha-params: 个数 / 节点名称
# ha-sync-mode: automatic  同步的方式
![]()
以上同步所有的队列到所有的节点,json部分,外层必须单引号。
负载均衡
为了使所有的节点,都能来接收消息,节点资源合理利用,客户端发布消息时,需要进行负载均衡。
这里使用HAProxy做负载均衡。
HAProxy安装
- 方式1
ubuntu直接使用apt安装
# apt包管理器安装 --> /usr/sbin/
sudo apt-get install haproxy
查看可以安装的版本:
apt-cache madison haproxy
# 查看版本
haproxy -v
编辑配置文件参考方式2
- 方式2
- 下载压缩包
- 解压
tar -zxvf haproxy-1.8.31.tar.gz
#
cd haproxy-1.8.31
# 编译
make TARGET=linux2628 PREFIX=/usr/local/haproxy
# 安装
make install PREFIX=/usr/local/haproxy
# 查看版本
cd /usr/local/haproxy/sbin
haproxy -v
编译时要指定TARGET变量,具体可以查看haproxy> readme & linux内核(uname -a)
配置启动文件:
$ cp /usr/local/haproxy/sbin/haproxy /usr/sbin/
$ cp /home/laufing/haproxy-1.8.31/examples/haproxy.init /etc/init.d/haproxy
$ chmod 755 /etc/init.d/haproxy
添加用户:
$ useradd -r haproxy
创建配置文件:
vim /etc/haproxy/haproxy.cfg

# 全局配置
global
    # 设置日志
    log 127.0.0.1 local0 info
    # 当前工作目录
    chroot /usr/local/haproxy  # apt安装时 /usr
    # 用户与用户组
    user haproxy
    group haproxy
    # 运行进程 ID
    uid 99   # 不同节点 不变
    gid 99   # 不同节点 不变
    # 守护进程启动
    daemon
    # 最大连接数
    maxconn 4096

# 默认配置
defaults
    # 应用全局的日志配置
    log global
    # mode {tcp|http|health},TCP 是 4 层,HTTP 是 7 层,health 只返回 OK
    mode tcp
    # 日志类别 tcplog
    option tcplog
    # 不记录健康检查的日志信息
    option dontlognull
    # 3 次失败则认为服务不可用
    retries 3
    # 每个进程可用的最大连接数
    maxconn 2000
    # 连接超时
    timeout connect 5s
    # 客户端超时 30 秒,ha 就会发起重新连接(需要心跳信息维持连接)
    timeout client 30s
    # 服务端超时 15 秒,ha 就会发起重新连接(需要心跳信息维持连接)
    timeout server 15s

# 绑定配置
listen rabbitmq_cluster
    bind 192.168.0.113:5673  # node1
    # 配置 TCP 模式
    mode tcp
    # 简单的轮询
    balance roundrobin
    # RabbitMQ 集群节点配置,每隔 5 秒对 mq 集群做检查,2 次正确证明服务可用,3 次失败证明服务不可用
    server node1 192.168.0.113:5672 check inter 5000 rise 2 fall 3
    server node2 192.168.0.109:5672 check inter 5000 rise 2 fall 3

# haproxy 监控页面地址
listen monitor
    bind 192.168.0.113:8100
    mode http
    option httplog
    stats enable
    # 监控页面地址 http://192.168.0.116:8100/monitor
    stats uri /monitor
    stats refresh 5s
防火墙开启端口,并启动haproxy:
systemctl restart haproxy
访问监控中心:
http://192.168.0.113:8100/monitor

客户端使用
生产者、消费者均连接haproxy的ip和port。
生产者:
# __author__ = "laufing"

from pika import PlainCredentials, BlockingConnection, ConnectionParameters, BasicProperties


# 连接
# 注意连接时更换ip port  需要心跳信息来维持连接
credentials = PlainCredentials("lauf", "lauf")
conn = BlockingConnection(ConnectionParameters(host="192.168.0.113", port=5673, credentials=credentials,
                                               virtual_host='/', heartbeat=2)) # 2s发送一次心跳
channel = conn.channel()


# 声明队列
channel.queue_declare(queue="q1")


# 确认每次接收一个消息
channel.basic_publish(exchange="", routing_key="q1", body="message1")
channel.basic_publish(exchange="", routing_key="q1", body="message2")
channel.basic_publish(exchange="", routing_key="q1", body="message3")
channel.basic_publish(exchange="", routing_key="q1", body="message4")

channel.close()
conn.close()
消费者:
# __author__ = "laufing"
from pika import PlainCredentials, BlockingConnection, ConnectionParameters, BasicProperties


# 连接  消费者必须使用心跳维持连接,否则超时断开
credentials = PlainCredentials("lauf", "lauf")
conn = BlockingConnection(ConnectionParameters(host="192.168.0.113", port=5673, credentials=credentials,
                                               virtual_host='/', heartbeat=2))
channel = conn.channel()

# 声明队列
channel.queue_declare(queue="q1")
# 声明交换机
# channel.exchange_declare(exchange="e1", exchange_type="direct") # 正则转发

# 队列绑定交换机
# channel.queue_bind(queue="q1", exchange="e2", routing_key="*.laufing") # 消费者端 正则匹配


# 定义消费程序
def func(ch, delivery, prop, body):
    print(ch is channel)
    print("消费的信息:", body)


# 确认每次接收一个消息
channel.basic_qos(prefetch_count=1)
channel.basic_consume(queue="q1", on_message_callback=func, auto_ack=True)
channel.start_consuming()
HAProxy的高可用
在node2节点,也同样安装haproxy服务,并启动。
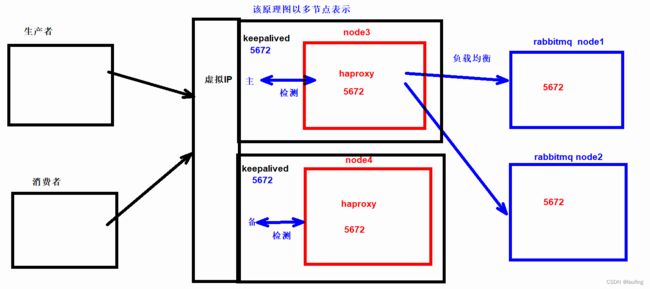
生产环境中,haproxy应该使用rabbitmq集群节点之外的其他节点,这里由于资源有限,就使用node1、node2部署haproxy集群。
-
KeepAlived 搭建高可用的 HAProxy 集群;
-
Keepalived 是 Linux 的轻量级别的高可用热备解决方案;
-
Keepalived 检测每个服务节点的状态,如果有一台服务器宕机(出现故障),它将有故障的服务器从系统中剔除,同时使用其他服务器代替该服务器的工作,当服务器工作正常后, Keepalived 自动将服务器加入到服务器群中,这些工作全部自动完成。
-
Keepalived 基于 VRRP - Virtual Router Redundancy Protocol主备(主机和备用机)模式的协议,通过 VRRP 可以在网络发生故障时透明的进行设备切换而不影响主机之间的数据通信。
-
主备两台主机之间生成一个虚拟的 ip,称为漂移 ip,漂移 ip 由主服务器承担,一旦主服务器宕机,备份服务器就会抢夺漂移 ip,继续工作,有效的解决了群集中的单点故障。
-
KeepAlived 将多台路由器设备虚拟成一个设备,对外提供统一 ip(Virtual IP)

关闭haproxy的开机自启动
# 禁止开机自启动
systemctl disable haproxy
安装keepalived
node1、node2分别安装keepalived,并配置。
# apt 包管理器
apt-get install keepalived
编写配置文件:
# vim /etc/keepalived/keepalived.conf

global_defs {
    # 本机hostname   其他节点配置 node2...等主机名称
    router_id node1
}

vrrp_script chk_haproxy {
    # 执行的脚本位置
    script "/etc/keepalived/haproxy_check.sh"
    # 检测时间间隔
    interval 3
    # 如果条件成立则权重减 20
    weight -20
}

vrrp_instance VI_1 {
    # 当前为主节点MASTER   第二个节点备用为BACKUP
    state MASTER
    # 网卡名(ifconfig 查看)
    interface ens33
    # 虚拟路由 ID 号(主备节点要相同)
    virtual_router_id 66
    # 优先级(0-254),一般主机大于备机
    priority 100   # 备可为90
    # 主备信息发送间隔,主备一致
    advert_int 1
    # 认证信息,主备一致
    authentication {
        auth_type PASS
        auth_pass 1234
    }
    track_script {
        # 检查 haproxy 健康状况的脚本
        chk_haproxy
    }
    # 虚拟ip
    virtual_ipaddress {
        # 虚拟 ip,可以多个,以后连接 mq 就用这个虚拟ip
        192.168.0.66/24  # ip、子网掩码
    }
}
# 虚拟 ip 的详细配置
virtual_server 192.168.0.66 5674 {
    # 健康检查间隔,单位为秒
    delay_loop 6
    # lvs 调度算法 rr|wrr|lc|wlc|lblc|sh|dh
    lb_algo rr
    # 负载均衡转发规则。一般包括 DR, NAT, TUN 3 种
    lb_kind NAT
    # 转发协议TCP & UDP,一般用 TCP
    protocol TCP
        # 本机的真实 ip
        real_server 192.168.0.113 5674 {
        # 默认为 1, 失效为 0
        weight 1
    }
}
编写haproxy进程检测脚本,并加可执行权限:
#vim /etc/keepalived/haproxy_check.sh

#!/bin/bash
COUNT=`ps -C haproxy --no-header |wc -l`
if [ $COUNT -eq 0 ];then
    /usr/sbin/haproxy -f /etc/haproxy/haproxy.cfg
    sleep 2
    if [ `ps -C haproxy --no-header |wc -l` -eq 0 ];then
        killall keepalived
    fi
fi
# 加可执行权限
[root@C etc]# chmod +x /etc/keepalived/haproxy_check.sh
node1、node2均启动keepalived:
# 启动服务
systemctl start keepalived
# 查看状态
systemctl status keepalived
查看ip信息:
ip a


