8版本ELK集群部署
源码安装8.4版本的elasticsearch集群
elasticsearch官网地址:Elasticsearch:官方分布式搜索和分析引擎 | Elastic
第一步: 环境配置(每一台都做)
配置主机名、配置IP地址、每台主机配置/etc/hosts名称解析
192.168.11.128 es1
192.168.11.130 es2
192.168.11.138 es3
将Linux系统的软硬限制最大文件数改为65536,将所有用户的最大线程数修改为4096
修改/etc/security/limits.conf文件(每一台都做)
[root@es1 ~]# cat <
* soft nofile 65536
* hard nofile 65536
* hard nproc 4096
EOF
修改/etc/sysctl.conf文件,添加下面这行,并执行命令sysctl -p使其生效
[root@es1 ~]# cat <
vm.max_map_count=262144
EOF
将下载的源码包上传至/root/目录下,并解压缩至/usr/local目录下
[root@es1 ~]# tar xf elasticsearch-8.4.0-linux-x86_64.tar.gz -C /usr/local/
创建数据目录,证书目录,并修改归属关系为增加创建的启动用户(es)
[root@es1 ~]# cd /usr/local
[root@es1 local]# mkdir ./elasticsearch-8.4.0/data
[root@es1 local]# mkdir ./elasticsearch-8.4.0/config/certs
创建ca证书,什么也不用输入,两次回车即可(会在当前目录生成名为elastic-stack-ca.p12的证书文件)
[root@es1 local]# cd /usr/local/elasticsearch-8.4.0/
[root@es1 elasticsearch-8.4.0]# ./bin/elasticsearch-certutil ca
使用之前生成的ca真书创建节点证书,过程三次回车,会在当前目录生成一个名为elastic-certificates.p12的文件
[root@es1 elasticsearch-8.4.0]# ./bin/elasticsearch-certutil cert --ca elastic-stack-ca.p12
将两个证书文件移动到自定义的证书目录下
[root@es1 elasticsearch-8.4.0]#mv elastic-stack-ca.p12 elastic-certificates.p12 config/certs
生成http证书,根据提示信息进行操作,主要是下面几步
[root@es1 elasticsearch-8.4.0]# bin/elasticsearch-certutil http
Generate a CSR? [y/N]n
Use an existing CA? [y/N]y
CA Path: /usr/local/elasticsearch-8.4.0/config/certs/elastic-stack-ca.p12
Password for elastic-stack-ca.p12: 直接回车,不使用密码
For how long should your certificate be valid? [5y] 50y
Generate a certificate per node? [y/N]n
Enter all the hostnames that you need, one per line.
When you are done, press
es1
es2
es3
You entered the following hostnames.
- es1
- es2
- es3
Is this correct [Y/n]y
When you are done, press
192.168.11.128
192.168.11.130
192.168.11.138
You entered the following IP addresses.
- 192.168.11.128
- 192.168.11.130
- 192.168.11.138
Is this correct [Y/n]y
Do you wish to change any of these options? [y/N]n
接下来一直回车,然后会在当前目录生成名为:elasticsearch-ssl-http.zip的压缩文件
解压缩http证书文件 到当前目录
[root@es1 elasticsearch-8.4.0]# unzip elasticsearch-ssl-http.zip
将压缩的证书文件移动到之定义的证书目录下
[root@es1 elasticsearch-8.4.0]# mv elasticsearch/http.p12 kibana/elasticsearch-ca.pem config/certs
修改elasticsearch的配置文件(找到每一行修改很麻烦,直接将下面配置追加到配置文件底部就好啦)
[root@es1 elasticsearch-8.4.0]# vim config/elasticsearch.yml
cluster.name: my-application
node.name: es1
path.data: /usr/local/elasticsearch-8.4.0/data
path.logs: /usr/local/elasticsearch-8.4.0/logs/
network.host: es1
http.port: 9200
discovery.seed_hosts: ["es1","es2","es3"]
cluster.initial_master_nodes: ["es1"]
#上面是找对配置文件对应的行修改,下面是在配置文件底部追加的内容
xpack.security.enabled: true
xpack.security.enrollment.enabled: true
xpack.security.http.ssl:
enabled: true
keystore.path: /usr/local/elasticsearch-8.4.0/config/certs/http.p12
truststore.path: /usr/local/elasticsearch-8.4.0/config/certs/http.p12
xpack.security.transport.ssl:
enabled: true
verification_mode: certificate
keystore.path: /usr/local/elasticsearch-8.4.0/config/certs/elastic-certificates.p12
truststore.path: /usr/local/elasticsearch-8.4.0/config/certs/elastic-certificates.p12
[root@es1 elasticsearch-8.4.0]# chown -R es:es /usr/local/elasticsearch-8.4.0/
重启使其之前的所有配置生效
[root@es1 elasticsearch-8.4.0]# reboot
启动之前确保elasticsearch目录下所有文件的归属关系都是es用户(这是之前自己创建的,每个人可以不一样)
每台主机新增普通用户es(用户名自定义,可以不是es),因为elasticsearch 6.8 版本以后增加认证功能,不能以root用户启动,不然会报错。
[root@es1 elasticsearch-8.4.0]# useradd es
[root@es1 elasticsearch-8.4.0]# passwd es
[root@es1 elasticsearch-8.4.0]# chown -R es:es /usr/local/elasticsearch-8.4.0/
切换到es用户启动,并以绝对路径启动
[root@es1 elasticsearch-8.4.0]# su - es
[es@es1 ~]$ /usr/local/elasticsearch-8.4.0/bin/elasticsearch
查看成功并且记得保存elastic用户的密码(我这里是hiti_qS2scWDlWwCNY*f),此时都不用看,就知道当前节点是已经初始化成功。
然后另外打开窗口,因为之前是前台启动不是后台启动,所以重新开启额外窗口,以root的省份将整个目录复制到另外两台机器
[root@es1 ~]# scp -r /usr/local/elasticsearch-8.4.0/ es2:/usr/local/
[root@es1 ~]# scp -r /usr/local/elasticsearch-8.4.0/ es3:/usr/local/
接下来分别在es2、es3的机器上修改配置文件
[root@es2 ~]# chown -R es:es /usr/local/elasticsearch-8.4.0/
[root@es2 ~]# su - es
[es@es2 ~]$ vim /usr/local/elasticsearch-8.4.0/config/elasticsearch.yml
只修改下面两项就行
node.name: es2
network.host: es2
然后删除数据文件,后台启动
[es@es2 ~]$ rm -rf /usr/local/elasticsearch-8.4.0/data/*
[es@es2 ~]$ /usr/local/elasticsearch-8.4.0/bin/elasticsearch -d
[root@es3 ~]# chown -R es:es /usr/local/elasticsearch-8.4.0/
[root@es3 ~]# su - es
[es@es3 ~]$ vim /usr/local/elasticsearch-8.4.0/config/elasticsearch.yml
只修改下面两项就行
node.name: es3
network.host: es3
然后删除数据文件,后台启动
[es@es3 ~]$ rm -rf /usr/local/elasticsearch-8.4.0/data/*
[es@es3 ~]$ /usr/local/elasticsearch-8.4.0/bin/elasticsearch -d
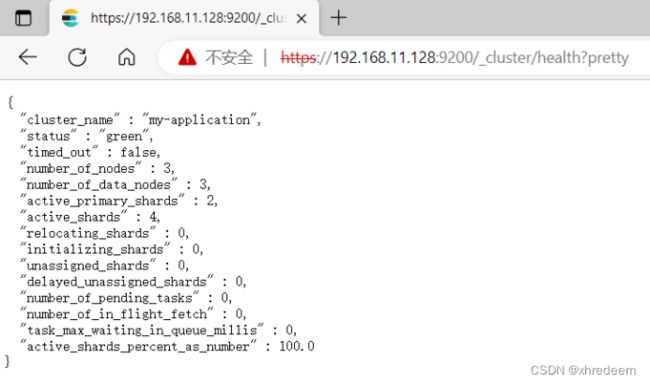
查看集群状态与集群中节点,部署没有问题。elasticsearch集群部署到此完成
到这elasticsearch集群已经搭建完毕。此时可以看到集群有三个节点,集群状态为green
源码安装当前最新版elasticsearch-head插件
下载地址:
Releases · mobz/elasticsearch-head · GitHub
将下载好的插件上传到es1机器,任意一台都行,只不过我这里没有多余机器罢了。作如下操作
[root@es1 ~]# tar xf elasticsearch-head-5.0.0.tar.gz
[root@es1 ~]# mv elasticsearch-head-5.0.0 /var/www/html/head
[root@es1 ~]# systemctl enable httpd --now
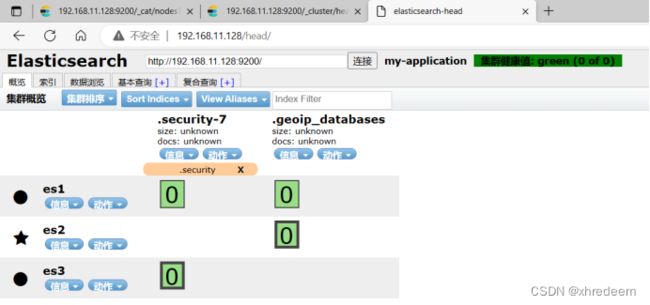
此时网页访问head插件显示无连接,是因为elasticsearch集群没有设备跨域访问
停止上面的某一台或者所有elasticsearch业务,并在某一台或者所有elasticsearch.ym配置文件中追加下面内容,并再次启动,这里我只在es1配置文件添加
http.cors.enabled : true
http.cors.allow-origin : "*"
http.cors.allow-methods : OPTIONS, HEAD, GET, POST, PUT, DELETE
http.cors.allow-headers : X-Requested-With,X-Auth-Token,Content-Type,Content-Length
此时还是连接不,报下面错
[o.e.x.s.t.n.SecurityNetty4HttpServerTransport] [es1] received plaintext http traffic on an https channel, closing connection Netty4HttpChannel{localAddress=/192.168.11.128:9200, remoteAddress=/192.168.11.1:58173}
然后停止所有elasticsearch服务,修改配置文件,将
xpack.security.enabled: true 修改为false
重启所有服务,再次查看,此时head插件配置完毕
rpm包安装8版本的filebeat插件
简单介绍:filebeat插件的作用是收集web日志文件,将其转发到logstash
filebeat下载地址:Download Filebeat • Lightweight Log Analysis | Elastic
将下载的rpm包上传至机器并安装,安装在web所在的机器
[root@web ~]# yum -y install ./filebeat-8.4.0-x86_64.rpm
修改配置文件,找到下面几项修改或者直接在最下方追加都可以
[root@web ~]# vim /etc/filebeat/filebeat.yml
enabled: true
paths:
- /var/log/httpd/access_log
fields:
label: myself
output.logstash:
hosts: ["192.168.11.136:5044"]
#上面是logstash的ip地址
注释掉下面三行
#output.elasticsearch:
# Array of hosts to connect to.
# hosts: ["localhost:9200"]
重启服务
[root@web ~]# systemctl restart filebeat.service
rpm包安装8版本的logstash
logstash下载地址:Download Logstash Free | Get Started Now | Elastic
安装已经上传的软件包
[root@logstash ~]# yum -y install ./logstash-8.4.0-x86_64.rpm
修改配置文件
[root@logstash ~]# cat /etc/logstash/conf.d/my.conf
input {
beats {
port => 5044
}
}
filter{
if [fields][label] == "myself" {
grok {
match => { "message" => "%{HTTPD_COMBINEDLOG}" }
}}
}
output{
#stdout{ codec => "rubydebug" }
if [fields][label] == "myself" {
elasticsearch {
hosts => ["es1:9200", "es2:9200"]
index => "httpd-%{+YYYY.MM.dd}"
}}
}
重启服务
[root@logstash ~]# systemctl restart logstash.service
做完这一步以后,可以测试,我这里在es1上访问web服务器(192.168.11.129)
以便于生成日志记录
[root@es1 ~]# for i in {1..6};do curl 192.168.11.129;done
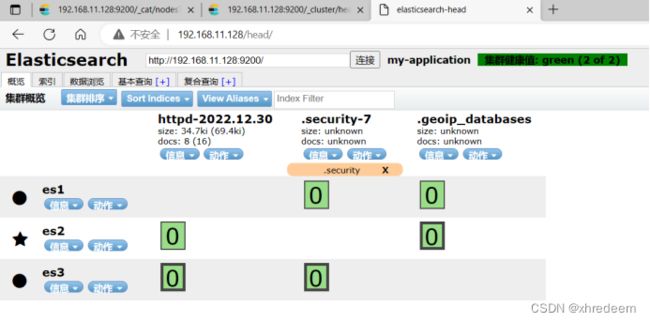
此时查看head插件网页,发现已经有名为httpd-时间的索引生成,只差kibana可视化分析啦
rpm包安装8版本的kibana
kibana下载地址:Download Kibana Free | Get Started Now | Elastic
上传rpm安装包并安装
[root@kibana ~]# yum -y install ./kibana-8.4.0-x86_64.rpm
修改配置文件
[root@kibana ~]# vim /etc/kibana/kibana.yml
server.port: 5601
server.host: 192.168.11.137
server.name: kibana
elasticsearch.hosts: ["es1:9200","es2:9200"]
i18n.locale: "zh-CN"
[root@kibana ~]# vim /etc/kibana/kibana.yml
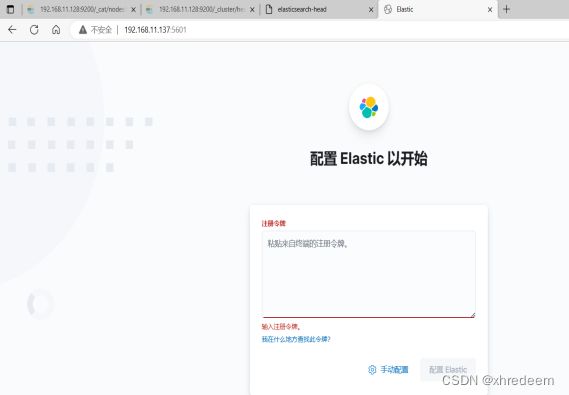
网页访问http://kibana服务器所在地址:5601
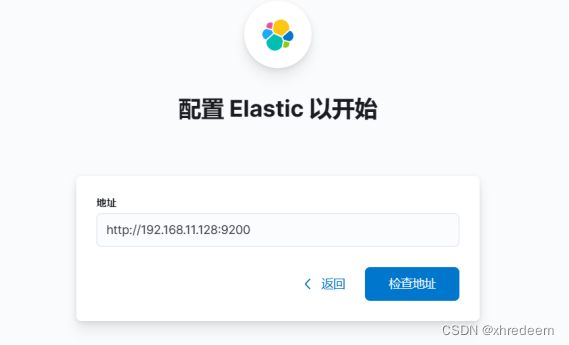
选择手动配置,输入任一台elastic地址,然后点击检查地址
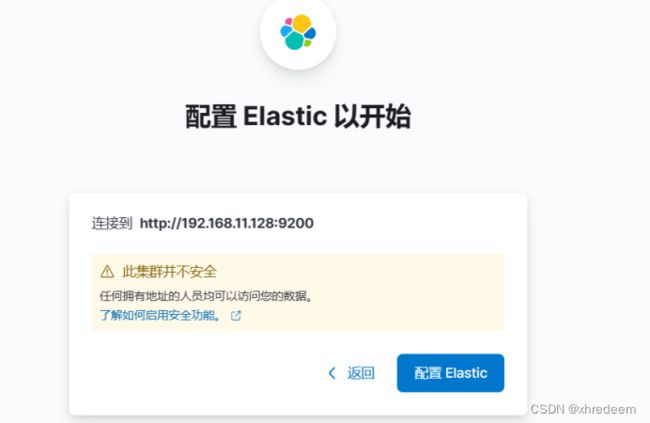
点击配置elastic
出现如下画面
在kibana服务器执行下面指令,可以获取验证码
[root@kibana ~]# /usr/share/kibana/bin/kibana-verification-code
Your verification code is: 725 232
到此配置完成,进入首页,点击左侧菜单栏discovery-点击创建数据视图,可以看到右侧自定义的httpd-时间索引,到此就可以分析日志啦。

