Linux驱动开发基础__mmap
目录
1 引入
2 内存映射现象与数据结构
3 ARM 架构内存映射简介
3.1 一级页表映射过程
3.2 二级页表映射过程
4 怎么给 APP 新建一块内存映射
4.1 mmap 调用过程
编辑4.2 cache 和 buffer
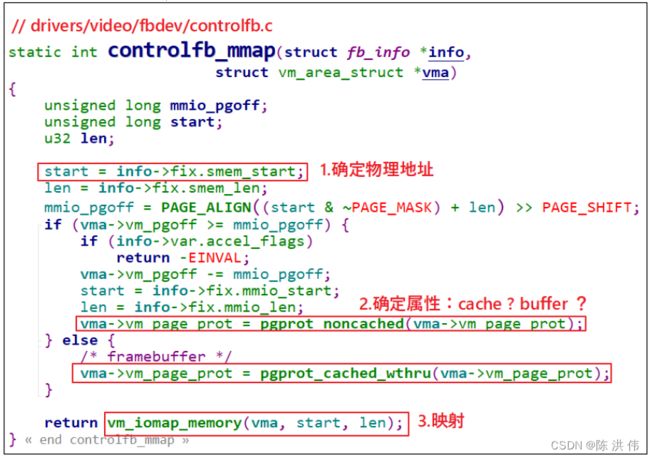
4.3 驱动程序要做的事
5 编程
5.1 app编程
5.2 hello_drv_test.c
5.3 驱动编程
5.3.1 分配一块 8K 的内存
5.3.2 提供 mmap 函数
5.4 hello_drv.c
1 引入
应用程序和驱动程序之间传递数据时,可以通过 read、write 函数进行。这涉及在用户态 buffer 和内核态 buffer 之间传数据,如下图所示:
 应用程序不能直接读写驱动程序中的 buffer,需要在用户态 buffer 和内核态 buffer 之间进行一次数据拷贝。这种方式在数据量比较小时没什么问题;但是数据量比较大时效率就太低了。比如更新 LCD 显示时,如果每次都让 APP 传递一帧数据给内核,假设 LCD 采用 1024*600*32bpp 的格式,一帧数据就有1024*600*32/8=2.3MB 左右,这无法忍受。
改进的方法就是让程序可以直接读写驱动程序中的 buffer,这可以通过mmap 实现(memory map),把内核的 buffer 映射到用户态,让 APP 在用户态直接读写。
2 内存映射现象与数据结构
假设有这样的程序,名为 test.c:
#include
#include
#include

int a;
int main(int argc, char **argv)
{
  if (argc != 2)
  {
    printf("Usage: %s \n", argv[0]);
    return -1;
  }
  a = strtol(argv[1], NULL, 0);
  printf("a's address = 0x%lx, a's value = %d\n", &a, a);
  while (1)
  {
    sleep(10);
  }
  return 0;
}
在 PC 上如下编译(必须静态编译):
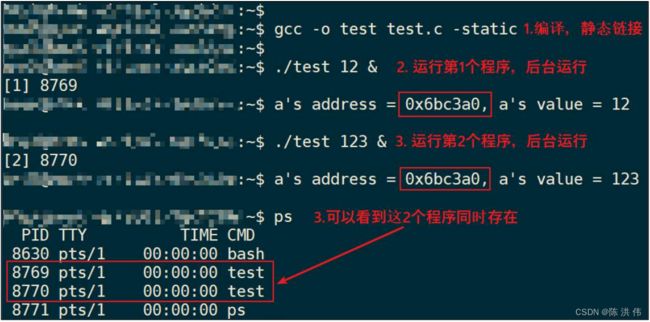
gcc -o test test.c -staitc 分别执行 test 程序 2 次,最后执行 ps,可以看到这 2 个程序同时存在,这 2 个程序里 a 变量的地址相同,但是值不同。如下图:
观察到这些现象:
- 2 个程序同时运行,它们的变量 a 的地址都是一样的:0x6bc3a0;
- 2 个程序同时运行,它们的变量 a 的值是不一样的,一个是 12,另一个是 123。
疑问来了:
- 这 2 个程序同时在内存中运行,它们的值不一样,所以变量 a 的地址肯定不同;
- 但是打印出来的变量 a 的地址却是一样的。
怎么回事? 这里要引入虚拟地址的概念: CPU 发出的地址是虚拟地址,它经过MMU(Memory Manage Unit,内存管理单元)映射到物理地址上,对于不同进程的同一个虚拟地址,MMU 会把它们映射到不同的物理地址。如下图:
- 当前运行的是 app1 时,MMU 会把 CPU 发出的虚拟地址 addr 映射为物理地址paddr1,用paddr1 去访问内存。
- 当前运行的是 app2 时,MMU 会把 CPU 发出的虚拟地址 addr 映射为物理地址paddr2,用paddr2 去访问内存。
- MMU 负责把虚拟地址映射为物理地址,虚拟地址映射到哪个物理地址去?
可以执行 ps 命令查看进程 ID,然后执行“cat /proc/325/maps”得到映射关系。
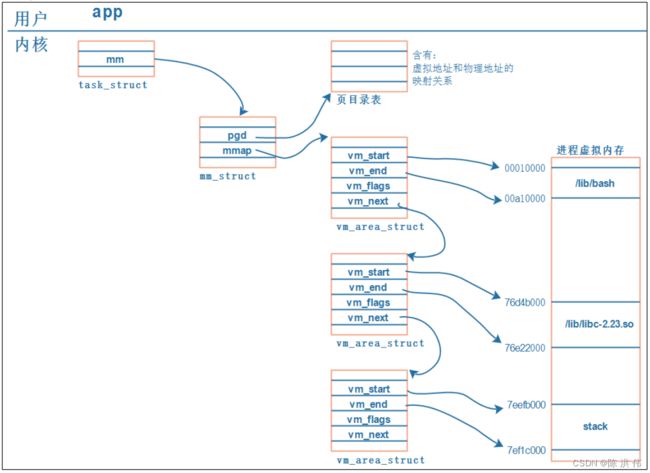
每一个 APP 在内核里都有一个 tast_struct,这个结构体中保存有内存信息:mm_struct。而虚拟地址、物理地址的映射关系保存在页目录表中,如下图所示:
解析如下:
- 每个 APP 在内核中都有一个 task_struct 结构体,它用来描述一个进程;
- 每个 APP 都要占据内存,在 task_struct 中用 mm_struct 来管理进程占用的内存; 内存有虚拟地址、物理地址,mm_struct 中用 mmap 来描述虚拟地址,用 pgd(Page Global Directory,页目录) 来描述对应的物理地址。
- 每个 APP 都有一系列的 VMA:virtual memory : 比如 APP 含有代码段、数据段、BSS 段、栈等等,还有共享库。这些单元会保存在内存里,它们的地址空间不同,权限不同(代码段是只读、的可运行的、数据段可读可写),内核用一系列的 vm_area_struct 来描述它们。 vm_area_struct 中的 vm_start、vm_end 是虚拟地址。
- vm_area_struct 中虚拟地址如何映射到物理地址去? 每一个 APP 的虚拟地址可能相同,物理地址不相同,这些对应关系保存在 pgd 中。
3 ARM 架构内存映射简介
ARM 架构支持一级页表映射,也就是说 MMU 根据 CPU 发来的虚拟地址可以找到第 1 个页表,从第 1 个页表里就可以知道这个虚拟地址对应的物理地址。一级页表里地址映射的最小单位是 1M。
ARM 架构还支持二级页表映射,也就是说 MMU 根据 CPU 发来的虚拟地址先找到第 1 个页表,从第 1 个页表里就可以知道第 2 级页表在哪里;再取出第 2 级页表,从第 2 个页表里才能确定这个虚拟地址对应的物理地址。二级页表地址映射的最小单位有 4K、1K,Linux 使用 4K。
一级页表项里的内容,决定了它是指向一块物理内存,还是指问二级页表,如下图:
3.1 一级页表映射过程
一线页表中每一个表项用来设置 1M 的空间,对于 32 位的系统,虚拟地址空间有 4G,4G/1M=4096。所以一级页表要映射整个 4G 空间的话,需要 4096 个页表项。
第 0 个页表项用来表示虚拟地址第 0 个 1M(虚拟地址为 0~0xFFFFF)对应哪一块物理内存,并且有一些权限设置;
第 1 个页表项用来表示虚拟地址第 1 个 1M(虚拟地址为 0x100000~0x1FFFFF)对应哪一块物理内存,并且有一些权限设置;
依次类推。
使用一级页表时,先在内存里设置好各个页表项,然后把页表基地址告诉 MMU,就可以启动 MMU 了。
以下图为例介绍地址映射过程:
- CPU 发出虚拟地址 vaddr,假设为 0x12345678
- MMU 根据 vaddr[31:20]找到一级页表项: 虚拟地址 0x12345678 是虚拟地址空间里第 0x123 个 1M,所以找到页表里第 0x123 项,根据此项内容知道它是一个段页表项。 段内偏移是 0x45678。
- 从这个表项里取出物理基地址:Section Base Address,假设是0x81000000
- 物理基地址加上段内偏移得到:0x81045678
所以 CPU 要访问虚拟地址 0x12345678 时,实际上访问的是 0x81045678 的
物理地址。
3.2 二级页表映射过程
首先设置好一级页表、二级页表,并且把一级页表的首地址告诉 MMU。
以下图为例介绍地址映射过程:
- CPU 发出虚拟地址 vaddr,假设为 0x12345678
- MMU 根据 vaddr[31:20]找到一级页表项: 虚拟地址 0x12345678 是虚拟地址空间里第 0x123 个 1M,所以找到页表里第 0x123 项。根据此项内容知道它是一个二级页表项。
- 从这个表项里取出地址,假设是 address,这表示的是二级页表项的物理地址;
- vaddr[19:12]表示的是二级页表项中的索引 index 即 0x45,在二级页表项中找到第 0x45 项;
里面含有这 4K 或 1K 物理空间的基地址 page base addr,假设是0x81889000:
它 跟 vaddr[11:0] 组 合 得 到 物 理 地 址 : 0x81889000 + 0x678 = 0x81889678。
所以 CPU 要访问虚拟地址 0x12345678 时,实际上访问的是 0x81889678 的物理地址
4 怎么给 APP 新建一块内存映射
4.1 mmap 调用过程
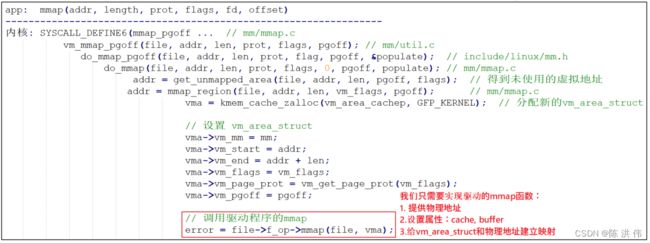
从上面内存映射的过程可以知道,要给 APP 新开劈一块虚拟内存,并且让它指向某块内核 buffer,我们要做这些事:
- 得到一个 vm_area_struct,它表示 APP 的一块虚拟内存空间; 很 幸 运 , APP 调 用 mmap 系 统 函 数 时 , 内 核 就 帮 我 们 构 造 了 一 个vm_area_stuct 结构体。里面含有虚拟地址的地址范围、权限。
- 确定物理地址: 你想映射某个内核 buffer,你需要得到它的物理地址,这得由你提供。
- 给 vm_area_struct 和物理地址建立映射关系: 也很幸运,内核提供有相关函数。
APP 里调用 mmap 时,导致的内核相关函数调用过程如下:
 4.2 cache 和 buffer
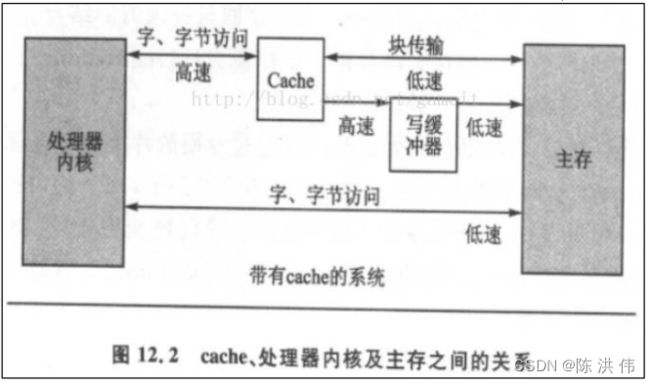
使用 mmap 时,需要有 cache、buffer 的知识。下图是 CPU 和内存之间的关系,有 cache、buffer(写缓冲器)。Cache 是一块高速内存;写缓冲器相当于一个 FIFO,可以把多个写操作集合起来一次写入内存。
程序运行时有“局部性原理”,这又分为时间局部性、空间局部性。
- 时间局部性: 在某个时间点访问了存储器的特定位置,很可能在一小段时间里,会反复地访问这个位置。
- 空间局部性: 访问了存储器的特定位置,很可能在不久的将来访问它附近的位置。
而 CPU 的速度非常快,内存的速度相对来说很慢。CPU 要读写比较慢的内存时,怎样可以加快速度?根据“局部性原理”,可以引入 cache。
读取内存 addr 处的数据时:
- 先看看 cache 中有没有 addr 的数据,如果有就直接从 cache 里返回数据:这被称为 cache 命中。
- 如果 cache 中没有 addr 的数据,则从内存里把数据读入,注意:它不是仅仅读入一个数据,而是读入一行数据(cache line)。
- 而 CPU 很可能会再次用到这个 addr 的数据,或是会用到它附近的数据,这时就可以快速地从 cache 中获得数据。
写数据:
CPU 要写数据时,可以直接写内存,这很慢;也可以先把数据写入 cache,这很快。 但是 cache 中的数据终究是要写入内存的啊,这有 2 种写策略:
a) 写通(write through):
- 数据要同时写入 cache 和内存,所以 cache 和内存中的数据保持一致,但是它的效率很低。能改进吗?可以!使用“写缓冲器”:cache 大哥,你把数据给我就可以了,我来慢慢写,保证帮你写完。
- 有些写缓冲器有“写合并”的功能,比如 CPU 执行了 4 条写指令:写第 0、1、2、3 个字节,每次写 1 字节;写缓冲器会把这 4 个写操作合并成一个写操作:写 word。对于内存来说,这没什么差别,但是对于硬件寄存器,这就有可能导致问题。
- 所以对于寄存器操作,不会启动 buffer 功能;对于内存操作,比如 LCD 的显存,可以启用 buffer 功能。
b) 写回(write back):
- 新数据只是写入 cache,不会立刻写入内存,cache 和内存中的数据并不一致。
- 新数据写入 cache 时,这一行 cache 被标为“脏”(dirty);当cache 不够用时,才需要把脏的数据写入内存。
使用写回功能,可以大幅提高效率。但是要注意 cache 和内存中的数据很可能不一致。这在很多时间要小心处理:比如 CPU 产生了新数据,DMA 把数据从内存搬到网卡,这时候就要 CPU 执行命令先把新数据从 cache 刷到内存。反过来也是一样的,DMA 从网卡得过了新数据存在内存里,CPU 读数据之前先把 cache中的数据丢弃。
是否使用 cache、是否使用 buffer,就有 4 种组合(Linux 内核文件arch\arm\include\asm\pgtable-2level.h):
上面 4 种组合对应下表中的各项,一一对应(下表来自 s3c2410 芯片手册,高架构的 cache、buffer 更复杂,但是这些基础知识没变):
- 第 1 种是不使用 cache 也不使用 buffer,读写时都直达硬件,这适合寄存器的读写。
- 第 2 种是不使用 cache 但是使用 buffer,写数据时会用 buffer 进行优化,可能会有“写合并”,这适合显存的操作。因为对显存很少有读操作,基本都是写操作,而写操作即使被“合并”也没有关系。
- 第 3 种是使用 cache 不使用 buffer,就是“write through”,适用于只读设备:在读数据时用 cache 加速,基本不需要写。
- 第 4 种是既使用 cache 又使用 buffer,适合一般的内存读写。
4.3 驱动程序要做的事
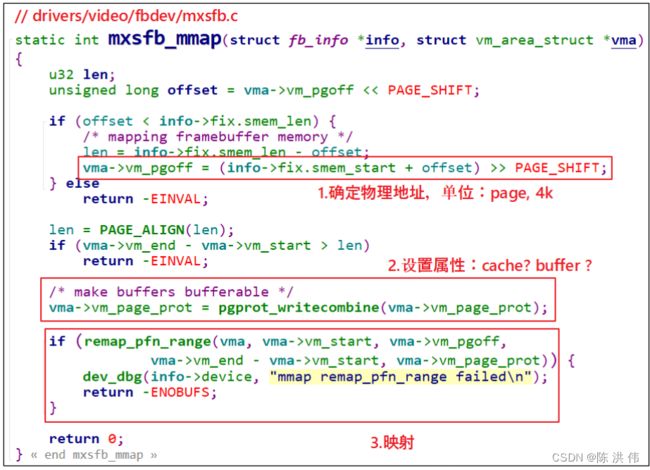
驱动程序要做的事情有 3 点:
- 确定物理地址
- 确定属性:是否使用 cache、buffer
- 建立映射关系
参考 Linux 源文件,示例代码如下:
5 编程
5.1 app编程
APP 怎么写?open 驱动、buf=mmap(……)映射内存,直接读写 buf 就可以了,代码如下:
22      /* 1. 打开文件 */
23      fd = open("/dev/hello", O_RDWR);
24      if (fd == -1)
25      {
26              printf("can not open file /dev/hello\n");
27              return -1;
28      }
29
30      /* 2. mmap
31       * MAP_SHARED  : 多个 APP 都调用 mmap 映射同一块内存时, 对内存的修改大家都可以看到。
32       *               就是说多个 APP、驱动程序实际上访问的都是同一块内存
33       * MAP_PRIVATE : 创建一个 copy on write 的私有映射。
34       *               当 APP 对该内存进行修改时,其他程序是看不到这些修改的。
35       *               就是当 APP 写内存时, 内核会先创建一个拷贝给这个 APP,
36       *               这个拷贝是这个 APP 私有的, 其他 APP、驱动无法访问。
37       */
38      buf =  mmap(NULL, 1024*8, PROT_READ | PROT_WRITE, MAP_SHARED, fd, 0);
39      if (buf == MAP_FAILED)
40      {
41              printf("can not mmap file /dev/hello\n");
42              return -1;
43      }
最 难 理 解 的 是 mmap 函 数 MAP_SHARED 、 MAP_PRIVATE 参 数 。 使 用MAP_PRIVATE 映射时,在没有发生写操作时,APP、驱动访问的都是同一块内存;当 APP 发起写操作时,就会触发“copy on write”,即内核会先创建该内存块的拷贝,APP 的写操作在这个新内存块上进行,这个新内存块是 APP 私有的,别的 APP、驱动看不到。
仅用 MAP_SHARED 参数时,多个 APP、驱动读、写时,操作的都是同一个内存块,“共享”。
MAP_PRIVATE 映射是很有用的,Linux 中多个 APP 都会使用同一个动态库,在没有写操作之前大家都使用内存中唯一一份代码。当 APP1 发起写操作时,内核会为它复制一份代码,再执行写操作,APP1 就有了专享的、私有的动态库,在里面做的修改只会影响到 APP1。其他程序仍然共享原先的、未修改的代码。
有了这些知识后,下面的代码就容易理解了,请看代码中的注释:
    printf("mmap address = 0x%x\n", buf);
46      printf("buf origin data = %s\n", buf); /* old */
47
48      /* 3. write */
49      strcpy(buf, "new");
50
51      /* 4. read & compare */
52      /* 对于 MAP_SHARED 映射:  str = "new"
53       * 对于 MAP_PRIVATE 映射: str = "old"
54       */
55      read(fd, str, 1024);
56      if (strcmp(buf, str) == 0)
57      {
58              /* 对于 MAP_SHARED 映射,APP 写的数据驱动可见
59               * APP 和驱动访问的是同一个内存块
60               */
61              printf("compare ok!\n");
62      }
63      else
64      {
65              /* 对于 MAP_PRIVATE 映射,APP 写数据时, 是写入另一个内存块(是原内存块的
"拷贝")
66               */
67              printf("compare err!\n");
68              printf("str = %s!\n", str);  /* old */
69              printf("buf = %s!\n", buf);  /* new */
70      }
5.2 hello_drv_test.c
#include
#include
#include
#include
#include
#include
#include
#include

/*
 * ./hello_drv_test
 */
int main(int argc, char **argv)
{
	int fd;
	char *buf;
	int len;
	char str[1024];


	/* 1. 打开文件 */
	fd = open("/dev/hello", O_RDWR);
	if (fd == -1)
	{
		printf("can not open file /dev/hello\n");
		return -1;
	}

	/* 2. mmap
	 * MAP_SHARED  : 多个APP都调用mmap映射同一块内存时, 对内存的修改大家都可以看到。
	 *               就是说多个APP、驱动程序实际上访问的都是同一块内存
	 * MAP_PRIVATE : 创建一个copy on write的私有映射。
	 *               当APP对该内存进行修改时,其他程序是看不到这些修改的。
	 *               就是当APP写内存时, 内核会先创建一个拷贝给这个APP,
	 *               这个拷贝是这个APP私有的, 其他APP、驱动无法访问。
	 */
	buf =  mmap(NULL, 1024*8, PROT_READ | PROT_WRITE, MAP_SHARED, fd, 0);
	if (buf == MAP_FAILED)
	{
		printf("can not mmap file /dev/hello\n");
		return -1;
	}

	printf("mmap address = 0x%x\n", buf);
	printf("buf origin data = %s\n", buf); /* old */

	/* 3. write */
	strcpy(buf, "new");

	/* 4. read & compare */
	/* 对于MAP_SHARED映射:  str = "new"
	 * 对于MAP_PRIVATE映射: str = "old"
	 */
	read(fd, str, 1024);
	if (strcmp(buf, str) == 0)
	{
		/* 对于MAP_SHARED映射,APP写的数据驱动可见
		 * APP和驱动访问的是同一个内存块
		 */
		printf("compare ok!\n");
	}
	else
	{
		/* 对于MAP_PRIVATE映射,APP写数据时, 是写入原来内存块的"拷贝"
		 */
		printf("compare err!\n");
		printf("str = %s!\n", str);  /* old */
		printf("buf = %s!\n", buf);  /* new */
	}

	while (1)
	{
		sleep(10);  /* cat /proc/pid/maps */
	}

	munmap(buf, 1024*8);
	close(fd);

	return 0;
}
5.3 驱动编程
5.3.1 分配一块 8K 的内存
我们应该使用 kmalloc 或 kzalloc,这样得到的内存物理地址是连续的,在 mmap 时后 APP 才可以使用同一个基地址去访问这块内存。(如果物理地址不连续,就要执行多次 mmap 了)。
5.3.2 提供 mmap 函数
关键在于 mmap 函数,代码如下:
要注意的是,remap_pfn_range 中,pfn 的意思是“Page Frame Number”。在 Linux 中,整个物理地址空间可以分为第 0 页、第 1 页、第 2 页,诸如此类,这就是 pfn。假设每页大小是 4K,那么给定物理地址 phy,它的 pfn = phy / 4096 = phy >> 12。内核的 page 一般是 4K,但是也可以配置内核修改 page的大小。所以为了通用,pfn = phy >> PAGE_SHIFT。
APP 调用 mmap 后,会导致驱动程序的 mmap 函数被调用,最终 APP 的虚拟地址和驱动程序中的物理地址就建立了映射关系。APP 可以直接访问驱动程序的buffer。
5.4 hello_drv.c
#include

#include
#include
#include
#include
#include
#include
#include
#include
#include
#include
#include
#include
#include
#include
#include
#include
#include

/* 1. 确定主设备号                                                                 */
static int major = 0;
static char *kernel_buf;
static struct class *hello_class;
static int bufsiz = 1024*8;

#define MIN(a, b) (a < b ? a : b)

/* 3. 实现对应的open/read/write等函数,填入file_operations结构体                   */
static ssize_t hello_drv_read (struct file *file, char __user *buf, size_t size, loff_t *offset)
{
	int err;
	printk("%s %s line %d\n", __FILE__, __FUNCTION__, __LINE__);
	err = copy_to_user(buf, kernel_buf, MIN(bufsiz, size));
	return MIN(bufsiz, size);
}

static ssize_t hello_drv_write (struct file *file, const char __user *buf, size_t size, loff_t *offset)
{
	int err;
	printk("%s %s line %d\n", __FILE__, __FUNCTION__, __LINE__);
	err = copy_from_user(kernel_buf, buf, MIN(1024, size));
	return MIN(1024, size);
}

static int hello_drv_mmap(struct file *file, struct vm_area_struct *vma)
{
	/* 获得物理地址 */
	unsigned long phy = virt_to_phys(kernel_buf);

	/* 设置属性: cache, buffer */
	vma->vm_page_prot = pgprot_writecombine(vma->vm_page_prot);

	/* map */
	if (remap_pfn_range(vma, vma->vm_start, phy >> PAGE_SHIFT,
			    vma->vm_end - vma->vm_start, vma->vm_page_prot)) {
		printk("mmap remap_pfn_range failed\n");
		return -ENOBUFS;
	}

	return 0;
}

static int hello_drv_open (struct inode *node, struct file *file)
{
	printk("%s %s line %d\n", __FILE__, __FUNCTION__, __LINE__);
	return 0;
}

static int hello_drv_close (struct inode *node, struct file *file)
{
	printk("%s %s line %d\n", __FILE__, __FUNCTION__, __LINE__);
	return 0;
}

/* 2. 定义自己的file_operations结构体                                              */
static struct file_operations hello_drv = {
	.owner	 = THIS_MODULE,
	.open    = hello_drv_open,
	.read    = hello_drv_read,
	.write   = hello_drv_write,
	.release = hello_drv_close,
	.mmap    = hello_drv_mmap,
};

/* 4. 把file_operations结构体告诉内核:注册驱动程序                                */
/* 5. 谁来注册驱动程序啊?得有一个入口函数:安装驱动程序时,就会去调用这个入口函数 */
static int __init hello_init(void)
{
	int err;

	kernel_buf = kmalloc(bufsiz, GFP_KERNEL);
	strcpy(kernel_buf, "old");

	printk("%s %s line %d\n", __FILE__, __FUNCTION__, __LINE__);
	major = register_chrdev(0, "hello", &hello_drv);  /* /dev/hello */


	hello_class = class_create(THIS_MODULE, "hello_class");
	err = PTR_ERR(hello_class);
	if (IS_ERR(hello_class)) {
		printk("%s %s line %d\n", __FILE__, __FUNCTION__, __LINE__);
		unregister_chrdev(major, "hello");
		return -1;
	}

	device_create(hello_class, NULL, MKDEV(major, 0), NULL, "hello"); /* /dev/hello */

	return 0;
}

/* 6. 有入口函数就应该有出口函数:卸载驱动程序时,就会去调用这个出口函数           */
static void __exit hello_exit(void)
{
	printk("%s %s line %d\n", __FILE__, __FUNCTION__, __LINE__);
	device_destroy(hello_class, MKDEV(major, 0));
	class_destroy(hello_class);
	unregister_chrdev(major, "hello");
	kfree(kernel_buf);
}


/* 7. 其他完善:提供设备信息,自动创建设备节点                                     */

module_init(hello_init);
module_exit(hello_exit);

MODULE_LICENSE("GPL");
