Pytorch :从零搭建一个神经网络
文章目录
- 安装
-
- 依赖
- 从源码编译pytorch
- CXX_ABI问题
- 数据集
-
- 归一化
-
- Transforms
- 搭建神经网络
-
- Components of a neural network
- nn.Flatten
- nn.Linear
- nn.Sequential
- nn.Softmax
- Model Parameters
- 优化模型参数
-
- 设置超参数
- 添加优化循环
-
- 添加 loss function
- 优化过程
- 完整实现
- 模型的保存和加载
安装
依赖
下载cudnn压缩包
#Unzip the cuDNN package.
$ tar -xvf cudnn-linux-x86_64-8.x.x.x_cudaX.Y-archive.tar.xz
#Copy the following files into the CUDA toolkit directory.
$ sudo cp cudnn-*-archive/include/cudnn*.h /usr/local/cuda/include
$ sudo cp -P cudnn-*-archive/lib/libcudnn* /usr/local/cuda/lib64
$ sudo chmod a+r /usr/local/cuda/include/cudnn*.h /usr/local/cuda/lib64/libcudnn*
从源码编译pytorch
git clone https://github.com/pytorch/pytorch.git
cd pytorch
git checkout branchname # 切换分支
git submodule sync
git submodule update --init --recursive
conda install cmake ninja
# Run this command from the PyTorch directory after cloning the source code using the “Get the PyTorch Source“ section below
pip install -r requirements.txt
conda install mkl mkl-include
# CUDA only: Add LAPACK support for the GPU if needed
conda install -c pytorch magma-cuda110  # or the magma-cuda* that matches your CUDA version from https://anaconda.org/pytorch/repo
export CMAKE_PREFIX_PATH=${CONDA_PREFIX:-"$(dirname $(which conda))/../"}
python setup.py build --cmake-only
ccmake build  # or cmake-gui build
make -j${nproc}
CXX_ABI问题
查看pytorch编译使用的CXXABI
torch._C._GLIBCXX_USE_CXX11_ABI
数据集
torch.utils.data.Dataset是代表这一数据的抽象类,你可以自己定义你的数据类继承和重写这个抽象类,只需定义__len__和__getitem__这两个函数:
__len__函数返回数据集样本的数量__getitem__函数从数据集中返回给定索引idx的样本
归一化
归一化是一种常用的数据预处理技术,用于缩放或转换数据,以确保每个特征都有相同的学习贡献。
Transforms
数据并不总是以训练机器学习算法所需的最终处理形式出现。我们使用transforms来对数据进行一些操作,并使其适合训练。所有TorchVision数据集都有两个参数(tansform来修改特征和target_transform来修改标签),它们接受包含转换逻辑的可调用对象。torchvision.transforms模块提供了几个开箱即用的常用转换。
from torchvision import datasets
from torchvision.transforms import ToTensor, Lambda

ds = datasets.FashionMNIST(
    root="data",
    train=True,
    download=True,
    transform=ToTensor(),
    target_transform=Lambda(lambda y: torch.zeros(10, dtype=torch.float).scatter_(0, torch.tensor(y), value=1))
)
ToTensor将PIL image 或 NumPy ndarray 转化为FloatTensor,并且将像素值缩放到[0.,1.]区间
搭建神经网络
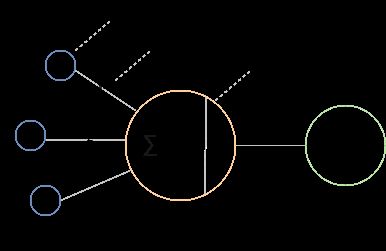
神经网络是由一层一层连接起来的神经元的集合。每个神经元都是一个小型计算单元,执行简单的计算,解决一个问题。它们是分层组织的。有3种类型的层:输入层,隐藏层和输出层。除了输入层,每一层都包含一些神经元。神经网络模仿人类大脑处理信息的方式。
Components of a neural network
- Activation function激活函数
决定一个神经元是否应该被激活。在神经网络中发生的计算包括应用激活函数。如果一个神经元被激活,那就意味着输入很重要。这是不同种类的激活函数。选择使用哪个激活函数取决于您想要的输出是什么。激活函数的另一个重要作用是为模型添加非线性- Binary used to set an output node to 1 if function result is positive and 0 if the function result is negative. f ( x ) = { 0 , if x < 0 1 , if x ≥ 0 f(x)= {\small \begin{cases} 0, & \text{if } x < 0\\ 1, & \text{if } x\geq 0\\ \end{cases}} f(x)={0,1,if x<0if x≥0
- Sigmod is used to predict the probability of an output node being between 0 and 1. f ( x ) = 1 1 + e − x f(x) = {\large \frac{1}{1+e^{-x}}} f(x)=1+e−x1
- Tanh is used to predict if an output node is between 1 and -1. Used in classification use cases. f ( x ) = e x − e − x e x + e − x f(x) = {\large \frac{e^{x} - e^{-x}}{e^{x} + e^{-x}}} f(x)=ex+e−xex−e−x
- ReLU used to set the output node to 0 if fuction result is negative and keeps the result value if the result is a positive value. f ( x ) = { 0 , if x < 0 x , if x ≥ 0 f(x)= {\small \begin{cases} 0, & \text{if } x < 0\\ x, & \text{if } x\geq 0\\ \end{cases}} f(x)={0,x,if x<0if x≥0
- Weights权值
一层中所有神经元的权重被组织成一个张量 - Bias偏置

我们可以说,具有权重 W W W和偏差 b b b的神经网络层的输出 y = f ( x ) y=f(x) y=f(x)被计算为输入的总和乘以权重加上偏差 x = ∑ ( w e i g h t s ∗ i n p u t s ) + b i a s x = \sum{(weights * inputs) + bias} x=∑(weights∗inputs)+bias,其中 f ( x ) f(x) f(x)是激活函数
nn.Flatten
nn.Flatten 将高维数据展平为一维数据
nn.Linear
线性层是一个模块,该模块使用其存储的权重和偏置在输入上应用线性转换。
nn.Sequential
nn.Sequential 是一个有顺序的模块容器
nn.Softmax
Softmax激活函数计算神经网络输出的概率。它只用于神经网络的输出层。结果被缩放为值[0,1],表示模型对每个类的预测概率。dim 参数表示结果值之和必须为维度1。

torch.nn.functional.binary_cross_entropy_with_logits二元交叉熵
l o s s = − ( t a r g e t ∗ log ( s i g m o i d ( i n p u t ) ) + ( 1 − t a r g e t ) ∗ l o g ( 1 − s i g m o i d ( i n p u t ) ) ) \rm loss = -(target * \log(sigmoid(input)) + (1 - target) * log(1 - sigmoid(input))) loss=−(target∗log(sigmoid(input))+(1−target)∗log(1−sigmoid(input)))
sigmoid()函数将输入映射到0到1之间的概率
Model Parameters
神经网络中的许多层都被参数化,即具有在训练过程中优化的相关权重和偏置。nn.module的派生类自动跟踪模型对象中定义的所有字段,并使用模型的parameter()或named_parameters()方法访问所有参数。
优化模型参数
现在我们有了模型和数据,是时候通过优化数据上的参数来训练、验证和测试我们的模型了。训练一个模型是一个迭代的过程,在每个迭代中(称为epoch)。该模型对输出进行预测,计算预测的误差(损失),收集误差对其参数的导数(正如我们在上一模块中看到的那样),并使用梯度下降优化这些参数。
设置超参数
超参数是可调整的参数,让您控制模型优化过程。不同的超参数值可能会影响模型的训练和准确性水平。
我们为训练定义了以下超参数:
- Epoch number - 整个训练数据集通过网络的次数。
- Batch size - 每个 epoch 模型看到的数据样本数量。迭代次数是完成一个 epoch 所需的批次数。
- 学习率 - 模型匹配时所采用的步长大小,以寻找能够产生更高模型准确度的最佳权重。较小的值意味着模型需要更长时间来寻找最佳权重,而较大的值可能会导致模型跳过并错过最佳权重,从而在训练期间产生不可预测的行为。
添加优化循环
一旦我们设置了超参数,我们就可以用优化循环来训练和优化我们的模型。优化循环的每个迭代称为一个epoch。
每个epoch包含两个部分:
- The Train Loop - iterate over the training dataset and try to converge to optimal parameters.
- The Validation/Test Loop - iterate over the test dataset to check if model performance is improving.
添加 loss function
当给出一些训练数据时,我们未经训练的网络可能不会给出正确的预测。
Loss function衡量预测结果与期望值的差异度,我们希望在训练阶段最小化loss function。为了计算损失,我们使用给定数据样本的输入进行预测,并将其与真实的数据标签值进行比较。
Common loss functions include:
nn.MSELoss(Mean Square Error) used for regression tasksnn.NLLLoss(Negative Log Likelihood) used for classificationnn.CrossEntropyLosscombinesnn.LogSoftmaxandnn.NLLLoss
We pass our model’s output logits to nn.CrossEntropyLoss, which will normalize the logits and compute the prediction error.
优化过程
所有优化的逻辑都被封装在optimizer对象中。提供了很多不同的优化算法,如ADAM 和 RMSProp
我们通过注册需要训练的模型参数来初始化优化器,并传入学习率超参数
optimizer = torch.optim.SGD(model.parameters(), lr=learning_rate)
在训练循环,优化分为三步:
- 调用
optimizer.zero_grad()来初始化模型参数的梯度。梯度默认情况下是累加起来的,为了避免这种情况,我们在每次迭代显式调用归零。 - 通过调用
loss.backward()反向传播预测损失。PyTorch保存损失函数相对于每个参数的梯度 - 一旦有了梯度,调用
optimizer.step()来通过反向传播中收集的梯度来调整参数
完整实现
我们定义了根据训练数据集优化模型参数的train_loop,以及根据测试数据评估模型性能的test_loop
def train_loop(dataloader, model, loss_fn, optimizer):
	model.train()  # sets the module in training mode
    size = len(dataloader.dataset)
    for batch, (X, y) in enumerate(dataloader):
        # Compute prediction and loss
        pred = model(X)
        loss = loss_fn(pred, y)

        # Backpropagation
        optimizer.zero_grad()
        loss.backward()
        optimizer.step()

        if batch % 100 == 0:
            loss, current = loss.item(), batch * len(X)
            print(f"loss: {loss:>7f}  [{current:>5d}/{size:>5d}]")


def test_loop(dataloader, model, loss_fn):
    model.eval()  # sets the module in evaluation mode
    size = len(dataloader.dataset)
    test_loss, correct = 0, 0

    with torch.no_grad():
        for X, y in dataloader:
            pred = model(X)
            test_loss += loss_fn(pred, y).item()
            correct += (pred.argmax(1) == y).type(torch.float).sum().item()

    test_loss /= size
    correct /= size
    print(f"Test Error: \n Accuracy: {(100*correct):>0.1f}%, Avg loss: {test_loss:>8f} \n")
我们初始化损失函数和优化器,并将其传递给“训练循环”和“测试循环”。您可以随意增加epoch的数量,以跟踪模型不断改进的性能
loss_fn = nn.CrossEntropyLoss()
optimizer = torch.optim.SGD(model.parameters(), lr=learning_rate)

epochs = 10
for t in range(epochs):
    print(f"Epoch {t+1}\n-------------------------------")
    train_loop(train_dataloader, model, loss_fn, optimizer)
    test_loop(test_dataloader, model, loss_fn)
print("Done!")
模型的保存和加载
参考链接
在PyTorch里面使用torch.save来保存模型的结构和参数,有两种保存方式
- 保存整个模型的结构信息和参数信息,保存的对象是模型
model - 保存模型的参数,保存的对象是模型的状态
model.state_dict()
可以这样保存,save的第一个参数是保存对象,第二个参数是保存路径及名称:
torch.save(model, './model.pth')
torch.save(model.state_dict(), './model_state.pth')
加载模型有两种方式对应于保存模型的方式:
- 加载完整的模型结构和参数信息,使用
load_model = torch.load('model.pth'),在网络较大时加载时间比较长,同时存储空间也比较大; - 加载模型的参数信息,需要先导入模型的结构,然后通过
model.load(torch.load('model_state.pth'))来导入。
model = NeuralNetwork()
model.load_state_dict(torch.load('data/model.pth'))
model.eval()
Note: Be sure to call
model.eval()method before inferencing to set the dropout and batch normalization layers to evaluation mode. Failing to do this will yield inconsistent inference results.
