Springboot注解——Spring容器中Bean的生老病死
Spring注解驱动开发
官方文档:https://docs.spring.io/spring-boot/docs/current/reference/html/
IOC容器
@Configuration和@Bean
@Configuration
public class TestConfig {
    @Bean("pet")
    Pet pet01(){
        return new Pet("LTH",20);
    }
}
@Configuration声明为配置类,作用等价于配置文件
@Bean用于向容器中注册bean,可以bean的id默认为方法名,也可以通过@Bean的value字段设置id
@ComponentScan
这个注解用于配置包的扫描规则,需要作用于配置类上(@Configuration)
如果不设置value或者basePackage的值,则扫描路径默认是当前类所在的包及其子包
@Configuration
@ComponentScan(value = "com.demo")
public class GetOtherComponentConfig {
}
@SpringBootApplication会默认扫描启动类所在包(com.demo2)的所有组件,其中的配置类可以扫描其他包(com.demo)下的组件
启动类本身也是一个配置类,任何下都会被扫描
@SpringBootApplication
public class Demo2Application {
    public static void main(String[] args) {
        ConfigurableApplicationContext context = SpringApplication.run(Demo2Application.class, args);
        String[] beanDefinitionNames = context.getBeanDefinitionNames();
        Arrays.stream(beanDefinitionNames).forEach(System.out::println);
    }
}
@ComponentScan带有注解@Repeatable(ComponentScans.class),可以在一个配置类上加上多个@ComponentScan设置扫描路径
@Retention(RetentionPolicy.RUNTIME)
@Target(ElementType.TYPE)
@Documented
@Repeatable(ComponentScans.class)
public @interface ComponentScan
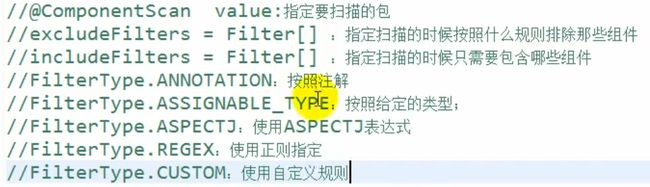
可以用includeFilters指定扫描路径下具体包含哪些组件,默认全部包含,所以要加上(useDefaultFilters = false)这个属性,includeFilters才能生效,excludeFilters用于在包含的组件中排除一些组件
@Configuration
@ComponentScan(
        value = "com.demo.test",
        excludeFilters = {
                @ComponentScan.Filter(type = FilterType.ANNOTATION,classes = {Controller.class})
        },
        includeFilters = {
                @ComponentScan.Filter(type = FilterType.ANNOTATION,classes = {Controller.class})
        },
        useDefaultFilters = false
)
public class GetOtherComponentConfig {
}
自定义过滤规则:
public class ServiceFilter implements TypeFilter {
    @Override
    public boolean match(MetadataReader metadataReader, MetadataReaderFactory metadataReaderFactory) throws IOException {
        //类信息
        ClassMetadata classMetadata = metadataReader.getClassMetadata();
        //注解信息
        AnnotationMetadata annotationMetadata = metadataReader.getAnnotationMetadata();
        //资源文件所在的路径
        Resource resource = metadataReader.getResource();
        return false;
    }
}
excludeFilters:false表示不被筛除,true表示被筛除
includeFilters:false表示不被包含,true表示被包含
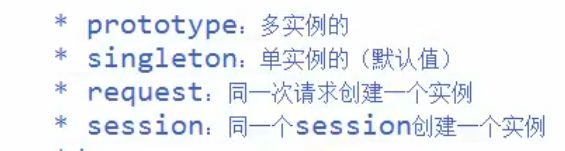
@Scope
设置bean的作用域(单实例还是多实例)
@Configuration
public class GetOtherComponentConfig {
        @Bean
        @Scope("prototype")
        public User user01(){
                return new User("123",12);
        }
}
默认单实例
prototype:使用时创建bean,容器启动时不创建bean
singleton:容器启动时创建bean,获取时从容器中获取
@Lazy
懒加载单例bean(多实例没有lan)
在Spring容器启动的时候不创建bena,在获取这个bean的时候再创建这个bean,这个bean只会创建一次,第一次创建后后面获取bean就是从Spring容器中获取。
@Configuration
public class GetOtherComponentConfig {
        @Bean
        @Lazy
        public User user01(){
                return new User("123",12);
        }
}
@Conditional条件装配
@Configuration
public class GetOtherComponentConfig {
        @Bean
        @Conditional(LinuxCondition.class)
        public User user01(){
                return new User("linux",12);
        }
        @Bean
        @Conditional(WindowCondition.class)
        public User user02(){
                return new User("windows",12);
        }
}
@Conditional需要我们传入实现了Condition(org.springframework.context.annotation.Condition)接口的类,可以传入一个数组
然后根据这个接口中的matches方法的返回值来判断当前@Bean是否需要注入Spring容器中
matches返回true表示装配进Spring容器中,返回false表示不装配进Spring容器
下面两个类根据当前操作系统的类型来判断是否要装配进Spring容器中
public class LinuxCondition implements Condition {
    @Override
    public boolean matches(ConditionContext context, AnnotatedTypeMetadata metadata) {
        Environment environment = context.getEnvironment();
        String property = environment.getProperty("os.name");
        if(property!=null&&property.contains("Linux")){
            return true;
        }
        return false;
    }
}
public class WindowCondition implements Condition {
    @Override
    public boolean matches(ConditionContext context, AnnotatedTypeMetadata metadata) {
        Environment environment = context.getEnvironment();
        String property = environment.getProperty("os.name");
        if(property!=null&&property.contains("Window")){
            return true;
        }
        return false;
    }
}
结果输出window是那个bean
@SpringBootApplication
public class AnnotationDemoApplication {
    public static void main(String[] args) {
        ConfigurableApplicationContext context = SpringApplication.run(AnnotationDemoApplication.class, args);
        context.getBeansOfType(User.class).forEach((k,v)->{
            System.out.println(k+":"+v);
        });
    }
}
如果作用于方法上,则是对整个类进行条件装配,如果返回false,整个配置类都会失效
@Configuration
@Conditional(LinuxCondition.class)
@ComponentScan("com.demo.test")
public class GetOtherComponentConfig {
        @Bean
        @Conditional(LinuxCondition.class)
        public User user01(){
                return new User("linux",12);
        }
        @Bean
        @Conditional(WindowCondition.class)
        public User user02(){
                return new User("windows",12);
        }
}
比如当前是windows环境,因而这个配置类会失效,因而加了注解:@ComponentScan(“com.demo.test”)也不会得到其他包的组件
@Import
注册组件的方式:
1.包扫描+组件注册注解(@Controller,@Service,@Repository,@Component)
2.配置类+@Bean注册bean
3.@import
4.使用Spring提供的FactoryBean(工厂bean)
快速注册组件
@Configuration
@Import({User.class})
public class GetOtherComponentConfig {
}
注册的组件id是这个类的全限定名:com.demo.test.pojo.User
如果已经有名为com.demo.test.pojo.User的组件(重复的类)则不再注册
也可以传入一个实现了ImportSelector的类:
public class UserSelector implements ImportSelector {
    @Override
    public String[] selectImports(AnnotationMetadata importingClassMetadata) {
        return new String[]{"com.demo.test.pojo.User"};
    }
}
importingClassMetadata是标注的类的元数据,注意这个方法不能返回null,否则会出现空指针异常
返回值是全限定名组成的数组
@Configuration
@Import(UserSelector.class)
public class GetOtherComponentConfig {
}
然后在@Import中传入这个selector类时,就会根据数组中的全限定名创建bean
传入实现了ImportBeanDefinitionRegistrar接口的类:
public class UserBeanDefinition implements ImportBeanDefinitionRegistrar {
    @Override
    public void registerBeanDefinitions(AnnotationMetadata importingClassMetadata, BeanDefinitionRegistry registry) {
        registry.registerBeanDefinition("uuser",new RootBeanDefinition(User.class));
    }
}
相当于手动传入bean的定义注册组件(批量注册组件),用@Import引入这个类完成批量注册的功能
只能用@Import注解导入组件时才会注册组件,用@Bean或者@Component都不会注册组件
工厂bean
注意工厂bean和bean工厂不同,工厂bean是一种特殊的bean,需要实现FactoryBean接口
public class UserBeanFactory implements FactoryBean<User> {

    @Override
    public User getObject() throws Exception {
        return new User("lth",20);
    }

    @Override
    public Class<?> getObjectType() {
        return User.class;
    }

    @Override
    public boolean isSingleton() {
        return true;
    }
}
getObject 获取对象
getObjectType 获取对象的类型
isSingleton 设置是否是单实例对象,如果设置为true,每次获取的bean都是Spring容器中的bean,并且只会有一个。如果设置为false,则表示设置为多实例对象,每次调用getObject会生成新的对象。
通过之前说的三种方式向Spring容器中注册这个bean后,在获取这个bean的时候,会得到这个工厂bean生成的用getObject得到的bean
例如:(用@Import注入)
@SpringBootApplication
public class AnnotationDemoApplication {
    public static void main(String[] args) {
        ConfigurableApplicationContext context = SpringApplication.run(AnnotationDemoApplication.class, args);
        System.out.println(context.getBean("com.demo.annotationdemo.config.beanfactory.UserBeanFactory"));
    }
}
这个得到的结果是User(username=lth, age=20),证实了是用getObject方法得到的bean,想要获取工厂bean本身,需要在前面加上&
@SpringBootApplication
public class AnnotationDemoApplication {
    public static void main(String[] args) {
        ConfigurableApplicationContext context = SpringApplication.run(AnnotationDemoApplication.class, args);
        System.out.println(context.getBean("&com.demo.annotationdemo.config.beanfactory.UserBeanFactory"));
    }
}
得到com.demo.annotationdemo.config.beanfactory.UserBeanFactory@2dc995f4
Bean的创建和销毁
initMethod和destroyMethod
@Data
@AllArgsConstructor
@NoArgsConstructor
public class User {
    String username;
    Integer age;
    void init(){
        System.out.println("init");
    }
    void destroy(){
        System.out.println("destroy");
    }
}
我们可以在需要加入容器的组件的bean对应的实体类创建创建(init)和销毁方法(destroy)(名字不一定要叫init和destroy)
然后在用@Bean注解向Spring容器中添加组件时,可以设置这个bean的创建和销毁方法:
@Configuration
public class GetOtherComponentConfig {
    @Bean(value = "user",initMethod = "init",destroyMethod = "destroy")
    public User user01(){
        return new User();
    }
}
initMethod:创建方法,在向Spring容器中添加这个组件和执行
destroyMethod:销毁方法,会在Spring容器关闭时执行(context.close())
如果创建的对象是单实例的,则由Spring容器管理这些对象,容器启动时会调用initMethod方法,销毁时会调用destroyMethod
如果创建的对象是多实例的,则不会调用这两个方法(可以用@Scope设置是单实例还是多实例)
InitializingBean和DisposableBean
可以让注册进Spring容器的bean实现这两个接口,完成bean的创建和销毁
@Data
@AllArgsConstructor
@NoArgsConstructor
public class User implements InitializingBean, DisposableBean {
    String username;
    Integer age;
    void methodInit(){
        System.out.println("methodInit");
    }
    void methodDestroy(){
        System.out.println("methodDestroy");
    }

    @Override
    public void afterPropertiesSet() throws Exception {
        System.out.println("afterPropertiesSet");
    }

    @Override
    public void destroy() throws Exception {
        System.out.println("destroy");
    }
}
这四个方法的执行顺序如下:
1.afterPropertiesSet
2.methodInit
3.destroy
4.methodDestroy
@PostConstruct和@PreDestroy
@PostConstruct标注的方法是在构造方法执行完后执行
@PreDestroy标注的方法是在bean销毁前执行
标注的方法都必须是无参数的方法
PostConstruct		构造方法执行完后执行
afterPropertiesSet	属性设置完后执行
methodInit
preDestroy
destroy
methodDestroy
BeanPostProcessor
以上Bean的创建和销毁都是作用于特定的bean中,而BeanPostProcessor则作用于所有的bean
@Configuration
public class UserPostProceccer implements BeanPostProcessor  {

    @Override
    public Object postProcessBeforeInitialization(Object bean, String beanName) throws BeansException {
        System.out.println("postProcessBeforeInitialization:"+beanName);
        return bean;
    }

    @Override
    public Object postProcessAfterInitialization(Object bean, String beanName) throws BeansException {
        System.out.println("postProcessAfterInitialization:"+beanName);
        return bean;
    }
}
postProcessBeforeInitialization 在创建完bean实例后,在所有初始化流程(initMethod,PostConstruct,afterPropertiesSet)之前执行,bean是刚创建好的bean,我们可以对其进行修改或者包装后返回。
postProcessAfterInitialization 是在初始化流程完成后(initMethod,PostConstruct,afterPropertiesSet)执行
构造方法
postProcessBeforeInitialization:user
PostConstruct
afterPropertiesSet
methodInit
postProcessAfterInitialization:user
使用bean
preDestroy
destroy
methodDestroy
所有的组件创建时(包括Spring自带的组件)都会执行这两个方法
BeanPostProcessor作用原理
	protected Object initializeBean(String beanName, Object bean, @Nullable RootBeanDefinition mbd) {
		if (System.getSecurityManager() != null) {
			AccessController.doPrivileged((PrivilegedAction<Object>) () -> {
				invokeAwareMethods(beanName, bean);
				return null;
			}, getAccessControlContext());
		}
		else {
			invokeAwareMethods(beanName, bean);
		}

		Object wrappedBean = bean;
		if (mbd == null || !mbd.isSynthetic()) {
            //执行上面设置的所有postProcessBeforeInitialization方法
			wrappedBean = applyBeanPostProcessorsBeforeInitialization(wrappedBean, beanName);
		}

		try {
            //依次执行PostConstruct,afterPropertiesSet,methodInit方法
			invokeInitMethods(beanName, wrappedBean, mbd);
		}
		catch (Throwable ex) {
			throw new BeanCreationException(
					(mbd != null ? mbd.getResourceDescription() : null),
					beanName, "Invocation of init method failed", ex);
		}
		if (mbd == null || !mbd.isSynthetic()) {
            //执行上面设置的所有postProcessAfterInitialization方法
			wrappedBean = applyBeanPostProcessorsAfterInitialization(wrappedBean, beanName);
		}

		return wrappedBean;
	}
在调用这个方法之前,还会先调用populateBean(beanName, mbd, instanceWrapper)方法进行属性赋值
Spring对PostProcessor的使用
如果我们想在一个类中拿到IOC容器,可以让这个类实现ApplicationContextAware接口,其中的setApplicationContext方法就会把IOC容器的引用传进来,我们就可以把这个引用保存起来便于后续使用
public class User implements ApplicationContextAware {

    ApplicationContext applicationContext;
    String username;
    Integer age;

    @Override
    public void setApplicationContext(ApplicationContext applicationContext) throws BeansException {
        this.applicationContext=applicationContext;
    }
}
调用这个方法的组件就是ApplicationContextAwareProcessor
而之前标有@PostConstruct注解和@PreDestroy注解的方法的执行是通过InitDestroyAnnotationBeanPostProcessor这个PostProcessor来执行的(遍历所有bean的方法。执行其中带有@PostConstruct和@PreDestroy注解的方法)
包括我们使用@Autowire,@Async等注解,这些注解的处理都是通过实现PostProcessor接口来进行的
@Value
可以作用于属性字段和方法参数上
public class User{
    @Value("lth")
    String username;
    @Value("#{5+15}")
    Integer age;
}
1.可以直接设置值@Value(“lth”)
2.可以设置Spring表达式#{}来赋值@Value(“#{5+15}”)
3.可以使用 获 取 配 置 文 件 的 值 @ V a l u e ( {}获取配置文件的值@Value( 获取配置文件的值@Value({user.name})
(显然,这个会覆盖构造函数中设置的值)
public class User{
    @Value("${user01.name}")
    String username;
    @Value("${user01.age}")
    Integer age;
}
@PropertySource
@PropertySource(“classpath:/myapplication.properties”) 可以使用这个注解加载额外的配置文件,只能加载properties配置文件,@PropertySource配置优先级高于默认配置文件
@Configuration
@PropertySource("classpath:/myapplication.properties")
public class UserOtherComponentConfig {
    @Bean("user")
    public User user01(){
        return new User("zz",11);
    }
}
/*
myapplication.properties:
	user01.name=lth
	user01.age=22
*/
@AutoWired
假如当前容器中有多个User类型的对象,分别叫user01,user02
@Configuration
@ComponentScan("com.demo.test")
public class UserOtherComponentConfig {
    @Bean
    public User user01(){
        return new User("user01",11);
    }
    @Bean
    public User user02(){
        return new User("user02",22);
    }
}
然后使用@Autowired进行依赖注入
@Controller
@Data
public class UserController {
    @Autowired
    User user01;
}
@Autowired
先按照bean类型去找,如果有多个再按照bean的名称去找
1.如果容器中只有一个指定类型的bean,则装配这个唯一的bean
2.如果容器中有多个指定类型的bean,则根据装配字段的属性名称来装配(user01)
如果根据属性名称来寻找没有找到,则报错
如果容器中没有指定类型的bean,也会报错,如果不想让他报错,可以将require字段设置为false,这样在没有找到时会被设置为null而不会报错
@Autowired
User user01; //得到user01
@Autowired
User user01; //得到user02
@AutoWired
User user;	 //报错
@Primary
有多个可选的bean时,优先选择@Primary注解的bean(一个类型的bean只能有一个带有@Primary注解,否则会报错)
@Configuration
@ComponentScan("com.demo.test")
public class UserOtherComponentConfig {
    @Bean
    @Primary
    public User user01(){
        return new User("user01",11);
    }
    @Bean
    public User user02(){
        return new User("user02",22);
    }
}
@Controller
@Data
public class UserController {
    @Autowired
    User user;
}
此时user会拿到user01
当有了@Primary注解后,就不再根据属性名user来查找bean了,而是直接拿到带有@Primary注解的bean,如果拿到多个@Primary注解的bean则报错
@Qualifier
@Qualifier用于指定查找的bean的id
@Controller
@Data
public class UserController {
    @Autowired
    @Qualifier("user02")
    User user;
}
如果属性注入字段带有@Qualifier注解,则装配这个字段的时候,如果找到多个指定类型的bean,直接找到id和@Qualifier注解的value值一样的bean,然后装配进来(@Primary注解失效)。
总结
当有多个相同类型的bean
1.有@Qualifier根据@Qualifier的value
2.有@Primary根据@Primary
3.都没有根据属性名
上述三条只能按照优先级选择一条规则,按照那个规则没有找到时都会报错
@Resource
@Resource有两个字段:name(bean的id),type(bean的类型)
1.先按照name属性的值来找(如果没有设置则默认是属性名称)
@Controller
@Data
public class UserController {
    @Resource(name = "user02")
    User user01;
}
这里name设置了值,所以是按照user02来找而不是字段名称user01
如果根据名字找到了对应的bean,然后不管是什么类型都会尝试装配进来,如果类型兼容,则成功装配,如果类型不符合则报错
2.如果根据name没有找到,则再根据type来找(如果没有设置type则默认是这个字段本身的类型)
如果根据type没有找到则报错,如果找到了进行下一步判断
3.判断有无@Qualifier注解
1.如果有@Qualifier注解,则根据这个注解的值来找,如果找到了则装配,如果没有找到则报错
假如有三个bean:
@Configuration
@ComponentScan("com.demo.test")
public class UserOtherComponentConfig {
    @Bean
    public User user01(){
        return new User("user01",11);
    }
    @Bean
    public User user02(){
        return new User("user02",22);
    }
    @Bean
    public User user03(){
        return new User("user03",33);
    }
}
用于装配的类是:
@Controller
@Data
public class UserController {
    @Resource(type = User.class)
    @Qualifier("user02")
    User user;
}
这里会找到user02(根据user没有找到,再根据type=User.class来找,找到了三个:user01,user02,user03,然后再根据@Qualifier(“user02”)来找,找到user02进行装配)
而如果是:
@Controller
@Data
public class UserController {
    @Resource
    @Qualifier("user02")
    User user03;
}
则会找到user03(没有设置name的值,name默认是就是字段的名称user03,并且优先级比@Qualifier要高)
2.如果没有@Qualifier注解,则优先装配带有@Primary的bean
@Configuration
@ComponentScan("com.demo.test")
public class UserOtherComponentConfig {
    @Bean
    @Primary
    public User user01(){
        return new User("user01",11);
    }
    @Bean
    public User user02(){
        return new User("user02",22);
    }
}
这样装配结果就是user01(type和属性类相同时可以不写):
@Controller
@Data
public class UserController {
    @Resource(type = User.class)
    User user;
}
如果有多个bean带有@Primary注解则会报错
3.如果没有@Qualifier,也没有带有@Primary注解的bean,但是对应type的bean只有一个,则直接将这个bean装配进来
如果只找到了一个则直接装配进来
@Controller
@Data
public class UserController {
    @Resource(type = UserSon.class)
    User user;
}
@Configuration
@ComponentScan("com.demo.test")
public class UserOtherComponentConfig {
    @Bean
    public User user01(){
        return new User("user01",11);
    }
    @Bean
    public User user02(){
        return new User("user02",22);
    }
    @Bean
    public UserSon userSon(){
        return new UserSon("son",33);
    }
}
这里根据user没有找到,则根据type(UserSon是User的子类)来找,只找到了一个则直接装配进来,装配结果是userSon:
UserController(user=User(username=son, age=33))
如果根据type只找到了一个,并且没有@Qualifier注解,则直接装配进来。
4.如果没有这两个注解,而且还有多个bean,则报错
@Inject
功能和@Autowired一样,只是里面没有reqiure属性(所以被@Autowire完爆)
并且还需要引入依赖:
        <dependency>
            <groupId>javax.injectgroupId>
            <artifactId>javax.injectartifactId>
            <version>1version>
        dependency>
@Autowired注解,@Inject注解,@Resource注解,@Value注解都是使用ApplicationContextAwareProcessor来完成自动装配的
@Autowire作用于方法上
@Autowire作用于构造器
@Data
@Component
public class User{
    String username;
    Integer age;
    Pet pet;

    @Autowired
    User(Pet pet){
        System.out.println("构造器:"+pet);
    }
}
作用于构造器时,容器在创建这个组件的时候会为所有的方法参数按照@Autowired的规则自动装配(从Spring容器中找到对应的组件,并将引用赋值给对应的参数)
@Autowire除了自动装配的作用,还可以指定在创建组件时使用哪种构造器,如果只有一个构造器就使用那个唯一的构造器,使用的时候会完成自动装配,如果有多个参数,默认使用无参数构造器,如果我们想使用有参构造器可以在构造器上加上@Autowired注解
@Data
@Component
public class User{
    String username;
    Integer age;
    Pet pet;
    @Autowired
    User(Pet pet){
        this.pet=pet;
        System.out.println("构造器:"+this);
    }
    User(){
        System.out.println("无参构造器:");
        System.out.println(this);
    }
}
Tips:
this.pet=pet;//this.pet代表的是对象的成员参数,后面那个pet代表的是方法参数
属性参数Pet pet;作用域是整个类
方法参数Pet pet的作用域是整个方法
如果两者同名,作用域出现重叠,则以作用域小的参数优先(方法参数优先),也就是用pet代表方法参数,this.pet代表属性参数
加上@Autowired后,创建对象的时候就会调用有参构造器,不能有多个构造器同时标注@Autowire注解。如果只有一个构造器,@Autowired注解可以省略,省略后一样会完成自动装配
@Data
@Component
public class User{
    String username;
    Integer age;
    Pet pet;

    User(Pet pet,String age){
        this.pet=pet;
        System.out.println("构造器:"+this);
    }
    User(){
        System.out.println("无参构造器:");
        System.out.println(this);
    }
}
标注在方法参数表示只为这个字段进行自动装配,但是Spring会优先调用无参构造器,所以这里的有参构造器不会执行
如果删除无参构造器,或者在有参构造器上标注@Autowired注解,则会让Spring在创建bean的时候优先调用这个构造器,但是此时容器中没有age字段,所以会报错
@Data
@Component
public class User{
    String username;
    Integer age;
    Pet pet;

    User(@Autowired Pet pet, String age){
        this.pet=pet;
        System.out.println("构造器:"+this);
    }
}
如果不想让他报错,允许age以null的形式传进来,可以加上@Nullable注解(org.springframework.lang下的注解)
@Data
@Component
public class User{
    String username;
    Integer age;
    Pet pet;

    User(Pet pet,@Nullable String age){
        this.pet=pet;
        System.out.println("构造器:"+this);
    }
}
这样如果容器中有age,则将age装配进来,如果容器中没有age则以null值传进来,而不会报错(相当于reqired=false)
@Autowired注解标注在方法参数上(无用)
@Autowired作用于方法参数上没有什么作用,因为Spring调用这些方法时都会为所有的方法参数进行自动装配(相当于所有的方法参数上都默认带有@Autowired注解,并都进行了省略)
作用于普通方法
如果作用于普通方法上,会在装配属性时调用这些方法,一样会为所有的方法参数进行自动装配
@Data
@Component
@NoArgsConstructor
@AllArgsConstructor
public class User{
    String username;
    Integer age;
    Pet pet;

    @Autowired
    void toSetPet(Pet pet){
        this.pet=pet;
        System.out.println("toSetPet"+this);
    }
}
标注了@Bean注解的方法如果有参数,则也会自动装配
Aware注入Spring底层组件
如果我们想使用Spring底层的xxx组件,可以让当前类失效xxxAware接口,然后Spring在进行自动装配时,就会使用xxxAwareProccessor来执行对于Aware中对应的set方法来完成自动装配。
例如:
ApplicationContextAware 拿到IOC容器
BeanNameAware 拿到当前bean的名称
BeanFactoryAware 拿到Bean工厂
EmbeddedValueResolverAware 拿到表达式解析器解析Spring表达式(${}用于取出配置文件的值,#{}用于计算)
EnvironmentAware 拿到环境信息
ResourceLoaderAware 拿到配置文件的资源信息
ApplicationEventPublisherAware 拿到事件发布器
MessageSourceAware 拿到国际化组件
ApplicationStartupAware 开启器……
实现这些接口后会出现对应的set方法,通过set方法的方法参数拿到Spring的底层组件
@Data
@Component
@NoArgsConstructor
@AllArgsConstructor
public class User implements EmbeddedValueResolverAware {
    String username;
    Integer age;

    @Override
    public void setEmbeddedValueResolver(StringValueResolver resolver) {
        System.out.println(resolver.resolveStringValue("${os.name} #{22+22}"));
    }
}
输出:Windows 10 44
而使得这些接口生效则是依赖于ApplicationContextAwareProcessor,这个类实现了BeanPostProcessor,会在初始化前,调用这个bean所有对应接口的set方法,将我们需要的组将传进来。
postProcessBeforeInitialization方法会调用下面的invokeAwareInterfaces来实现
	private void invokeAwareInterfaces(Object bean) {
		if (bean instanceof EnvironmentAware) {
			((EnvironmentAware) bean).setEnvironment(this.applicationContext.getEnvironment());
		}
		if (bean instanceof EmbeddedValueResolverAware) {
			((EmbeddedValueResolverAware) bean).setEmbeddedValueResolver(this.embeddedValueResolver);
		}
		if (bean instanceof ResourceLoaderAware) {
			((ResourceLoaderAware) bean).setResourceLoader(this.applicationContext);
		}
		if (bean instanceof ApplicationEventPublisherAware) {
			((ApplicationEventPublisherAware) bean).setApplicationEventPublisher(this.applicationContext);
		}
		if (bean instanceof MessageSourceAware) {
			((MessageSourceAware) bean).setMessageSource(this.applicationContext);
		}
		if (bean instanceof ApplicationStartupAware) {
			((ApplicationStartupAware) bean).setApplicationStartup(this.applicationContext.getApplicationStartup());
		}
		if (bean instanceof ApplicationContextAware) {
			((ApplicationContextAware) bean).setApplicationContext(this.applicationContext);
		}
	}
这个方法依次判断当前bean是否实现了指定的Aware接口,如果实现了则调用对应的set方法
Profile条件装配
@PropertySource 加载额外的配置文件
从配置文件中获取数据的方法:
1.@Value(“${os.name}”)
2.使用Spring底层的值解析器EmbeddedValueResolver,获取方法是上一节讲的实现EmbeddedValueResolverAware接口
3.@ConfigurationProperties(“person”) 将配置文件中person下的值,按照字段名称装配进类中
@Profile可以标注在带有@Bean注解的方法上来选择性在Spring容器中注册bean
@Profile如果不设置value字段的值,则value字段的值默认是default,也就是默认环境下会使用的配置,不加@Profile则是在任何环境都会加载的bean。如果不激活任何环境也就是不设置spring.profiles.active的值(或者设置为default),这个值默认是default,默认会加载默认环境下的bean
条件装配的方法:
1.@Bean+@Profile(作用于@Configuration的类中的方法上)
2.添加组件的注解+@Profile(作用于类上)
然后用spring.profiles.active设置运行环境(也可以通过命令行参数来设置:两种方法-Dspring.profiles.active=xxx,–spring.profiles.active=xxx)
(具体内容可以看Springboot2那篇笔记)
AOP
基本使用
通知方法:
1.前置通知(@Before):方法运行之前运行
2.后置通知(@After):方法运行之后运行
3.正常返回(@AfterReturning):目标方法正常返回后运行
4.异常返回(@AfterThrowing):目标方法出现异常后运行
5.环绕通知(@Around):动态代理,用joinPonit.procceed()来运行目标方法
注意,@Before,@After,@Around无论是否出现异常都会执行
切点表达式:
public int com.demo.test.Aspects.DivTest.div(int,int)
可以用*来代表其中的一部分,代表任意
参数可以用…来代表任意参数
访问权限可以不写,代表任意权限
切点表达式可以直接写在上述注解中(需要在execution中),不过这样显得有些过于麻烦,我们提取公共切点表达式
@Pointcut("execution(public * com.demo.test.Aspects.DivTest.*(..))")
    public void pointCut(){}
这样其他方法在引用时,就只需将value字段设置为方法名加上()
    @Before("pointCut()")
    public void beforeDiv(){
        System.out.println("before div");
    }
AOP的使用步骤:
实例:
@Aspect
public class DivAspect {
@Pointcut("execution(public * com.demo.test.Aspects.DivTest.*(..))")
public void pointCut(){}
@Before("pointCut()")
public void beforeDiv(JoinPoint joinPoint){
System.out.println("before div");
}
@After("pointCut()")
public void afterDiv(JoinPoint joinPoint){
System.out.println("AfterDiv");
}
@AfterReturning(value = "pointCut()",returning = "result")
public void afterReturn(JoinPoint joinPoint,Object result){
System.out.println("afterReturn");
}
@AfterThrowing(value = "pointCut()",throwing = "ex")
public void afterThrowing(JoinPoint joinPoint,Exception ex){
System.out.println("afterThrowing");
}
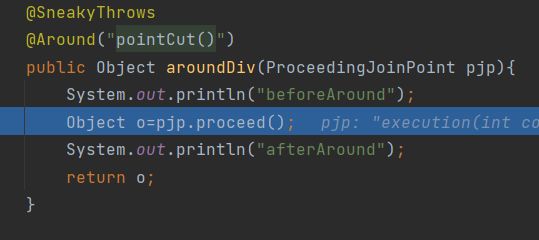
@SneakyThrows
@Around("pointCut()")
public Object aroundDiv(ProceedingJoinPoint pjp){
System.out.println("beforeAround");
Object o=pjp.proceed();
System.out.println("afterAround");
return o;
}
}
每个通知注解标识的方法的参数中都可以有一个JoinPoint类型的参数,代表切入点的方法信息,并且这个参数必须方法必须防在参数列表的第一个,否则无法解析
JoinPoint类常用方法:
getSignature()	获取方法的信息
getArgs()		获取所有的参数
不同的注解中还有不同的参数,可以为方法装配额外的参数。例如:
@AfterThrowing(value = “pointCut()”,throwing = “ex”) throwing参数指明了将Exception类的对象装配进名为ex参数中
@AfterReturning(value = “pointCut()”,returning = “result”) returning 参数表示将返回值装配进名为result的参数中
其余注解的参数也是用这种方法来使用
业务类和切片类都要添加进Spring容器中,用我们之前讲的方法都可以。然后将注解@Aspect标注在切片类上(@Aspect不能标注在方法上)
执行结果:
beforeAround
before div
DivTest
afterReturn/afterThorwing
AfterDiv
afterAround
@EnableAspectJAutoProxy
注解功能
上一节说到,必须在配置类上加上@EnableAspectJAutoProxy注解才能开启AOP功能
@Target(ElementType.TYPE)
@Retention(RetentionPolicy.RUNTIME)
@Documented
@Import(AspectJAutoProxyRegistrar.class)
public @interface EnableAspectJAutoProxy {

	/**
	 * Indicate whether subclass-based (CGLIB) proxies are to be created as opposed
	 * to standard Java interface-based proxies. The default is {@code false}.
	 */
	boolean proxyTargetClass() default false;

	/**
	 * Indicate that the proxy should be exposed by the AOP framework as a {@code ThreadLocal}
	 * for retrieval via the {@link org.springframework.aop.framework.AopContext} class.
	 * Off by default, i.e. no guarantees that {@code AopContext} access will work.
	 * @since 4.3.1
	 */
	boolean exposeProxy() default false;

}
这个注解上有注解@Import(AspectJAutoProxyRegistrar.class),表示向容器中引入AspectJAutoProxyRegistrar类的组件(对象)
class AspectJAutoProxyRegistrar implements ImportBeanDefinitionRegistrar {

	/**
	 * Register, escalate, and configure the AspectJ auto proxy creator based on the value
	 * of the @{@link EnableAspectJAutoProxy#proxyTargetClass()} attribute on the importing
	 * {@code @Configuration} class.
	 */
	@Override
	public void registerBeanDefinitions(
			AnnotationMetadata importingClassMetadata, BeanDefinitionRegistry registry) {

		AopConfigUtils.registerAspectJAnnotationAutoProxyCreatorIfNecessary(registry);

		AnnotationAttributes enableAspectJAutoProxy =
				AnnotationConfigUtils.attributesFor(importingClassMetadata, EnableAspectJAutoProxy.class);
		if (enableAspectJAutoProxy != null) {
			if (enableAspectJAutoProxy.getBoolean("proxyTargetClass")) {
				AopConfigUtils.forceAutoProxyCreatorToUseClassProxying(registry);
			}
			if (enableAspectJAutoProxy.getBoolean("exposeProxy")) {
				AopConfigUtils.forceAutoProxyCreatorToExposeProxy(registry);
			}
		}
	}

}
AspectJAutoProxyRegistrar类实现了ImportBeanDefinitionRegistrar接口,并用@Import导入,这样可以向容器中注册组件
注册的组件是:AnnotationAwareAspectJAutoProxyCreator
@Enablexxx注解的研究方式:点击去看看它引入了什么组件,组件的功能是什么
AnnotationAwareAspectJAutoProxyCreator实现了这两个接口:
SmartInstantiationAwareBeanPostProcessor, BeanFactoryAware
SmartInstantiationAwareBeanPostProcessor:xxxBeanPostProcessor表示是一个后置处理器,可以在初始化前后进行一些操作
BeanFactoryAware:xxxAware是用于获得Spring容器底层组件的接口,BeanFactoryAware用于获得BeanFactory这个组件
AnnotationAwareAspectJAutoProxyCreator组件
AnnotationAwareAspectJAutoProxyCreator是在什么时候生效的:
AnnotationAwareAspectJAutoProxyCreator也是一个BeanPostProccessor,和普通的BeanPostProccessor的创建流程一样
1.创建IOC容器
2.注册配置类,refresh刷新容器
3.刷新容器时会调用方法:registerBeanPostProcessors(beanFactory) 来注册bean的后置处理器来进行拦截
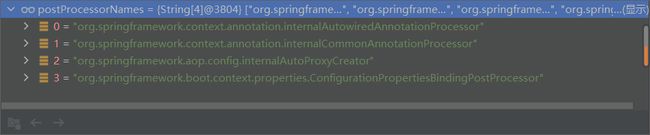
1.获取容器中所有注册的BeanPostProcessor的定义(此时还没有创建出来)
String[] postProcessorNames = beanFactory.getBeanNamesForType(BeanPostProcessor.class, true, false);
2.添加其他的一些BeanProccessor,然后将实现了PriorityOrder接口,Order接口,和没有实现这两个接口的BeanPostProcessor分 开。
3.优先注册实现了PriorityOrder接口的BeanPostProcessor
4.然后注册实现了Order接口的BeanPostProccessor
5.然后注册没有实现优先级接口的BeanPostProccessor
6.注册BeanPostProccessor,其实就是根据Bean的定义创建对应的对象,并保存在Spring容器中
创建bean的流程
对于所有容器中的组件,都是通过以下方法创建的
========================================================================================================
创建过程:【doCreateBean】
1.创建bean的实例 【Object bean = instanceWrapper.getWrappedInstance()】
1.5 这里会有【resolveBeforeInstantiation】,用于提前生成代理对象
2.为bean的属性赋值 【populateBean(beanName, mbd, instanceWrapper)】依赖注入
3.初始化bean 【exposedObject = initializeBean(beanName, exposedObject, mbd)】
1.处理一部分Aware接口的回调 【invokeAwareMethods(beanName, bean)】
2.应用BeanPostProcessor的前置回调BeanPostProcessorsBeforeInitialization 【wrappedBean = applyBeanPostProcessorsBeforeInitialization(wrappedBean, beanName)】
3.执行初始化方法 【invokeInitMethods】(用@Bean指定的)
4.应用BeanPostProcessor的BeanPostProcessorsAfterInitialization方法 【wrappedBean = applyBeanPostProcessorsBeforeInitialization(wrappedBean, beanName)】,在这个方法中也能生成代理对象
4.放入Spring容器中
=======================================================================================================
BeanPostProccessor的注册过程和普通bean的注册过程一样都调用的是doCreateBean方法,都会有对应的生命周期中的流程,注册完成后为后面创建其他组件服务
经过上述流程后AnnotationAwareAspectJAutoProxyCreator就创建出来了
AnnotationAwareAspectJAutoProxyCreator实现了InstantiationAwareBeanPostProcessor接口,比普通的BeanPostProcessor多两个方法,而在这个接口中,多了两个方法postProcessBeforeInstantiation,postProcessAfterInstantiation
public interface InstantiationAwareBeanPostProcessor extends BeanPostProcessor {
	@Nullable
	default Object postProcessBeforeInstantiation(Class<?> beanClass, String beanName) throws BeansException 	{
		return null;
	}

	default boolean postProcessAfterInstantiation(Object bean, String beanName) throws BeansException {
		return true;
	}

	@Nullable
	default PropertyValues postProcessProperties(PropertyValues pvs, Object bean, String beanName)
			throws BeansException {
		return null;
	}

}
完成bean的初始化,创建剩下的单实例bean
也是调用doCreateBean方法来完成创建,不过在创建之前会先检查缓存中是否有对应的bean,如果有就不再创建(当前,前提是这个bean被设置为单实例的)
【finishBeanFactoryInitialization(beanFactory()】
【beanFactory.preInstantiateSingletons()】
遍历容器中所以的bean,获取或者创建对象【getBean】
【getBean()】-> 【doGetBean()】 ->
【getSingleton()】(目的是查找缓存中有没有对应的bean,防止重复创建,所以创建出的bean都会被缓存起来)
->创建bean(拿到BeanFactory创建bean)
【createBean(beanName, mbd, args)】
给bean一个机会生成代理对象
Object bean = resolveBeforeInstantiation(beanName, mbdToUse)
回顾创建bean的流程:
createBean
	Object bean = resolveBeforeInstantiation(beanName, mbdToUse)	//提前生成代理对象
	Object beanInstance = doCreateBean(beanName, mbdToUse, args)	//创建bean
		instanceWrapper.getWrappedInstance()						//调用都早方法创建bean实例
		populateBean(beanName, mbd, instanceWrapper)				//属性赋值,依赖注入
		exposedObject = initializeBean(beanName, exposedObject, mbd)//初始化bean
			invokeAwareMethods(beanName, bean)						//Aware接口获取底层组件
			applyBeanPostProcessorsBeforeInitialization				//PostProcessor前置处理
			invokeInitMethods										//@Bean中指定的初始化方法
			applyBeanPostProcessorsAfterInitialization				//PostProcessor后置处理
如果能返回就使用,否则就使用doCreateBean创建对象(和前面的流程一样)
    bean = applyBeanPostProcessorsBeforeInstantiation(targetType, beanName);//这个是PostProccessor子类新加的
    if (bean != null) {
        bean = applyBeanPostProcessorsAfterInitialization(bean, beanName);//这个是原本的PostProccessor里面的
    }
所谓的代理对象其实是因而后置处理器中,我们可以对对象进行包装后返回,因而也就是代理对象
注意
这里调用的是所有BeanPostProcessor的postProcessBeforeInstantiation方法
postProcessBeforeInstantiation方法是在在resolveBeforeInstantiation调用
postProcessBeforeInitialization方法是在初始化的时候用的
在这里调用所有InstantiationAwareBeanPostProcessor的postProcessBeforeInstantiation
AOP的动态代理的逻辑在这里AnnotationAwareAspectJAutoProxyCreator产生
我们来看看postProcessBeforeInstantiation做了哪些事情:
	@Override
	public Object postProcessBeforeInstantiation(Class<?> beanClass, String beanName) {
		Object cacheKey = getCacheKey(beanClass, beanName);

		if (!StringUtils.hasLength(beanName) || !this.targetSourcedBeans.contains(beanName)) {
			if (this.advisedBeans.containsKey(cacheKey)) {
				return null;
			}
			if (isInfrastructureClass(beanClass) || shouldSkip(beanClass, beanName)) {
				this.advisedBeans.put(cacheKey, Boolean.FALSE);
				return null;
			}
		}

		// Create proxy here if we have a custom TargetSource.
		// Suppresses unnecessary default instantiation of the target bean:
		// The TargetSource will handle target instances in a custom fashion.
		TargetSource targetSource = getCustomTargetSource(beanClass, beanName);
		if (targetSource != null) {
			if (StringUtils.hasLength(beanName)) {
				this.targetSourcedBeans.add(beanName);
			}
			Object[] specificInterceptors = getAdvicesAndAdvisorsForBean(beanClass, beanName, targetSource);
			Object proxy = createProxy(beanClass, beanName, specificInterceptors, targetSource);
			this.proxyTypes.put(cacheKey, proxy.getClass());
			return proxy;
		}

		return null;
	}
1.首先判断当前bean是否在需要增强的bean(advisedBeans)中【advisedBeans.containsKey(cacheKey)】
2.判断是否是基础的代理类型(Advice之类的)或者切面(@Aspect)【isInfrastructureClass(beanClass)】
3.再判断是否应当跳过【shouldSkip】
将所有的增强方法封装成一个增强器,判断是不是对应的类型之类的,这里大多数情况下返回false
这里一般情况下会返回null,然后触发applyBeanPostProcessorsAfterInitialization
applyBeanPostProcessorsAfterInitialization生成代理对象
AnnotationAwareAspectJAutoProxyCreator会调用applyBeanPostProcessorsAfterInitialization方法生成代理对象
	@Override
	public Object applyBeanPostProcessorsAfterInitialization(Object existingBean, String beanName)
			throws BeansException {

		Object result = existingBean;
		for (BeanPostProcessor processor : getBeanPostProcessors()) {
			Object current = processor.postProcessAfterInitialization(result, beanName);
			if (current == null) {
				return result;
			}
			result = current;
		}
		return result;
	}
postProcessAfterInitialization中会生成我们需要的AOP代理对象
1.获取我们设置的所有增强器(包装后的增强方法),然后用切入点表达式判断当前bean能不能使用,把能使用的增强器放入到一个集合中,然后判断当前方法需不需要增强,不需要增强(集合大小为0)则直接返回
2.将增强器按照优先级排序
3.将当前bean标志为增强
4.创建代理对象
1.将增强器放入增强工厂(【proxyFactory】DefaultAopProxyFactory),用代理工厂创建AOP代理【createAopProxy】
有两种AOP代理:
ObjenesisCglibAopProxy(config)	CGLIB动态代理
JdkDynamicAopProxy(config)		JDK动态代理
默认使用CGLIB动态代理
2.创建代理对象
创建完代理对象后,Spring容器种放置的就是bean的代理对象
至此bean的创建流程就结束了
小记:
总结一些Spring创建对象的大致流程:
Spring容器在启动的时候,扫描指定的包扫描路径下的所有组件,将所有带有@Controller,@Service,@Compoent等将组件注册进Spring容器的注解的类的定义信息保存下来,然后创建对应的BeanFactory并放入到三级缓存中。然后遍历三级缓存,调用beanFactory的getObject方法创建组件。创建组件时,先调用构造器创建对象实例,然后判断当前bean有没有依赖其他组件,如果没有则不需要依赖注入,执行初始化方法后,生成代理对象,放入一级缓存中(Spring容器),如果依赖了其他组件,则提前生成代理对象,放入二级缓存中,然后创建其他其他的bean,等所有bean都按这种方式创建完成了,他们在内存中的位置也就确定了,然后我们再遍历二级缓存,二级缓存中的bean,虽然里面的属性还没有赋值,但是在内存中的位置以及确定了,然后我们就可以根据依赖注入的规则(@Autowired,@Resource)在一级缓存和二级缓存中查找对应的bean,并将其地址赋值到属性字段中,这样就可以完成所有字段依赖注入。完成依赖注入中将其从二级缓存中移除,然后放入到一级缓存中,这样bean就创建完成了。
初始化方法:
invokeAwareMethods
postProcessBeforeInitialization:user
PostConstruct
afterPropertiesSet
methodInit
postProcessAfterInitialization:user
Spring如何解决循环依赖问题:
Spring组件之间的依赖关系本质上可以构成一个图,创建对象的过程其实就是图的遍历过程,每个结点就是就是我们要创建的组件,而每一条边就是进行依次依赖注入,我们遍历图的经典算法就是在外层套一个循环,遍历每个点,然后从每个点出来进行深度优先遍历(dfs),然后我们还会使用一个vis数组来记录每个遍历过的点,防止一个点被重复遍历。Spring创建对象的过程其实就是这么做。构造这个依赖关系图的信息保存在BeanDefinition中,创建对象时候会调用三级缓存中的beanFactory来创建对象,如果当前对象不依赖其他组件,也就是在图中是一个孤立的点或者无法到达其他结点,我们就直接创建这个对象然后放入一级缓存中,如果依赖了其他组件,我们先判断这个依赖的组件在一级缓存和二级缓存中有没有,如果有的话,说明出现了循环依赖,就说明依赖的组件之前已经创建过了,把缓存中的对象的引用赋值到对应的属性字段即可,如果没有依赖的对象还没有创建,就递归地创建所依赖的对象,然后也把它的引用赋值过来。按照这个流程完成依赖注入,然后从二级缓存中移除,放入到一级缓存中即可。
AOP执行流程
获取拦截器链
List执行拦截器链
retVal = new CglibMethodInvocation(proxy, target, method, args, targetClass, chain, methodProxy).proceed();
处理返回值
retVal = processReturnType(proxy, target, method, retVal);
如果有连接器链,执行连接器链,如果没有,执行原方法
@Override
		@Nullable
		public Object intercept(Object proxy, Method method, Object[] args, MethodProxy methodProxy) throws Throwable {
			Object oldProxy = null;
			boolean setProxyContext = false;
			Object target = null;
			TargetSource targetSource = this.advised.getTargetSource();
			try {
				if (this.advised.exposeProxy) {
					// Make invocation available if necessary.
					oldProxy = AopContext.setCurrentProxy(proxy);
					setProxyContext = true;
				}
				// Get as late as possible to minimize the time we "own" the target, in case it comes from a pool...
				target = targetSource.getTarget();
				Class<?> targetClass = (target != null ? target.getClass() : null);
				List<Object> chain = this.advised.getInterceptorsAndDynamicInterceptionAdvice(method, targetClass);
				Object retVal;
				// Check whether we only have one InvokerInterceptor: that is,
				// no real advice, but just reflective invocation of the target.
				if (chain.isEmpty() && CglibMethodInvocation.isMethodProxyCompatible(method)) {
					// We can skip creating a MethodInvocation: just invoke the target directly.
					// Note that the final invoker must be an InvokerInterceptor, so we know
					// it does nothing but a reflective operation on the target, and no hot
					// swapping or fancy proxying.
					Object[] argsToUse = AopProxyUtils.adaptArgumentsIfNecessary(method, args);
					retVal = invokeMethod(target, method, argsToUse, methodProxy);
				}
				else {
					// We need to create a method invocation...
					retVal = new CglibMethodInvocation(proxy, target, method, args, targetClass, chain, methodProxy).proceed();
				}
				retVal = processReturnType(proxy, target, method, retVal);
				return retVal;
			}
			finally {
				if (target != null && !targetSource.isStatic()) {
					targetSource.releaseTarget(target);
				}
				if (setProxyContext) {
					// Restore old proxy.
					AopContext.setCurrentProxy(oldProxy);
				}
			}
		}
获取拦截器链,其实就是把我们增强的方法转换为一个统一的类型,然后放入集合List中
执行逻辑:
	@Override
	@Nullable
	public Object proceed() throws Throwable {
		// We start with an index of -1 and increment early.
		if (this.currentInterceptorIndex == this.interceptorsAndDynamicMethodMatchers.size() - 1) {
			return invokeJoinpoint();
		}

		Object interceptorOrInterceptionAdvice =
				this.interceptorsAndDynamicMethodMatchers.get(++this.currentInterceptorIndex);
        //省略一些不会发生的步骤……
		// It's an interceptor, so we just invoke it: The pointcut will have
		// been evaluated statically before this object was constructed.
		return ((MethodInterceptor) interceptorOrInterceptionAdvice).invoke(this);
	}
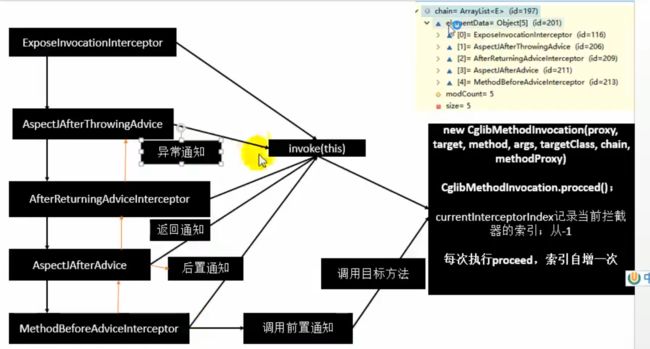
下面的代码可以用下面这张图来表示

首先我们可以看到这个代码是一个递归的逻辑,递归的终止条件是:
		// We start with an index of -1 and increment early.
		if (this.currentInterceptorIndex == this.interceptorsAndDynamicMethodMatchers.size() - 1) {
			return invokeJoinpoint();
		}
当索引到最后一个时,也就是所有的拦截器都已经处理过了,执行我们目标方法,然后返回。
获取下一个拦截器
		Object interceptorOrInterceptionAdvice =
				this.interceptorsAndDynamicMethodMatchers.get(++this.currentInterceptorIndex);
执行它的invoke方法
			if (dm.methodMatcher.matches(this.method, targetClass, this.arguments)) {
				return dm.interceptor.invoke(this);
			}
invoke方法又会来到这个方法中,获取下一个拦截器并执行,知道所有的拦截器都被执行完,然后执行目标方法,然后回溯执行剩下拦截器的其他逻辑,从而完成所有拦截器的逻辑。
拦截器的顺序在执行之前经过了合理的排序,这样才执行的时候才能按照Around前->Before->目标方法->After->AfterRurning/AfterThrowing->Around后的顺序来执行。
各个注解的拦截器:
mi.proceed()每个注解的invoke方法都会执行mi.proceed()方法,然后获取下一个拦截器执行它的invoke方法,每一个invoke方法都好像是后面(序号靠后)的拦截器的代理一样
@Before
	@Override
	@Nullable
	public Object invoke(MethodInvocation mi) throws Throwable {
        //前置拦截
		this.advice.before(mi.getMethod(), mi.getArguments(), mi.getThis());
        //接下来就要执行目标方法了(或者其他Before方法)
		return mi.proceed();
	}
@After的拦截器:
	@Override
	@Nullable
	public Object invoke(MethodInvocation mi) throws Throwable {
		try {
            //这里会执行@Before方法和目标方法
			return mi.proceed();
		}
		finally {
            //回溯时,无论是否出现异常都会执行执行这个逻辑
			invokeAdviceMethod(getJoinPointMatch(), null, null);
		}
	}
@AfterReturning的拦截器
	@Override
	@Nullable
	public Object invoke(MethodInvocation mi) throws Throwable {
        //这里会执行Before方法,目标方法,After方法
		Object retVal = mi.proceed();
        //只有在没有异常的时候才会执行这个逻辑
		this.advice.afterReturning(retVal, mi.getMethod(), mi.getArguments(), mi.getThis());
		return retVal;
	}
@AfterThrowing的拦截器
	@Override
	@Nullable
	public Object invoke(MethodInvocation mi) throws Throwable {
		try {
            //这里会执行@Before方法,目标方法,@After方法,@AfterThrowing方法
            //只要这些方法有一个出现异常都会执行下面的@AfterThrowing的方法
			return mi.proceed();
		}
		catch (Throwable ex) {
			if (shouldInvokeOnThrowing(ex)) {
                //只有在出现异常时才会执行
				invokeAdviceMethod(getJoinPointMatch(), null, ex);
			}
			throw ex;
		}
	}
@Around执行流程和上述不一样,@Around注解有自己的动态代理机制
这里执行proceed()方法后就会执行上述的拦截器链(执行@Before方法,目标方法,@After方法,@AfterThrowing/@AfterReturning方法)
@Around拦截器
	@Override
	@Nullable
	public Object invoke(MethodInvocation mi) throws Throwable {
		if (!(mi instanceof ProxyMethodInvocation)) {
			throw new IllegalStateException("MethodInvocation is not a Spring ProxyMethodInvocation: " + mi);
		}
		ProxyMethodInvocation pmi = (ProxyMethodInvocation) mi;
		ProceedingJoinPoint pjp = lazyGetProceedingJoinPoint(pmi);
		JoinPointMatch jpm = getJoinPointMatch(pmi);
        //执行我们编写的方法
		return invokeAdviceMethod(pjp, jpm, null, null);
	}
Spring异步请求
Callable
效果展示
@RestController
public class UserController {

    @GetMapping("/hello")
    public Callable<String> callableTest() {
        System.out.println("主线程:" + Thread.currentThread().getName() + "=>" + System.currentTimeMillis());
        Callable<String> callable = new Callable<String>() {
            @Override
            public String call() throws Exception {
                System.out.println(Thread.currentThread().getName() + "=>" + System.currentTimeMillis());
                Thread.sleep(2000);
                System.out.println(Thread.currentThread().getName() + "=>" + System.currentTimeMillis());
                return "callable:hello world";
            }
        };
        System.out.println("主线程:" + Thread.currentThread().getName() + "=>" + System.currentTimeMillis());
        return callable;
    }
}
测试结果
preHandle
beforeAround
before div
主线程:http-nio-8080-exec-1=>1652709584741
主线程:http-nio-8080-exec-1=>1652709584742
afterReturn
AfterDiv
afterAround
task-1=>1652709584748
2s后:
=========================执行主线程=================================
preHandle
beforeAround
before div
主线程:http-nio-8080-exec-1=>1652709697775
主线程:http-nio-8080-exec-1=>1652709697776
afterReturn
AfterDiv
afterAround
========================执行从线程==============================
task-1=>1652709697785
task-1=>1652709699795
=========================重新发送响应=========================
preHandle
posthandle
afterCompletion

我们返回callable对象后,Springboot会另外使用另一个线程池来执行我们的callable,同时主线程结束,DispatchServlet和Filter结束,但是response仍然处于打开的状态,等待我们返回数据。等callable得到结果后,Springboot会重新发一次请求触发DispatchServlet,执行DispatchServlet的声明周期,但是不再执行handler方法,而是直接将得到的callable的返回值作为handler的的执行结果,然后执行后面类型转换或者视图解析的流程。
DefferedResult
我们可以先把这个对象返回,但是对方查询这个数据时会被阻塞住,我们通过调用setResult方法设置结果。
我们在一个请求中返回一个DefferedResult,但是此时和callable一样,请求不会完成,response仍然是打开是状态,但是线程已经结束,等到其他线程调用了setResult方法后,得到返回值才能完成本次请求,可以用于消息队列。
@RestController
public class UserController {

    static LinkedBlockingDeque<DeferredResult<Object>> mq = new LinkedBlockingDeque<>();

    @GetMapping("/hello")
    public DeferredResult<Object> callableTest() {
        DeferredResult<Object> objectDeferredResult = new DeferredResult<>();
        mq.add(objectDeferredResult);
        return objectDeferredResult;
    }

    @GetMapping("save")
    @SneakyThrows
    public void saveObject() {
        DeferredResult<Object> obj = mq.take();
        obj.setResult("hello world");
    }
}
返回DeferredResult后,会等待其他线程调用setResult方法完成请求,否则response会一直处于打开的状态,调用setResult方法后,会重新发一次请求完成流程。