华为手表开发:WATCH 3 Pro(12)http请求数据到服务器
华为手表开发:WATCH 3 Pro(12)http请求数据到服务器
- 初
- 环境与设备
-
-
- 文件夹:
- 文件
-
- 重点
-
-
- 新增一个文本输入框
-
- index.hml
- index.css
- http 核心功能,官方的介绍:
- 代码如下:
-
- api.js
- index.js
-
初
希望能写一些简单的教程和案例分享给需要的人
鸿蒙可穿戴开发
环境与设备
系统:window
设备:HUAWEI WATCH 3 Pro
开发工具:DevEco Studio 3.0.0.800
鸿蒙开发
文件夹:
entry:项目文件夹
js:前端文件夹
pages:页面文件夹
index:首页文件夹
文件
index.css:首页样式
index.hml:首页
index.js:首页脚本
config.json:配置文件
重点
HTTP 请求,需要网络权限和一个开关,这个必须注意:都在 config.json 增加
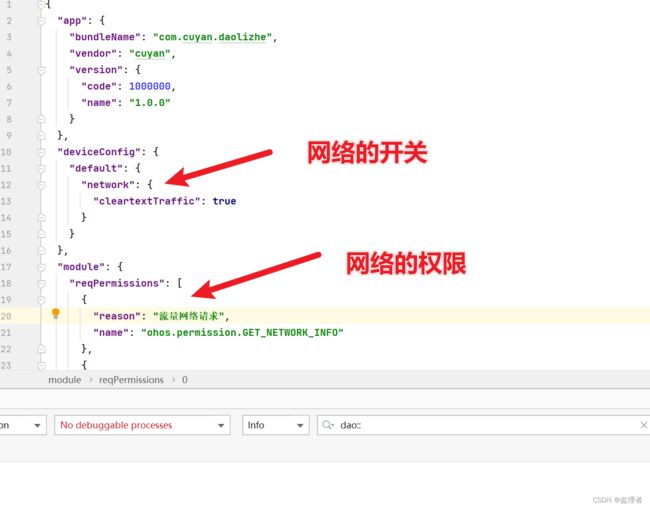
开关的代码:
    "default": {
      "network": {
        "cleartextTraffic": true
      }
    }
权限的代码:
    "reqPermissions": [
      {
        "reason": "流量网络请求",
        "name": "ohos.permission.GET_NETWORK_INFO"
      },
      {
        "reason": "流量网络请求",
        "name": "ohos.permission.INTERNET"
      },
      {
        "reason": "流量网络请求",
        "name": "ohos.permission.SET_NETWORK_INFO"
      },
      {
        "reason": "WLAN网络请求",
        "name": "ohos.permission.MANAGE_WIFI_CONNECTION"
      },
      {
        "reason": "WLAN网络请求",
        "name": "ohos.permission.SET_WIFI_INFO"
      },
      {
        "reason": "WLAN网络请求",
        "name": "ohos.permission.GET_WIFI_INFO"
      }
    ],
如果没加 “权限” 和 “开关” 就会请求失败 , 所以一定一定要加上
新增一个文本输入框
代码如下:
index.hml
<div class="container">
    <div class="input-item">
        <div class="color">
            <label class="input-title">用户名:label>
            <input class="input"  value="{{userName}}" type="text" placeholder="请输入用户名"  onchange="changeUserName">input>
        div>
    div>
    <input class="btn" type="button" value="确认" onclick="onSetting">input>
div>
index.css
.container {
    height: 100%;
    width: 100%;
    flex-direction: column;
    padding: 0 0 5% 0;
    justify-content: center;
    align-items: center;
}

.color {
    margin: 0 4% 0 4% ;
    width: 92%;
    border-bottom: 1px solid rgba(0,0,0,0.1);
}
.input-item {
    width: 100%;
    margin-bottom: 10px;
}
.input-title {
    width: 60px;
    color: #fff;
    font-family: HarmonyHeiTi;
    font-size: 12px;
    text-align: right;
}
.input {
    width: 65%;
    height: 36px;
    padding: 0% 10px;
    font-size: 14px;
    border-radius: 8px;
    background-color: #fff;
    color: black;
}
.btn{
    display: flex;
    width: 100px;
    font-size: 14px;
    height: 36px;
}
http 核心功能,官方的介绍:
http.createHttp
createHttp(): HttpRequest
创建一个http,里面包括发起请求、中断请求、订阅/取消订阅HTTP Response Header 事件。每一个HttpRequest对象对应一个Http请求。如需发起多个Http请求,须为每个Http请求创建对应HttpRequest对象。
代码如下:
将这个通用的请求封装成外部js,这样方便各个页面调用http请求
api.js
import http from ‘@ohos.net.http’;
import http from '@ohos.net.http';

export default {
    httpGET: function (address) {
        return new Promise((resolve, reject) => {
            let httpRequest = http.createHttp();
            let url = address;
            httpRequest.request(url, {
                header: {
                    'Content-Type': 'application/json'
                },
                connectTimeout: 60000,
                readTimeout: 60000,
            }, (err, data) => {
                if (!err) {
                    // 返回成功的结果
                    resolve(JSON.parse(data.result));
                } else {
                    // 返回错误的信息
                    reject(err)
                }
                httpRequest.destroy();
            });
        })
    },
    httpPOST: function (address, data) {
        return new Promise((resolve, reject) => {
            let httpRequest = http.createHttp();
            let url = address;
            console.info("dao::" + JSON.stringify(data));
            console.info("dao::" + url);
            httpRequest.request(url, {
                method: http.RequestMethod.POST,
                header: {
                    'Content-Type': 'application/json'
                },
                extraData: data,
                connectTimeout: 60000,
                readTimeout: 60000,
            }, (err, data) => {
                if (!err) {
                    // 返回成功的结果
                    resolve(JSON.parse(data.result));
                } else {
                    // 返回错误的信息
                    reject(err)
                }
                httpRequest.destroy();
            });
        })
    },
}
index.js
import prompt from '@system.prompt';
import request from '../../common/apis'

export default {
    data: {
        userName: ""
    },
    onInit() {
        var currPage = this;
        // 初始化获取用户信息
        let url = this.$app.$def.api_address + `/dao_webapi/dao/blog/getData`
        request.httpGET(url).then(res => {
            this.userName = res.data.userName;
        }).catch(err => {
            console.log(err);
        })
    },
    onSetting() {
        var currPage = this;
        // 写入用户信息到服务器
        let url = this.$app.$def.api_address + `/dao_webapi/dao/blog/saveData`
        const data = {
            userName: this.userName,
        }
        request.httpPOST(url, data).then(res => {
            console.info("dao::" + JSON.stringify(res));
            prompt.showToast({
                message: "保存成功",
                duration: 3000,
            });
        }).catch(err => {
            console.log(err);
        })
    },
    changeUserName(e) {
        this.userName = e.value;
    }
}
由于不能放文件,需要代码的私聊