CentOS7部署哨兵Redis(带架构图,清晰易懂)
1 缘起
要从上一篇文章如何正确使用Vertx操作Redis(3.9.4带源码分析)说起,
这篇文章分享了Vert.x连接并操作Redis,其中介绍了单体Redis和集群rRedis的连接和操作,
由于单体Redis和集群Redis之前做实验的时候都已经完成搭建(Ubuntu20.04),可以直接用,但是,哨兵的Redis没有搭建,因此,只能给出连接和操作代码,没有给出测试,
于是,周末(下雨,台风“暹芭”[xiān bā]来袭)在实验机器搭建哨兵方式的Redis集群,
测试哨兵方式下Vert.x连接和操作Redis,完善前面的文章,
由于实验机器是CentOS7的系统,
部署哨兵式Redis花了些时间,还是有参考价值的,
特分享如下文。
2 准备
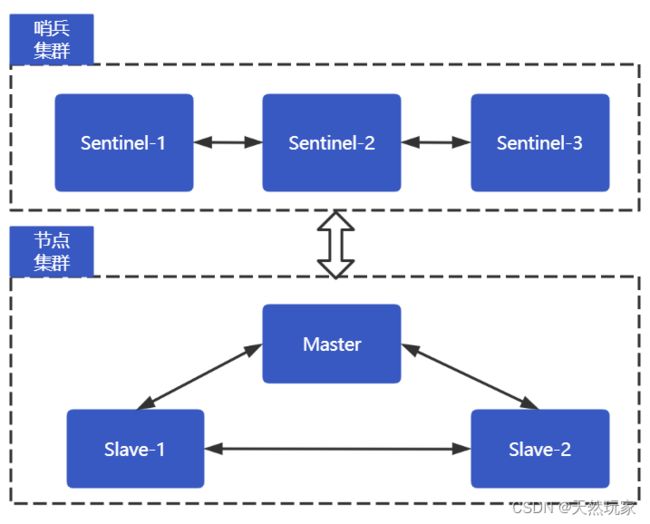
整体架构如下图所示,由图可知,哨兵3个,组成哨兵集群;节点3个,一个主节点和两个从节点。哨兵监视节点集群的运行状态,并即时切换服务,保证Redis正常运转。

2.1 编译环境
CentOS7默认的gcc版本为4.8.5,查看gcc命令:gcc -v,结果如下图所示:

该版本的gcc无法编译Redis6.0.6,因此需要升级gcc,使用如下命令:
# 软件集(Software collections)
yum -y install centos-release-scl
# gcc及工具集
sudo yum -y install devtoolset-9-gcc devtoolset-9-gcc-c++ devtoolset-9-binutils
# 启用gcc
scl enable devtoolset-9 bash
安装后的gcc版本,如下图所示:
2.2 Redis准备
本文使用Redis6.0.6,该版本的Redis可以实现哨兵和集群部署。
下载地址:http://download.redis.io/releases/redis-6.0.6.tar.gz
2.3 编译Redis
解压Redis到目录,如:/home/xindaqi/install/redis
tar -zxvf redis-6.0.6.tar.gz -C /home/xindaqi/install/redis
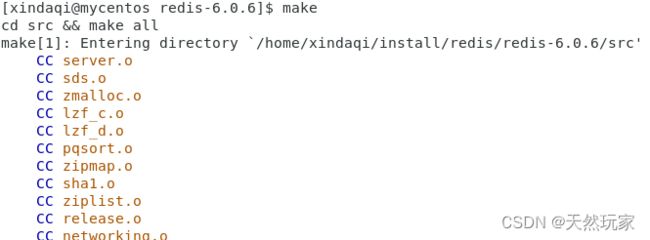
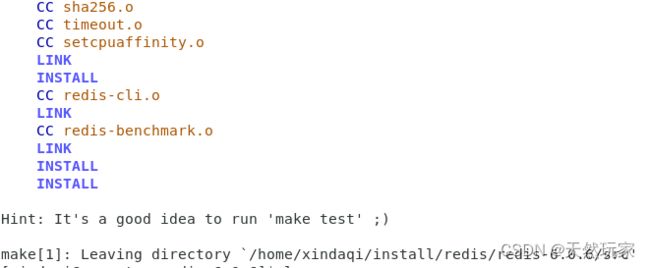
进入redis-6.0.6文件夹,编译Redis,命令:make,
如下图所示:


至此,完成Redis编译,
环境准备完成。
3 配置
哨兵模式下,配置三个Redis节点(虚拟节点),因此,由一台主节点和两台从节点构成,
将上述编译Redis复制三份,存储到路径:/home/xindaqi/install/redis/sentinel,
命名为9001,9002,9003,长这样:

其中,9001作为主节点,9002和9003作为从节点。
节点信息如下:
| 序号 | 节点IP | 端口 | 描述 |
|---|---|---|---|
| 1 | 192.168.1.12 | 9001 | 主节点 |
| 2 | 192.168.1.12 | 9002 | 从节点 |
| 3 | 192.168.1.12 | 9003 | 从节点 |
哨兵信息如下:
| 序号 | 节点IP | 端口 | 描述 |
|---|---|---|---|
| 1 | 192.168.1.12 | 26379 | 哨兵1 |
| 2 | 192.168.1.12 | 26380 | 哨兵2 |
| 3 | 192.168.1.12 | 26381 | 哨兵3 |
3.1 节点配置
3.1.1 主节点
主节点中修改Redis配置:redis.conf,
修改的地方如下:
# 注释IP绑定,Redis服务对所有IP开放
# bind 127.0.0.1 ::1
# 关闭保护模式,所有IP可访问Redis服务端
protected-mode no
# Redis服务端口
port 9001
# 守护进程运行Redis服务端
daemonize yes
# pid文件:9001
pidfile /var/run/redis_9006.pid
# 日志文件:9001
logfile /home/xindaqi/project/logs/redis-9001.log
3.1.2 从节点
从节点配置信息如下:redis.conf,
于主节点不同的是,从节点需要配置主节点分片信息(replicaof),用于同步数据和传递消息。
- 从节点1
端口使用9002。
# 注释IP绑定,Redis服务对所有IP开放
# bind 127.0.0.1 ::1
# 关闭保护模式,所有IP可访问Redis服务端
protected-mode no
# Redis服务端口
port 9002
# 守护进程运行Redis服务端
daemonize yes
# pid文件:9001
pidfile /var/run/redis_9006.pid
# 日志文件:9001
logfile /home/xindaqi/project/logs/redis-9002.log
# 主节点副本:同步主节点的数据到从节点
replicaof 192.168.1.12 9001
- 从节点2
端口使用9003。
# 注释IP绑定,Redis服务对所有IP开放
# bind 127.0.0.1 ::1
# 关闭保护模式,所有IP可访问Redis服务端
protected-mode no
# Redis服务端口
port 9003
# 守护进程运行Redis服务端
daemonize yes
# pid文件:9001
pidfile /var/run/redis_9006.pid
# 日志文件:9001
logfile /home/xindaqi/project/logs/redis-9003.log
# 主节点副本:同步主节点的数据到从节点
replicaof 192.168.1.12 9001
3.1.3 启动主从服务
完成配置后,下面可以先启动主从服务,查看相关信息。
使用Shell脚本启动服务,文件名:run_master_slave.sh
内容如下:
echo "Starting Redis master and slave"
cd /home/xindaqi/install/redis/sentinel
9001/src/redis-server 9001/redis.conf
9002/src/redis-server 9002/redis.conf
9003/src/redis-server 9003/redis.conf
echo "Redis master and slave is started!!!"
3.1.4 节点信息
- 进入Redis主节点:
src/redis-cli -h 192.168.1.12 -p 9001
- 查看节点信息
节点信息有从节点数量、从节点IP和Port等。
info replication
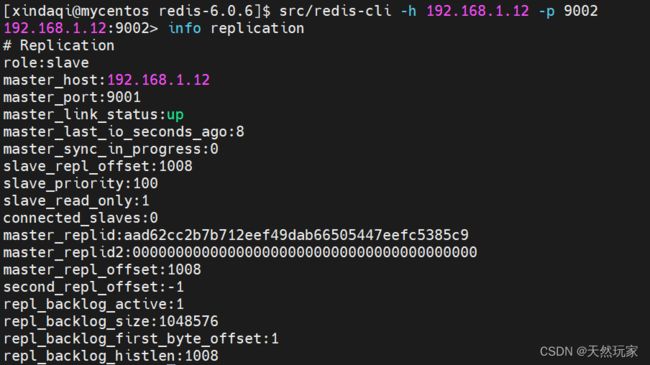
- 进入从节点
src/redis-cli -h 192.168.1.12 -p 9002
- 查看从节点信息
从节点中查看主节点信息,如IP和Port以及主节点工作状态:UP或者DOWN。
info replication
3.2 哨兵配置
完成节点配置后,接下来需要配置哨兵,
本文,哨兵同样使用集群(虚拟)方式,
配置三个哨兵节点,由前文可知,Redis6.0.6支持哨兵和集群配置,因此,
可以直接修改哨兵的配置文件:sentinel.conf。
3.2.1 sentinel
哨兵的配置中,最核心的是配置哨兵的端口和监视的主节点,
通过sentinel monitor mymaster 192.168.1.12 9001 2监控主节点,并为主节点命名,
是的,主节点的名称实在哨兵中配置的,
因为,客户端连接是通过哨兵进行的。
- 哨兵-1
# 哨兵运行的端口
port 26379
# 守护进程运行
daemonize yes
# 进程文件
pidfile "/var/run/redis-sentinel-26379.pid"
# 日志位置
logfile "/home/xindaqi/project/logs/sentinel-26379.log"
# 哨兵监控的主节点信息
# mymaster:主节点名称
# 192.168.1.12:主节点IP
# 9001:主节点Port
# 2:认定主节点哨兵的数量,如果达到该数量的哨兵认定主节点失联,则判定主节点客观失联
sentinel monitor mymaster 192.168.1.12 9001 2
- 哨兵-2
# 哨兵运行的端口
port 26380
# 守护进程运行
daemonize yes
# 进程文件
pidfile "/var/run/redis-sentinel-26380.pid"
# 日志位置
logfile "/home/xindaqi/project/logs/sentinel-26380.log"
# 哨兵监控的主节点信息
# mymaster:主节点名称
# 192.168.1.12:主节点IP
# 9001:主节点Port
# 2:认定主节点哨兵的数量,如果达到该数量的哨兵认定主节点失联,则判定主节点客观失联
sentinel monitor mymaster 192.168.1.12 9001 2
- 哨兵-3
# 哨兵运行的端口
port 26381
# 守护进程运行
daemonize yes
# 进程文件
pidfile "/var/run/redis-sentinel-26381.pid"
# 日志位置
logfile "/home/xindaqi/project/logs/sentinel-26381.log"
# 哨兵监控的主节点信息
# mymaster:主节点名称
# 192.168.1.12:主节点IP
# 9001:主节点Port
# 2:认定主节点哨兵的数量,如果达到该数量的哨兵认定主节点失联,则判定主节点客观失联
sentinel monitor mymaster 192.168.1.12 9001 2
3.2.2 启动哨兵
完成哨兵配置后,接下来启动哨兵,同样使用Shell执行,
文件名:run_sentinel.sh,
Shell脚本如下:
echo "Starting Redis sentinel"
cd /home/xindaqi/install/redis/sentinel
9001/src/redis-sentinel 9001/sentinel.conf
9002/src/redis-sentinel 9002/sentinel.conf
9003/src/redis-sentinel 9003/sentinel.conf
echo "Redis sentinel is started!!!"
3.2.3 查看哨兵信息
- 进入哨兵
src/redis-cli -h 192.168.1.12 -p 26379
- 查看信息
通过哨兵查看当前集群中的主节点信息、从节点数量和哨兵数量,如下图所示。
info sentinel
3.3 端口配置
由于CentOS7默认防火墙开启,默认情况下所有端口都不对外开放,
因此,部署的服务需要对外暴露端口,需要一一开放端口,
这里需要开放的端口由:26379、26380、26381、9001、9002和9003。
以26379端口为例:
# 开启端口
sudo firewall-cmd --zone=public --add-port=26379/tcp --permanent
# 端口生效
sudo firewall-cmd --reload
4 小结
核心:
(1)环境准备:gcc升级,Redis编译;
(2)配置节点:主节点和从节点;
(3)配置哨兵:监听主节点,配置主节点名称;
(4)开放端口:CentOS7默认关闭端口,因此,需要开放哨兵和节点的所有端口。
Q&A
error: ‘struct redisServer’ has no member named ‘aof_rewrite_perc’
CentOS7默认
gcc -v
提高gcc版本,安装如下插件:
# 软件集(Software collections)
yum -y install centos-release-scl
# gcc及工具集
sudo yum -y install devtoolset-9-gcc devtoolset-9-gcc-c++ devtoolset-9-binutils
# 启用gcc
scl enable devtoolset-9 bash


