Pytorch Lightning使用指南
文章目录
- 1.写在前面
- 2.使用步骤
- 3.高级特征
- 4.一些使用tips
- 5.Saving
感谢:Pytorch Lightning 完全攻略!一文
[入门]PyTorch Lightning快速上手-1 https://zhuanlan.zhihu.com/p/120331610
地址送上:
https://github.com/PyTorchLightning/pytorch-lightning
https://pytorch-lightning.readthedocs.io/en/latest/
1.写在前面
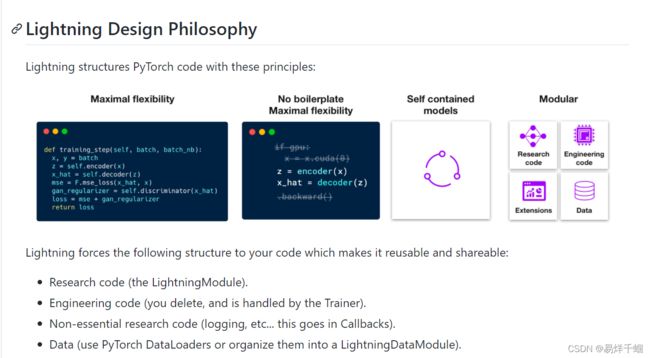
使用Lightning的好处
- 只需要专注于研究代码
不需要写一大堆的 .cuda() 和 .to(device),Lightning会帮你自动处理。如果要新建一个tensor,可以使用type_as来使得新tensor处于相同的处理器上。Pytorch-Lighting 的一大特点是把模型和系统分开来看。模型是像Resnet18, RNN之类的纯模型, 而系统定义了一组模型如何相互交互,如GAN(生成器网络与判别器网络)、Seq2Seq(Encoder与Decoder网络)和Bert。同时,有时候问题只涉及一个模型,那么这个系统则可以是一个通用的系统,用于描述模型如何使用,并可以被复用到很多其他项目。Pytorch-Lighting 的核心设计思想是“自给自足”。每个网络也同时包含了如何训练、如何测试、优化器定义等内容。
- 工程代码参数化
平时我们写模型训练的时候,这部分代码会不断重复,但又不得不做,不如说ealy stopping,精度的调整,显存内存之间的数据转移。这部分代码虽然不难,但减少这部分代码会使得 研究代码 更加清晰,整体也更加简洁。
2.使用步骤
- Step 1: Add these imports
import os
import torch
from torch import nn
import torch.nn.functional as F
from torchvision.datasets import MNIST
from torch.utils.data import DataLoader, random_split
from torchvision import transforms
import pytorch_lightning as pl
- Step 2: Define a LightningModule (nn.Module subclass)
class LitAutoEncoder(pl.LightningModule):
    def __init__(self):
        super().__init__()
        self.encoder = nn.Sequential(nn.Linear(28 * 28, 128), nn.ReLU(), nn.Linear(128, 3))
        self.decoder = nn.Sequential(nn.Linear(3, 128), nn.ReLU(), nn.Linear(128, 28 * 28))

    def forward(self, x):
        # in lightning, forward defines the prediction/inference actions
        embedding = self.encoder(x)
        return embedding

    def training_step(self, batch, batch_idx):
        # training_step defines the train loop. It is independent of forward
        x, y = batch
        x = x.view(x.size(0), -1)
        z = self.encoder(x)
        x_hat = self.decoder(z)
        loss = F.mse_loss(x_hat, x)
        self.log("train_loss", loss)
        return loss

    def configure_optimizers(self):
        optimizer = torch.optim.Adam(self.parameters(), lr=1e-3)
        return optimizer
- Step 3: Train!
dataset = MNIST(os.getcwd(), download=True, transform=transforms.ToTensor())
train, val = random_split(dataset, [55000, 5000])

autoencoder = LitAutoEncoder()
trainer = pl.Trainer()
trainer.fit(autoencoder, DataLoader(train), DataLoader(val))
3.高级特征


- Pro-level control of training loops (advanced users)
class LitAutoEncoder(pl.LightningModule):
    def __init__(self):
        super().__init__()
        self.automatic_optimization = False

    def training_step(self, batch, batch_idx):
        # access your optimizers with use_pl_optimizer=False. Default is True
        opt_a, opt_b = self.optimizers(use_pl_optimizer=True)

        loss_a = ...
        self.manual_backward(loss_a, opt_a)
        opt_a.step()
        opt_a.zero_grad()

        loss_b = ...
        self.manual_backward(loss_b, opt_b, retain_graph=True)
        self.manual_backward(loss_b, opt_b)
        opt_b.step()
        opt_b.zero_grad()
- Advantages over unstructured PyTorch
Models become hardware agnostic
Code is clear to read because engineering code is abstracted away
Easier to reproduce
Make fewer mistakes because lightning handles the tricky engineering
Keeps all the flexibility (LightningModules are still PyTorch modules), but removes a ton of boilerplate
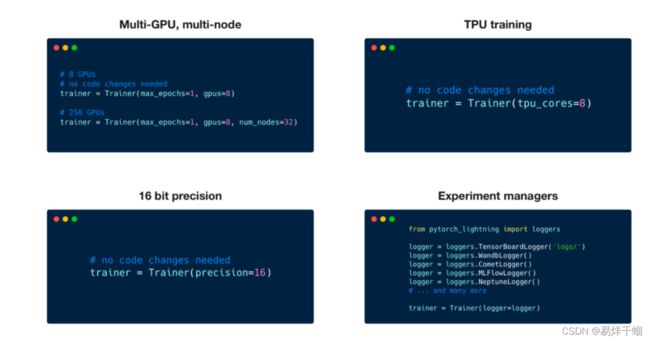
Lightning has dozens of integrations with popular machine learning tools.
Tested rigorously with every new PR. We test every combination of PyTorch and Python supported versions, every OS, multi GPUs and even TPUs.
Minimal running speed overhead (about 300 ms per epoch compared with pure PyTorch).
4.一些使用tips
Pytorch-Lightning 是一个很好的库,或者说是pytorch的抽象和包装。它的好处是可复用性强,易维护,逻辑清晰等。缺点也很明显,这个包需要学习和理解的内容还是挺多的,或者换句话说,很重。如果直接按照官方的模板写代码,小型project还好,如果是大型项目,有复数个需要调试验证的模型和数据集,那就不太好办,甚至更加麻烦了。经过几天的摸索和调试,我总结出了下面这样一套好用的模板,也可以说是对Pytorch-Lightning的进一步抽象。
欢迎大家尝试这一套代码风格,如果用习惯的话还是相当方便复用的,也不容易半道退坑。
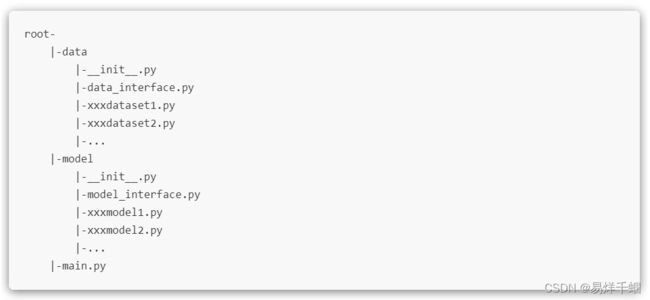
完全版模板可以在GitHub:https://github.com/miracleyoo/pytorch-lightning-template 找到。
5.Saving
ModelCheckpoint 地址: https://pytorch-lightning.readthedocs.io/en/latest/extensions/generated/pytorch_lightning.callbacks.ModelCheckpoint.html%23pytorch_lightning.callbacks.ModelCheckpoint
ModelCheckpoint: 自动储存的callback module。默认情况下training过程中只会自动储存最新的模型与相关参数,而用户可以通过这个module自定义。如观测一个val_loss的量,并储存top 3好的模型,且同时储存最后一个epoch的模型,等等。例:
from pytorch_lightning.callbacks import ModelCheckpoint

# saves a file like: my/path/sample-mnist-epoch=02-val_loss=0.32.ckpt
checkpoint_callback = ModelCheckpoint(
    monitor='val_loss',
    filename='sample-mnist-{epoch:02d}-{val_loss:.2f}',
    save_top_k=3,
    mode='min',
    save_last=True
)

trainer = pl.Trainer(gpus=1, max_epochs=3, progress_bar_refresh_rate=20, callbacks=[checkpoint_callback])