十一、Pytorch复现GoogLeNet
一、GoogLeNet网络模型架构
论文出处:Going deeper with convolutions
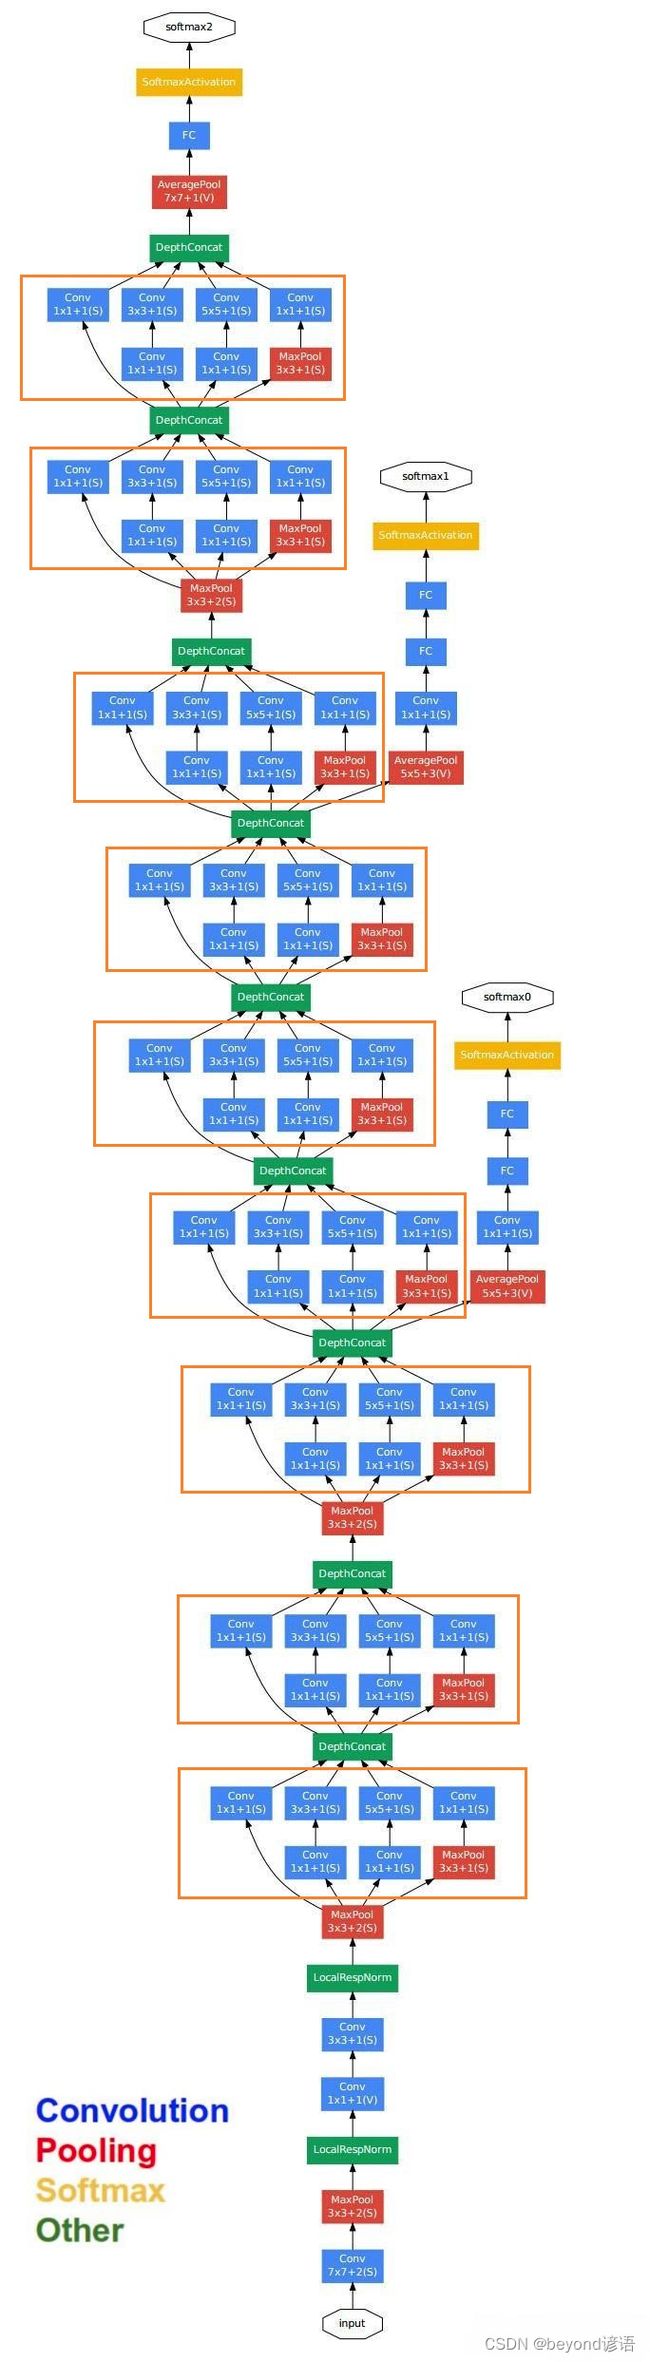
很容易发现里面有很多复用单元,把这些重复的单元封装成一个类,到时候调用即可,这样的复用单元在论文中被称为Inception module
二、复合模块实现
这里以论文中的(b) Inception module with dimension reductions为例进行简单复现
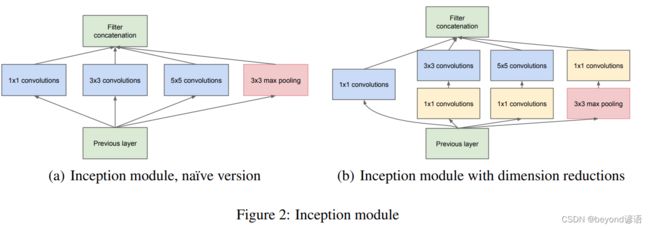
为了方便观察结构,将模块进行适当的转换

数据集还是选用MNIST手写数字数据集,详细的使用可参考博文:九、多分类问题
import torch
from torchvision import transforms
from torchvision import datasets
from torch.utils.data import DataLoader
import torch.nn.functional as F #为了使用relu激活函数
import torch.optim as optim

batch_size = 64
transform = transforms.Compose([
    transforms.ToTensor(),#把图片变成张量形式
    transforms.Normalize((0.1307,),(0.3081,)) #均值和标准差进行数据标准化,这俩值都是经过整个样本集计算过的
])

train_dataset = datasets.MNIST(root='./',train=True,download=True,transform = transform)
train_loader = DataLoader(train_dataset,shuffle=True,batch_size=batch_size)

test_dataset = datasets.MNIST(root="./",train=False,download=True,transform=transform)
test_loader = DataLoader(test_dataset,shuffle=False,batch_size=batch_size)
为了测试模型,使用测试集中的第1张作为测试样本进行调试
由x.shape得到样本的形状为[1, 28, 28],但pytorch中的卷积层函数调用需要传入的样本格式为[B,C,W,H],故通过x.view(-1,1,28,28)转换格式,得到最终的测试样本x,其形状为[1, 1, 28, 28]
x,y = test_dataset[0]
x.shape
"""
torch.Size([1, 28, 28])
"""
y
"""
7
"""

x = x.view(-1,1,28,28)
x.shape
"""
torch.Size([1, 1, 28, 28])
"""
由上图的复用模块可知,其由四部分组成,接下来开始对这四个部分一一进行实现
1、调试
①Part Ⅰ

第一部分是卷积层,输出通道数为16,卷积核的大小为1×1
因为样本形状为torch.Size([1, 1, 28, 28]),[B,C,W,H],故通过in_channel = x.shape[1]获取输入通道数
根据需要构建卷积层part_1_conv = torch.nn.Conv2d(in_channels=in_channel,out_channels=16,kernel_size=1)
in_channel = x.shape[1]
part_1_conv = torch.nn.Conv2d(in_channels=in_channel,out_channels=16,kernel_size=1)
part_1 = part_1_conv(x)
part_1.shape
"""
torch.Size([1, 16, 28, 28])
"""
②Part Ⅱ

第二部分是先进行卷积核大小为1×1的卷积层,输出通道数为16;然后再来个卷积核为3×3的卷积层,输出通道数为24
因为样本形状为torch.Size([1, 1, 28, 28]),[B,C,W,H],故通过in_channel = x.shape[1]获取输入通道数
根据需要构建第一个卷积层
part_2_conv1 = torch.nn.Conv2d(in_channels=in_channel,out_channels=16,kernel_size=1)
在构建第二个卷积层的时候,为了保证特征图大小不变,进行了加边
part_2_conv2 = torch.nn.Conv2d(in_channels=16,out_channels=24,kernel_size=3,padding=1)
in_channel = x.shape[1]
part_2_conv1 = torch.nn.Conv2d(in_channels=in_channel,out_channels=16,kernel_size=1)
part_2_conv2 = torch.nn.Conv2d(in_channels=16,out_channels=24,kernel_size=3,padding=1)
part_2 = part_2_conv1(x)
part_2 = part_2_conv2(part_2)
part_2.shape
"""
torch.Size([1, 24, 28, 28])
"""
③Part Ⅲ

第三部分是先进行卷积核大小为1×1的卷积层,输出通道数为16;然后再来个卷积核为5×5的卷积层,输出通道数为24
因为样本形状为torch.Size([1, 1, 28, 28]),[B,C,W,H],故通过in_channel = x.shape[1]获取输入通道数
根据需要构建第一个卷积层
part_3_conv1 = torch.nn.Conv2d(in_channels=in_channel,out_channels=16,kernel_size=1)
在构建第二个卷积层的时候,为了保证特征图大小不变,进行了加边
part_3_conv2 = torch.nn.Conv2d(in_channels=16,out_channels=24,kernel_size=5,padding=2)
in_channel = x.shape[1]
part_3_conv1 = torch.nn.Conv2d(in_channels=in_channel,out_channels=16,kernel_size=1)
part_3_conv2 = torch.nn.Conv2d(in_channels=16,out_channels=24,kernel_size=5,padding=2)
part_3 = part_3_conv1(x)
part_3 = part_3_conv2(part_3)
part_3.shape
"""
torch.Size([1, 24, 28, 28])
"""
④Part Ⅳ

第四部分是先进行卷积核大小为3×3的最大池化层;然后再来个卷积核为1×1的卷积层,输出通道数为24
因为样本形状为torch.Size([1, 1, 28, 28]),[B,C,W,H],故通过in_channel = x.shape[1]获取输入通道数
根据需要构建最大池化层,为了保证输出特征大小一致,stride设置为1(默认情况下与kernel一致),padding设置为1
part_4_maxpool = torch.nn.MaxPool2d(kernel_size=3,stride=1,padding=1)
根据需要构建卷积层
part_4_conv = torch.nn.Conv2d(in_channels=in_channel,out_channels=24,kernel_size=1)
in_channel = x.shape[1]
part_4_maxpool = torch.nn.MaxPool2d(kernel_size=3,stride=1,padding=1)
part_4_conv = torch.nn.Conv2d(in_channels=in_channel,out_channels=24,kernel_size=1)
part_4 = part_4_maxpool(x)
part_4 = part_4_conv(part_4)
part_4.shape
"""
torch.Size([1, 24, 28, 28])
"""
⑤合并
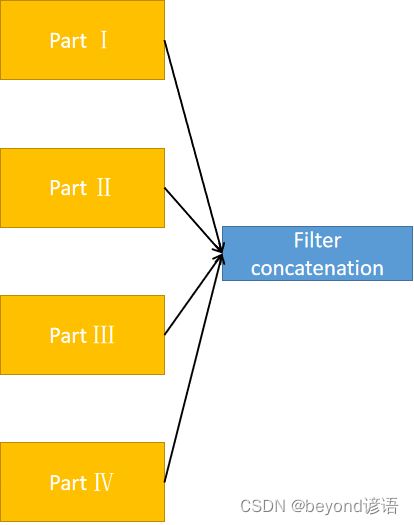
每层的结果都拿到之后,进行troch.cat()根据通道进行合并,因为只有通道数不相同,其他的都完全一致
[B,C,W,H]通道数在第二个,故dim=1
print(part_1.shape)
print(part_2.shape)
print(part_3.shape)
print(part_4.shape)
"""
torch.Size([1, 16, 28, 28])
torch.Size([1, 24, 28, 28])
torch.Size([1, 24, 28, 28])
torch.Size([1, 24, 28, 28])
"""

outputs = [part_1,part_2,part_3,part_4]
final = torch.cat(outputs,dim=1)#因为是[B,C,W,H],通道数是1,故dim=1
final.shape# 16+24+24+24=88
"""
torch.Size([1, 88, 28, 28])
"""
2、封装
根据上述的调试,将各层进行封装
class google_net (torch.nn.Module):
    def __init__(self,in_channels):
        super(google_net,self).__init__()

        self.part_1_conv = torch.nn.Conv2d(in_channels=in_channel,out_channels=16,kernel_size=1)

        self.part_2_conv1 = torch.nn.Conv2d(in_channels=in_channel,out_channels=16,kernel_size=1)
        self.part_2_conv2 = torch.nn.Conv2d(in_channels=16,out_channels=24,kernel_size=3,padding=1)

        self.part_3_conv1 = torch.nn.Conv2d(in_channels=in_channel,out_channels=16,kernel_size=1)
        self.part_3_conv2 = torch.nn.Conv2d(in_channels=16,out_channels=24,kernel_size=5,padding=2)

        self.part_4_maxpool = torch.nn.MaxPool2d(kernel_size=3,stride=1,padding=1)
        self.part_4_conv = torch.nn.Conv2d(in_channels=in_channel,out_channels=24,kernel_size=1)

    def forward(self,x):
        part_1 = self.part_1_conv(x)

        part_2 = self.part_2_conv1(x)
        part_2 = self.part_2_conv2(part_2)

        part_3 = self.part_3_conv1(x)
        part_3 = self.part_3_conv2(part_3)

        part_4 = self.part_4_maxpool(x)
        part_4 = self.part_4_conv(part_4)

        outputs = [part_1,part_2,part_3,part_4]
        final = torch.cat(outputs,dim=1)

        return final
还是使用上述的x进行测试一下
in_channel = x.shape[1]
model = google_net(in_channel)
model(x).shape
"""
torch.Size([1, 88, 28, 28])
"""
对着了,跟上述的调试结果一样,嘿嘿
未完待续~~~ 先淦饭,饿了