7. unity脚本控制物体运动(转向、移动、旋转)
1. 移动物体:
在界面中添加一个物体,并给这个物体添加一个脚本文件,在脚本文件当中如果想控制物体运动,就需要在unity每一帧更新的时候,给物体的坐标值重新赋值,这样就能按照帧更新速率实时的更改物体的位置,实现移动效果。
位置更新的代码应该写在***update()***函数里,这个函数会在帧更新时不停的重复调用,代码以及相关注释如下:
using System.Collections;
using System.Collections.Generic;
using UnityEngine;

public class SampleLogic : MonoBehaviour
{
    // Start is called before the first frame update
    void Start()
    {
        Application.targetFrameRate = 60;//设定帧更新速率
    }

    // Update is called once per frame
    void Update()
    {
        float speed = 3;    //定义移动速度
        float distance = speed * Time.deltaTime;    //速度与时间相乘计算出每次更新时移动的距离

        Vector3 curPos = this.transform.localPosition;  //获取物体的当前坐标
        curPos.z += distance;   //将移动的距离附加到物体的对应方向的坐标值上

        this.transform.localPosition = curPos;  //更新物体的当前坐标
    }
}
效果如下:
unity脚本移动物体
2. 相对运动:
使用Translate(dx,dy,dz,space)实现物体的相对运动,前三个参数是对应坐标轴的偏移量,最后一个参数space可以指定是相对于自身坐标系还是相对于世界坐标系进行移动。代码如下:
    void Update()
    {
        float speed = 3;    //定义移动速度
        float distance = speed * Time.deltaTime;    //速度与时间相乘计算出每次更新时移动的距离
        //this.transform.Translate(0, 0, distance, Space.World);//相对于世界坐标系进行z轴上的移动
        this.transform.Translate(0, 0, distance, Space.Self);//相对于自身坐标系进行z轴上的移动
    }
注意:一般要求模型的正脸方向与坐标系的z轴方向保持一致
3. 朝着某一参照物移动:
物体的运动一般都不是漫无目的,大多数情况下都是朝着某一个目标去移动,达成自己目的。可以在视图中放置两个物体,一个模拟移动的物体,一个模拟目标,如下图所示:让飞盘朝着目标的方向移动
大致思路:先让飞盘原地转动一定角度,朝向目标,然后再进行移动。
转向可以使用***LookAt()***函数,但是这个函数有一定的缺陷,如果目标在空中,那么转向后,物体在移动的过程中将飞起,无法始终都在地面上运动。

相关代码如下:
using System.Collections;
using System.Collections.Generic;
using UnityEngine;

public class SampleLogic : MonoBehaviour
{
    // Start is called before the first frame update
    void Start()
    {
        Application.targetFrameRate = 60;//设定帧更新速率

        GameObject flag = GameObject.Find("flag");//根据目标物体的名称,先找到目标物体

        this.transform.LookAt(flag.transform);//将移动物体看向目标物体,可实现物体的转向
    }

    // Update is called once per frame
    void Update()
    {
        float speed = 3;    //定义移动速度
        float distance = speed * Time.deltaTime;    //速度与时间相乘计算出每次更新时移动的距离

        this.transform.Translate(0, 0, distance, Space.Self);//相对于自身坐标系进行z轴上的移动
    }
}
4. 控制物体停止:
物体运动到目的点后应当停止运动,实现的逻辑就是在开始运动时,先计算一下物体与目标点之间的距离,然后进行距离的判断,如果距离小于设定的临界值,就不再让物体运动,其中使用到了函数magnitude,可以计算两个vector3向量之间的差值,具体代码如下:
using System.Collections;
using System.Collections.Generic;
using UnityEngine;

public class SampleLogic : MonoBehaviour
{
    GameObject flag;//定义全局属性
    // Start is called before the first frame update
    void Start()
    {
        Application.targetFrameRate = 60;//设定帧更新速率

        flag = GameObject.Find("flag");//根据目标物体的名称,先找到目标物体

        this.transform.LookAt(flag.transform);//将移动物体看向目标物体,可实现物体的转向
    }

    // Update is called once per frame
    void Update()
    {
        Vector3 flagTrf = flag.transform.position;
        Vector3 objTrf = this.transform.position;
        Vector3 subTrf = flagTrf - objTrf;
        float minDistance = subTrf.magnitude;//根据坐标计算距离差值

        if(minDistance > 6.0f)//距离大于阈值时,才会移动物体,否则不移动
        {
            float speed = 3;    //定义移动速度
            float distance = speed * Time.deltaTime;    //速度与时间相乘计算出每次更新时移动的距离

            this.transform.Translate(0, 0, distance, Space.Self);//相对于自身坐标系进行z轴上的移动
        }
    }
}
5. 视角随物体运动:
在某个物体运动时,有时希望我们的摄像机视野也能跟随着物体一块运动,类似于玩游戏以第一人称的视角去观察场景,此时我们可以先选中可以移动的物体,然后在菜单栏Edit -> Lock View To Selected…,将视图与移动的物体锁定在一起,即可实现功能,如下图所示:

效果展示:
视野随移动物体改变
6. 物体的旋转:
给物体设定一个旋转角度,有两种方法可以实现:
1:使用Quaternion四元组(x,y,z,w),使用transform.rotation = …,这中方法比较麻烦
2:使用欧拉角Euler Angle:(推荐使用)
transform.eulerAngles = new vector(45,0,0);
transform.localEulerAnglers = new vector(0,45,0);
可以在场景中添加一个物体,控制物体的匀速旋转,添加一个如下图所示的小风扇,并新建一个RotateScript脚本,挂载到上面:

旋转脚本代码如下:
using System.Collections;
using System.Collections.Generic;
using UnityEngine;

public class RotateScript : MonoBehaviour
{
    // Start is called before the first frame update
    void Start()
    {
        Application.targetFrameRate = 60;//设置更新帧速率
        //transform.localEulerAngles = new Vector3(0, 45, 0);
    }

    // Update is called once per frame
    void Update()
    {
        float rotateSpeed = 30;	//控制旋转速度

        Vector3 angles = this.transform.localEulerAngles;

        angles.y += rotateSpeed * Time.deltaTime;	//速度*时间=旋转角度

        this.transform.localEulerAngles = angles;
    }
}
实际效果:
物体旋转
7. 自转与公转:
物体自转就是绕着自身的坐标轴进行旋转,物体公转个人理解为是物体绕着某个物体或者某个点进行旋转,类似于地月系统。
实现公转的思路:可以建立一个空物体,然后将需要公转的物体放到这个空物体的下面,当成子物体,父物体转动,子物体也会跟着转动,此时空物体的自转就相当于子物体在绕着这个空物体在公转了。
如图所示,添加一个圆球物体放置在中间,添加一个卫星模型,使圆球成为卫星的父物体,在卫星模型上添加脚本文件,代码如下:
using System.Collections;
using System.Collections.Generic;
using UnityEngine;

public class SampleLogic : MonoBehaviour
{

    GameObject flag;

    // Start is called before the first frame update
    void Start()
    {
        Application.targetFrameRate = 60;//设定帧更新速率

    }

    // Update is called once per frame
    void Update()
    {
        float rotateSpeed = 20;
        float angleDelta = rotateSpeed * Time.deltaTime;

		Transform parent = this.transform.parent;
        //使用API实现设定旋转角度
        parent.transform.Rotate(0, angleDelta, 0, Space.Self);
    }
}
实际效果:
物体公转
8. 消息函数:
常见的消息函数:
Awake:初始化,仅执行一次(第一阶段初始化),先于Start调用,即使组件被禁用也会调用
Start:初始化,仅执行一次(第二阶段初始化),第一次启用时调用
Update:帧更新,每帧调用一次
OnEnable:每当组件启用时调用
OnDisable:每当组件禁用时调用
using System.Collections;
using System.Collections.Generic;
using UnityEngine;

public class RotateScript : MonoBehaviour
{
    private void Awake()
    {
        Debug.Log(this.gameObject.name + "** Awake()初始化...");
    }
    // Start is called before the first frame update
    void Start()
    {
        Application.targetFrameRate = 60;//设置更新帧速率
        //transform.localEulerAngles = new Vector3(0, 45, 0);
    }

    // Update is called once per frame
    void Update()
    {
        float rotateSpeed = 30;
        float angleDelta = rotateSpeed * Time.deltaTime;

        //使用API实现
        Transform parent = this.transform.parent;
        parent.transform.Rotate(0, angleDelta, 0, Space.Self);
    }
    private void OnEnable()
    {
        Debug.Log(this.gameObject.name + "** OnEnable()初始化...");
    }

    private void OnDisable()
    {
        Debug.Log(this.gameObject.name + "** OnDisable()初始化...");
    }

}
9.脚本优先级
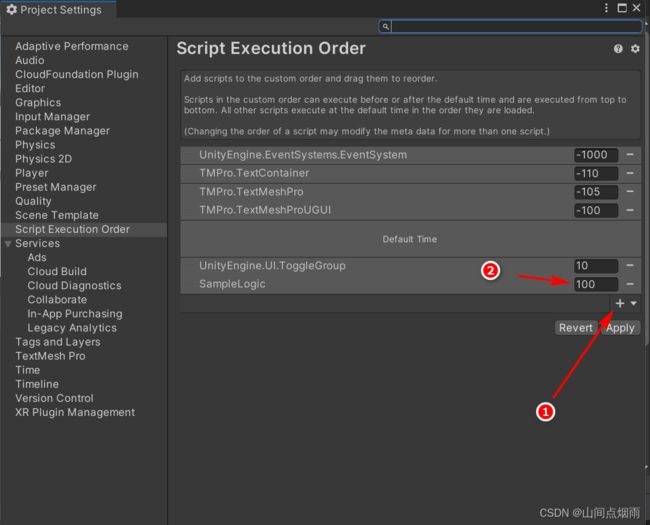
所有脚本的优先级默认都是 0 ,优先级数值越小,级别越高,执行顺序越靠前,脚本的优先级和在Hierarchy中的层级顺序无关。可以对指定的脚本设置其优先级大小,不过没太大必要,让所有的脚本优先级保持默认即可。
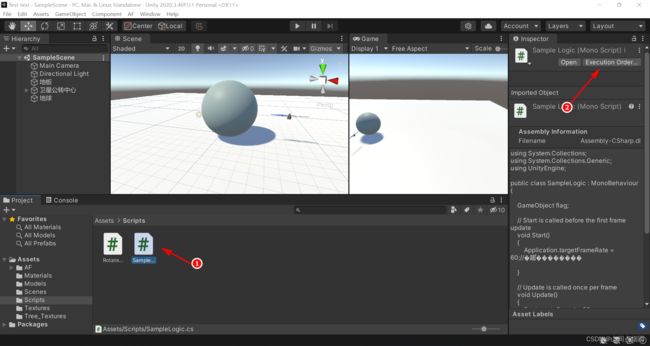
指定脚本优先级方式:
选中一个脚本,打开Execution Order对话框,点击 + 号按钮后,添加一个脚本,即可设置该脚本的优先级大小,如下图所示:


10.主控脚本
可以为整个项目添加一个脚本,在这个脚本中进行一些全局性的设置或者全局性的逻辑编写,添加方式:在项目中添加一个空物体,然后在这个空物体上面挂载一个脚本,在脚本里写入全局性的逻辑或设置即可。