CentOS install ORACLE (the most detailed in history!!! There is no one!!!)
CentOS install ORACLE (the most detailed in history!!! There is no one!!!)
文章目录
- CentOS install ORACLE (the most detailed in history!!!!!!!!!!!!!!! There is no one!!!)
-
- 1.Install required software
- 2.Configuration environment (operation under root user)
- 3.start install
1.Install required software
1.1.centos installation platform, vmware esxi 6.5 (Alibaba Cloud)
https://www.aliyundrive.com/s/QEB5TMaLJRv
1.2.CentOS-7-x86_64-DVD-1810.iso (Alibaba Cloud)
https://www.aliyundrive.com/s/SqmtWGCXPGU
1.3.oracle installation package (Alibaba Cloud)
https://www.aliyundrive.com/s/QBEw8utfFjo
2.Configuration environment (operation under root user)
2.1 Install httpd
yum install httpd -y
2.2 Configure epel source
rpm -vih https://dl.fedoraproject.org/pub/epel/7Server/x86_64/Packages/e/epel-release-7-12.noarch.rpm
2.3 Turn off the firewall
systemctl stop firewalld.service
systemctl disable firewalld
systemctl stop firewalld
systemctl status firewalld
2.4 install Dependent library
yum install -y compat-libstdc++-33 elfutils-libelf-devel gcc gcc-c++ glibc-devel
yum install -y ksh libaio-devel numactl-devel
yum install -y unixODBC unixODBC-devel oracleasm oracleasmlib oracleasm-support
2.5 Create Oracle user groups and user accounts
groupadd oinstall
groupadd dba
useradd -g oinstall -G dba oracle
passwd oracle
2.6 Configure kernel parameters,Modify the file /etc/sysctl.conf, vim /etc/sysctl.conf, and add the following command
fs.file-max = 6815744

kernel.shmall = 2097152

kernel.shmmax = 536870912

kernel.shmmni = 4096

kernel.sem = 250 32000 100 128

net.ipv4.ip_local_port_range = 9000 65500

net.core.rmem_default = 262144

net.core.rmem_max = 4194304

net.core.wmem_default = 262144

net.core.wmem_max = 1048576

net.ipv4.tcp_wmem = 262144 262144 262144

 net.ipv4.tcp_rmem = 4194304 4194304 4194304
Execute the command: /sbin/sysctl -p to make the parameters take effect.
2.7 Modify the files /etc/security/limits.conf, vim /etc/security/limits.conf, and add the following commands
oracle              soft    nproc   2047
oracle              hard    nproc   16384
oracle              soft    nofile  1024
oracle              hard    nofile  65536
oracle              soft    stack   10240
oracle              hard   stack    32768
oracle              hard   memlock    134217728
oracle              soft   memlock    134217728
2.8 Create the Oracle installation directory and give it read and write permissions
mkdir -p /u01/app/oracle
chown -R oracle:oinstall /u01/app/oracle
chmod -R 777 /u01/app/oracle
chown -R oracle:oinstall /home/oracle
chmod -R 777 /home/oracle
mkdir -p /u01/app/oraInventory
chown -R oracle:oinstall /u01/app/oraInventory
mkdir -p /home/oracle/Downloads
chmod -R 777 /home/oracle/Downloads
2.9 Edit Oracle user environment,Enter su oracle under the root user to enter the oracle user environment,Edit the .bash_profile file vim /home/oracle/.bash_profile
PATH=$PATH:$HOME/.local/bin:$HOME/bin

export PATH
#For Oracle(下面是需要添加的部分)
export DISPLAY=:0.0
export TMP=/tmp;
export TMPDIR=$TMP;
export ORACLE_BASE=/u01/app/oracle;
export ORACLE_HOME=$ORACLE_BASE/product/11.2.0/dbhome_1;
export ORACLE_SID=ORADB11G;
export ORACLE_TERM=xterm;
export PATH=/usr/sbin:$PATH;
export PATH=$ORACLE_HOME/bin:$PATH;
export LD_LIBRARY_PATH=$ORACLE_HOME/lib:/lib:/usr/lib;
2.10 Check whether the environment variable is configured successfully (oracle user)
echo $ORACLE_HOME
If the configured path is output normally, it is successful. If the output is blank, you can execute it manually this time source /home/oracle/.bash_profile executes the loading of environment variables. But it only works in the current terminal window.
2.11 Set the host mapping, change vi /etc/hosts under root, the effect after the change should be as follows
127.0.0.1 localhost

127.0.1.1 centos-oracle11
2.12 Restart centos, enter the following command under root user
init 6
2.13 Transfer compressed files to /home/oracle/Downloads
2.14 cd /home/oracle/Downloads, decompress, the file will be automatically decompressed to /home/oracle/Downloads/database
unzip linux.x64_11gR2_database_1of2.zip
unzip linux.x64_11gR2_database_2of2.zip
Be sure to unzip in Linux, otherwise an error will be reported when the installation reaches 7%:
Error in invoking target’libasmclntsh19.ohso libasmperl19.ohso client_sharedlib’ of makefile’/u01/app/rdbms/lib/ins_rdbms.mk’. See’/tmp/InstallActions2021-07-10_07-46-40AM/installActions2021-07-10_07 -46-40AM.log’ for details.^
2.15 Under the root user, create a new swap partition (otherwise an error will be reported during the installation process, the specific installation requirements have not been studied, and the following partition size is 16400000KB)
1、使用dd命令创建一个swap分区

          2、#dd if=/dev/zero of=/home/swap bs=1024 count=16400000
          (要等待很长一段时间,大概二十分钟,不能打断现在正在操作的终端窗口,直到输出:
			16400000+0 records in
			16400000+0 records out
			16793600000 bytes (17 GB) copied, 274.484 s, 61.2 MB/s
          ,创建成功)

          3、格式化刚才创建的分区

          4、# mkswap /home/swap

          5、再使用swapon命令把这个文件分区变成swap分区

          6、#swapon /home/swap

          7、(关闭SWAP分区的命令为:#swapoff /home/swap)

          8、再用free -m 查看已经扩容的了swap分区。

          9、为了能够让swap自动挂载,需要修改etc/fstab文件,用vi /etc/fstab

          10、在文件末尾加上 /home/swap swap swap default 0 0

          11、这样就算重启系统,swap分区也不用手动挂载了

          12、但是我感觉好像我重启了系统 swap就没有了,然后我又百度了一下,要执行下面一段命令
            #echo   "swapon  /home/swap" >> /etc/inittab

          13、然后在 vi /etc/inittab

          14、最后一行是swapon  /home/swap,这样就万事大吉了。
3.start install
3.1 Enter the centos desktop, log out of the current account, log in to centos with the oracle account,cd /home/oracle/Downloads/database, execute ./runInstaller to enter the installation interface, this terminal window cannot be interrupted, you need to enter a new command, please open another terminal window
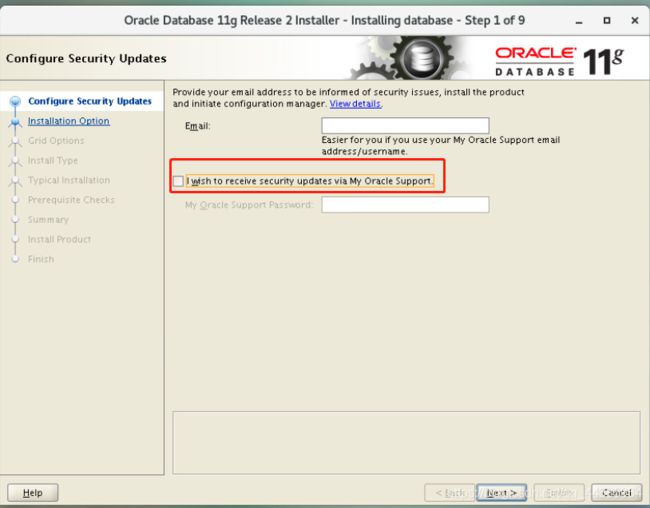
3.2 Cancel the communication-----next step------yes (prompt not to fill in the mailbox)
3.3 Select “Create and configure a database” and click “Next”

3.4 Select “Server Class” and click “Next”

3.5 Select “single instance database installation”, click “next”

3.6 Select “Advanced install” and click “next”

3.7 The default is “English”, add “English(United Kingdom)”, click “next”

3.8 Select “Enterprise Edition(4.29G)”, click “next”

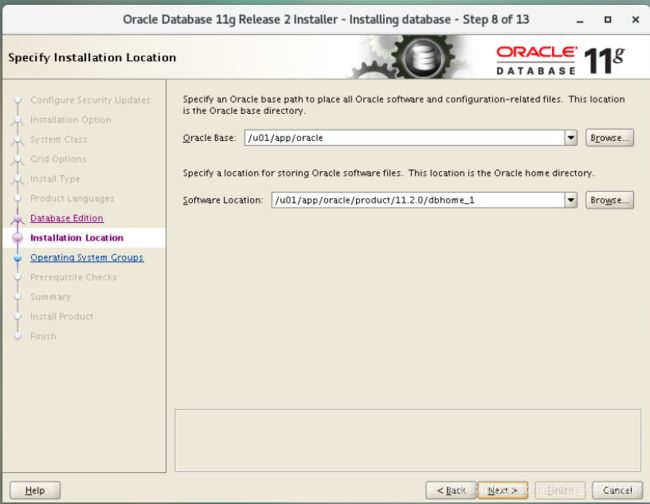
3.9 Generally Oracle base and Oracle home directory will be used
Oracle Base: /u01/app/oracle
Software location: /u01/app/oracle/product/11.2.0/dbhome_1
3.10 The directory where Oracle installation files are stored is called “Oracle inventory directory”.
Inventory directory: /u01/app/oraInventory
oraInventory user group name: oinstall

3.11 Select the type of database you want to create:
General Purpose / Transaction Processing

3.12 global database name and Oracle Service Identifier can be defined as the same value
Global database name: ORADB11G
Oracle Service Identifier (SID): ORADB11G

3.13 There are four options in this step, you can configure each option as shown below
Memory: Check Automatic Memory Management (default).

Character setting: Check Unicode (AL32UTF8).

Security: 勾选Assert all new security settings (default).

Sample schemas: Check Create database with sample schemas (however, you don’t need to make changes, it’s not checked here).

3.14 Management options
Do nothing, the next step

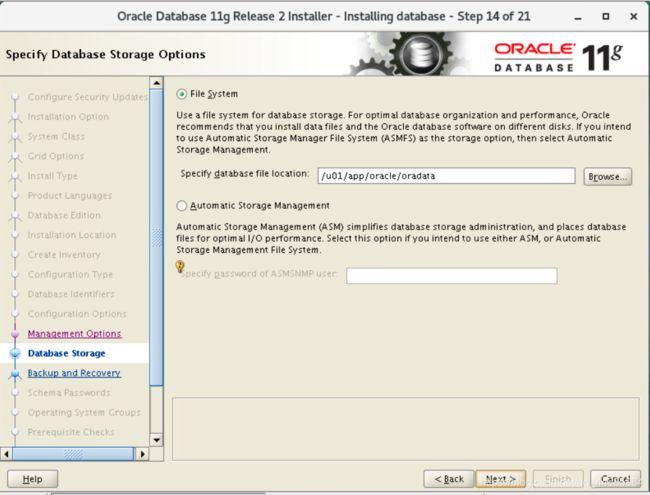
3.15 Database storage
Read the suggestion as shown and select File system
Specify database file location: /u01/app/oracle/oradata
3.16 Backup and restore
Choose the default option: Do not enable automated backups (default).
Backup is very important, but it is best to do data backup after installing oracle on centos

3.17 Schema password
Choice: Use the same password for all accounts. Enter the password and confirm the password

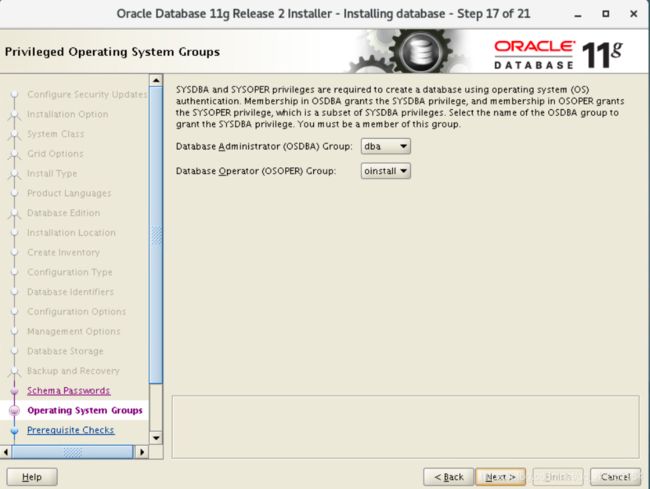
3.18 Operating system user group
Read the content shown in the window and select the user group
Database Administrator (OSDBA) Group: dba
Database Operator (OSOPER) Group: oinstall
3.19 an examination
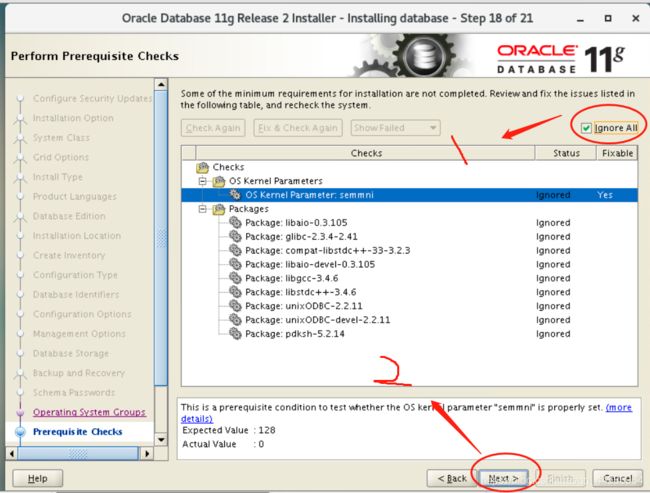
Now the Oracle installer checks whether the system configuration meets the conditions, a warning will appear in this step. The OS Kernel Parameter semmni has been configured before, but the status displayed now is still Failed
OS Kernel Parameter: semmni Failed

3.20 Use the following command (root user) to check the semimni parameter, /sbin/sysctl -a | grep sem or
cat /proc/sys/kernel/sem, if the last value is greater than or equal to 128, then you can ignore this warning, for example:
kernel.sem = 250
32000 100 128
or
cat /proc/sys/kernel/sem
250 32000 100 128
For some reason, the Oracle prerequisite checker cannot determine whether the semmni parameters are correct and whether the required packages are installed. If the content of the Prerequisite Checks window is similar to the window shown in the screenshot above, check the Ignore All checkbox and click Next to continue.
3.21 Summary
Check the configuration summary to make sure you have configured all settings as needed. You can save the response file (db.rsp), because it may come in handy when you need to install Oracle on multiple Linux machines or you plan to install Oracle on a centos server without a GUI.


Now you can monitor how the Oracle installer copies files until the installer enters the stage of linking binary files.

3.22 
Solution:
Let’s open the ins_ctx.mk file and check the 11th line of the file.
vim /u01/app/oracle/product/11.2.0/dbhome_1/ctx/lib/ins_ctx.mk
In the navigation mode of vim, enter: set number to view the line number.

Let’s find line 11.

When using navigation mode in vim, you can use the following command to find the required string:
/LINK_CTXHX
Edit the following section:
ctxhx: $(CTXHXOBJ)
$(LINK_CTXHX) $(CTXHXOBJ) $(INSO_LINK)
You must edit line 11 as follows:
-static $(LINK_CTXHX) $(CTXHXOBJ) $(INSO_LINK) /usr/lib64/stdc.a

Save ins_ctx.mk and exit vim.
Now return to the Oracle installation error window and click Retry.
Run the script and click retry
The installation process continues, but after a few seconds, another error is displayed when building the proxy library:
Error in invoking target ‘agent nmhs’ of makefile ‘/u01/app/oracle/product/11.2.0/dbhome_1/sysman/lib/ins_emagent.mk’.

Run the following command as the oracle user:
- export ORACLE_HOME=/u01/app/oracle/product/11.2.0/dbhome_1
- sed -i ‘s/^(\s*KaTeX parse error: Undefined control sequence: \s at position 21: …MAGENT_NMECTL))\̲s̲*/\1 -lnnz11/g’ $ORACLE_HOME/sysman/lib/ins_emagent.mk
Note: sed is a streaming text editor. Compared with editing them with vim or other interactive text editors, it is used to save the time of editing .mk files.
After running the above two commands, click Retry in the Oracle installation error window.


Execute configuration script
We are about to install the Oracle database on centos.

Run these two scripts as root:
/u01/app/oraInventory/orainstRoot.sh
/u01/app/oracle/product/11.2.0/dbhome_1/root.sh
In the screenshot below, you can see that the script has been successfully executed.

3.23 Configure the listener
After the oracle installation is successful, you need to configure the listener, directly type in the netca command, if it prompts bash:netca:command not found, manually execute source /home/oracle/.bash_profile, you can enter the user interface for configuring the listener, and configure the listener according to your needs Device.
First configure tnsnames.name

ORADB11G =
  (DESCRIPTION =
    (ADDRESS_LIST =
      (ADDRESS = (PROTOCOL = TCP)(HOST = 你的主机ip)(PORT = 1521))
    )
    (CONNECT_DATA =
      (SERVICE_NAME = ORADB11G)
    )
  )
Configure listener.ora

SID_LIST_LISTENER =
(SID_LIST =
  (SID_DESC =
  (GLOBAL_DBNAME = ORADB11G)
  (ORACLE_HOME=/u01/app/oracle/product/11.2.0/dbhome_1)
  (SID_NAME = ORADB11G)
  )
)


LISTENER =
  (DESCRIPTION_LIST =
    (DESCRIPTION =
      (ADDRESS = (PROTOCOL = TCP)(HOST = 你的主机ip)(PORT = 1521))
    )
  )

ADR_BASE_LISTENER = /u01/app/oracle
3.24 Check if Oracle is running on centos
Open a Web browser on the Ubuntu machine running Oracle, and check whether Oracle is running by opening the Web interface of Oracle Database Control Manager. The following link can be used to do this:
https://localhost:1158/em
https://centos-oracle11:1158/em
https://centos ip/em
You can also try to connect to a centos machine running Oracle from another host on the network.
Define the connection parameters.
User Name: SYS
Password: the password you installed during the oracle installation
Connect As: SYSDBA
Below you can see a screenshot of Oracle Enterprise Manager when Oracle is running normally.
3.25 Oracle post-installation configuration
Now that Oracle is installed, we should now configure the database to start automatically after centos is started. You should edit the /etc/oratab configuration file to set Oracle to start during system boot.
Run the following command as root user
vim /etc/oratab
Replace N to Y at the end of the line:
ORADB11G:/u01/app/oracle/product/11.2.0/dbhome_1:Y
3.26 useful command
Before setting up Oracle to start automatically, you should understand how to manually start Oracle components. This will also help the diagnosis. Run these commands as the oracle user.
Run the database:
dbstart $ORACLE_HOME
/etc/init.d/oracle start
Stop the database:
dbshut $ORACLE_HOME
Start the Database Control Enterprise Manager, which provides a Web interface for database control:
emctl start dbconsole
Stop Database Control Manager:
emctl stop dbconsole
Check the status of Database Control Manager:
emctl status dbconsole
Start listening:
lsnrctl start
Stop monitoring:
lsnrctl stop
Check the monitoring status:
$ORACLE_HOME/bin/lsnrctl status
Start the database configuration assistant (in the GUI shell, not in the SSH console):
dbca
You can configure Oracle monitoring by editing the file:
vim $ORACLE_HOME/network/admin/listener.ora
Connect to the database at the console:
sqlplus / as sysdba;
3.27 Create Oracle startup script in centos
Let’s discuss how to set up Oracle to start automatically when centos starts. After editing /etc/oratab, you should create a startup script in the /etc/init.d/ directory.
Create a new Oracle startup script file in centos (run the command as root):
vim /etc/init.d/oracle
Add the following content to the file
#!/bin/bash

#

# Run-level Startup script for the Oracle Instance and Listener

#

### BEGIN INIT INFO

# Provides:          Oracle

# Required-Start:    $remote_fs $syslog

# Required-Stop:     $remote_fs $syslog

# Default-Start:     2 3 4 5

# Default-Stop:      0 1 6

# Short-Description: Startup/Shutdown Oracle listener and instance

### END INIT INFO

#ORACLE_UNQNAME="ORADB11G"

#export $ORACLE_UNQNAME

echo "ORACLE_UNQNAME is $ORACLE_UNQNAME"

ORACLE_HOME="/u01/app/oracle/product/11.2.0/dbhome_1"

ORACLE_OWNR="oracle"

# if the executables do not exist -- display error

if [ ! -f $ORACLE_HOME/bin/dbstart -o ! -d $ORACLE_HOME ]

then

echo "Oracle startup: cannot start"

exit 1

fi

# depending on parameter -- startup, shutdown, restart

# of the instance and listener or usage display

case "$1" in

start)

# Oracle listener and instance startup

echo -n "Starting Oracle: "

echo "dbstart"

source "/home/oracle/.bashrc" && su $ORACLE_OWNR -c "$ORACLE_HOME/bin/dbstart $ORACLE_HOME"

echo "lsnrctl start"

source "/home/oracle/.bashrc" && su $ORACLE_OWNR -c "$ORACLE_HOME/bin/lsnrctl start"

#Optional : for Enterprise Manager software only

echo "emctl start dbconsole"

source "/home/oracle/.bashrc" && su $ORACLE_OWNR -c "$ORACLE_HOME/bin/emctl start dbconsole"

touch /var/lock/oracle

echo "OK - a script has been executed"

;;

stop)

# Oracle listener and instance shutdown

echo -n "Shutdown Oracle: "

#Optional : for Enterprise Manager software only

source "/home/oracle/.bashrc" && su $ORACLE_OWNR -c "$ORAClE_HOME/bin/emctl stop dbconsole"

source "/home/oracle/.bashrc" && su $ORACLE_OWNR -c "$ORACLE_HOME/bin/lsnrctl stop"

source "/home/oracle/.bashrc" && su $ORACLE_OWNR -c "$ORACLE_HOME/bin/dbshut $ORACLE_HOME"

rm -f /var/lock/oracle

echo "OK - a script has been executed"

;;

reload|restart)

$0 stop

$0 start

;;

*)

echo "Usage: $0 start|stop|restart|reload"

exit 1

esac

exit 0
3.28 Set the correct permissions:
chown oracle:oinstall /etc/init.d/oracle
chmod 0775 /etc/init.d/oracle
Start this script immediately after the operating system starts (can be used for the default run level):
update-rc.d oracle defaults
If necessary, you can edit the startup priority.
Run the script to stop Oracle (you can run this script as root):
/etc/init.d/oracle stop
If you want to start Oracle, use the following command to run this script:
/etc/init.d/oracle start
[外链图片转存失败,源站可能有防盗链机制,建议将图片保存下来直接上传(img-iGM75mkl-1630219395001)(https://user-images.githubusercontent.com/87814661/128490588-09be3e50-ac53-4262-a514-5fb181400ea1.png)]
Note: Pay attention to the following lines and similar lines in the Oracle startup script:
source “/home/oracle/.bashrc” && su ORACLEOWNR − c “ORACLE_OWNR -c” ORACLEOWNR−c"ORACLE_HOME/bin/dbstart ORACLEHOME “First, we set up the shell to read the .bashrc system configuration stored in the oracle user The settings in the file include the variables required for the normal operation of the Oracle component, such as ORACLEHOSTNAME, ORACLEBASE, PATH, etc. After applying the b a s h setting of the o r a c l e user to the current sh e l l session, execute the next command to start the O r a c l e database. What is the difference between s u − and s u? user 1 @ hostname: ORACLE_HOME” First, we set up the shell to read the settings stored in the oracle user’s .bashrc system configuration file, including the variables required for the normal operation of the Oracle components, such as ORACLE_HOSTNAME, ORACLE_BASE, PATH, etc. Change the oracle user After the bash setting is applied to the current shell session, execute the next command to start the Oracle database. What is the difference between su-and su? user1@hostname:~ ORACLEHOME" First, we set up the shell to read the data stored in the oracle user The settings in the .bashrc system configuration file include variables required for the normal operation of Oracle components, such as ORACLEHOSTNAME, ORACLEBASE, PATH, etc. After applying the oracle user’s bash settings to the current shell session, execute the next command to start the Oracle database. What is the difference between su− and su? user1@hostname: su-username2 – This command runs a command-line shell session as the selected user (username2) and uses the settings of the selected user (username2), just like you log in as username2 when you directly create a new shell session (Start from scratch). The environment variable of username2 is used in this shell session.
user1@hostname:~$ su username2-This command runs the command line shell as the selected user (username2). The settings of the current user (user1) and the environment variables of user1 are inherited by username2 in this shell session.
su -c (–command) means that the specified command must be run as the selected user.
NAKIVO backup and copy data protection
NAKIVO Backup & Replication provides high-end data protection for small and medium enterprises and enterprises through a variety of backup, replication and recovery functions, including VMware backup, Hyper-V backup, Office 365 backup, etc.
this shell session.
user1@hostname:~$ su username2-This command runs the command line shell as the selected user (username2). The settings of the current user (user1) and the environment variables of user1 are inherited by username2 in this shell session.
su -c (–command) means that the specified command must be run as the selected user.
NAKIVO backup and copy data protection
NAKIVO Backup & Replication provides high-end data protection for small and medium enterprises and enterprises through a variety of backup, replication and recovery functions, including VMware backup, Hyper-V backup, Office 365 backup, etc.