PyCharm中PyQt的使用方法
PyCharm中PyQt的使用方法
- 简单说明
- 本文范例软件
- 安装PyQt及相关软件
- PyCharm中设定:QtDesigner
- PyCharm中设定: PyUIC (模块方式)
- PyCharm中设定: PyUIC (直接使用)
- PyCharm中设定: PyRCC
-
- 在Qt Designer中新增资源文件
- 总结一下
- 配置完PyCharm
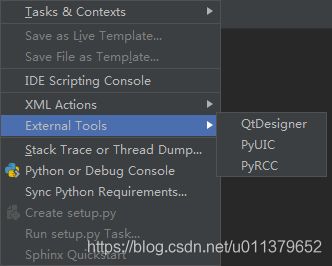
- Tools中已经有快捷方式
- 打开Qt Designer则可以创建窗口,拖拽各种需要的控件
- 保存的地址便是上面加ui的文件夹
- Qt Desinger中创建一个简单的界面
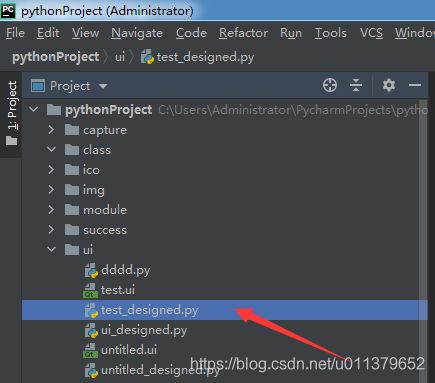
- 保存为test.ui选中并且点选PyUIC、生成test_designed.py
- A.如何使用这个生成的py文件呢? 直接使用
-
- 运行后如下图效果
- 代码有两处告警提示
- B.如何使用这个生成的py文件呢? 继承方式
-
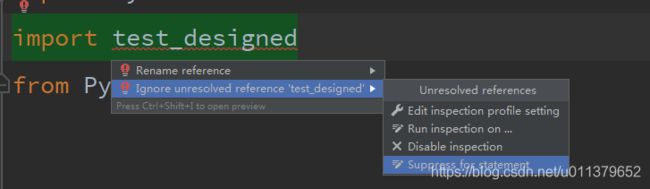
- 引用中错误的处理方式
- 选择Suppress for statement也可消除提示
- 题外话、修正自动生成的代码
简单说明
PyQt是Python与Qt的融合,做为Python的一个模块使用,有很多工具包。且Qt Designer可以快速的搭建应用程序的前台界面、类似Visual Studio的拖放操作,且可以配合PyCharm使用,让Python的开发效率更上一层楼。
本文范例软件
本文的前提是安装好了PyCharm以及Python(以下是范例中使用的版本)
- PyCharm Community Edition 2020.2.1 x64
- Python 3.7.0 x32
安装PyQt及相关软件
pip install pyqt5
pip install pyqt5-tools
pip install pyqt5-stubs
如果慢的话可以改用清华及其它的镜像地址
pip install 安装包 -i https://pypi.tuna.tsinghua.edu.cn/simple
pip install pyqt5 -i https://pypi.tuna.tsinghua.edu.cn/simple
PyCharm中设定:QtDesigner
完成后在PyCharm中设定QtDesigner以及PyUIC
- QtDesigner
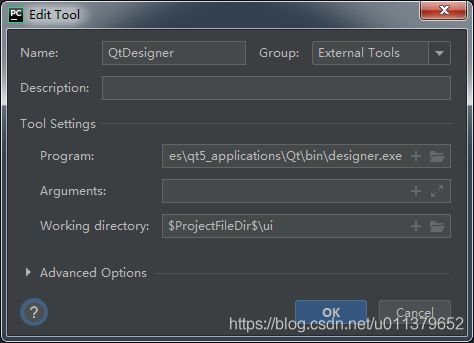
Name、Program、Working directory分别填入
#名称方便调用
QtDesigner
#你的designer文件地址
C:\Python\Python37-32\Lib\site-packages\qt5_applications\Qt\bin\designer.exe
#项目文件夹下ui文件夹内
$ProjectFileDir$\ui
PyCharm中设定: PyUIC (模块方式)
PyUIC这里有两种方式
一,以模块方式调用pyuci
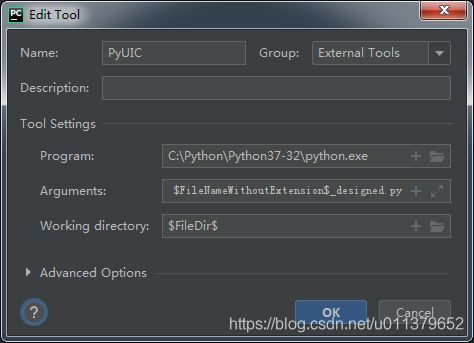
Name、Program、 Arguments、Working directory分别填入
PyUIC
#python.exe位置
C:\Python\Python37-32\python.exe
#以模块方式调用pyuic将ui文件转换成py
-m PyQt5.uic.pyuic $FileName$ -o $FileNameWithoutExtension$_designed.py
#当前ui同目录下
$FileDir$
PyCharm中设定: PyUIC (直接使用)
PyUIC
#pyuic5.exe位置
C:\Python\Python37-32\Scripts\pyuic5.exe
#将ui文件转换成py、加了_designed在生成文件名后,用于区别
$FileName$ -o $FileNameWithoutExtension$_designed.py
#当前ui同目录下
$FileDir$
PyCharm中设定: PyRCC
什么是pyrcc?在Qt Designer中新增的资源文件名为qrc、将qrc转换成py用于程序使用,这就需要用到pyrcc5程序,配置如下

Name、Program、 Arguments、Working directory分别填入
(Description是描述:这里我是qrc to py)
PyRCC
C:\Python\Python37-32\Scripts\pyrcc5.exe
# 由于ui生成的py如果带有资源文件会默认  <资源文件名_rc的方式>  所以这里直接将生成_rc的文件名
$FileName$ -o $FileNameWithoutExtension$_rc.py
$FileDir$
在Qt Designer中新增资源文件
点击最左边的新建、增加前缀(虚拟目录)、并添加文件这里是ico

选择复制
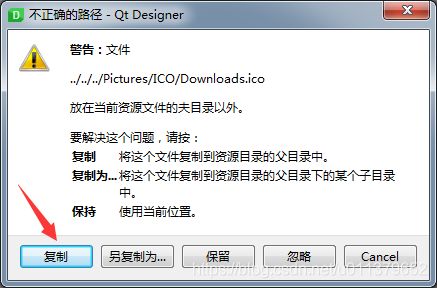
资源保存后为myqrc.qrc文件名、这里将窗体的图标设定完保存ui文件,用之前的PyUIC转换ui 到 py
打开文件后发现、myqrc_rc
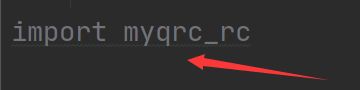
选中myqrc.qrc点击PyRCC、这也是在转换代码中加入rc的作用
![]()
总结一下
PyUIC是将设计界面的ui文件转换成py

如果还附带相关资源(ico、图片等等)、将产生qrc文件、PyRCC就是将qrc也转换成py文件的工具

最后程序调用:界面程序(ui转换的py)+资源程序(qrc转换的py)
配置完PyCharm

Tools中已经有快捷方式
打开Qt Designer则可以创建窗口,拖拽各种需要的控件

保存的地址便是上面加ui的文件夹

Qt Desinger中创建一个简单的界面
- 新建一个按钮并改名、并修改窗口标题为mytest

保存为test.ui选中并且点选PyUIC、生成test_designed.py
A.如何使用这个生成的py文件呢? 直接使用
# 引用的模块
import sys
from PyQt5 import QtCore, QtGui, QtWidgets


class Ui_Dialog(object):
    def setupUi(self, Dialog):
        Dialog.setObjectName("Dialog")
        Dialog.resize(400, 300)
        self.pushButton = QtWidgets.QPushButton(Dialog)
        self.pushButton.setGeometry(QtCore.QRect(110, 110, 181, 71))
        self.pushButton.setObjectName("pushButton")

        self.retranslateUi(Dialog)
        QtCore.QMetaObject.connectSlotsByName(Dialog)

    def retranslateUi(self, Dialog):
        _translate = QtCore.QCoreApplication.translate
        Dialog.setWindowTitle(_translate("Dialog", "mytest"))
        self.pushButton.setText(_translate("Dialog", "测试一下"))


# 下面是新加的内容
if __name__ == "__main__":
    mypro = QtWidgets.QApplication(sys.argv)
    mywin = QtWidgets.QMainWindow()
    thisui = Ui_Dialog()
    thisui.setupUi(mywin)
    mywin.show()
    sys.exit(mypro.exec_())
除了import sys以及最后新加的代码,中间都没有变动
运行后如下图效果

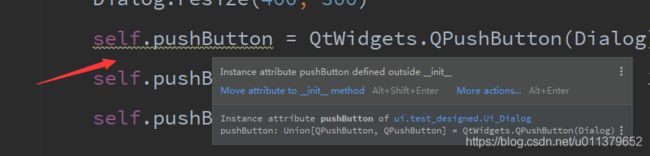
代码有两处告警提示
一.删除未引用到的模块即可

二.Instance attribute pushButton defined outside init (提示在init之外定义实例变量、此处是程序自动生成的代码,此处定义并无不妥)
当然你也可以消除这个提示、选中Suppress for statement

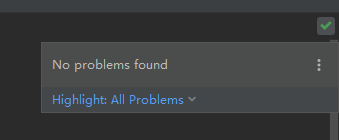
会在代码前加一段# noinspection PyAttributeOutsideInit (注解)、此时消除了所有错误
B.如何使用这个生成的py文件呢? 继承方式
import sys
# test_designed是文件名
import test_designed
from PyQt5 import QtWidgets


class RunTest(test_designed.Ui_Dialog):
    def __init__(self, myinherit):
        test_designed.Ui_Dialog.setupUi(self, myinherit)


if __name__ == "__main__":
    mypro = QtWidgets.QApplication(sys.argv)
    mywin = QtWidgets.QMainWindow()
    RunTest(mywin)
    mywin.show()
    sys.exit(mypro.exec_())
引用中错误的处理方式

右键在文件所属的文件夹中、选中Sources Root

文件夹将变色(灰色–淡蓝色)、并且错误消失

选择Suppress for statement也可消除提示
题外话、修正自动生成的代码
原ui生成的py代码test_designed.py
# -*- coding: utf-8 -*-

# Form implementation generated from reading ui file 'test.ui'
#
# Created by: PyQt5 UI code generator 5.15.1
#
# WARNING: Any manual changes made to this file will be lost when pyuic5 is
# run again.  Do not edit this file unless you know what you are doing.


from PyQt5 import QtCore, QtGui, QtWidgets


class Ui_Dialog(object):
    def setupUi(self, Dialog):
        Dialog.setObjectName("Dialog")
        Dialog.resize(400, 300)
        self.pushButton = QtWidgets.QPushButton(Dialog)
        self.pushButton.setGeometry(QtCore.QRect(110, 110, 181, 71))
        self.pushButton.setObjectName("pushButton")

        self.retranslateUi(Dialog)
        QtCore.QMetaObject.connectSlotsByName(Dialog)

    def retranslateUi(self, Dialog):
        _translate = QtCore.QCoreApplication.translate
        Dialog.setWindowTitle(_translate("Dialog", "mytest"))
        self.pushButton.setText(_translate("Dialog", "测试一下"))
test_designed.py改成
from PyQt5 import QtCore, QtWidgets


class Ui_Dialog(object):
    def __init__(self, Dialog):
        Dialog.setObjectName("Dialog")
        Dialog.resize(400, 300)
        self.pushButton = QtWidgets.QPushButton(Dialog)
        self.pushButton.setGeometry(QtCore.QRect(110, 110, 181, 71))
        self.pushButton.setObjectName("pushButton")

        self.retranslateUi(Dialog)
        QtCore.QMetaObject.connectSlotsByName(Dialog)

    def retranslateUi(self, Dialog):
        _translate = QtCore.QCoreApplication.translate
        Dialog.setWindowTitle(_translate("Dialog", "mytest"))
        self.pushButton.setText(_translate("Dialog", "测试一下"))
则引用的文件修正为using_test_designed.py
import sys
# noinspection PyUnresolvedReferences
import test_designed
from PyQt5 import QtWidgets


class RunTest(test_designed.Ui_Dialog):
    def __init__(self, myinherit):
        test_designed.Ui_Dialog.__init__(self, myinherit)
        # 上下两段代码有相同的效果
        # super(RunTest, self).__init__(myinherit)


if __name__ == "__main__":
    mypro = QtWidgets.QApplication(sys.argv)
    mywin = QtWidgets.QMainWindow()
    RunTest(mywin)
    mywin.show()
    sys.exit(mypro.exec_())