Prometheus(3)Prometheus界面概述、监控服务功能实现
1 运用场景
无人驾驶车辆运行中要记录的经度,纬度,速度,方向,旁边物体的距离等等。每时每刻都要将数据记录下来做分析。
某一个地区的各车辆的行驶轨迹数据
传统证券行业实时交易数据
实时运维监控数据等
2 时间序列数据特点
性能好
存储成本低:高效的压缩算法,节省存储空间,有效降低IO
3 后台启动Prometheus
./prometheus --config.file=prometheus.yml &
测试:执行之后还是会弹出提示信息,但是回车或ctrl+c后,该进程并没有被杀死,还是可以访问Prometheus的
[root@localhost prometheus-2.6.1.linux-amd64]# ./prometheus --config.file=prometheus.yml &
[1] 66817
[root@localhost prometheus-2.6.1.linux-amd64]# level=info ts=2022-02-08T08:29:25.148125005Z caller=main.go:243 msg="Starting Prometheus" version="(version=2.6.1, branch=HEAD, revision=b639fe140c1f71b2cbad3fc322b17efe60839e7e)"
level=info ts=2022-02-08T08:29:25.148195298Z caller=main.go:244 build_context="(go=go1.11.4, user=root@4c0e286fe2b3, date=20190115-19:12:04)"
level=info ts=2022-02-08T08:29:25.148210852Z caller=main.go:245 host_details="(Linux 3.10.0-1160.49.1.el7.x86_64 #1 SMP Tue Nov 30 15:51:32 UTC 2021 x86_64 localhost.localdomain (none))"
level=info ts=2022-02-08T08:29:25.148224939Z caller=main.go:246 fd_limits="(soft=1024, hard=4096)"
level=info ts=2022-02-08T08:29:25.148235639Z caller=main.go:247 vm_limits="(soft=unlimited, hard=unlimited)"
level=info ts=2022-02-08T08:29:25.148793611Z caller=main.go:561 msg="Starting TSDB ..."
level=info ts=2022-02-08T08:29:25.151957885Z caller=web.go:429 component=web msg="Start listening for connections" address=0.0.0.0:9090
level=info ts=2022-02-08T08:29:25.18589452Z caller=main.go:571 msg="TSDB started"
level=info ts=2022-02-08T08:29:25.186044958Z caller=main.go:631 msg="Loading configuration file" filename=prometheus.yml
level=info ts=2022-02-08T08:29:25.187174095Z caller=main.go:657 msg="Completed loading of configuration file" filename=prometheus.yml
level=info ts=2022-02-08T08:29:25.187189038Z caller=main.go:530 msg="Server is ready to receive web requests."
^C
[root@localhost prometheus-2.6.1.linux-amd64]#
[root@localhost prometheus-2.6.1.linux-amd64]# lsof -i:9090
COMMAND     PID USER   FD   TYPE DEVICE SIZE/OFF NODE NAME
prometheu 66817 root    6u  IPv6 617898      0t0  TCP *:websm (LISTEN)
prometheu 66817 root    7u  IPv4 617900      0t0  TCP localhost:50178->localhost:websm (ESTABLISHED)
prometheu 66817 root    8u  IPv6 617901      0t0  TCP localhost:websm->localhost:50178 (ESTABLISHED)
prometheu 66817 root    9u  IPv6 617909      0t0  TCP localhost:49520->localhost:websm (ESTABLISHED)
prometheu 66817 root   10u  IPv6 617910      0t0  TCP localhost:websm->localhost:49520 (ESTABLISHED)
[root@localhost prometheus-2.6.1.linux-amd64]#
4 Prometheus软件界面
4.1 查看监控的机器(监控的目标)
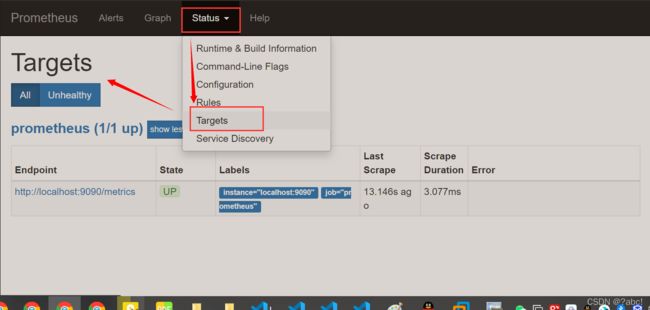
,点Status --》点Targets --》可以看到只监控了本机
查看监控的目标(界面如下):
- State:表示当前机器的运行状态,UP代表运行,DOWN代表没有运行
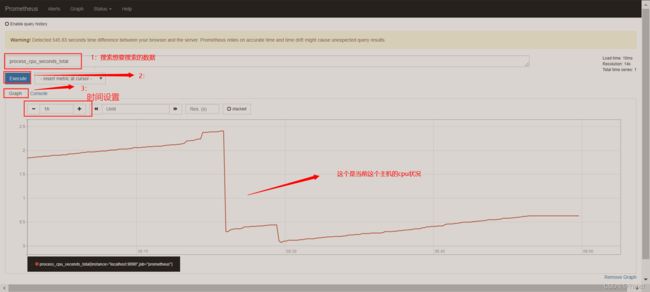
4.2 查看监控的数据
4.3 在web主界面可以通过关键字查询监控项
5 监控远程Linux主机
第一步:安装node组件
在远程linux主机(被监控端agent1)上安装node_exporter组件。其主要作用就是帮助Prometheus收集数据
官方下载地址: https://prometheus.io/download/
链接:https://pan.baidu.com/s/1ABbfa2VuPLYM_KabYMSeJQ
提取码:2g1f
第一步:将下载的node上传到想要收集的Linux机器上
收集每一种信息想要不同的node组件
第二步:解压到对应的目录中

实际操作(一般是解压到usr/local目录下,我这个是解压过了,就步修改了)
[root@localhost ~]# mv node_exporter-0.16.0.linux-amd64.tar.gz /opt/
[root@localhost ~]#
[root@localhost opt]# tar -zxvf node_exporter-0.16.0.linux-amd64.tar.gz
node_exporter-0.16.0.linux-amd64/
node_exporter-0.16.0.linux-amd64/LICENSE
node_exporter-0.16.0.linux-amd64/node_exporter
node_exporter-0.16.0.linux-amd64/NOTICE
[root@localhost opt]# ls
apache-maven-3.5.4                   kibana-7.6.1-linux-x86_64
apache-maven-3.5.4-bin.tar.gz        maven
containerd                           node_exporter-0.16.0.linux-amd64
elasticsearch-7.6.1                  node_exporter-0.16.0.linux-amd64.tar.gz
elasticsearch-analysis-ik-7.4.0      prometheus
elasticsearch-analysis-ik-7.4.0.zip  rh
filebeat
[root@localhost opt]# mv node_exporter-0.16.0.linux-amd64 node_export
[root@localhost opt]# ls
apache-maven-3.5.4                   kibana-7.6.1-linux-x86_64
apache-maven-3.5.4-bin.tar.gz        maven
containerd                           node_export
elasticsearch-7.6.1                  node_exporter-0.16.0.linux-amd64.tar.gz
elasticsearch-analysis-ik-7.4.0      prometheus
elasticsearch-analysis-ik-7.4.0.zip  rh
filebeat
[root@localhost opt]# cd node_export/
[root@localhost node_export]# ls
LICENSE  node_exporter  NOTICE
[root@localhost node_export]#
第三步:在安装目录下运行node_exporter,收集Linux主机信息
nohup ./node_exporter &
nohup:代表会永久的运行下去,除非我们将其停止
第四步:查看是否运行,通过端口查看:lsof -i:9100
lsof -i:9100
执行流程
[root@localhost node_export]# nohup ./node_exporter &
[1] 67601
[root@localhost node_export]# nohup: 忽略输入并把输出追加到"nohup.out"

[root@localhost node_export]# lsof -i:9100
COMMAND     PID USER   FD   TYPE DEVICE SIZE/OFF NODE NAME
node_expo 67601 root    3u  IPv6 629243      0t0  TCP *:jetdirect (LISTEN)
[root@localhost node_export]#
第五步:通过浏览器访问http://被监控端IP:9100/metrics就可以查看到node_exporter在被监控端收集的监控信息
第二步:修改配置信息
第一步中,安装了node_exporter,只是安装,并没有使Prometheus收集到这些信息

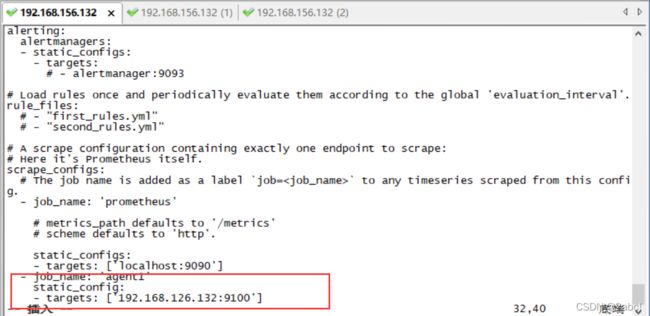
回到prometheus服务器的配置文件里添加被监控机器的配置段,在配置文件的最后添加如下内容
  - job_name: 'agent1'
    static_config:
    - targets: ['192.168.126.132:9100']
第三步:重启服务
[root@localhost prometheus-2.6.1.linux-amd64]# pkill prometheus
[root@localhost prometheus-2.6.1.linux-amd64]# level=warn ts=2022-02-08T09:35:14.287987247Z caller=main.go:405 msg="Received SIGTERM, exiting gracefully..."
level=info ts=2022-02-08T09:35:14.288075426Z caller=main.go:430 msg="Stopping scrape discovery manager..."
level=info ts=2022-02-08T09:35:14.288098231Z caller=main.go:444 msg="Stopping notify discovery manager..."
level=info ts=2022-02-08T09:35:14.288105588Z caller=main.go:466 msg="Stopping scrape manager..."
level=info ts=2022-02-08T09:35:14.288130775Z caller=main.go:440 msg="Notify discovery manager stopped"
level=info ts=2022-02-08T09:35:14.288115221Z caller=main.go:426 msg="Scrape discovery manager stopped"
level=info ts=2022-02-08T09:35:14.288145369Z caller=manager.go:664 component="rule manager" msg="Stopping rule manager..."
level=info ts=2022-02-08T09:35:14.288154592Z caller=manager.go:670 component="rule manager" msg="Rule manager stopped"
level=info ts=2022-02-08T09:35:14.288156181Z caller=main.go:460 msg="Scrape manager stopped"
level=info ts=2022-02-08T09:35:14.28898856Z caller=notifier.go:521 component=notifier msg="Stopping notification manager..."
level=info ts=2022-02-08T09:35:14.289016013Z caller=main.go:615 msg="Notifier manager stopped"
level=info ts=2022-02-08T09:35:14.289145291Z caller=main.go:627 msg="See you next time!"

[1]+  完成                  ./prometheus --config.file=prometheus.yml
确认端口没有进程占用
[root@localhost prometheus-2.6.1.linux-amd64]# lsof -i:9090
[root@localhost prometheus-2.6.1.linux-amd64]#
启动Prometheus
[root@localhost prometheus-2.6.1.linux-amd64]# ./prometheus --config.file=prometheus.yml &
[1] 67831
[root@localhost prometheus-2.6.1.linux-amd64]# level=info ts=2022-02-08T09:37:47.345266924Z caller=main.go:243 msg="Starting Prometheus" version="(version=2.6.1, branch=HEAD, revision=b639fe140c1f71b2cbad3fc322b17efe60839e7e)"
level=info ts=2022-02-08T09:37:47.345336859Z caller=main.go:244 build_context="(go=go1.11.4, user=root@4c0e286fe2b3, date=20190115-19:12:04)"
level=info ts=2022-02-08T09:37:47.345351432Z caller=main.go:245 host_details="(Linux 3.10.0-1160.49.1.el7.x86_64 #1 SMP Tue Nov 30 15:51:32 UTC 2021 x86_64 localhost.localdomain (none))"
level=info ts=2022-02-08T09:37:47.345366609Z caller=main.go:246 fd_limits="(soft=1024, hard=4096)"
level=info ts=2022-02-08T09:37:47.345390694Z caller=main.go:247 vm_limits="(soft=unlimited, hard=unlimited)"
level=info ts=2022-02-08T09:37:47.345997993Z caller=main.go:561 msg="Starting TSDB ..."
level=info ts=2022-02-08T09:37:47.346270607Z caller=repair.go:48 component=tsdb msg="found healthy block" mint=1644301801123 maxt=1644307200000 ulid=01FVCAP8H8Y7N29REN56N45P92
level=info ts=2022-02-08T09:37:47.347426319Z caller=web.go:429 component=web msg="Start listening for connections" address=0.0.0.0:9090
level=info ts=2022-02-08T09:37:47.386462493Z caller=main.go:571 msg="TSDB started"
level=info ts=2022-02-08T09:37:47.386517841Z caller=main.go:631 msg="Loading configuration file" filename=prometheus.yml
level=info ts=2022-02-08T09:37:47.387938336Z caller=main.go:657 msg="Completed loading of configuration file" filename=prometheus.yml
level=info ts=2022-02-08T09:37:47.387957157Z caller=main.go:530 msg="Server is ready to receive web requests."
认端口被占用,说明重启成功
[root@localhost prometheus-2.6.1.linux-amd64]# lsof -i:9090
COMMAND     PID USER   FD   TYPE DEVICE SIZE/OFF NODE NAME
prometheu 67831 root    6u  IPv6 633287      0t0  TCP *:websm (LISTEN)
prometheu 67831 root    7u  IPv4 633289      0t0  TCP localhost:60874->localhost:websm (ESTABLISHED)
prometheu 67831 root    8u  IPv6 634116      0t0  TCP localhost:websm->localhost:60874 (ESTABLISHED)
[root@localhost prometheus-2.6.1.linux-amd64]#
第五步:查看是否多了一台监控目标
回到web管理界面 --》点Status --》点Targets --》可以看到多了一台监控目标
额,我这个是在配置信息的时候,地址写错了,这里便不改了,各位注意就是了

6 监控其他服务服务
流程与5差不多,就是想要安装不同的node,总结根据需求进行安装即可


