GFS(GlusterFS)分布式文件系统的构建
目录
- 一:GlusterFS概述
-
- 1.1:GlusterFS简介
- 1.2:GlusterFS特点
- 1.3:常用术语
- 1.4:模块化堆栈式的结构
- 二:GlusterFS工作原理及流程
-
- 2.1:工作原理
- 2.2:工作流程
- 三:GlusterFS卷的类型及卷的创建方式
-
- 3.1:分布式卷
- 3.2:条带卷
- 3.3:复制卷
- 3.4:分布式条带卷
- 3.5:分布式复制卷
- 3.6:其它类型的卷
- 四:GFS平台部署
-
- 4.1:环境准备
- 4.2:将添加的磁盘进行分区给实话并挂载
- 4.3:防火墙设置和GFS集群设置
- 4.4:设置共享目录
- 4.5:建立连接
- 4.6:部署yum本地源
- 4.7:部署GlusterFS
- 五:创建卷,并测试
-
- 5.1:创建卷
- 5.2:查看卷的状态
- 5.3:客户端配置
- 5.4:测试实验
- 5.5:删除卷
一:GlusterFS概述
1.1:GlusterFS简介
- 开源的分布式文件系统
- 有存储服务器,客户端以及NFS/Smaba存储网关组成
- 无元数据服务器

1.2:GlusterFS特点
- 扩展性和高性能
- 高可用性
- 全局统一命名空间
- 弹性卷管理
- 基于标准协议
1.3:常用术语
- Brick:GFS中的存储单元,通过一个受信存储池中的服务器的一个导出目录.可以通过主机名和目录名来识别,如’SERVER:EXPORT’
- Volime :卷
- FUSE:内核文件系统,Filesystem Userpace是一个可加载的内核模块,其支持非特权用户创建自己的文件系统而不需要修改内核代码.通过在用户空间运行文件系统的代码通过FUSE代码与内核进行桥接
- Gluseterd:Gluster management daemon,要在teusted storage pool中所有的服务器上运行
1.4:模块化堆栈式的结构
- 模块化,堆栈式的结构
- 通过对模块的组合,实现复杂的功能d

二:GlusterFS工作原理及流程
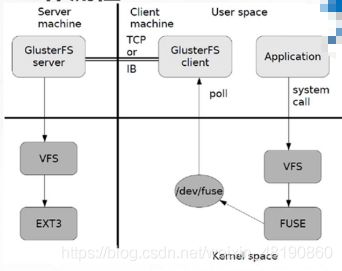
2.1:工作原理
- 客户端或应用程序通过GlusterFS的挂载点访问数据
- Linux系统内核通过VFS API收到请求并处理
- VFS将数据递交给FUSE内核文件系统,FUSE文件系统则是将数据通过/dev/fuse设备文件递交给了GlusterFS client短
- GlusterFS client 收到数据后,client根据配置文件的配置对数据进行处理
- 通过网络将数据传递至远端的GlusterFS Server,并且将数据写入到服务器存储设备上
2.2:工作流程
- 弹性HASH算法
-
通过HASH算法得到一个32位的整数
-
划分为N个连续的子空间,每个空间对应一个Brick
-
弹性HASA算法的优点
- 保证数据平均分布在每一个Brick
- 解决了对元数据服务器的依赖,进而解决了单点故障以及访问瓶颈
三:GlusterFS卷的类型及卷的创建方式
3.1:分布式卷
-
没有对文件进行分块处理
-
通过扩展文件属性保存HASH值
-
支持的底层文件系统有EXT3、EXT、ZFS、XFS等
-
分布式卷的特点
- 文件分布在不同的服务器,不具备冗余性
- 更容易和廉价地扩展卷的大小
- 单点故障回造成数据丢失
- 依赖底层的数据保护
-
创建分布式卷
gluster volume create dis-volume server1:/dir1 server2:/dir2
3.2:条带卷
-
根据偏移量将文件分成N快(N个条带节点),轮询的存储在每个Brick Server节点
-
存储大文件时,性能尤为突出
-
不具备冗余性,类似RAID0
-
条带卷的特点
- 数据被分割成更小块分布到快服务器群中的不同条带区
- 分布减少了负载且更小的文件加速了存取速度
- 没有数据冗余
-
创建条带卷
gluster volume create stripe-volume stripe 2 transport tcp server1:/dir1 server2:/dir2
3.3:复制卷
-
同一文件保存一份或多份
-
因为要保存副本,所以磁盘利用率较低
-
若干个节点上的存储空间不一致,将按照木桶效应取低节点的容量作为该卷的总容量
-
复制卷的特点
- 卷中所有的服务器均保存一个完整的副本
- 卷的副本数量可由客户创建的时候决定
- 至少有两个快服务器或更多服务器
-
创建复制卷
gluster volume create rep-volume replica 2 transport tcp server1:/dir1 server2:/dir2
3.4:分布式条带卷
- 兼顾分布式卷和条带卷的功能
- 主要用于大文件访问处理
- 至少最少需要4台服务器
- 创建分布式条带卷
gluster volume create dis-stripe 2 transport tcp server1:/dir1 server2:/dir2 server3:/dir3 server4:/dir4
3.5:分布式复制卷
- 兼顾分布式卷和复制卷的功能
- 用于需要冗余的情况
- 创建分布式复制卷
gluster volume create dis-rep replica 2 transport tcp server1:/dir1 server2:/dir2 server3:/dir3 server4:/dir4
3.6:其它类型的卷
- 条带复制卷
- 分布式条带复制卷
四:GFS平台部署
4.1:环境准备
- VMware软件
- 四台centos7虚拟机,IP地址分别为:20.0.0.111;112;113;114,主机名为:node1;node2;node3;node4,分别添加4块大小位20G的磁盘。
- 一台centos7虚拟机,IP地址为:20.0.0.115,主机名为:client,当做测试机使用
4.2:将添加的磁盘进行分区给实话并挂载
- 创建磁盘分区,以node1为例
[root@node1 ~]# fdisk -l	'//查看磁盘是否添加成功'
[root@node1 ~]# fdisk /dev/sdb
欢迎使用 fdisk (util-linux 2.23.2)。

更改将停留在内存中,直到您决定将更改写入磁盘。
使用写入命令前请三思。

Device does not contain a recognized partition table
使用磁盘标识符 0x5fae534e 创建新的 DOS 磁盘标签。

命令(输入 m 获取帮助):n	'//创建分区'
Partition type:
   p   primary (0 primary, 0 extended, 4 free)
   e   extended
Select (default p): p	'//创建主分区'
分区号 (1-4,默认 1):	'//回车,默认分区号'
起始 扇区 (2048-6291455,默认为 2048):	'//回车,默认扇区大小'
将使用默认值 2048
Last 扇区, +扇区 or +size{K,M,G} (2048-6291455,默认为 6291455):	'//回车,默认主分区大小'
将使用默认值 6291455
分区 1 已设置为 Linux 类型,大小设为 20 GiB

命令(输入 m 获取帮助):w	'//保存分区信息'
The partition table has been altered!

Calling ioctl() to re-read partition table.
正在同步磁盘。
[root@node1 ~]# ll /dev/ | grep sd	'//查看刚刚格式化的磁盘是否成功/dev/sdb1,/dev/sdc1,/dev/sdd1,/dev/sde1'
'//刚刚fdisk -l查看,有/dev/sdb,/dev/sdc,/dev/sdd,/dev/sde四个磁盘,用相同方法格式化其他的磁盘和其他node主机的磁盘'
- 格式化磁盘
[root@node1 ~]# mkfs -t xfs /dev/sdb1	'//格式化分区'
[root@node1 ~]# mkfs -t xfs /dev/sdc1
[root@node1 ~]# mkfs -t xfs /dev/sdd1
[root@node1 ~]# mkfs -t xfs /dev/sde1
- 创建挂载点进行挂载
[root@node1 ~]# mkdir /b3 /c4 /d5 /e6
[root@node1 ~]# vim /etc/fstab 	'//末行添加下方四个自动挂载信息'
/dev/sdb1       /b3                             xfs    defaults        0 0
/dev/sdc1       /c4                             xfs    defaults        0 0
/dev/sdd1       /d5                             xfs    defaults        0 0
/dev/sde1       /e6                             xfs    defaults        0 0
- 重启服务器,查看挂载情况
[root@node1 ~]# reboot
[root@node1 ~]# df -Th  ###查看磁盘挂载情况
/dev/sdb1               xfs        20G   33M   20G   1% /data/sdb1
/dev/sdc1               xfs        20G   33M   20G   1% /data/sdc1
/dev/sdd1               xfs        20G   33M   20G   1% /data/sdd1
/dev/sde1               xfs        20G   33M   20G   1% /data/sde1
4.3:防火墙设置和GFS集群设置
- 以node1为例
[root@node1 ~]# systemctl stop firewalld.service 	'//关闭防火墙'
[root@node1 ~]# systemctl disable firewalld.service 	'//取消开启自启'
Removed symlink /etc/systemd/system/multi-user.target.wants/firewalld.service.
Removed symlink /etc/systemd/system/dbus-org.fedoraproject.FirewallD1.service.
[root@node1 ~]# setenforce 0	'//关闭核心防护'
[root@node1 ~]# vim /etc/selinux/config
SELINUX=disabled	'//修改为disabled'
- 修改本地域名解析文件
[root@node1 ~]# vi /etc/hosts
20.0.0.111   node1	'//尾行添加如下内容'
20.0.0.112   node2
20.0.0.113   node3
20.0.0.114   node4
4.4:设置共享目录


4.5:建立连接
[root@node1 ~]# smbclient -L //20.0.0.1
Enter SAMBA\root's password:

	Sharename       Type      Comment
	---------       ----      -------
	ADMIN$          Disk      远程管理
	C$              Disk      默认共享
	D$              Disk      默认共享
	IPC$            IPC       远程 IPC
	Users           Disk
	[root@node1 ~]# mkdir /abc   ###创建挂载目录
    [root@node1 ~]# mount.cifs //20.0.0.1/gfsrepo  /abc    ###挂载
4.6:部署yum本地源
#########五台虚拟机一样########
root@node1 chen]# cd /etc/yum.repos.d/                     ###进入到etc/yum.repos.d/ 目录里
[root@node1 yum.repos.d]# mv CentOs-*  bak/   ###把CentOs*放到bak目录里
[root@node1 yum.repos.d]# vim glfs.repo
[GLFS]
name=glfs
baseurl=file:///abc
gpgcheck=0
enabled=1
[root@node1 yum.repos.d]# yum clean all         ###清除缓存
[root@node1 yum.repos.d]# yum list                 ###重新加载
4.7:部署GlusterFS
#####服务器需要安装####
[root@node1 ~]# yum -y install glusterfs glusterfs-server glusterfs-fuse glusterfs-rdma

[root@node1 yum.repos.d]# systemctl start glusterd.service    ###启动服务
[root@node1 yum.repos.d]# systemctl enable glusterd             ###开机自启
[root@node1 yum.repos.d]# systemctl status  glusterd             ###查看状态
[root@node1 yum.repos.d]# ntpdate ntp1.aliyun.com ##时间同步
- 添加信任储存池,只需要在一台服务器上做就可以了
[root@node1 yum.repos.d]# gluster peer probe node3
peer probe: success.
[root@node1 yum.repos.d]# gluster peer probe node4
peer probe: success.
[root@node1 yum.repos.d]# gluster peer probe node2
peer probe: success.

[root@node1 yum.repos.d]# gluster peer status  ##查看池子状态
Number of Peers: 3

Hostname: node2
Uuid: 63f568a6-9f1a-47f7-8667-0893186ef99e
State: Peer in Cluster (Connected)

Hostname: node3
Uuid: b69de245-b692-46bc-8848-8db471f304b8
State: Peer in Cluster (Connected)

Hostname: node4
Uuid: 9f0decde-ba47-4537-a0f0-50464962d182
State: Peer in Cluster (Connected)
五:创建卷,并测试
5.1:创建卷
- 创建分布式卷
[root@node4 yum.repos.d]# gluster volume create dis-vol node1:/data/sdb1 node2:/data/sdb1 force  ###创建分布式卷,卷名叫dis-vol,用了node1:/data/sdb1和node2:/data/sdb1

[root@node4 yum.repos.d]# gluster volume info dis-vol    ###查看详细信息和状态
Volume Name: dis-vol          ###名称
Type: Distribute                     ###分布式卷的类型
Volume ID: 5b75e4bd-d830-4e3f-9714-456261c276be  ###id,独一无二的
Status: Created                      ###Created(创建)状态不能使用
Snapshot Count: 0
Xlator 1: BD
Capability 1: thin
Capability 2: offload_copy
Capability 3: offload_snapshot
Number of Bricks: 2               ###两个块组成
Transport-type: tcp                ###tcp协议
Bricks:
Brick1: node1:/data/sdb1      ###node1的sdb1
Brick1 VG:
Brick2: node2:/data/sdb1      ###node2的sbd1
Brick2 VG:
Options Reconfigured:
transport.address-family: inet
nfs.disable: on

[root@node4 yum.repos.d]# gluster volume start dis-vol      ###开启
[root@node4 yum.repos.d]# gluster volume info dis-vol       ###再用这条查看状态就是Started
- 创建条带卷
[root@node4 yum.repos.d]# gluster volume create stripe-vol stripe 2 node1:/data/sdc1 node2:/data/sdc1 force   ##创建条带卷
[root@node4 yum.repos.d]# gluster volume start stripe-vol    ###开启条带卷
- 创建复制卷
[root@node4 yum.repos.d]# gluster volume create rep-vol replica 2 node3:/data/sdb1 node4:/data/sdb1 force
yum.repos.d]# gluster volume start rep-vol     ###开启
- 创建分布式条带卷
[root@node4 yum.repos.d]# gluster volume create dis-stripe stripe 2 node1:/data/sdd1 node2:/data/sdd1 node3:/data/sdd1 node4:/data/sdd1 force

[root@node4 yum.repos.d]# gluster volume start dis-stripe     ###开启
- 创建分布式复卷
[root@node4 yum.repos.d]# gluster volume create dis-rep replica 2 node1:/data/sde1 node2:/data/sde1 node3:/data/sde1 node4:/data/sde1 force

[root@node4 yum.repos.d]# gluster volume start  dis-rep     ###开启
5.2:查看卷的状态
[root@node4 yum.repos.d]# gluster volume  list
dis-rep
dis-stripe
dis-vol
rep-vol
stripe-vol
5.3:客户端配置
[root@client yum.repos.d]# yum -y install glusterfs glusterfs-fuse

创建五个挂载目录,并且挂载
ot@client yum.repos.d]# mkdir -p /test/dis         ### 挂载分布式卷
[root@client yum.repos.d]# mount.glusterfs node1:dis-vol /test/dis/

[root@client yum.repos.d]# mkdir -p /test/stripe
[root@client yum.repos.d]# mount.glusterfs node1:stripe-vol /test/stripe/    ### 挂载条带卷

[root@client yum.repos.d]# mkdir -p /test/rep
[root@client yum.repos.d]# mount.glusterfs node1:rep-vol /test/rep/    ### 挂载复制卷

[root@client yum.repos.d]# mkdir -p /test/dis-stripe
[root@client yum.repos.d]# mount.glusterfs node1:dis-stripe /test/dis-stripe/   ### 挂载分布条带卷

[root@client yum.repos.d]# mkdir -p /test/dis-rep
[root@client yum.repos.d]# mount.glusterfs node1:dis-rep /test/dis-rep/    ###

[root@master ~]# df -Th   ##挂载情况
Filesystem              Type            Size  Used Avail Use% Mounted on
/dev/mapper/centos-root xfs             291G  4.2G  287G   2% /
devtmpfs                devtmpfs        1.9G     0  1.9G   0% /dev
tmpfs                   tmpfs           1.9G     0  1.9G   0% /dev/shm
tmpfs                   tmpfs           1.9G   13M  1.9G   1% /run
tmpfs                   tmpfs           1.9G     0  1.9G   0% /sys/fs/cgroup
/dev/sde1               xfs              20G   33M   20G   1% /data/sde1
/dev/sdd1               xfs              20G   33M   20G   1% /data/sdd1
/dev/sdc1               xfs              20G   33M   20G   1% /data/sdc1
/dev/sdb1               xfs              20G   33M   20G   1% /data/sdb1
/dev/sda1               xfs            1014M  179M  836M  18% /boot
tmpfs                   tmpfs           378M     0  378M   0% /run/user/0
tmpfs                   tmpfs           378M   12K  378M   1% /run/user/42
//192.168.100.2/chen    cifs            477G  395M  477G   1% /root/chen
node1:dis-vol           fuse.glusterfs   40G  265M   40G   1% /test/dis
node1:stripe-vol        fuse.glusterfs   40G  265M   40G   1% /test/stripe
node1:rep-vol           fuse.glusterfs   20G  233M   20G   2% /test/rep
node1:dis-stripe        fuse.glusterfs   80G  330M   80G   1% /test/dis-stripe
node1:dis-rep           fuse.glusterfs   40G  265M   40G   1% /test/dis-rep
5.4:测试实验
- 创建5个50M的文件
[root@client yum.repos.d]# dd if=/dev/zero of=/demo1.log bs=1M count=50
[root@client yum.repos.d]# dd if=/dev/zero of=/demo2.log bs=1M count=50
[root@client yum.repos.d]# dd if=/dev/zero of=/demo3.log bs=1M count=50
[root@client yum.repos.d]# dd if=/dev/zero of=/demo4.log bs=1M count=50
[root@client yum.repos.d]# dd if=/dev/zero of=/demo5.log bs=1M count=50
- 将创建的文件复制到5个共享目录中
[root@client yum.repos.d]# cp /demo* /test/dis
[root@client yum.repos.d]# cp /demo* /test/stripe/
[root@client yum.repos.d]# cp /demo* /test/rep/
[root@client yum.repos.d]# cp /demo* /test/dis-stripe/
[root@client yum.repos.d]# cp /demo* /test/dis-rep/
- 查看卷
[root@node1 yum.repos.d]# ls -h +磁盘
例子

   ##########查看分布式卷#########
[root@node1 ~]# ls -lh /data/sdb1/
total 160M
-rw-r--r-- 2 root root 40M Oct 27 21:29 demo1.log
-rw-r--r-- 2 root root 40M Oct 27 21:29 demo2.log
-rw-r--r-- 2 root root 40M Oct 27 21:29 demo3.log
-rw-r--r-- 2 root root 40M Oct 27 21:29 demo4.log

[root@node2 yum.repos.d]# ls -lh /data/sdb1/
total 40M
-rw-r--r-- 2 root root 40M Oct 27 21:29 demo5.log

      ######查看条带卷####
[root@node1 ~]# ls -lh /data/sdc1/
total 100M
-rw-r--r-- 2 root root 20M Oct 27 21:29 demo1.log
-rw-r--r-- 2 root root 20M Oct 27 21:29 demo2.log
-rw-r--r-- 2 root root 20M Oct 27 21:29 demo3.log
-rw-r--r-- 2 root root 20M Oct 27 21:29 demo4.log
-rw-r--r-- 2 root root 20M Oct 27 21:29 demo5.log

[root@node2 ~]# ls -lh /data/sdc1/
total 100M
-rw-r--r-- 2 root root 20M Oct 27 21:29 demo1.log
-rw-r--r-- 2 root root 20M Oct 27 21:29 demo2.log
-rw-r--r-- 2 root root 20M Oct 27 21:29 demo3.log
-rw-r--r-- 2 root root 20M Oct 27 21:29 demo4.log
-rw-r--r-- 2 root root 20M Oct 27 21:29 demo5.log

      ###查看复制卷###
  [root@node4 ~]# ls -lh /data/sdb1/
total 200M
-rw-r--r-- 2 root root 40M Oct 27 21:29 demo1.log
-rw-r--r-- 2 root root 40M Oct 27 21:29 demo2.log
-rw-r--r-- 2 root root 40M Oct 27 21:29 demo3.log
-rw-r--r-- 2 root root 40M Oct 27 21:29 demo4.log
-rw-r--r-- 2 root root 40M Oct 27 21:29 demo5.log

[root@node3 ~]# ls -lh /data/sdb1/
total 200M
-rw-r--r-- 2 root root 40M Oct 27 09:29 demo1.log
-rw-r--r-- 2 root root 40M Oct 27 09:29 demo2.log
-rw-r--r-- 2 root root 40M Oct 27 09:29 demo3.log
-rw-r--r-- 2 root root 40M Oct 27 09:29 demo4.log
-rw-r--r-- 2 root root 40M Oct 27 09:29 demo5.log
#####查看分布式条带卷#####
[root@node1 ~]# ls -lh /data/sdd1/
total 80M
-rw-r--r-- 2 root root 20M Oct 27 21:29 demo1.log
-rw-r--r-- 2 root root 20M Oct 27 21:29 demo2.log
-rw-r--r-- 2 root root 20M Oct 27 21:29 demo3.log
-rw-r--r-- 2 root root 20M Oct 27 21:29 demo4.log

[root@node2 ~]# ls -lh /data/sdd1/
total 80M
-rw-r--r-- 2 root root 20M Oct 27 21:29 demo1.log
-rw-r--r-- 2 root root 20M Oct 27 21:29 demo2.log
-rw-r--r-- 2 root root 20M Oct 27 21:29 demo3.log
-rw-r--r-- 2 root root 20M Oct 27 21:29 demo4.log

[root@node3 ~]# ls -lh /data/sdd1/
total 20M
-rw-r--r-- 2 root root 20M Oct 27 09:29 demo5.log

[root@node4 ~]# ls -lh /data/sdd1/
total 20M
-rw-r--r-- 2 root root 20M Oct 27 21:29 demo5.log

     #######分布式复制卷#####
[root@node1 ~]# ls -lh /data/sde1/
total 160M
-rw-r--r-- 2 root root 40M Oct 27 21:29 demo1.log
-rw-r--r-- 2 root root 40M Oct 27 21:29 demo2.log
-rw-r--r-- 2 root root 40M Oct 27 21:29 demo3.log
-rw-r--r-- 2 root root 40M Oct 27 21:29 demo4.log

[root@node2 ~]# ls -lh /data/sde1/
total 160M
-rw-r--r-- 2 root root 40M Oct 27 21:29 demo1.log
-rw-r--r-- 2 root root 40M Oct 27 21:29 demo2.log
-rw-r--r-- 2 root root 40M Oct 27 21:29 demo3.log
-rw-r--r-- 2 root root 40M Oct 27 21:29 demo4.log

[root@node3 ~]# ls -lh /data/sde1/
total 40M
-rw-r--r-- 2 root root 40M Oct 27 09:29 demo5.log

 [root@node4 ~]# ls -lh /data/sde1/
total 40M
-rw-r--r-- 2 root root 40M Oct 27 21:29 demo5.log
-
做破坏实验
- 关闭服务器一
- 进入客户端查看
[root@master test]# ll
ls: cannot access stripe: Transport endpoint is not connected
total 16
drwxr-xr-x. 3 root root 4096 Oct 27 21:29 dis
drwxr-xr-x. 3 root root 4096 Oct 27 21:29 dis-rep
drwxr-xr-x. 3 root root 4096 Oct 27 21:29 dis-stripe
drwxr-xr-x. 3 root root 4096 Oct 27 21:29 rep
d?????????? ? ?    ?       ?            ? stripe
- 可以看到分布式卷挂掉了
- 再关闭服务器三
[root@master test]# ll
ls: cannot access stripe: Transport endpoint is not connected
ls: cannot access dis-stripe: Transport endpoint is not connected
total 12
drwxr-xr-x. 3 root root 4096 Oct 27 21:29 dis
drwxr-xr-x. 3 root root 4096 Oct 27 21:29 dis-rep
d?????????? ? ?    ?       ?            ? dis-stripe
drwxr-xr-x. 3 root root 4096 Oct 27 21:29 rep
d?????????? ? ?    ?       ?            ? stripe
- 分布式卷和条带卷都挂掉了
注意:删除卷时,信任池中不能有主机处于拓机状态,否则删除不成功(只有关闭状态才能删除)
5.5:删除卷
[root@node3 yum.repos.d]# gluster volume stop 卷名 ###要先关闭卷
Stopping volume will make its data inaccessible. Do you want to continue? (y/n) ####填y
volume stop: rep-vol: success
[root@node3 yum.repos.d]# gluster volume delete 卷名 ##删除卷
Deleting volume will erase all information about the volume. Do you want to continue?(y/n) ###填写y
volume delete: rep-vol: success
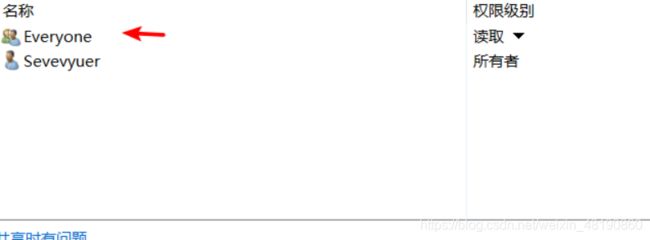
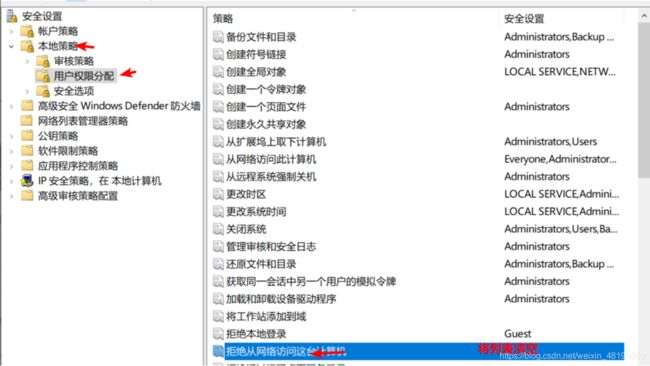
## 4.9 访问控制
```bash
[root@node1 yum.repos.d]# gluster volume set dis-vol auth.reject IP地址 ###拒绝IP用户
volume set: success
[root@node1 yum.repos.d]# gluster volume set dis-vol auth.allow IP地址 ##允许IP用户
volume set: success