SpringBoot 学习笔记(十)Spring Security 安全框架
一、什么是Spring Security?
Spring Security致力于为Java应用提供核心功能认证和授权管理,其核心就是一组过滤器链,项目启动后会自动配置。
简单来说,Spring Security就是通过过滤器来验证你是谁,你是什么身份,然后给予相应的授权,让你能够干某些事。
二、SpringSecurity使用
1、入门项目
- 创建项目,并添加web和security的依赖
建议在创建项目时直接添加,而不是后面在pom.xml中添加
        <dependency>
            <groupId>org.springframework.boot</groupId>
            <artifactId>spring-boot-starter-security</artifactId>
        </dependency>
        <dependency>
            <groupId>org.springframework.boot</groupId>
            <artifactId>spring-boot-starter-web</artifactId>
        </dependency>
- 添加控制器
package com.example.demo3springsecurity.controller;
import org.springframework.web.bind.annotation.RequestMapping;
import org.springframework.web.bind.annotation.RestController;
@RestController
public class HelloController {
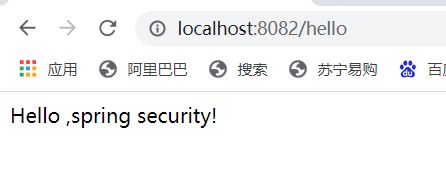
@RequestMapping("/hello")
public String home() {
return "Hello ,spring security!";
}
}
- 测试
在浏览器中访问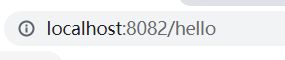
然后就会弹出
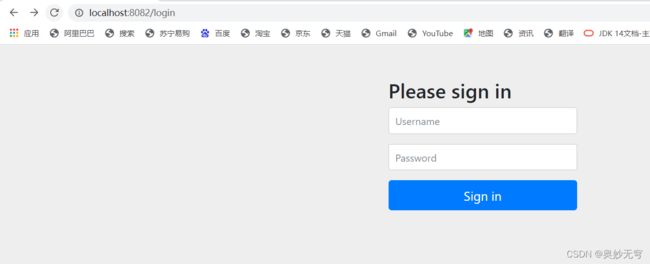
说明security生效
默认用户名是user
SpringSecurity启动时会自动生成默认密码,在IDEA的控制台里可以看到

输入用户名和密码即可成功访问
2、角色访问控制
我们设置两个角色,admin可以访问所有接口,而user只能访问一部分接口
- 设置两个角色的资源
UserController类
package com.example.demo3springsecurity.controller;

import org.springframework.web.bind.annotation.RequestMapping;
import org.springframework.web.bind.annotation.RestController;

@RestController
public class UserController {
    @RequestMapping("/user/hello")
    public String hello() {
        return "user,Hello !";
    }
}
AdminController类
package com.example.demo3springsecurity.controller;

import org.springframework.web.bind.annotation.RequestMapping;
import org.springframework.web.bind.annotation.RestController;

@RestController
public class AdminController {
    @RequestMapping("/admin/hello")
    public String hello() {
        return "admin,Hello !";
    }
}
- 配置两个角色
本来用户和角色是保存在数据库中的,这里只是单纯地创建了两个存放于内存的用户和角色
创建config目录,并创建SecurityConfig类
package com.example.demo3springsecurity.config;

import org.springframework.context.annotation.Bean;
import org.springframework.context.annotation.Configuration;
import org.springframework.security.config.annotation.authentication.builders.AuthenticationManagerBuilder;
import org.springframework.security.config.annotation.web.builders.HttpSecurity;
import org.springframework.security.config.annotation.web.configuration.WebSecurityConfigurerAdapter;
import org.springframework.security.crypto.password.NoOpPasswordEncoder;
import org.springframework.security.crypto.password.PasswordEncoder;

@Configuration
public class SecurityConfig extends WebSecurityConfigurerAdapter {
    /*不对密码进行加密*/
    @Bean
    PasswordEncoder passwordEncoder(){
        return NoOpPasswordEncoder.getInstance();
    }
    @Override
    protected void configure(AuthenticationManagerBuilder auth) throws Exception {
        auth.inMemoryAuthentication()
                /*管理员用户  具备ADMIN和USER角色*/
                .withUser("admin").password("admin").roles("ADMIN", "USER")
                .and()
                /*普通用户*/
                .withUser("aoxiu").password("aoxiu").roles("USER");
    }
    @Override
    protected void configure(HttpSecurity http) throws Exception {
        http
                .authorizeRequests()
                /*普通用户访问的url*/
                .antMatchers("/user/**").hasRole("USER")
                /*管理员用户访问的url*/
                .antMatchers("/admin/**").hasRole("ADMIN")
                .anyRequest().authenticated() //其他多有路径都必须认证
                .and()
                .formLogin()
                .loginProcessingUrl("/login")
                .permitAll()  //访问“/login”接口不需要进行身份认证了,防止重定向死循环
                .and()
                .csrf().disable(); //关闭csrf
    }
}
然后就可以发现,若要访问admin/hello,用户名和密码必须是admin才可以
若使用aoxiu这种用户的身份就会报错
三、基于数据库的认证
1、SpringSecurity基于数据库认证
-
创建项目,添加如下依赖

lombok用于使用注解替代getter、setter等方法

-
在application.yml文件中配置
spring:
  datasource:
    url: jdbc:mysql://localhost:3306/test?useUnicode=true&characterEncoding=UTF-8&serverTimezone=UTC
    username: root
    password: root
    driver-class-name: com.mysql.jdbc.Driver
logging:
  level:
    com.example.bdatabaserole.mapper: debug  #打印SQL语句
mybatis:
  mapper-locations: classpath:mappers/*.xml
  type-aliases-package: com.example.securitydatebase.mapper
server:
  port: 8082
- 创建实体类
UserInfo
package com.beixi.entity;

import lombok.Data;
import org.springframework.security.core.GrantedAuthority;
import org.springframework.security.core.authority.SimpleGrantedAuthority;
import org.springframework.security.core.userdetails.UserDetails;

import java.io.Serializable;
import java.util.ArrayList;
import java.util.Collection;
import java.util.List;

@Data   //lombok注解省略get/set等方法
public class UserInfo implements Serializable,UserDetails {
    private int id;

    private String username;
    private String password;
    private List<Role> roleList;

    @Override
    public Collection<? extends GrantedAuthority> getAuthorities() {
        Collection<GrantedAuthority> authorities = new ArrayList<>();
        for (Role role : roleList) {
            //数据库role表字段中是以ROLE_开头的,所以此处不必再加ROLE_
            authorities.add(new SimpleGrantedAuthority(role.getName()));
        }
        return authorities;
    }

    /**
     * 指示用户的账户是否已过期。无法验证过期的账户。
     * 如果用户的账户有效(即未过期),则返回true,如果不在有效就返回false
     */
    @Override
    public boolean isAccountNonExpired() {
        return true;
    }

    /**
     * 指示用户是锁定还是解锁。无法对锁定的用户进行身份验证。
     * 如果用户未被锁定,则返回true,否则返回false
     */
    @Override
    public boolean isAccountNonLocked() {
        return true;
    }

    /**
     * 指示用户的凭证(密码)是否已过期。过期的凭证阻止身份验证
     * 如果用户的凭证有效(即未过期),则返回true
     * 如果不在有效(即过期),则返回false
     */
    @Override
    public boolean isCredentialsNonExpired() {
        return true;
    }


    /**
     * 指示用户是启用还是禁用。无法对禁用的用户进行身份验证
     * 如果启用了用户,则返回true,否则返回false
     */
    @Override
    public boolean isEnabled() {
        return true;
    }
}
- 创建Mapper接口和Service层
UserMapper
package com.example.securitydatebase.mapper;

import com.example.securitydatebase.entity.UserInfo;
import org.apache.ibatis.annotations.Mapper;
import org.apache.ibatis.annotations.Select;
import org.springframework.stereotype.Repository;

@Mapper
@Repository
public interface UserMapper {
    @Select("select * from user where username = #{username}")
    UserInfo getUserByUsername(String username);

}
UserInfoService
package com.example.securitydatebase.service;

import com.example.securitydatebase.entity.UserInfo;
import com.example.securitydatebase.mapper.UserMapper;
import org.springframework.beans.factory.annotation.Autowired;
import org.springframework.stereotype.Service;

@Service
public class UserInfoService {
    @Autowired
    private UserMapper userMapper;

    public UserInfo getUserInfo(String username){
        return userMapper.getUserByUsername(username);
    }
}
- 创建Controller层
package com.example.securitydatebase.controller;

import com.example.securitydatebase.entity.UserInfo;
import com.example.securitydatebase.service.UserInfoService;
import org.springframework.beans.factory.annotation.Autowired;
import org.springframework.web.bind.annotation.*;

@RestController
public class UserController {
    @Autowired
    private UserInfoService userInfoService;

    @GetMapping("/getUser")
    public UserInfo getUser(@RequestParam String username){
        return userInfoService.getUserInfo(username);
    }

}
- 身份认证
CustomUserDetailsService
package com.example.securitydatebase.service;

import com.example.securitydatebase.entity.UserInfo;
import org.springframework.beans.factory.annotation.Autowired;
import org.springframework.security.core.GrantedAuthority;
import org.springframework.security.core.authority.SimpleGrantedAuthority;
import org.springframework.security.core.userdetails.User;
import org.springframework.security.core.userdetails.UserDetails;
import org.springframework.security.core.userdetails.UserDetailsService;
import org.springframework.security.core.userdetails.UsernameNotFoundException;
import org.springframework.security.crypto.password.PasswordEncoder;
import org.springframework.stereotype.Component;

import java.util.ArrayList;
import java.util.List;

@Component
public class CustomUserDetailsService implements UserDetailsService {
    @Autowired
    private UserInfoService userInfoService;

    /**
     * 需新建配置类注册一个指定的加密方式Bean,或在下一步Security配置类中注册指定
     */
    @Autowired
    private PasswordEncoder passwordEncoder;

    @Override
    public UserDetails loadUserByUsername(String username) throws UsernameNotFoundException {
        // 通过用户名从数据库获取用户信息
        UserInfo userInfo = userInfoService.getUserInfo(username);
        if (userInfo == null) {
            throw new UsernameNotFoundException("用户不存在");
        }
        //得到用户角色
        String role=userInfo.getRole();
        //角色集合
        List<GrantedAuthority> authorities=new ArrayList<>();
        //角色必须以“ROLE_”开头,如果数据中没有,则在这里添加
        authorities.add(new SimpleGrantedAuthority("ROLE_"+role));
        return new User(
            userInfo.getUsername(),
            //因为数据库是明文,所以这里需要加密密码
            passwordEncoder.encode(userInfo.getPassword()),
            authorities
        );
    }
}
- SpringSecurity配置
WebSecurityConfig
package com.example.securitydatebase.config;

import com.example.securitydatebase.service.CustomUserDetailsService;
import org.springframework.beans.factory.annotation.Autowired;
import org.springframework.context.annotation.Bean;
import org.springframework.context.annotation.Lazy;
import org.springframework.security.config.annotation.authentication.builders.AuthenticationManagerBuilder;
import org.springframework.security.config.annotation.web.configuration.EnableWebSecurity;
import org.springframework.security.config.annotation.web.configuration.WebSecurityConfigurerAdapter;
import org.springframework.security.crypto.bcrypt.BCryptPasswordEncoder;
import org.springframework.security.crypto.password.PasswordEncoder;

@EnableWebSecurity //是Spring Security用于启用Web安全的注解
public class WebSecurityConfig extends WebSecurityConfigurerAdapter {
    @Autowired
    @Lazy
    private CustomUserDetailsService userDatailService;

    /**
     * 指定加密方式
     */
    @Bean
    public PasswordEncoder passwordEncoder(){
        // 使用BCrypt加密密码
        return new BCryptPasswordEncoder();
    }

    @Override
    protected void configure(AuthenticationManagerBuilder auth) throws Exception {
        auth
            // 从数据库读取的用户进行身份认证
            .userDetailsService(userDatailService)
            .passwordEncoder(passwordEncoder());
    }
}
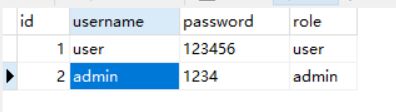
- 建立test数据库,建立user表
- 测试

注意这一段只是用于认证,但是还没有限制角色的访问
2、角色访问控制
-
开启访问权限,在WebSecurityConfig中添加@EnableGlobalMethodSecurity

prePostEnabled=true会解锁@PreAuthorize和@PostAuthorize两个注解,@preAuthorize注解会在方法执行前进行验证,而@PostAuthorize注解在方法执行后进行验证
是不是有点懵,没关系,看后面就懂了 -
在控制层添加访问接口
UserController类增加方法的访问权限
    @PreAuthorize("hasAnyRole('user')") // 只能user角色才能访问该方法
    @GetMapping("/user")
    public String user(){
        return "hello,user";
    }

    @PreAuthorize("hasAnyRole('admin')") // 只能admin角色才能访问该方法
    @GetMapping("/admin")
    public String admin(){
        return "hello,admin";
    }
PreAuthorize在执行前会首先验证是否user角色
- 测试
使用user登录时无法访问/admin,
使用admin界面时,无法访问/user
3、密码加密保护
- 修改Mapper接口
package com.example.securitydatebase.mapper;

import com.example.securitydatebase.entity.UserInfo;
import org.apache.ibatis.annotations.Insert;
import org.apache.ibatis.annotations.Mapper;
import org.apache.ibatis.annotations.Select;
import org.springframework.stereotype.Repository;

@Mapper
@Repository
public interface UserMapper {
    @Select("select * from user where username = #{username}")
    UserInfo getUserByUsername(String username);

    // 添加用户
    @Insert("insert into user(username, password) value(#{username}, #{password})")
    int insertUserInfo(UserInfo userInfo);
}
- 修改service类
package com.example.securitydatebase.service;

import com.example.securitydatebase.entity.UserInfo;
import com.example.securitydatebase.mapper.UserMapper;
import org.springframework.beans.factory.annotation.Autowired;
import org.springframework.security.crypto.password.PasswordEncoder;
import org.springframework.stereotype.Service;

@Service
public class UserInfoService {
    @Autowired
    private UserMapper userMapper;
    @Autowired
    private PasswordEncoder passwordEncoder;
    public int insertUser(UserInfo userInfo){
        // 加密密码
        userInfo.setPassword(passwordEncoder.encode(userInfo.getPassword()));
        return userMapper.insertUserInfo(userInfo);
    }

    public UserInfo getUserInfo(String username){
        return userMapper.getUserByUsername(username);
    }
}
- 修改controller
package com.example.securitydatebase.controller;

import com.example.securitydatebase.entity.UserInfo;
import com.example.securitydatebase.service.UserInfoService;
import org.springframework.beans.factory.annotation.Autowired;
import org.springframework.security.access.prepost.PreAuthorize;
import org.springframework.web.bind.annotation.*;

@RestController
public class UserController {
    @Autowired
    private UserInfoService userInfoService;

    //添加
    @PostMapping("/addUser")
    public int addUser(@RequestBody UserInfo userInfo){
        return userInfoService.insertUser(userInfo);
    }

    @GetMapping("/getUser")
    public UserInfo getUser(@RequestParam String username){
        return userInfoService.getUserInfo(username);
    }

    @PreAuthorize("hasAnyRole('user')") // 只能user角色才能访问该方法
    @GetMapping("/user")
    public String user(){
        return "hello,user";
    }

    @PreAuthorize("hasAnyRole('admin')") // 只能admin角色才能访问该方法
    @GetMapping("/admin")
    public String admin(){
        return "hello,admin";
    }

}
- 测试,并修改config
使用Postman发送POST请求来添加用户

发现有报错,这是因为没有给注册用户释放权限,导致添加用户还需要登录,所以后续需要取消权限
修改WebSecurityConfig配置类
package com.example.securitydatebase.config;

import com.example.securitydatebase.service.CustomUserDetailsService;
import org.springframework.beans.factory.annotation.Autowired;
import org.springframework.context.annotation.Bean;
import org.springframework.context.annotation.Lazy;
import org.springframework.http.HttpMethod;
import org.springframework.security.config.annotation.authentication.builders.AuthenticationManagerBuilder;
import org.springframework.security.config.annotation.method.configuration.EnableGlobalMethodSecurity;
import org.springframework.security.config.annotation.web.builders.HttpSecurity;
import org.springframework.security.config.annotation.web.configuration.EnableWebSecurity;
import org.springframework.security.config.annotation.web.configuration.WebSecurityConfigurerAdapter;
import org.springframework.security.crypto.bcrypt.BCryptPasswordEncoder;
import org.springframework.security.crypto.password.PasswordEncoder;

@EnableWebSecurity //Spring Security用于启用Web安全的注解
@EnableGlobalMethodSecurity(prePostEnabled = true) //开启方法级安全验证
public class WebSecurityConfig extends WebSecurityConfigurerAdapter {
    @Autowired
    @Lazy
    private CustomUserDetailsService userDatailService;

    @Override
    protected void configure(HttpSecurity http) throws Exception {
        http
                .authorizeRequests()
                .antMatchers(HttpMethod.POST, "/addUser").permitAll() // 允许post请求/add-user,而无需认证
                .anyRequest().authenticated() // 所有请求都需要验证
                .and()
                .formLogin() // 使用默认的登录页面
                .and()
                .csrf().disable();// post请求要关闭csrf验证,不然访问报错;实际开发中开启,需要前端配合传递其他参数
    }
    /**
     * 指定加密方式
     */
    @Bean
    public PasswordEncoder passwordEncoder(){
        // 使用BCrypt加密密码
        return new BCryptPasswordEncoder();
    }

    @Override
    protected void configure(AuthenticationManagerBuilder auth) throws Exception {
        auth
            // 从数据库读取的用户进行身份认证
            .userDetailsService(userDatailService)
            .passwordEncoder(passwordEncoder());
    }
}
- 重启项目,并重新发送POST请求
在这里插入图片描述

注意要修改发送的格式
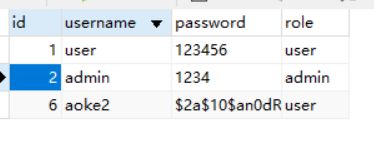
可以看到密码已经是加密状态,但是还是可以用“aoke2”“aoke2”就可以登录