利用github部署应用
Continuous integration, continuous delivery, or CI/CD. It’s one of those developer buzzwords, and with good reason. The CI/CD pipeline allows us to automate much of the code deployment process, making it faster and safer in the process.
持续集成,持续交付或CI / CD。 这是那些开发人员的流行语之一,并且有充分的理由。 CI / CD管道使我们能够自动化大部分代码部署过程,从而使其在过程中更快,更安全。
The CI part covers the automation of building, packaging, and testing our applications. For the most part, this is automated by Angular. And, once we’ve written our unit tests, they’re easily integrated into the process too.
CI部分涵盖了构建,包装和测试我们的应用程序的自动化。 在大多数情况下,这是由Angular自动化的。 而且,一旦我们编写了单元测试,它们也很容易集成到流程中。
Next is CD, the automated delivery of our app. In our case, this is the deployment to Firebase.
接下来是CD,这是我们应用程序的自动交付。 在我们的例子中,这是到Firebase的部署。
In this article, we will automate of CI/CD pipeline using GitHub Actions. Meaning that every time we hit git push origin masterGitHub will automatically kick-in with a full build, package, (test), and deploy process. We will cover:
在本文中,我们将使用GitHub Actions自动化CI / CD管道。 这意味着每次我们按下git push origin master GitHub时,GitHub都会自动加入完整的构建,打包,(测试)和部署过程。 我们将介绍:
> Deployment Setup
  - Writing Our Deployment (YAML)
  - Secret Keys (With GitHub)
部署设定 (Deployment Setup)
First, we are assuming an Angular app has already been deployed to Firebase Hosting via the usual firebase deploy — if you haven’t already done this, please follow this guide. It will take no longer than a few minutes!
首先,我们假设一个角度应用程序已被部署到火力地堡通过平时的主机firebase deploy -如果你还没有这样做,请按照本指南。 只需几分钟!
Once we’re ready, we begin by creating a .github folder in the root directory of our project. In there, we add another folder called workflows, and inside there a YAML file called main.yml.
准备就绪后,我们将在项目的根目录中创建一个.github文件夹。 在其中,我们添加了另一个名为workflows文件夹,并在其中添加了一个名为main.yml的YAML文件。

The directory .github\workflows, when pushed to GitHub, will be read by GitHub and used as the GitHub Actions folder — where we store YAML files for our workflows!
目录.github\workflows推送到GitHub后,将由GitHub读取,并用作GitHub Actions文件夹-我们在其中存储用于工作流程的YAML文件!
But what is a YAML file? Well, according to our beloved Wikipedia —
但是什么是YAML文件? 好吧,根据我们钟爱的Wikipedia ,
“YAML is a human-readable data-serialization language. It is commonly used for configuration files and in applications where data is being stored or transmitted.”
“ YAML是一种人类可读的数据序列化语言。 它通常用于配置文件以及用于存储或传输数据的应用程序。”
The first sentence means YAML is a file format that we can read! It’s used for transferring data between different languages or environments (JSON is another example of this).
第一句话表示YAML是一种我们可以阅读的文件格式! 它用于在不同语言或环境之间传输数据(JSON是此示例的另一个示例)。
The second part is what we need to understand. It means that YAML is a standardized way of providing instructions, which is typically used for configuration files — like our deployment configuration!
第二部分是我们需要了解的内容。 这意味着YAML是一种提供指令的标准化方式,通常用于配置文件(例如我们的部署配置)!
编写我们的部署 (Writing Our Deployment)
Okay, so let’s take a look at the YAML file we will be using.
好的,让我们看一下将要使用的YAML文件。
Although it looks pretty confusing, once we break the script down into parts, it’s incredibly simple.
尽管看起来很混乱,但是一旦我们将脚本分解成几个部分,它就变得非常简单。
nameis simply for us to name the different sections of our code (it’s optional!).name只是为了我们为代码的不同部分命名(这是可选的!)。on: push: branches: - master, this is our trigger. It tells GitHub to trigger the following code as soon as wepushto themaster branch.on: push: branches: - master,这是我们的触发器。 它告诉GitHub在我们push送到master branch立即触发以下代码。Next up, we have our execution plan in
jobs, consisting of onebuildstage.接下来,我们将在
jobs执行计划,其中包括一个build阶段。We execute everything on the latest Ubuntu machine
ubuntu-latest.我们在最新的Ubuntu计算机
ubuntu-latest上执行所有操作。And now we perform each of the
stepsin our plan.现在,我们执行计划中的每个
steps。We
git checkout masterviaactions/checkout@masterto set our active branch tomaster.我们通过
actions/checkout@mastergit checkout master来将我们的活动分支设置为master。Then initialize Node with
actions/setup-node@masterso that we can usenpmin the following steps.然后使用
actions/setup-node@master初始化Node,以便我们可以在以下步骤中使用npm。npm installadds all of our app dependencies, it looks like this:npm install添加了我们所有的应用程序依赖项,如下所示:

After that, we compile our app with
npm run build— which gets translated intong build:之后,我们使用
npm run build编译应用npm run build-将其转换为ng build:

Finally, we deploy our newly built app using
w9jds/firebase-action@master— with two additional parameters:最后,我们使用
w9jds/firebase-action@master部署新构建的应用程序-带有两个附加参数:We pass the
deploy --only hostingarguments, meaning we are only deploying to Firebase hosting (rather than Functions, for example).我们传递
deploy --only hosting参数,这意味着我们仅部署到Firebase托管(例如,而不是Function)。And we pass our Firebase security token (to authenticate us) via the
FIREBASE_TOKENkey stored in our repo (we cover this next).然后,我们通过存储在我们存储库中的
FIREBASE_TOKEN密钥传递Firebase安全令牌(以对我们进行身份验证)(我们将在接下来的内容中介绍)。
That covers everything in our YAML, which is nothing more than the operation we would usually perform when deploying our apps — other than specifying the OS!
这涵盖了YAML中的所有内容,无非就是我们在部署应用程序时通常执行的操作-除了指定操作系统之外!
秘密钥匙 (Secret Keys)
The only part missing is our FIREBASE_TOKEN. Let’s work through that.
唯一缺少的部分是我们的FIREBASE_TOKEN 。 让我们来解决这个问题。
First, we need to get our access token, for that we simply:
首先,我们需要获取访问令牌,为此,我们只需:
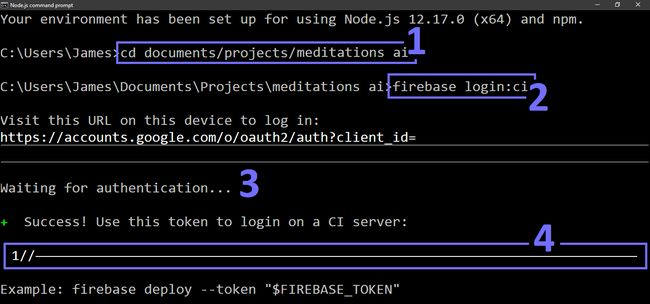
1.Open our CLI and navigate to our project — making sure the correct Firebase project is active by typing firebase use [project-id] (not shown above).
1.打开CLI并导航到我们的项目-通过键入firebase use [project-id] (上面未显示),确保正确的Firebase项目处于活动状态。
2.Request our CI (continuous integration) access token with firebase login:ci which should open a new window (otherwise, enter the URL provided).
2.使用firebase login:ci请求我们的CI(连续集成)访问令牌,这应该打开一个新窗口(否则,输入提供的URL)。
3.In the authorization window, we need to login to Google Cloud and authorize access to our account.
3.在授权窗口中,我们需要登录Google Cloud并授权访问我们的帐户。
4.Finally, we receive an access token that we can use to deploy our apps to Firebase!
4.最后,我们收到一个访问令牌,可用于将应用程序部署到Firebase!
Now that we have our token, we need to navigate to our project repo on GitHub — where we can add our access token.
现在我们有了令牌,我们需要导航到GitHub上的项目存储库-我们可以在其中添加访问令牌。
To do so, while in the project repo we:
为此,在项目回购中,我们:
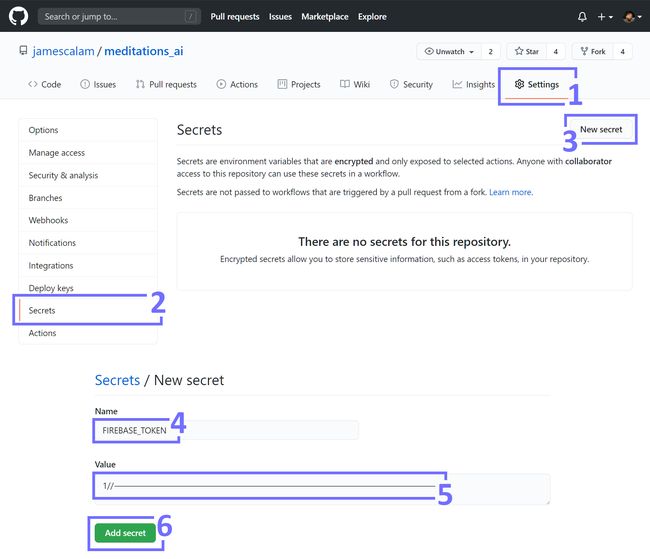
1/3.Navigate through from Settings > Secrets and click New secret. Opening the New secret window.
1 /3.Navigate通过从设置>的秘密,然后单击新建的秘密。 打开“新机密”窗口。
4/6.Enter FIREBASE_TOKEN as the secret name, enter the token provided from login firebase:ci, and click Add secret!
4 /6.Enter FIREBASE_TOKEN作为秘密的名字,请从所提供的令牌login firebase:ci ,然后单击添加秘密!
Now, back in our YAML file, ${{ secrets.FIREBASE_TOKEN }} allows us to access the value we just entered for FIREBASE_TOKEN — without storing it in our repo files.
现在,回到我们的YAML文件中,通过${{ secrets.FIREBASE_TOKEN }} ,我们可以访问刚刚为FIREBASE_TOKEN输入的值,而无需将其存储在我们的回购文件中。
部署! (Deploy!)
Once we have everything set up, we push our project to the master branch of our GitHub repo as we usually would. Back in our CLI, we enter something like:
一旦完成所有设置,就可以像往常一样将项目推送到GitHub存储库的master分支中。 回到我们的CLI,我们输入如下内容:
git add .
git commit -m "Added CI support"
git push -u origin master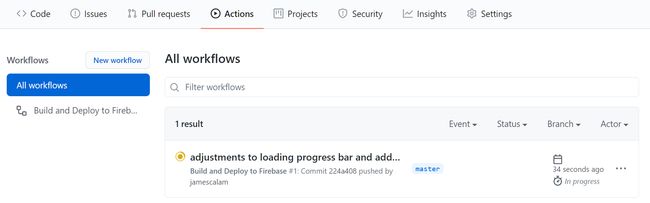
Our repo is pushed to GitHub as usual. To see our deployment in action, we need to open our repo in GitHub and click on the Actions tab. We will see the All workflows window (above).
我们的仓库像往常一样被推送到GitHub。 要查看我们的部署正在执行中,我们需要在GitHub中打开我们的存储库,然后单击“操作”选项卡。 我们将看到“所有工作流程”窗口(上方)。
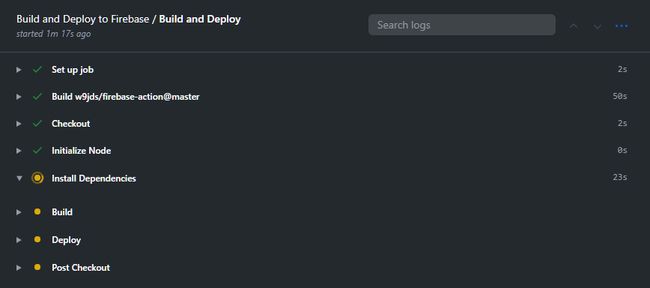
If we want to see our deployment progress in more detail, we click on our deployment (where we can see our commit message), and in the sidebar, click Build and Deploy. Here we will be able to see a list of actions that our deployment is taking.
如果我们想更详细地了解我们的部署进度,请单击我们的部署(可以在其中看到提交消息),然后在边栏中单击Build and Deploy 。 在这里,我们将能够看到我们的部署正在执行的操作的列表。
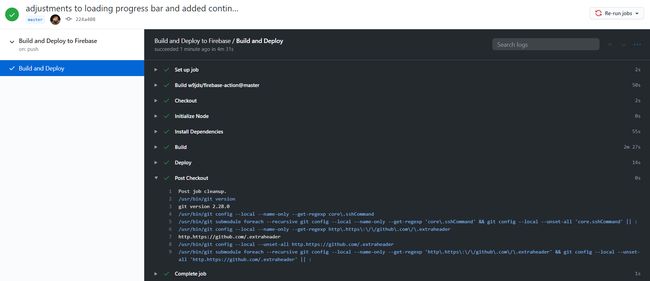
Once our deployment is complete, we will see a green tick in the top-right corner! We can see the deployment in more detail by clicking on the drop-down arrows next to each stage of the deployment in the Build and Deploy window.
部署完成后,我们将在右上角看到一个绿色的勾! 通过单击“构建和部署”窗口中部署每个阶段旁边的下拉箭头,我们可以更详细地查看部署。
最后几点注意事项 (Last Few Notes)
部署生产版本(Deploying a Production Build)
At the moment, we’re not deploying the Angular optimized production build. Just like we would do with ng build — we add --prod to npm run build to switch to the production build.
目前,我们尚未部署Angular优化的生产版本。 就像我们要使用ng build —我们在npm run build添加--prod以切换到生产版本。
Back in our YAML file, we modify Build:
回到我们的YAML文件中,我们修改Build :
- name: Build
  uses: npm run build --prod
整合测试 (Integrating Testing)
We can also incorporate our Angular unit tests! Right after— name: Install Dependencies we add npm test, like so:
我们还可以合并我们的Angular单元测试! 在— name: Install Dependencies我们添加npm test ,如下所示:
- name: Install Dependencies
        run: npm install
      - name: Testing
        run: npm test
      - name: Build
        run: npm run build
结语 (Wrapping Up)
We’re done, and we covered a lot! Including:
我们已经完成了,我们涵盖了很多内容! 包含:
- YAML scripts, and how to write one for deploying Angular apps to Firebase. YAML脚本,以及如何编写用于将Angular应用程序部署到Firebase的脚本。
Getting our
FIREBASE_TOKENfrom the Firebase CLI and adding it as a secret key in our GitHub repo.从Firebase CLI获取
FIREBASE_TOKEN并将其添加为GitHub存储库中的密钥。- Deploying our app and viewing deployment status in GitHub! 部署我们的应用程序并在GitHub中查看部署状态!
And a few bonus notes covering production builds and unit tests.
还有一些关于生产构建和单元测试的奖金说明。
And with that, we’ve built a fully automated CI/CD pipeline — triggered as soon as we push to master in GitHub!
至此,我们已经构建了一个完全自动化的CI / CD管道-一旦我们推动在GitHub中掌握,就会触发它!
I hope you’ve enjoyed the article. If you have any questions, ideas, or suggestions, please feel free to reach out via Twitter or in the comments below!
希望您喜欢这篇文章。 如果您有任何疑问,想法或建议,请随时通过Twitter或以下评论与我们联系!
Thanks for reading!
谢谢阅读!
翻译自: https://towardsdatascience.com/deploy-angular-apps-to-firebase-from-github-5f5ef0aad396
利用github部署应用