SpringCloud之小Demo
一、使用Spring Cloud,开发基于RESTFul的Web Service接口,注册到EurekaServer
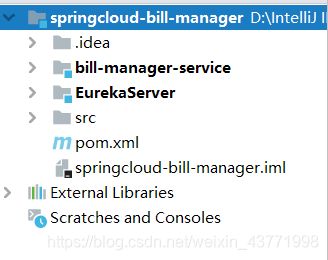
1.首先创建父工程
使用Maven的聚合和继承,统一管理子项目的版本和配置。然后后续的工程都以这个工程为父。
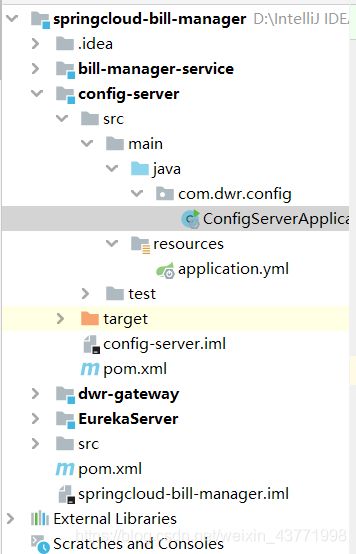
项目结构为:
父工程的pom.xml文件:
<project xmlns="http://maven.apache.org/POM/4.0.0"
         xmlns:xsi="http://www.w3.org/2001/XMLSchema-instance"
         xsi:schemaLocation="http://maven.apache.org/POM/4.0.0 http://maven.apache.org/xsd/maven-4.0.0.xsd">
    <modelVersion>4.0.0modelVersion>

    <groupId>com.dwrgroupId>
    <artifactId>springcloud-bill-managerartifactId>
    <version>1.0-SNAPSHOTversion>
    <modules>
        <module>EurekaServermodule>
        <module>bill-manager-servicemodule>
    modules>
    <packaging>pompackaging>

    <parent>
        <groupId>org.springframework.bootgroupId>
        <artifactId>spring-boot-starter-parentartifactId>
        <version>2.1.5.RELEASEversion>
        <relativePath/>
    parent>

    <properties>
        <java.version>1.8java.version>
        <spring-cloud.version>Greenwich.SR1spring-cloud.version>
        <mapper.starter.version>2.1.5mapper.starter.version>
        <mysql.version>5.1.46mysql.version>
    properties>

    <dependencyManagement>
        <dependencies>

            <dependency>
                <groupId>org.springframework.cloudgroupId>
                <artifactId>spring-cloud-dependenciesartifactId>
                <version>${spring-cloud.version}version>
                <type>pomtype>
                <scope>importscope>
            dependency>

            <dependency>
                <groupId>tk.mybatisgroupId>
                <artifactId>mapper-spring-boot-starterartifactId>
                <version>${mapper.starter.version}version>
            dependency>

            <dependency>
                <groupId>mysqlgroupId>
                <artifactId>mysql-connector-javaartifactId>
                <version>${mysql.version}version>
            dependency>
        dependencies>
    dependencyManagement>

    <dependencies>
        <dependency>
            <groupId>org.projectlombokgroupId>
            <artifactId>lombokartifactId>
        dependency>
    dependencies>

    <build>
        <plugins>
            <plugin>
                <groupId>org.springframework.bootgroupId>
                <artifactId>spring-boot-maven-pluginartifactId>
            plugin>
        plugins>
    build>

project>
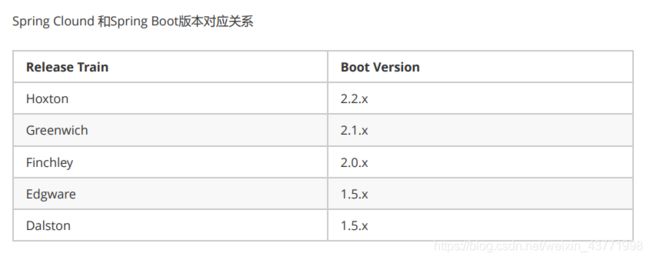
这里使用Greenwich版本,对应的spring boot版本为2.1.x
注意聚合父工程pom
2.创建Eureka注册中心EurekaServer
Eureka的工作原理是:
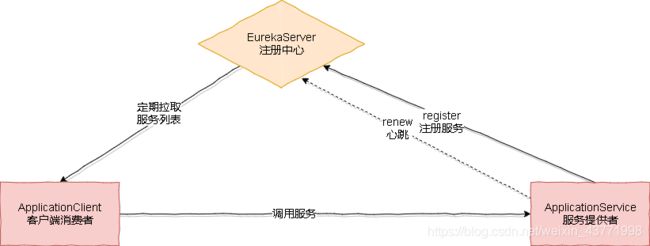
- 服务提供者将服务注册到Eureka
- Eureka(注册服务中心)记录服务
- 服务消费者从Eureka中获取服务列表
- 服务消费者基于负载均衡算法从地址列表中选择一个服务地址调用服务
- 服务提供者定期发送心跳
- Eureka检查哪些没有定期发送心跳续约的服务,将其在一定时间内剔除出服务列表
(1)编写pom.xml文件:
<project xmlns="http://maven.apache.org/POM/4.0.0"
         xmlns:xsi="http://www.w3.org/2001/XMLSchema-instance"
         xsi:schemaLocation="http://maven.apache.org/POM/4.0.0 http://maven.apache.org/xsd/maven-4.0.0.xsd">
    <parent>
        <artifactId>springcloud-bill-managerartifactId>
        <groupId>com.dwrgroupId>
        <version>1.0-SNAPSHOTversion>
    parent>
    <modelVersion>4.0.0modelVersion>

    <artifactId>EurekaServerartifactId>

    <dependencies>
        <dependency>
            <groupId>org.springframework.cloudgroupId>
            <artifactId>spring-cloud-starter-netflix-eureka-serverartifactId>
        dependency>
    dependencies>


project>
(2)编写启动类:
@EnableEurekaServer     //声明当前应用是Eureka服务
@SpringBootApplication
public class EurekaServerApplication {
    public static void main(String[] args) {
        SpringApplication.run(EurekaServerApplication.class, args);
    }
}
@EnableEurekaServer 声明当前应用是Eureka服务
(3)编写配置:
server:
  port: 10086
spring:
  application:
    name: eureka-server
eureka:
  client:
    service-url:
      defaultZone: http://127.0.0.1:10086/eureka
    # 不注册自己
    register-with-eureka: false
    # 不拉取服务
    fetch-registry: false
register-with-eureka: false 不注册自己
fetch-registry: false 不拉取服务
(4)启动服务,访问http://127.0.0.1:10086

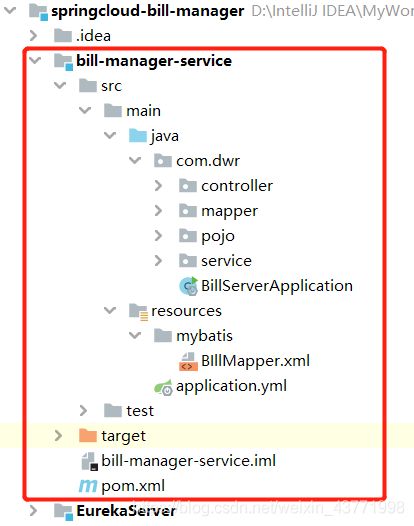
3.创建服务提供者bill-manager-service
项目结构:
(1)编写pom.xml文件:
<dependencies>
    <dependency>
        <groupId>org.springframework.bootgroupId>
        <artifactId>spring-boot-starter-webartifactId>
    dependency>

    <dependency>
        <groupId>tk.mybatisgroupId>
        <artifactId>mapper-spring-boot-starterartifactId>
    dependency>

    <dependency>
        <groupId>mysqlgroupId>
        <artifactId>mysql-connector-javaartifactId>
    dependency>

    <dependency>
        <groupId>com.github.pagehelpergroupId>
        <artifactId>pagehelper-spring-boot-starterartifactId>
        <version>1.2.3version>
    dependency>

    <dependency>
        <groupId>org.springframework.cloudgroupId>
        <artifactId>spring-cloud-starter-netflix-eureka-clientartifactId>
    dependency>
dependencies>
其中添加了Eureka客户端依赖,会自动将服务注册到Eurekaserver服务地址列表。

(2)编写启动类:
@SpringBootApplication
@MapperScan("com.dwr.mapper")
@EnableDiscoveryClient  //开启Eureka客户端发现功能
public class BillServerApplication {
    public static void main(String[] args) {
        SpringApplication.run(BillServerApplication.class, args);
    }
}
@EnableDiscoveryClient 用来开启Eureka客户端发现功能
@MapperScan(“com.dwr.mapper”)注意导入的包是import tk.mybatis.spring.annotation.MapperScan;可别导错了
(3)编写配置:
server:
  port: 9091
spring:
  datasource:
    driver-class-name: com.mysql.jdbc.Driver
    url: jdbc:mysql://localhost:3306/bill-manager
    username: root
    password: 123
  application:
    name: bill-manager-service
mybatis:
  type-aliases-package: com.dwr.pojo #别名搜索
  mapper-locations: classpath:/mybatis/*.xml
eureka:
  client:
    service-url:
      defaultZone: http://127.0.0.1:10086/eureka
(4)编写实体类、Mapper类、service类、controller类以及Mapper映射
Bill.java:
@Data
@Table(name = "bill_")
public class Bill {

    @Id
    @GeneratedValue(strategy = GenerationType.IDENTITY)
    @Column(name = "id_")
    private Long id;

    @Column(name = "title_")
    private String title;

    @Column(name = "bill_time_")
    private Date billTime;

    @Column(name = "type_id_")
    private Integer typeId;

    @Column(name = "price_")
    private Double price;

    @Column(name = "explain_")
    private String explain;

    /**
     * 类别名称
     */
    @Transient
    private String typeName;

    /**
     * 开始时间:用于查询
     */
    @Transient
    private Date date1;

    /**
     * 结束时间:用于查询
     */
    @Transient
    private Date date2;
}
@Data提供get、set方法,还提供equals()、hashCode()、toString() 方法。
BillMapper接口:
public interface BillMapper extends Mapper<Bill> {

    List<Bill> select(Bill b);
}
pom.xml文件添加

导入的包是import tk.mybatis.mapper.common.Mapper;
BillMapper.xml映射:
<mapper namespace="com.dwr.mapper.BillMapper">

    <sql id="selectSql">
        SELECT
            b.id_ as id,
            b.title_ as title,
            b.bill_time_ as billTime,
            b.type_id_ as typeId,
            b.price_ as price,
            b.explain_ as `explain`,
            t.name_ as typeName
        FROM
            bill_ as b
        left join
            bill_type_ as t
        on
            b.type_id_ = t.id_
    sql>

    <select id="select" resultType="bill">
        <include refid="selectSql"/>
        <where>
            <if test="typeId !=null">
                b.type_id_ = #{typeId}
            if>
            <if test="title !=null">
                and b.title_ like '%${title}%'
            if>
            <if test="date1 !=null">
                and b.bill_time_ >= #{date1}
            if>
            <if test="date2 !=null">
                and b.bill_time_ <= #{date2}
            if>
        where>
    select>

mapper>
mapper命名空间要写对,而且在配置文件中添加映射文件的位置
mapper-locations: classpath:/mybatis/*.xml
BillService.java:
@Service
public class BillService {

    @Resource
    private BillMapper billMapper;

    public List<Bill> list(Bill b){
        return billMapper.select(b);
    }

    public int add(Bill b){
        return billMapper.insert(b);
    }

    public Bill get(Long id){
        return billMapper.selectByPrimaryKey(id);
    }

    public int update(Bill b){
        return billMapper.updateByPrimaryKey(b);
    }

    public int delete(Long id){
        return billMapper.deleteByPrimaryKey(id);
    }

    //分页
    public PageInfo<Bill> listPage(Bill b, int pageNum, int pageSize) {
        return PageHelper.startPage(pageNum, pageSize).doSelectPageInfo(() -> {
            billMapper.select(b);
        });
    }
}
分页插件:

BillController.java:
@RestController
@RequestMapping("/bill")
public class BillController {

    @Resource
    private BillService billService;

    //查询全部
    @GetMapping("/list")
    public List<Bill> list(Bill b){
        return billService.list(b);
    }

    //查询单个
    @GetMapping("/{id}")
    public Bill get(@PathVariable Long id){
        return billService.get(id);
    }

    //添加
    @PostMapping("/add")
    public int add(@Param("title") String title,
                   @Param("typeId") Integer typeId,
                   @Param("price") Double price,
                   @Param("explain") String explain){
        Bill bill = new Bill();
        bill.setTitle(title);
        bill.setTypeId(typeId);
        bill.setPrice(price);
        bill.setExplain(explain);
        return billService.add(bill);
    }

    //删除
    @DeleteMapping("/delete/{id}")
    public int delete(@PathVariable("id") Long id){
        return billService.delete(id);
    }

    //修改
    @PutMapping("/update/{id}")
    public int update(@PathVariable("id") Long id,
                      @Param("title") String title,
                      @Param("typeId") Integer typeId,
                      @Param("price") Double price,
                      @Param("explain") String explain){
        Bill bill = new Bill();
        bill.setId(id);
        bill.setTitle(title);
        bill.setTypeId(typeId);
        bill.setPrice(price);
        bill.setExplain(explain);
        return billService.update(bill);
    }

    //分页
    @GetMapping("/list-page")
    public PageInfo<Bill> listPage(@RequestParam(defaultValue = "1") int pageNum,
                                   @RequestParam(defaultValue = "10") int pageSize,
                                   Bill b){
        return billService.listPage(b,pageNum,pageSize);
    }
}
@RestController返回的是json格式的数据,而且也表明了该类是控制器类
Post(增),Delete(删),Put(改),Get(查)
对外提供REST风格的web服务
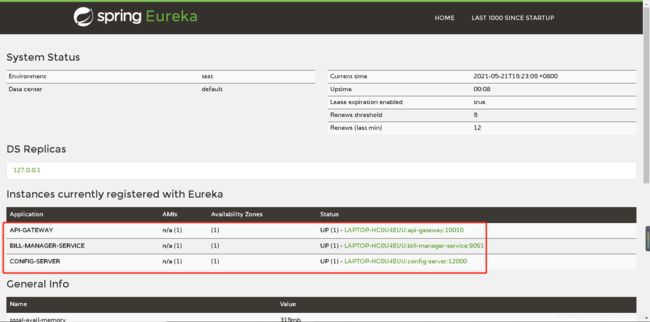
Eureka Server 管理界面注册了账单服务

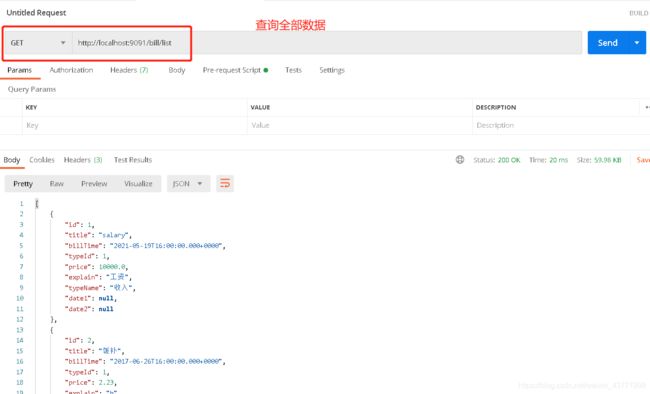
查询全部数据:
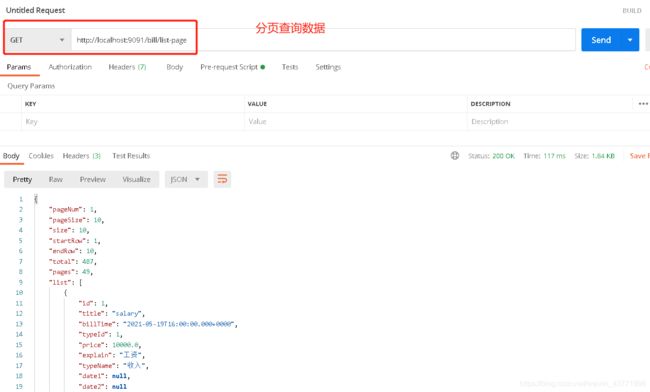
分页查询数据:
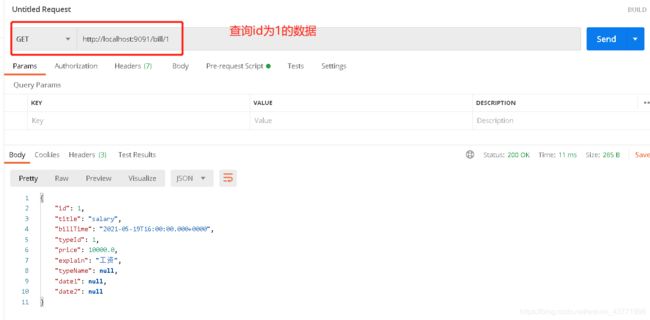
查询单条数据:
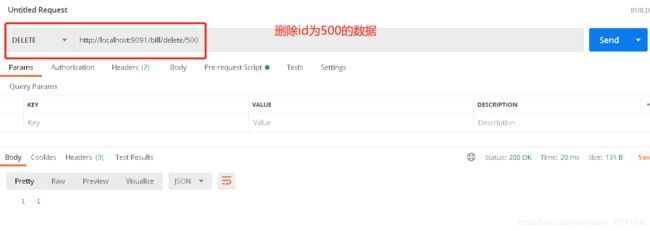
删除数据:
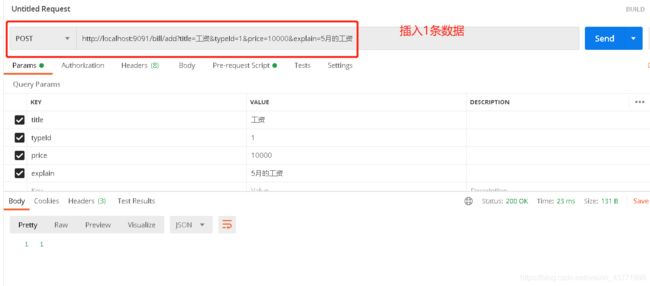
插入数据:
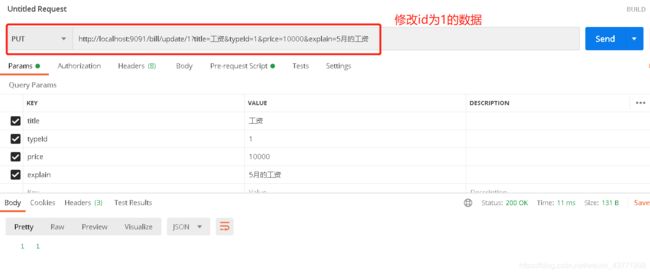
修改数据:
通过这次任务,学会了使用debug来找bug。
二、使用Spring Cloud,开发账单网关微服务
1.Spring Cloud Gateway网关简介
- Spring Cloud Gateway组件的核心是一系列的过滤器,通过这些过滤器可以将客户端发送的请求转发(路由)到对应的微服务。
- Spring Cloud Gateway是加在整个微服务最前沿的防火墙和代理墙,隐藏微服务结点IP端口信息,从而加强安全保护。
- Spring Cloud Gateway本身也是一个微服务,需要注册到Eureka服务注册中心。
- 网关的核心功能:过滤和路由。
- 不管是来自于客户端(PC或移动端)的请求,还是服务内部调用。一切对服务的请求都可经过网关,然后再由网关来实现鉴权、动态路由等等操作。Gateway就是我们服务的统一入口。
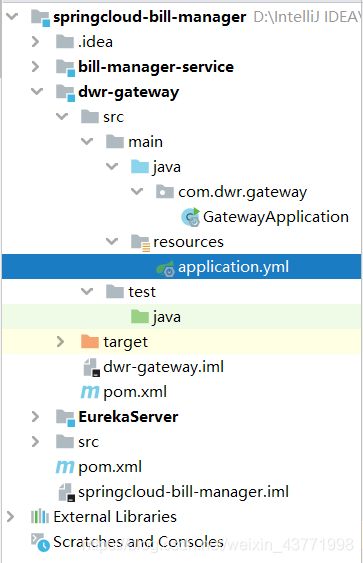
2.创建网关系统dwr-gateway
项目结构:
编写pom.xml添加依赖:
<dependencies>
    <dependency>
        <groupId>org.springframework.cloudgroupId>
        <artifactId>spring-cloud-starter-gatewayartifactId>
    dependency>
    <dependency>
        <groupId>org.springframework.cloudgroupId>
        <artifactId>spring-cloud-starter-netflix-eureka-clientartifactId>
    dependency>
dependencies>
编写启动类:
@SpringBootApplication
@EnableDiscoveryClient  //开启Eureka注册发现功能
public class GatewayApplication {
    public static void main(String[] args) {
        SpringApplication.run(GatewayApplication.class, args);
    }
}
@EnableDiscoveryClient 开启Eureka注册发现功能。因为Spring Cloud Gateway本身也是一个微服务,需要注册到Eureka服务注册中心。
编写配置文件:
server:
  port: 10010
spring:
  application:
    name: api-gateway
  cloud:
    gateway:
      routes:
        # 路由id,可以随意写
        - id: bill-service-route
          # 代理的服务地址
          uri: http://127.0.0.1:9091
          # 路由断言,可以配置映射路径
          predicates:
            - Path=/api/bill/**
eureka:
  client:
    service-url:
      defaultZone: http://127.0.0.1:10086/eureka
  instance:
    # 更倾向使用ip地址,而不是host名
    prefer-ip-address: true

将路径中包含有/bill/**开头的请求,全都代理到http://127.0.0.1:9091,也就是http://127.0.0.1:10010/bill/list 映射到 http://127.0.0.1:9091/bill/list。
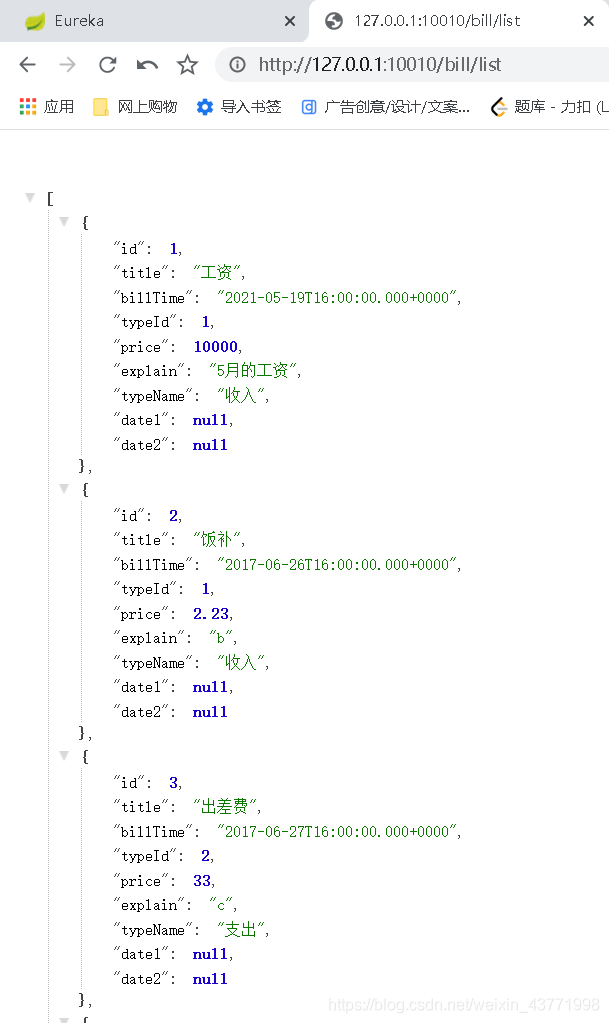
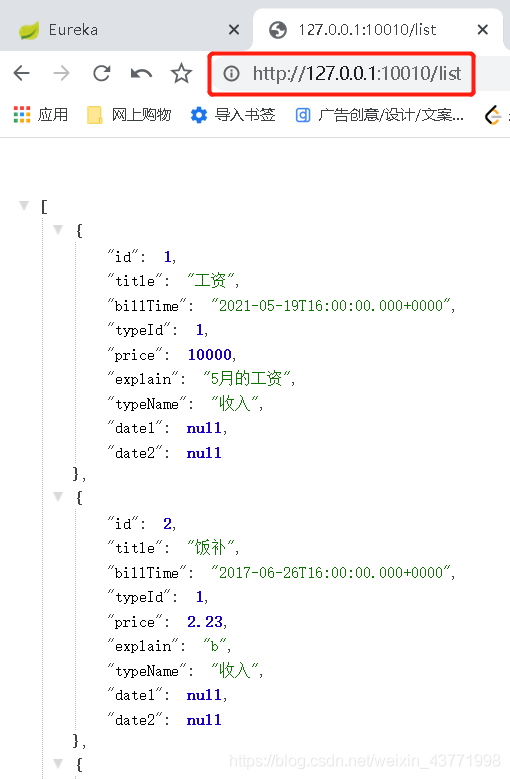
访问http://127.0.0.1:10010/bill/list
由于配置文件中代理服务地址uri: http://127.0.0.1:9091,已把路径写固定了。但如果同一台服务有多个实例的话,这样做显然不合理。应该根据服务的名称,也就是bill-manager-service,去Eureka注册中心查找服务对应的所有实例列表,然后进行动态路由。
更改为:

路由配置中心uri所用的协议为lb时,gateway将使用LoadBalancerClient把bill-manager-service通过Eureka解析为实际的主机和端口,并进行ribbon负载均衡。
负载均衡(控制台截图):
![]()
3.路由前缀
客户端的请求地址与微服务的服务地址如果不一致的时候,可以通过配置路径过滤器实现路径的前缀的添加和去除。
- 添加前缀:对请求地址添加前缀路径之后再作为代理的服务地址。
http://127.0.0.1:10010/list 映射到 http://127.0.0.1:9091/user/list - 去除前缀:将请求地址中路径去除一些前缀路径之后再作为代理的服务地址。
http://127.0.0.1:10010/api/bill/list 映射到 http://127.0.0.1:9091/bill/list
(1)添加前缀:
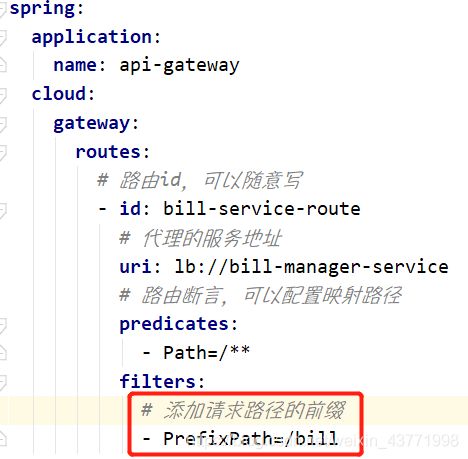
访问http://127.0.0.1:10010/list,会映射到 http://127.0.0.1:9091/user/list
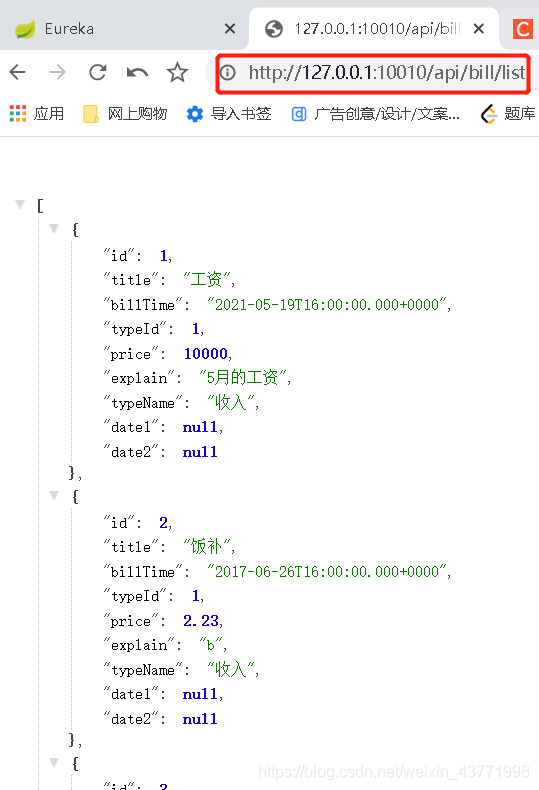
(2)去除前缀:
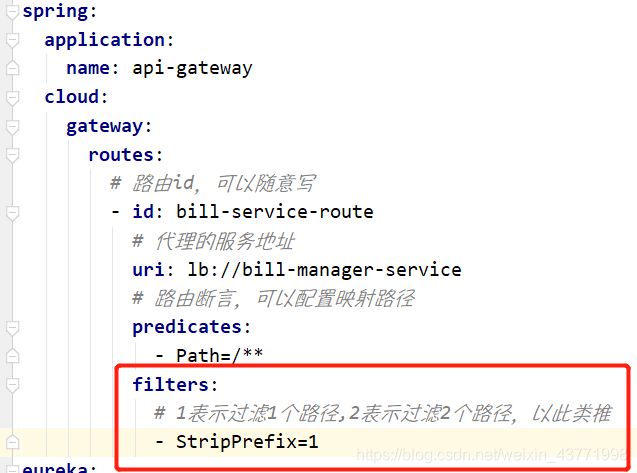
访问http://127.0.0.1:10010/api/bill/list ,会映射到 http://127.0.0.1:9091/bill/list
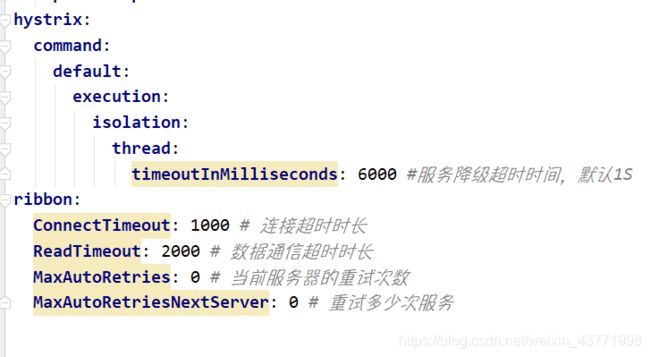
4.负载均衡和熔断
5.Gateway跨域配置
跨域:在js请求访问中,如果访问的地址与当前服务器的域名、ip或者端口号不一致则称为跨域请求。
若不解决则不能获取到对应地址的返回结果。

上述配置表示:可以允许来自 http://docs.spring.io 的get请求方式获取服务数据。
三、账单配置微服务,统一由码云管理账单微服务配置文件
1.创建远程仓库/配置文件
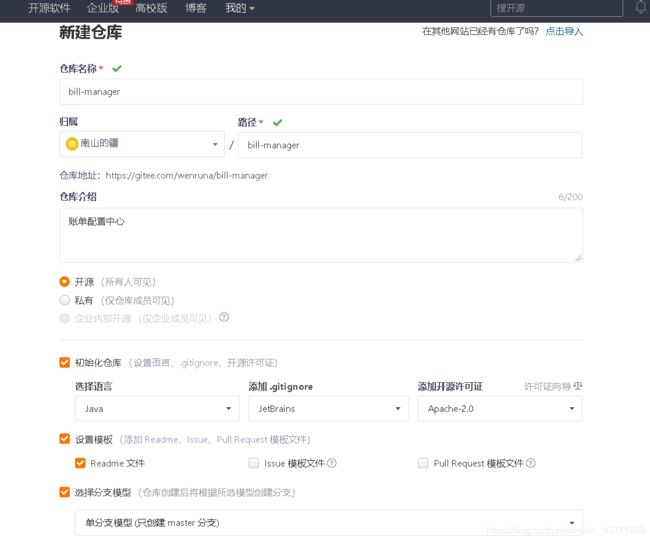
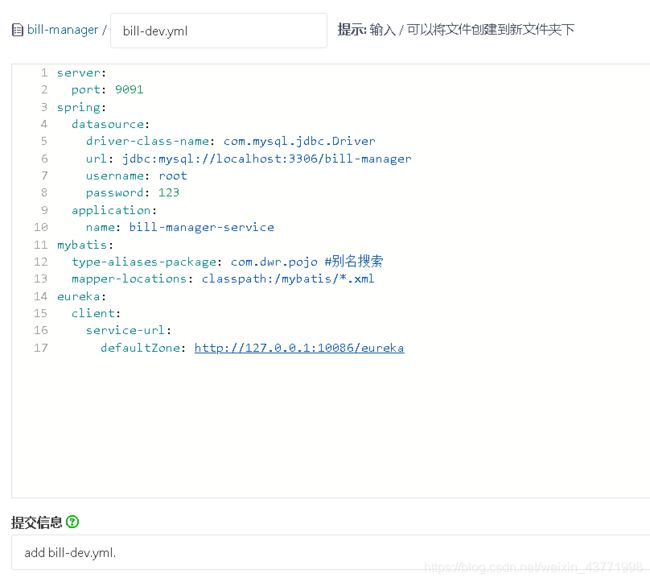
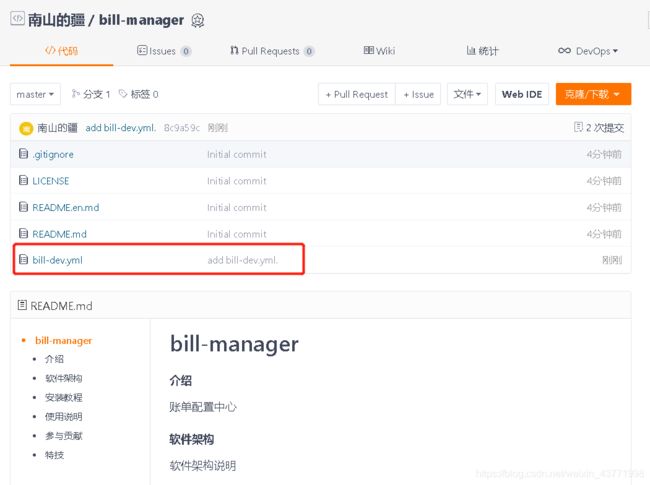
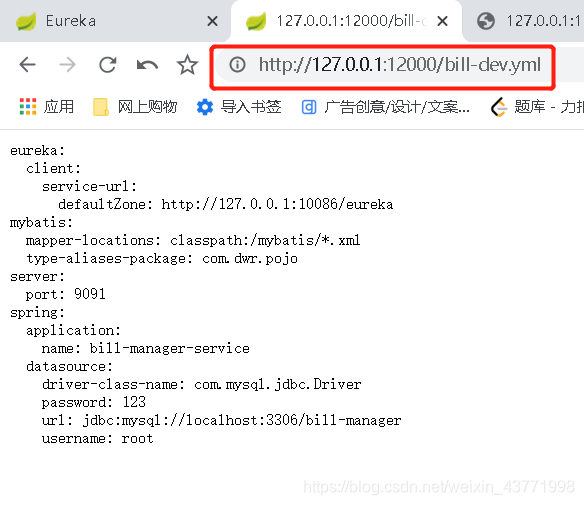
将bill-manager-service项目的配置文件的内容复制到这里,命名为bill-dev.yml。
2.搭建配置中心微服务
项目结构:
编写pom.xml添加依赖:
<dependencies>
    <dependency>
        <groupId>org.springframework.cloudgroupId>
        <artifactId>spring-cloud-starter-netflix-eureka-clientartifactId>
    dependency>
    <dependency>
        <groupId>org.springframework.cloudgroupId>
        <artifactId>spring-cloud-config-serverartifactId>
    dependency>
dependencies>
编写启动类:
@SpringBootApplication
@EnableConfigServer  //开启配置服务
public class ConfigServerApplication {
    public static void main(String[] args) {
        SpringApplication.run(ConfigServerApplication.class, args);
    }
}
@EnableConfigServer 开启配置服务
编写配置文件:
server:
  port: 12000
spring:
  application:
    name: config-server
  cloud:
    config:
      server:
        git:
          uri: https://gitee.com/wenruna/bill-manager.git
eureka:
  client:
    service-url:
      defaultZone: http://127.0.0.1:10086/eureka
启动测试类:
3.获取配置中心配置
改造一下账单微服务bill-manager-service ,配置文件信息不再由微服务项目提供,而是从配置中心获取。
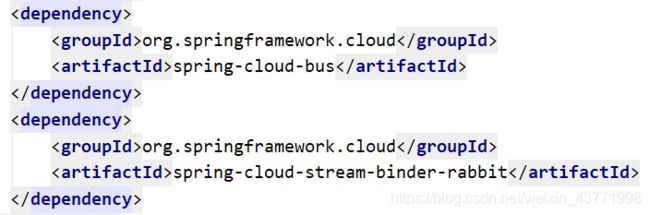
(1)添加依赖
在bill-manager-service工程中的pom.xml文件中添加依赖:

(2)修改配置
- 删除bill-manager-service工程中的application.yml文件(因为该文件从配置中心获取)
- 在bill-manager-service工程中创建bootstrap.yml配置文件
spring:
  cloud:
    config:
      # 要与仓库中的配置文件的application保持一致
      name: bill
      # 要与仓库中的配置文件的profile保持一致
      profile: dev
      # 要与仓库中的配置文件所属的版本(分支)一致
      label: master
      discovery:
        # 使用配置中心
        enabled: true
        # 配置中心服务名
        service-id: config-server
eureka:
  client:
    service-url:
      defaultZone: http://127.0.0.1:10086/eureka
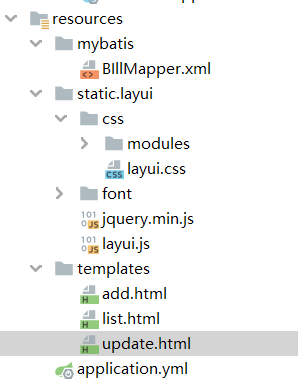
项目结构为:

(3)启动测试:

4.使用Spring Cloud Bus
(1)问题
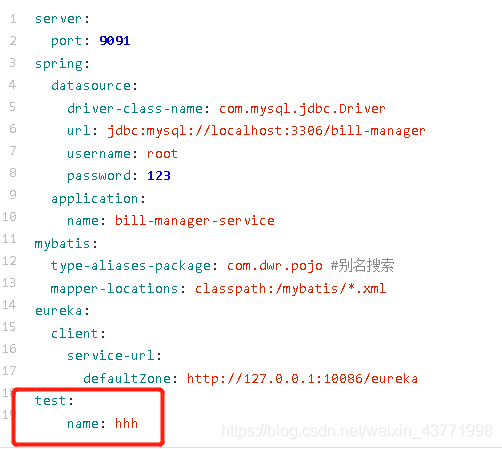

如果我们在码云上修改bill-dev.yml配置文件,然后启动Eureka注册中心、配置中心config-server、账单服务bill-manager-service,可以看到修改的内容。
然后再修改码云上的配置文件,发现它并没有更新到账单微服务上,只有重启用户微服务才能生效。
结论:通过查看账单微服务控制台的输出结果可以发现,我们对于Git仓库中配置文件的修改并没有及时更新到账单微服务,只有重启账单微服务才能生效。
如果想在不重启微服务的情况下更新配置该如何实现呢? 可以使用Spring Cloud Bus来实现配置的自动更新。
(2)Spring Cloud Bus简介
- Spring Cloud Bus是用轻量的消息代理将分布式的节点连接起来,可以用于广播配置文件的更改或者服务的监控管 理。
- 也就是消息总线可以为微服务做监控,也可以实现应用程序之间相互通信。
- Spring Cloud Bus可选的消息代理有RabbitMQ和Kafka。
(3)改造配置中心
在config-server项目的pom.xml文件加入Spring Cloud Bus相关依赖:
application.yml:
server:
  port: 12000
spring:
  application:
    name: config-server
  cloud:
    config:
      server:
        git:
          uri: https://gitee.com/wenruna/bill-manager.git
  # 配置rabbitmq信息,如果是都与默认值一致则不需要配置(下面几行可省略)
  rabbitmq:
    host: localhost
    port: 5672
    username: guest
    password: guest
eureka:
  client:
    service-url:
      defaultZone: http://127.0.0.1:10086/eureka
management:
  endpoints:
    web:
      exposure:
        # 暴露触发信息总线的地址
        include: bus-refresh
(4)改造用户服务
在config-server项目的pom.xml文件加入Spring Cloud Bus相关依赖:

bootstrap.yml:
spring:
  cloud:
    config:
      # 要与仓库中的配置文件的application保持一致
      name: bill
      # 要与仓库中的配置文件的profile保持一致
      profile: dev
      # 要与仓库中的配置文件所属的版本(分支)一致
      label: master
      discovery:
        # 使用配置中心
        enabled: true
        # 配置中心服务名
        service-id: config-server
  # 配置rabbitmq信息,如果是都与默认值一致则不需要配置(下面几行可省略)
  rabbitmq:
    host: localhost
    port: 5672
    username: guest
    password: guest
eureka:
  client:
    service-url:
      defaultZone: http://127.0.0.1:10086/eureka
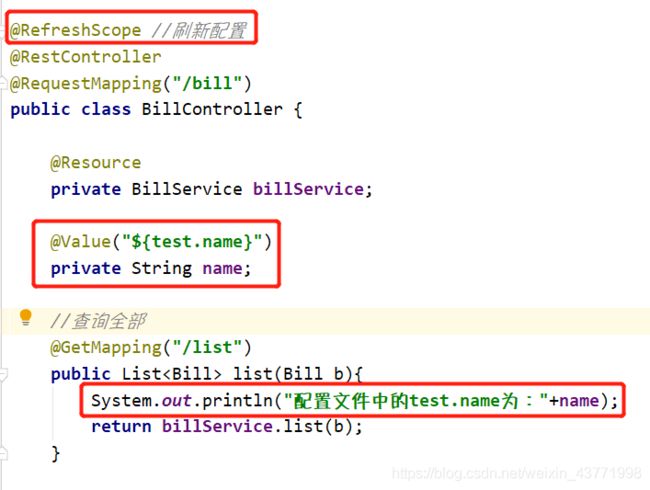
修改控制器:
(5)测试
-
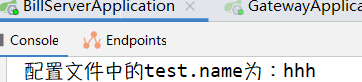
访问http://127.0.0.1:10010/api/bill/list,控制台显示结果
-
修改Git仓库中配置文件bill-dev.yml的test.name内容

-
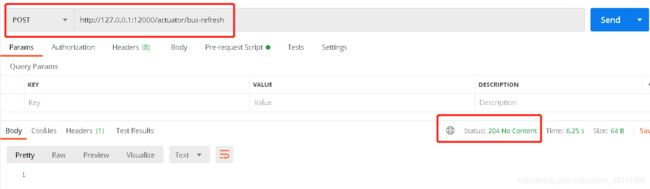
使用Postman或者RESTClient工具发送POST方式请求访问地址http://127.0.0.1:12000/actuator/bus-refresh
-
再次访问http://127.0.0.1:10010/api/bill/list,控制台显示结果

1、请求地址http://127.0.0.1:12000/actuator/bus-refresh中 /actuator是固定的
2、请求http://127.0.0.1:12000/actuator/bus-refresh地址的作用是访问配置中心的消息总线服务,消息总线服务接收到请求后会向消息队列中发送消息,各个微服务会监听消息队列。当微服务接收到队列中的消息后,会重新从配置中心获取最新的配置信息。
四、使用layui开发账单前端项目
billController:
package com.dwr.controller;

import com.dwr.pojo.Bill;
import com.dwr.pojo.BillType;
import com.dwr.service.BillService;
import com.dwr.service.TypeService;
import com.github.pagehelper.PageInfo;
import org.springframework.stereotype.Controller;
import org.springframework.web.bind.annotation.*;

import javax.annotation.Resource;
import java.util.List;

@Controller
@RequestMapping("/bill")
public class BillController {

    @Resource
    private BillService billService;

    @Resource
    private TypeService typeService;

    //列表页
    @RequestMapping("/index")
    public String index() {
        return "list";
    }

    //跳转到增加页面
    @RequestMapping("/toAdd")
    public String toAdd() {
        return "add";
    }

    //跳转到更新页面
    @RequestMapping("/toUpdate")
    public String toUpdate() {
        return "update";
    }

    //查询全部
    @ResponseBody
    @GetMapping("/list")
    public List<Bill> list(Bill b){
        return billService.list(b);
    }

    //查询单个
    @ResponseBody
    @GetMapping("/{id}")
    public Bill get(@PathVariable Long id,Bill b){
        //为了显示类型
        List<Bill> list = billService.list(b);
        for (Bill bill : list) {
            if(bill.getId()==id){
                return bill;
            }
        }
        return billService.get(id);
    }

    //类型
    @ResponseBody
    @GetMapping("/types")
    public List<BillType> get(){
        return typeService.list();
    }

    //添加
    @ResponseBody
    @PostMapping("/add")
    public int add(Bill bill){
        return billService.add(bill);
    }

    //删除
    @ResponseBody
    @DeleteMapping("/delete/{id}")
    public int delete(@PathVariable("id") Long id){
        return billService.delete(id);
    }

    //修改
    @ResponseBody
    @PutMapping("/update/{id}")
    public int update(Bill bill){
        return billService.update(bill);
    }

    //分页
    @ResponseBody
    @GetMapping("/list-page")
    public PageInfo<Bill> listPage(@RequestParam(required=false,defaultValue = "1") int pageNum,
                                   @RequestParam(required=false,defaultValue = "10") int pageSize,
                                   Bill b){
        return billService.listPage(b,pageNum,pageSize);
    }
}
list.html:
<html lang="en" xmlns:th="http://www.thymeleaf.org">
<head>
    <meta charset="UTF-8">
    <title>Titletitle>
    <link rel="stylesheet" th:href="@{/layui/css/layui.css}" media="all"/>
    <style>
        /*设置数据表表头字体*/
        .layui-table th {
            /*表头内容居中显示*/
            text-align: center;
            /*表头内容字体加深*/
            font-weight: bold;
        }
    style>
head>
<body>

<fieldset class="layui-elem-field layui-field-title" style="margin-top: 20px;">
    <legend style="text-align: center;">账单列表legend>
fieldset>


<form id="myForm" style="text-align: center;">
    <div class="layui-inline">

        <div class="layui-form" style="width: 250px;">
            <label class="layui-form-label">类型label>
            <div class="layui-input-block">
                <select name="typeId" id="typeId" lay-filter="type">
                    <option value="">请选择类型option>
                    <option value="1">收入option>
                    <option value="2">支出option>
                    <option value="3">借入option>
                    <option value="4">借出option>
                select>
            div>
        div>
        <br/>
        <label class="layui-form-label">日期范围label>
        <div class="layui-inline" id="test6">
            <div class="layui-input-inline">
                <input type="text" autocomplete="off" name="date1" id="test-startDate-1" class="layui-input"
                       placeholder="开始日期">
            div>
            -
            <div class="layui-input-inline">
                <input type="text" autocomplete="off" name="date2" id="test-endDate-1" class="layui-input"
                       placeholder="结束日期">
            div>
        div>
    div>

    <button type="button" onclick="loadData()" class="layui-btn">查询button>
    <input type="reset" class="layui-btn"/>
form>


<div>
    <table id="demo" lay-filter="test">table>
    <script type="text/html" id="barDemo">
        <a class="layui-btn layui-btn-xs" lay-event="more">更多 <i class="layui-icon layui-icon-down"></i></a>
    script>
div>
body>
<script type="text/javascript" th:src="@{/layui/jquery.min.js}">script>
<script type="text/javascript" th:src="@{/layui/layui.js}">script>

<script>
    layui.use('table', function (res) {
        var table = layui.table, dropdown = layui.dropdown; //下拉菜单

        //分页列出所有数据
        table.render({
            elem: '#demo'
            , url: '/bill/list-page' //数据接口
            , page: true //开启分页
            , toolbar: 'default' //开启工具栏,此处显示默认图标
            , cols: [
                [ //表头
                    {type: 'checkbox', fixed: 'left'}
                    , {field: 'id', title: 'ID', sort: true}
                    , {field: 'title', title: '标题'}
                    , {field: 'billTime', title: '时间', sort: true}
                    , {field: 'price', title: '金额'}
                    , {field: 'typeName', title: '类别'}
                    , {field: 'explain', title: '说明'}
                    , {fixed: 'right', align: 'center', toolbar: '#barDemo'}
                ]
            ], parseData: function (res) {
                return {
                    "code": 0,
                    "msg": "",
                    "count": res.total,
                    "data": res.list
                }
            }, request: {
                pageName: 'pageNum',
                limitName: 'pageSize'
            }
        });

        //监听头工具栏事件
        table.on('toolbar(test)', function (obj) {
            var checkStatus = table.checkStatus(obj.config.id)
                , data = checkStatus.data; //获取选中的数据
            switch (obj.event) {
                case 'add':
                    window.location.href = "/bill/toAdd";
                    break;
                case 'update':
                    if (data.length === 0) {
                        layer.msg('请选择一行');
                    } else if (data.length > 1) {
                        layer.msg('只能同时编辑一个');
                    } else {
                        window.location.href = "/bill/toUpdate?id=" + checkStatus.data[0].id;
                    }
                    break;
                case 'delete':
                    if (data.length === 0) {
                        layer.msg('请选择一行');
                    } else {
                        layer.confirm('真的删除这行么', function (index) {
                            //向服务端发送删除指令
                            //发起异步请求
                            $.ajax({
                                type: "post",
                                url: "/bill/delete/" + checkStatus.data[0].id,
                                data: "_method=DELETE",
                                success: function (obj) {
                                    if (obj == 1) {
                                        window.location.href = "/bill/index";
                                    } else {
                                        alert("删除失败!");
                                    }
                                }
                            })
                        });
                    }
                    break;
            }
            ;
        });

        //监听行工具事件
        table.on('tool(test)', function (obj) { //注:tool 是工具条事件名,test 是 table 原始容器的属性 lay-filter="对应的值"
            var data = obj.data //获得当前行数据
                , layEvent = obj.event; //获得 lay-event 对应的值
            if (layEvent === 'detail') {
                layer.msg('查看操作');
            } else if (layEvent === 'more') {
                //下拉菜单
                dropdown.render({
                    elem: this //触发事件的 DOM 对象
                    , show: true //外部事件触发即显示
                    , data: [{
                        title: '编辑'
                        , id: 'edit'
                    }, {
                        title: '删除'
                        , id: 'del'
                    }]
                    , click: function (menudata) {
                        if (menudata.id === 'del') {
                            layer.confirm('真的删除这行么', function (index) {
                                obj.del(); //删除对应行(tr)的DOM结构
                                layer.close(index);
                                //向服务端发送删除指令
                                //发起异步请求
                                $.ajax({
                                    type: "post",
                                    url: "/bill/delete/" + data.id,
                                    data: "_method=DELETE",
                                    success: function (obj) {
                                        if (obj == 1) {
                                            window.location.href = "/bill/index";
                                        } else {
                                            alert("删除失败!");
                                        }
                                    }
                                })
                            });
                        } else if (menudata.id === 'edit') {
                            window.location.href = "/bill/toUpdate?id=" + data.id;
                        }
                    }
                    , style: 'margin-left: -45px; box-shadow: 1px 1px 10px rgb(0 0 0 / 12%);' //设置额外样式
                })
            }
        });
    });
script>

<script>
    layui.use('laydate', function () {
        var laydate = layui.laydate;
        //日期范围
        laydate.render({
            elem: '#test6'
            //设置开始日期、日期日期的 input 选择器
            //数组格式为 2.6.6 开始新增,之前版本直接配置 true 或任意分割字符即可
            , range: ['#test-startDate-1', '#test-endDate-1']
        });
    });
script>

<script>
    function loadData() {
        var typeId = $("#typeId").val();
        var date1 = $("#test-startDate-1").val();
        var date2 = $("#test-endDate-1").val();
        $.ajax({
            type: "GET",
            url: "/bill/list-page",
            data: $("#myForm").serialize(),  //主要是分页和多条件参数数据
            dataType: "json",
            success: function (list) {
                var table = layui.table, dropdown = layui.dropdown; //下拉菜单

                //分页列出查询到的数据
                table.render({
                    elem: '#demo'
                    , url: '/bill/list-page' //数据接口
                    , page: true //开启分页
                    , toolbar: 'default' //开启工具栏,此处显示默认图标
                    , where: {
                        typeId:typeId,
                        date1: date1,
                        date2: date2
                    }
                    , cols: [
                        [ //表头
                            {type: 'checkbox', fixed: 'left'}
                            , {field: 'id', title: 'ID', sort: true}
                            , {field: 'title', title: '标题'}
                            , {field: 'billTime', title: '时间', sort: true}
                            , {field: 'price', title: '金额'}
                            , {field: 'typeName', title: '类别'}
                            , {field: 'explain', title: '说明'}
                            , {fixed: 'right', align: 'center', toolbar: '#barDemo'}
                        ]
                    ], parseData: function (res) {
                        return {
                            "code": 0,
                            "msg": "",
                            "count": res.total,
                            "data": res.list
                        }
                    }, request: {
                        pageName: 'pageNum',
                        limitName: 'pageSize'
                    }
                });
            }
        })
    }
script>
html>
add.html:
<html lang="en" xmlns:th="http://www.thymeleaf.org">
<head>
    <meta charset="UTF-8">
    <title>addtitle>
    <link rel="stylesheet" th:href="@{/layui/css/layui.css}" media="all"/>
head>
<body>
<div style="width: 60%;margin: 0 auto" >
    <fieldset class="layui-elem-field layui-field-title" style="margin-top: 20px;">
        <legend>增加账单legend>
    fieldset>

    <form class="layui-form" id="myForm" method="post">
        <div class="layui-form-item">
            <label class="layui-form-label">类型label>
            <div class="layui-input-block">
                <select name="typeId" lay-filter="typeId">
                    <option value="-1">请选择类型option>
                    <option value="1">收入option>
                    <option value="2">支出option>
                    <option value="3">借入option>
                    <option value="4">借出option>
                select>
            div>
        div>
        <div class="layui-form-item">
            <label class="layui-form-label">标题label>
            <div class="layui-input-block">
                <input type="text" name="title" lay-verify="title" autocomplete="off" placeholder="请输入标题" class="layui-input">
            div>
        div>
        <div class="layui-form-item">
            <label class="layui-form-label">时间label>
            <div class="layui-input-inline">
                <input type="text" name="billTime" id="date" lay-verify="date" placeholder="请选择时间" autocomplete="off" class="layui-input">
            div>
        div>
        <div class="layui-form-item">
            <label class="layui-form-label">金额label>
            <div class="layui-input-block">
                <input type="text" name="price" lay-verify="title" autocomplete="off" placeholder="请输入金额" class="layui-input">
            div>
        div>
        <div class="layui-form-item">
            <label class="layui-form-label">说明label>
            <div class="layui-input-block">
                <input type="text" name="explain" lay-verify="title" autocomplete="off" placeholder="请输入说明" class="layui-input">
            div>
        div>

        <div style="width: 30%;margin: 0 auto">
            <input id="btnAdd" type="submit" class="layui-btn"/>
            <input type="reset" class="layui-btn"/>
        div>
    form>
div>

body>

<script type="text/javascript" th:src="@{/layui/jquery.min.js}">script>
<script type="text/javascript" th:src="@{/layui/layui.js}">script>
<script>
    layui.use('laydate', function(){
        var laydate = layui.laydate;
        laydate.render({
            elem: '#date'
        });
    });
script>
<script>
    $(function () {
        //提交按钮的事件
        $("#btnAdd").click(function () {
            $.ajax({
                type:"post",
                url:"/bill/add",
                data:$("#myForm").serialize(),
                dataType:"json",
                success:function () {
                    window.location.href = "/bill/index";
                }
            })
        })
    })
script>
html>
update.html:
<html lang="en" xmlns:th="http://www.thymeleaf.org">
<head>
    <meta charset="UTF-8">
    <title>updatetitle>
    <link rel="stylesheet" th:href="@{/layui/css/layui.css}" media="all"/>
head>
<body>
<div style="width: 60%;margin: 0 auto">
    <fieldset class="layui-elem-field layui-field-title" style="margin-top: 20px;">
        <legend>修改账单legend>
    fieldset>

    <form class="layui-form" id="myForm" method="post">
        <div class="layui-form-item">
            <label class="layui-form-label">类型label>
            <div class="layui-input-block">
                <select name="typeId">
                    <option value="-1">请选择类型option>
                    <option value="1">收入option>
                    <option value="2">支出option>
                    <option value="3">借入option>
                    <option value="4">借出option>
                select>
            div>
        div>
        <div class="layui-form-item">
            <label class="layui-form-label">标题label>
            <div class="layui-input-block">
                <input type="text" name="title" lay-verify="title" autocomplete="off" placeholder="请输入标题"
                       class="layui-input">
            div>
        div>
        <div class="layui-form-item">
            <label class="layui-form-label">时间label>
            <div class="layui-input-inline">
                <input type="text" name="billTime" id="date" lay-verify="date" placeholder="请选择时间" autocomplete="off"
                       class="layui-input">
            div>
        div>
        <div class="layui-form-item">
            <label class="layui-form-label">金额label>
            <div class="layui-input-block">
                <input type="text" name="price" lay-verify="title" autocomplete="off" placeholder="请输入金额"
                       class="layui-input">
            div>
        div>
        <div class="layui-form-item">
            <label class="layui-form-label">说明label>
            <div class="layui-input-block">
                <input type="text" name="explain" lay-verify="title" autocomplete="off" placeholder="请输入说明"
                       class="layui-input">
            div>
        div>

        <div style="width: 30%;margin: 0 auto">
            <input id="btnUpdate" type="submit" class="layui-btn"/>
            <input type="reset" class="layui-btn"/>
        div>
    form>
div>

body>

<script type="text/javascript" th:src="@{/layui/jquery.min.js}">script>
<script type="text/javascript" th:src="@{/layui/layui.js}">script>
<script>
    layui.use('laydate', function () {
        var laydate = layui.laydate;
        laydate.render({
            elem: '#date'
        });
    });
script>
<script>
    String.prototype.GetValue = function (para) {
        let reg = new RegExp("(^|&)" + para + "=([^&]*)(&|$)");
        let r = this.substr(this.indexOf("\?") + 1).match(reg);
        if (r != null) return unescape(r[2]);
        return null;
    }
    $(function () {
        let url = document.location.toString(); //获取地址栏的URL
        let id = url.GetValue("id");
        //根据id查询账单信息并回显到页面
        queryById(id);
        //提交按钮的事件
        $("#btnUpdate").click(function () {
            $.ajax({
                type: "post",
                url: "/bill/update/" + id,
                data: $("#myForm").serialize() + "&_method=PUT",
                dataType: "json",
                success: function (obj) {
                    window.location.href = "/bill/index";
                }
            })
        })
    })

    //根据id查询账单信息并回显到页面
    function queryById(id) {
        $.ajax({
            type: "get",
            url: "/bill/"+id,
            data:"",
            success:function (obj) {
                $.ajax({
                    type: "get",
                    url: "/bill/types",
                    data:"",
                    success:function (types) {
                        let cnt = 0;
                        for(let i=0;i<types.length;i++){
                            if( obj.typeName == types[i].name){
                                cnt = i;
                            }
                        }
                        $("select[name='typeId']").val(types[cnt].id);
                        $("input[name='title']").val(obj.title);
                        $("input[name='billTime']").val(obj.billTime);
                        $("input[name='price']").val(obj.price);
                        $("input[name='explain']").val(obj.explain);
                        //重新渲染表单
                        layui.form.render();
                    }
                })
            }
        })
    }
script>
html>
学会了使用layui。