FastDDS Getting Started (1) 运行HelloWorldExample并创建Fast DDS publisher
在官网文档中的(Getting Started)一章中,解释了DDS和RTPS的基本概念,并通过一个HelloWorld的例子详细解释了如何搭建一个subscriber和一个publisher的application,并让他们实现通讯。但是其实在我们安装(安装过程见FastDDS Linux installation from sources)好的FastDDS代码包里就已经有丰富的现成的例子(有个examples文件夹)可以直接运行了。需要注意的是,examples文件夹中的例程可能是老版本的FastDDS的时候创建的,Getting Started上的内容会更新一点。
本文目前用的版本情况是:
- Fast-DDS: 基于release version 2.6.0的master branch
- Fast-DDS-Gen: 基于release version 2.1.2的master branch
文章目录
- 编译和运行HelloWorldExample
- 代码分析
-
- 1. CMakeLists.txt
-
- 1.1 通用部分
- 1.2 指定源文件和可执行文件部分
- 2. idl文件
-
- 2.1 class HelloWorld
- 2.2 class HelloWorldPubSubType: public eprosima::fastdds::dds::TopicDataType
- 3. 写一个Fast DDS publisher (HelloWorldPublisher.cpp)
-
- 3.1 class HelloWorldPublisher:
-
- 3.1.1 PubListener
- 3.1.2 构造函数和析构函数
- 3.1.3 初始化publisher
- 3.1.4 发送一次发布
- 3.1.5 运行Publisher
- 3.2 int main()
编译和运行HelloWorldExample
我们可以跑一下现成的HelloWorld例子,看一下效果,再详细分析搭建的过程。Example的路径在**~/Fast-DDS/src/fastrtps/examples/C++/**。
首先找到HelloWorldExample,我们可以看到里面已经有源代码和头文件了,还有一个idl文件。按照workflow,我们是要先使用fastddsgen命令,从idl描述的datatype生成代码的。这里可以先运行一下看看。
cd ~/Fast-DDS/src/fastrtps/examples/C++/HelloWorldExample
fastddsgen HelloWorld.idl

openjdk version "1.8.0_312"
OpenJDK Runtime Environment (build 1.8.0_312-8u312-b07-0ubuntu1~18.04-b07)
OpenJDK 64-Bit Server VM (build 25.312-b07, mixed mode)
Loading templates...
Processing the file HelloWorld.idl...
Generating Type definition files...
INFO: ./HelloWorld.h exists. Skipping.
INFO: ./HelloWorld.cxx exists. Skipping.
Generating TopicDataTypes files...
INFO: ./HelloWorldPubSubTypes.h exists. Skipping.
INFO: ./HelloWorldPubSubTypes.cxx exists. Skipping.
Adding project: HelloWorld.idl
可以看到四个INFO提示HelloWorld.h,HelloWorld.cxx,HelloWorldPubSubTypes.h,HelloWorldPubSubTypes.cxx已经存在了。也就是说这四个文件本应该是用fastddsgen生成的。
下面我们编译一下。
mkdir build
cd build
cmake ..
make
编译生成的app就在build/HelloWorldExample。接下来我们要打开两个terminal终端分别跑publisher和subscriber。
Publisher Terminal:
cd ~/Fast-DDS/src/fastrtps/examples/C++/HelloWorldExample/build/
./HelloWorldExample publisher
Subscriber Terminal:
cd ~/Fast-DDS/src/fastrtps/examples/C++/HelloWorldExample/build/
./HelloWorldExample subscriber
运行结果如下:
在运行Publisher的时候,Publisher会在Publisher running 10 samples等待。把Subscriber运行起来以后,10个message就被成功发送和接收了。

代码分析
至此,文件夹的结构如下:
HelloWorldExample
├── build
│  ├── CMakeCache.txt
│  ├── CMakeFiles
│  ├── cmake_install.cmake
│  ├── HelloWorldExample
│  └── Makefile
├── CMakeLists.txt
├── HelloWorld.cxx // 由idl生成
├── HelloWorld.h // 由idl生成
├── HelloWorld.idl      //idl 文件
├── HelloWorld_main.cpp
├── HelloWorldPublisher.cpp
├── HelloWorldPublisher.h
├── HelloWorldPubSubTypes.cxx // 由idl生成
├── HelloWorldPubSubTypes.h // 由idl生成
├── HelloWorldSubscriber.cpp
├── HelloWorldSubscriber.h
└── README.txt
接下来我们就按照Getting Started文档中搭建工程的过程来逐步分析一下。需要注意的是刚刚跑的Example里的源码比较旧,我们这里分析的是Getting Started里的。
1. CMakeLists.txt
在workspace根目录(这里就是HelloWorldExample文件夹)下首先要放一个CMakeLists.txt。内容可以大致分成两部分,通用部分和指定源文件和可执行文件部分。因为对cmake的语法不是很熟练,所以在这里也会小小地备注下。
1.1 通用部分
cmake_minimum_required(VERSION 3.12.4)

if(NOT CMAKE_VERSION VERSION_LESS 3.0)
    cmake_policy(SET CMP0048 NEW)
endif()


# 工程名称
project(DDSHelloWorld)

# Find requirements 包含库文件:fastcdr, foonathan_memory, fastrtps
if(NOT fastcdr_FOUND)
    find_package(fastcdr REQUIRED)
endif()

if(NOT fastrtps_FOUND)
    find_package(fastrtps REQUIRED)
endif()

# Set C++11 检查编译器是否支持C++11版本。
include(CheckCXXCompilerFlag)
if(CMAKE_COMPILER_IS_GNUCXX OR CMAKE_COMPILER_IS_CLANG OR
        CMAKE_CXX_COMPILER_ID MATCHES "Clang")
    check_cxx_compiler_flag(-std=c++11 SUPPORTS_CXX11)
    if(SUPPORTS_CXX11)
        add_compile_options(-std=c++11)
    else()
        message(FATAL_ERROR "Compiler doesn't support C++11")
    endif()
endif()
这里Getting Started的CMakeLists.txt和Example里会有点小区别,就是cmake的最小版本更新了(3.12.4)。另外,最后一个部分除了检查(check)是否支持C++11版本,还会set成C++11版本。
1.2 指定源文件和可执行文件部分
message(STATUS "Configuring HelloWorld publisher/subscriber example...")
file(GLOB DDS_HELLOWORLD_SOURCES_CXX "src/*.cxx")
add_executable(DDSHelloWorldPublisher src/HelloWorldPublisher.cpp ${DDS_HELLOWORLD_SOURCES_CXX})
target_link_libraries(DDSHelloWorldPublisher fastrtps fastcdr)
注意:在Example中,我们创建的是一个HelloWorldExample的可执行文件,通过传参publisher或subscriber区分两者。但是在Getting Started的例子里面,publisher和subscriber是分别创建各自的可执行文件的。
在Example的CMakeLists.txt里最后一行会有install的用法。
install(TARGETS HelloWorldExample
    RUNTIME DESTINATION examples/C++/HelloWorldExample/${BIN_INSTALL_DIR})
这里其实不需要,除非运行
make install命令,会把可执行文件HelloWorldExample放到DESTINATION/examples/C++/HelloWorldExample/${BIN_INSTALL_DIR}这个路径下。DESTINATION可以用message(${CMAKE_INSTALL_PREFIX})打印看一下具体路径,我这里是/usr/local。examples前加了/就是绝对路径了,而不是在${CMAKE_INSTALL_PREFIX}下。
2. idl文件

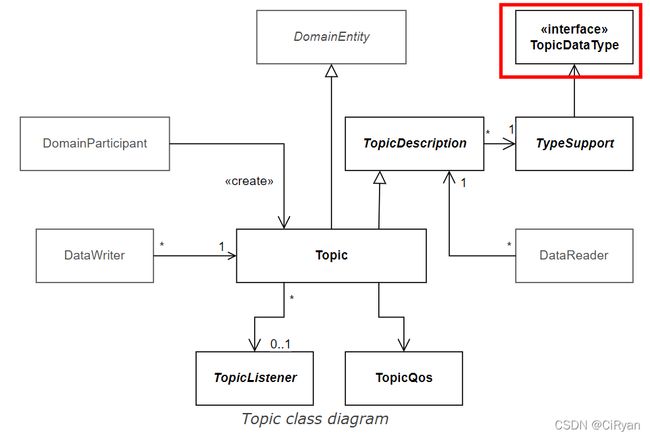
HelloWorld.idl文件非常简单,可以看到它创建了一个HelloWorld结构体,包含一个id和一个字符串类型的message。而这,也就是DDS概念模型中,TopicDataType的定义。从OMG的DDS官网我们可以知道,IDL(DDS基于的是IDL4 v4.2标准)是一种不依赖于编程语言的,用于定义数据类型和接口的描述性语言。他同时也是OMG组织制定的标准。Fast DDS-Gen作为一个Java应用程序,就是用来解析idl文件,生成数据类型定义的(即上文提到的HelloWorld.h,HelloWorld.cxx,HelloWorldPubSubTypes.h,HelloWorldPubSubTypes.cxx)。
其中:
2.1 class HelloWorld
This class represents the structure HelloWorld defined by the user in the IDL file.
-
HelloWorld.cxx: HelloWorld 类型定义.
-
HelloWorld.h: HelloWorld.cxx的头文件.
2.2 class HelloWorldPubSubType: public eprosima::fastdds::dds::TopicDataType
This class represents the TopicDataType of the type HelloWorld defined by the user in the IDL file.
- HelloWorldPubSubTypes.cxx: 基于HelloWorld类型的TopicDataType的定义。可以看到这里的HelloWorldPubSubType继承了dds中的TopicDataType父类。
- HelloWorldPubSubTypes.h: HelloWorldPubSubTypes.cxx的头文件.
3. 写一个Fast DDS publisher (HelloWorldPublisher.cpp)
HelloWorldPublisher.cpp的源码可以通过以下命令下载到:
wget -O HelloWorldPublisher.cpp https://raw.githubusercontent.com/eProsima/Fast-RTPS-docs/master/code/Examples/C++/DDSHelloWorld/src/HelloWorldPublisher.cpp
这个文件中主要包含了两部分:
- class HelloWorldPublisher:定义了一个HelloWorldPublisher类
- int main:定义了main函数
现在对代码做一个解析,为了把结构捋清,缩略了代码内容用...表示,头文件包含和命名空间部分省略不讲了。
3.1 class HelloWorldPublisher:
首先看一下FastDDS中Publisher的结构:
图片来源:https://fast-dds.docs.eprosima.com/en/latest/fastdds/dds_layer/publisher/publisher.html

可以看到图中很多类都是HelloWorldPublisher中的成员。
class HelloWorldPublisher
{
private:

    HelloWorld hello_; // HelloWorld类型的对象hello_, HelloWorld即我们在上一步中通过idl文件生成的datatype。
    DomainParticipant* participant_;
    Publisher* publisher_;
    Topic* topic_;
    DataWriter* writer_;
    TypeSupport type_; // TypeSupport class, 用于在DomainParticipant中注册topic data type。见2.2章的图片。
    class PubListener : public DataWriterListener // 继承DataWriterListener,用于重写默认的DataWriterListener的callback函数。
    {...// 详情见3.1.1
    } listener_; // the listener_ object of the class is defined as an instance of PubListener

public:

    HelloWorldPublisher()... //构造函数 详情见3.1.2,初始化了type_

    virtual ~HelloWorldPublisher()...//析构函数

    //!Initialize the publisher 初始化publisher,给以上各个成员变量赋值
    bool init()...// 详情见3.1.3

    //!Send a publication 发送一次发布
    bool publish()...// 详情见3.1.4

    //!Run the Publisher 运行publisher
    void run(
            uint32_t samples)... // 详情见3.1.5
};
以上是HelloWorldPublisher类的大致结构。下面分析一下细节:
3.1.1 PubListener
PubListener继承了FastDDS库中的 DataWriterListener。用于重写默认的DataWriterListener的callback函数。
在这个例子里只重写了on_publication_matched()这一个callback。实际上DataWriterListener还定义了其他一些callback。
class PubListener : public DataWriterListener // 继承DataWriterListener,用于重写默认的DataWriterListener的callback函数。
    {
    public:

        PubListener()
            : matched_(0) // 构造函数,初始化matched_=0
        {
        }

        ~PubListener() override // 析构函数
        {
        }
        // 重写callback on_publication_matched(),用来定义当一个新的DataReader被检测到正在监听此publisher的topic时的一系列动作。
        void on_publication_matched(
                DataWriter*,
                const PublicationMatchedStatus& info) override
        {
            if (info.current_count_change == 1) // info.current_count_change()检测此DataWriter对应的DataReaders的状态变化。
            {
                matched_ = info.total_count;
                std::cout << "Publisher matched." << std::endl; //如果有新的match的DataReader就打印Publisher matched。
            }
            else if (info.current_count_change == -1)
            {
                matched_ = info.total_count;
                std::cout << "Publisher unmatched." << std::endl; //unmatch意思是断开了和某个DataReader的关联
            }
            else
            {
                std::cout << info.current_count_change
                        << " is not a valid value for PublicationMatchedStatus current count change." << std::endl;
            }
        }

        std::atomic_int matched_;

    } listener_;
3.1.2 构造函数和析构函数
初始化成员变量和删除对象时释放空间。这里只需要注意一点,用我们通过IDL生成的HelloWorldPubSubType(见2.2章)初始化了type_。
HelloWorldPublisher()
        : participant_(nullptr)
        , publisher_(nullptr)
        , topic_(nullptr)
        , writer_(nullptr)
        , type_(new HelloWorldPubSubType())
    {
    }
3.1.3 初始化publisher
在初始化publisher的init()函数中,初始化了HelloWorldPublisher的很多成员:
- 初始化hello_的内容,hello_即为需要发送的data
- 初始化participant_,participant的QoS (FastDDS DomainPaticipant)
- participant注册type_
- 初始化topic_,由participant创建
- 初始化publisher_,由participant创建
- 初始化writer_, 由publisher创建 (FastDDS Publisher)
bool init()
    {
        // 1. Init hello_
        hello_.index(0);
        hello_.message("HelloWorld");

        // 2.Create Participant
        DomainParticipantQos participantQos;
        participantQos.name("Participant_publisher");
        participant_ = DomainParticipantFactory::get_instance()->create_participant(0, participantQos);

        if (participant_ == nullptr)
        {
            return false;
        }

        // 3.Register the Type
        type_.register_type(participant_);

        // 4.Create the publications Topic (DDS1.4规范里就定义了:topic是由DomainParticipant提供的create操作创建的)
        // create_topic(topic_name,type_name,qos)
        topic_ = participant_->create_topic("HelloWorldTopic", "HelloWorld", TOPIC_QOS_DEFAULT);

        if (topic_ == nullptr)
        {
            return false;
        }

        // 5.Create the Publisher    create_publisher(qos, listener)
        publisher_ = participant_->create_publisher(PUBLISHER_QOS_DEFAULT, nullptr);

        if (publisher_ == nullptr)
        {
            return false;
        }

        // 6.Create the DataWriter    create_datawriter(topic, qos, listener)
        writer_ = publisher_->create_datawriter(topic_, DATAWRITER_QOS_DEFAULT, &listener_);

        if (writer_ == nullptr)
        {
            return false;
        }
        return true;
    }
3.1.4 发送一次发布
HelloWorld hello_的index累加1,用writer_->write()发布hello_。
bool publish()
    {
        if (listener_.matched_ > 0)
        {
            hello_.index(hello_.index() + 1);
            writer_->write(&hello_);
            return true;
        }
        return false;
    }
3.1.5 运行Publisher
这里传了个samples,代表要发布的次数。调用3.1.4的publish()完成samples次数的发布。
void run(
            uint32_t samples)
    {
        uint32_t samples_sent = 0;
        while (samples_sent < samples)
        {
            if (publish())
            {
                samples_sent++;
                std::cout << "Message: " << hello_.message() << " with index: " << hello_.index()
                            << " SENT" << std::endl;
            }
            std::this_thread::sleep_for(std::chrono::milliseconds(1000));
        }
    }
3.2 int main()
在main函数里主要就是调用上面提到的各个成员函数了。
- 创建publisher对象
- publisher初始化
- 运行publisher
- 删除publisher对象
int main(
        int argc,
        char** argv)
{
    std::cout << "Starting publisher." << std::endl;
    int samples = 10;

    HelloWorldPublisher* mypub = new HelloWorldPublisher(); //创建publisher对象
    if(mypub->init()) //初始化
    {
        mypub->run(static_cast<uint32_t>(samples)); //运行publisher,发布10次
    }

    delete mypub;
    return 0;
}