Netty究竟是怎么运行的-连接流程的深入剖析
java nio非常难驾驭,就像我在上一篇文章中处理的文件服务器那样,也只是考虑并处理了部分情况,然而可能还是要出错,可扩展性也不好。
netty就是这样的一种框架,让Java nio变得:
- 网络服务器编程变得容易
- 可用性变高
- 扩展性好
netty的基本工作方式
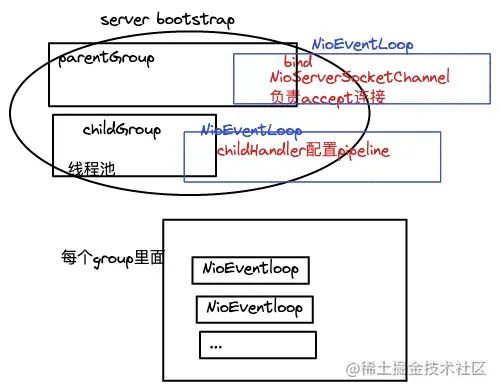
那么,Netty究竟是怎么运行的? Netty使用多Reactor多线程模型。
这种模型是把Reactor线程拆分了mainReactor和subReactor两个部分,mainReactor只处理连接事件,读写事件交给subReactor来处理。mainRactor只处理连接事件,一个端口用一个线程来处理。处理读写事件的subReactor个数一般和操作系统核数相关,一个连接对应一个线程.业务逻辑由业务线程池处理。
本文会引用一个例子,先谈谈netty使用的基本数据结构,然后梳理清楚使用netty建立连接的过程。
从一个例子开始
maven包依赖
    io.netty
    netty-all
    4.1.72.Final
server
server可以认为和我在nio的实现里面的区别是:acceptor单独一个线程池,其他io事件或者任务一个线程池。然而我当时没有这么实现,只是给业务流程一个线程池。
netty server 的代码示意如下:
public class NettyServer {
    public static void main(String[] args) throws InterruptedException {
        EventLoopGroup parentGroup = new NioEventLoopGroup();
        //NettyRuntime.availableProcessors() * 2 线程数
        EventLoopGroup childGroup = new NioEventLoopGroup();
        try {

            ServerBootstrap bootstrap = new ServerBootstrap();
            bootstrap.group(parentGroup, childGroup)
                    .channel(NioServerSocketChannel.class)
                    .childHandler(new ChannelInitializer() {
                        @Override
                        protected void initChannel(SocketChannel ch) throws Exception {
                            ChannelPipeline pipeline = ch.pipeline();
                            pipeline.addLast(new StringDecoder());//解码为字符串
                            pipeline.addLast(new StringEncoder());//编码为二进制
                            pipeline.addLast(new DemoSocketServerHandler());
                        }
                    });
            ChannelFuture future = bootstrap.bind(8888).sync();
            System.out.println("future.channel() = " + future.channel());
            System.out.println("服务器已启动。。。");
            future.channel().closeFuture().sync();
        } finally {
            parentGroup.shutdownGracefully();
            childGroup.shutdownGracefully();
        }
    }
}
server bind之后会启动一个线程阻塞在select,等待着连接了。
client
netty client的编码模型简单很多,如下:
netty client 的代码示意如下:
Bootstrap bootstrap = new Bootstrap();
bootstrap.group(eventLoopGroup)
        .channel(NioSocketChannel.class)
        .handler(new ChannelInitializer() {
            @Override
            protected void initChannel(SocketChannel ch) throws Exception {
                ChannelPipeline pipeline = ch.pipeline();
                pipeline.addLast(new StringDecoder(CharsetUtil.UTF_8));
                pipeline.addLast(new DemoSocketClientHandler());
                pipeline.addLast(new StringEncoder(CharsetUtil.UTF_8));

            }
        });

ChannelFuture future = bootstrap.connect("localhost", 8888).sync(); 客户端也是一个连接池,每个连接一个线程,这里只使用一个有点浪费了,但是这里只是一个简单的demo,暂且这样处理吧。
demo总结
可以看到,总体编码简单易懂,但要明白具体的运行机制,却要费一番功夫。下面先介绍demo中用到的基本数据结构,然后再试图弄清楚netty用于连接的机理。
数据结构
如果已经比较了解这块的数据结构,可直接跳到流程部分。
Bootstrap
- ServerBootstrap是为netty服务器设置服务的,像上面这样通过ServerBootstrap就可以配置出一个完善的netty服务来
- Bootstrap是为netty客户端设置服务的,像上面这样通过Bootstrap就可以配置出一个完善的netty客户端
Channel
可以认为channel是一个连接,Channel聚合了一组功能,不但包括网络IO操作,还包括获取该Channel的eventloop、以及获取缓冲分配器allocator, 和pipeline等。所以channel是netty里面最重要的数据结构。
NioEventLoop
NioEventLoopGroup,主要管理 eventLoop 的生命周期,可以理解为是一个线程池。
NioEventLoop 中维护了一个线程和任务队列,支持异步提交执行任务,线程启动时会调用 NioEventLoop 的 run 方法,执行I/O任务和非 I/O 任务:
- I/O 任务,即 selectionKey 中 ready 的事件,如 accept、connect、read、write 等,由 processSelectedKeys 方法触发。
- 非IO 任务,添加到 taskQueue 中的任务,如 register0、bind0 等任务以及一些定时任务,由 runAllTasks 方法触发。
两种任务的执行时间比由变量 ioRatio 控制,默认为 50,则表示允许非 IO 任务执行的时间与 IO 任务的执行时间相等。
异步的api
nio编程的时候讨论到的是非阻塞的api,非阻塞是不够方便的,往往要和循环放在一起操作,比如之前的文件服务器。
netty的设计却不同,主要需要使用到异步的api,这里谈到的异步的api其实是一种软件设计上的事情,引入这个,对于Java nio编码带来了极大的帮助。
下面先了解一下什么是异步的api
Future
Future可能大家已经非常熟知了,Future是JDK中的接口,当引入线程池的时候,Future也引入了,可以用来表示提交的任务的结果。 Future接口提供两个方法:
- get: 同步阻塞当前调用的线程,直到结果被设置
- cancel:取消异步操作,但是结果是未知的。如果操作已经完成,或者发送其他未知的原因拒绝取消,取消操作将会失败。
ChannelFuture和Promise接口
因为netty的操作和函数都和channel相关,故而netty里面给自己的Future接口命名为ChannelFuture
netty的api是建立在future之上的。
- 比如这个操作
bootstrap.connect("localhost", 8888)就是异步的,bootstrap.bind(8888)是异步的 - netty提供的write flush read bind 等函数也都是异步的
- ChannelPromise继承了ChannelFuture接口和Promise接口。
bind和connect调用之后会进入这段函数:
ChannelFuture regFuture = config().group().register(channel);
if (regFuture.cause() != null) {
    if (channel.isRegistered()) {
        channel.close();
    } else {
        channel.unsafe().closeForcibly();
    }
}
public ChannelFuture register(Channel channel) {
    return register(new DefaultChannelPromise(channel, this));
}
这个register函数里面生成了一个DefaultChannelPromise的实例new DefaultChannelPromise(channel, this),是实现了ChannelFuture接口的。
调用者可通过addListener系列设置毁掉,另一边,异步执行的地方通过setFail,setSuccess修改channelFuture的状态,trySuccess函数会调用listener的函数执行。
Channel的大动脉——pipeline
channel实例有很多成员,包括parent,id,unsafe和pipeline。 其中pipeline是Channel的大动脉。
- channel初始化的时候使用newChannelPipeline初始化了pipeline
protected AbstractChannel(Channel parent) {
    this.parent = parent;
    id = newId();
    unsafe = newUnsafe();
    pipeline = newChannelPipeline();
}- 看看pipeline的初始化吧
protected DefaultChannelPipeline(Channel channel) {
    this.channel = ObjectUtil.checkNotNull(channel, "channel");
    succeededFuture = new SucceededChannelFuture(channel, null);
    voidPromise =  new VoidChannelPromise(channel, true);

    tail = new TailContext(this);
    head = new HeadContext(this);

    head.next = tail;
    tail.prev = head;
}
在pipeline初始化的过程中,包括:
- tail的初始化,TailContext,继承了
AbstractChannelHandlerContext- tail实现了ChannelInboundHandler
- head 的初始化,HeadContext,继承了
AbstractChannelHandlerContext- head实现了
ChannelOutboundHandler, ChannelInboundHandler - 所以不管是inbound还是outbound的事件都会经过head的处理。
- head实现了
这样就构造了一个双向链表 head.next=tail,tail.prev=head,然后,通过pipiline的调用就可以使用这个双向链表继续处理了。而且,可以看到head和tail不仅有context的功能,也有Handler的功能。
ChannelHandlerContext
final class DefaultChannelHandlerContext extends AbstractChannelHandlerContext {
    private final ChannelHandler handler;
    DefaultChannelHandlerContext(
            DefaultChannelPipeline pipeline, EventExecutor executor, String name, ChannelHandler handler) {
        super(pipeline, executor, name, handler.getClass());
        this.handler = handler;
    }

    @Override
    public ChannelHandler handler() {
        return handler;
    }
}
context是pipieline链表中的一个节点 context提供了一些方法
- DefaultChannelHandlerContext初始化了handler,让Handler处理真正的逻辑
- AbstractChannelHandlerContext对应的pipeline、executor、prev和next
- AbstractChannelHandlerContext 提供了使得链路运转的方法
- findContextOutbound/Inbound
- inbound找下一个
MASK_ONLY_INOUND的next - ounbound 找下一个
MASK_ONLY_OUTBOUND的 prev
- inbound找下一个
- 一系列的invoke和fire方法
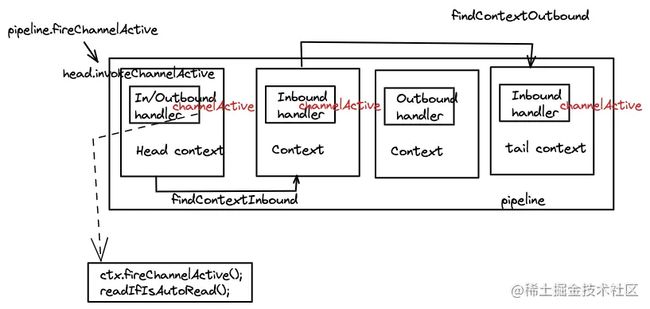
- fireChannelActive,通过findContextInbound找到下一个context,再通过invoke进行具体的调用
- invokeChannelActive(ctx)是上一个ctx调用下一个ctx,ctx调用本身的方法是不带参数的invokeChannelActive
- findContextOutbound/Inbound
static void invokeChannelActive(final AbstractChannelHandlerContext next) {
   EventExecutor executor = next.executor();
   if (executor.inEventLoop()) {
       next.invokeChannelActive();
   } else {
       executor.execute(new Runnable() {
           @Override
           public void run() {
               next.invokeChannelActive();
           }
       });
   }
}

private void invokeChannelActive() {
   if (invokeHandler()) {
       try {
           ((ChannelInboundHandler) handler()).channelActive(this);
       } catch (Throwable t) {
           invokeExceptionCaught(t);
       }
   } else {
       fireChannelActive();
   }
}
除了fire系列,还有bind/connect/disconnect/close/disregister/read/write/flush等方法,和fire系列功能类似,只是方向不同,通过findContextOutbound找到下一个context,invoke进行真正的调用。
ChannelHandler
每一个ChannelHandlerContext组合了一个Handler实例成员
ChannelHandler 是一个接口,处理 I/O 事件或拦截 I/O 操作,并将其转发到其 ChannelPipeline(业务处理链)中的下一个处理程序。
ChannelHandler 本身并没有提供很多方法,因为这个接口有许多的方法需要实现,方便使用期间,可以继承它的子类:
- ChannelInboundHandler 用于处理入站 I/O 事件。
- ChannelOutboundHandler 用于处理出站 I/O 操作。
或者使用以下适配器类:
- ChannelInboundHandlerAdapter 用于处理入站 I/O 事件。
- ChannelOutboundHandlerAdapter 用于处理出站 I/O 操作。
- ChannelDuplexHandler 用于处理入站和出站事件。
Outbound和Inbound
- 通常来说,channelXXX,表示inbound事件,否则是outBound事件
- 比如说
ChannelOutboundHandlerAdapter的connect read write flush bind close- bind其实也不会向外写数据,从tail开始处理。
ChannelInboundHandlerAdapter,- channelRegistered是从head开始 channelUngistered也是从head开始开始处理起
- channelRead,channeReadComplete
- channelWritabelChanged,这个应该需要通知handler
AbstractNioUnsafe
AbstractNioUnsafe提供了很多方法,一般是通过HeadContext的提供的io方法来调用的,主要是底层的nio方法处理,可能会注册一些定时任务,比如是否连接成功啊,发送成功啊,没发送成功则怎么处理的。就像connect这个注册了连接超时的事件。
开启eventLoop
启动新线程的入口
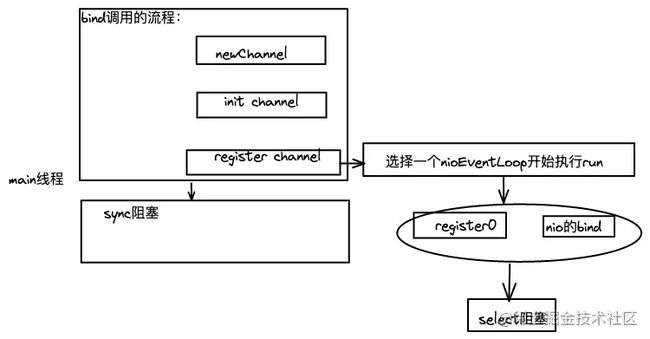
connect和bind、以及accept操作的时候都会调用group.register(channel),这个时候会启动新线程。
bind流程的启动
final ChannelFuture initAndRegister() {
    Channel channel = null;
    try {
        channel = channelFactory.newChannel();
        init(channel);
    } catch (Throwable t) {
    ...
    }
    ChannelFuture regFuture = config().group().register(channel);
    if (regFuture.cause() != null) {
       ...
    }
    return regFuture;
}初始了一个channel之后,group().register(channel)选择group里的一个eventLoop,执行它的register函数
promise.channel().unsafe().register(this, promise);if (eventLoop.inEventLoop()) {
register0(promise);
} else {
try {
eventLoop.execute(new Runnable() {
@Override
public void run() {
register0(promise);
}
});
} catch (Throwable t) {
logger.warn(
"Force-closing a channel whose registration task was not accepted by an event loop: {}",
AbstractChannel.this, t);
closeForcibly();
closeFuture.setClosed();
safeSetFailure(promise, t);
}
}如果还没有启动线程,则执行execute函数,则会启动一个新的线程。 NioEventLoop的父类SingleThreadEventExecutor的execute函数如下
private void execute(Runnable task, boolean immediate) {
    boolean inEventLoop = inEventLoop();
    addTask(task);
    if (!inEventLoop) {
        startThread();
       ...
}
先addtask,然后启动线程,并执行了
ThreadPerTaskExecutor{
@Override
public void execute(Runnable command) {
    threadFactory.newThread(command).start();
}
}
在这里启动了一个线程。
可以倒着看这里的初始化过程:
public static Executor apply(final Executor executor, final EventExecutor eventExecutor) {
    ObjectUtil.checkNotNull(executor, "executor");
    ObjectUtil.checkNotNull(eventExecutor, "eventExecutor");
    return new Executor() {
        @Override
        public void execute(final Runnable command) {
            executor.execute(apply(command, eventExecutor));
        }
    };
}
protected SingleThreadEventExecutor(EventExecutorGroup parent, Executor executor,
boolean addTaskWakesUp, int maxPendingTasks,
RejectedExecutionHandler rejectedHandler) {
super(parent);
this.addTaskWakesUp = addTaskWakesUp;
this.maxPendingTasks = Math.max(16, maxPendingTasks);
this.executor = ThreadExecutorMap.apply(executor, this);
taskQueue = newTaskQueue(this.maxPendingTasks);
rejectedExecutionHandler = ObjectUtil.checkNotNull(rejectedHandler, "rejectedHandler");
}也就是说,NioEventLoop初始化的时候使用ThreadExecutorMap.apply(executor, this)初始化了executor成员,executor成员是一个ThreadPerTaskExecutor类型。
register没有注册SelectionKey
启动新线程后,执行register0任务。 在connect和bind、以及accept的时候都会调用register,但是各自关心的SelectionKey并不是在register0任务里面注册的。SelectionKey是要用的时候才注册.
@Override
protected void doRegister() throws Exception {
    boolean selected = false;
    for (;;) {
        try {
            selectionKey = javaChannel().register(eventLoop().unwrappedSelector(), 0, this);
            return;
        }
doRegister并没有真的去注册SelectionKey,因为这里传入的参数是0.
连接的流程
我们这里认为连接有3个流程,server bind一个端口并监听这个端口,client发起连接,然后服务端通过accept和客户端建立连接。
server bind
如上面eventLoop真正开启的时候,我们当时举了bind的例子。bind的时候选择了一个NIOEventloop去执行,这个start之后就会启动NIOEventloop run的循环了。
任务0:register0
在bind流程里面,任务register0执行完之后加了一些任务,就是下面的任务1和任务2.
任务1: 添加handler-ServerBootstrapAcceptor
这个任务的添加点是ServerBootStrap的init方法,这是register0 里面addhandler的一个方法设置的。
            ch.eventLoop().execute(new Runnable() {
                @Override
                public void run() {
                    pipeline.addLast(new ServerBootstrapAcceptor(
                            ch, currentChildGroup, currentChildHandler, currentChildOptions, currentChildAttrs));
                }
            });
pipeline.addLast(new ServerBootstrapAcceptor( ch, currentChildGroup, currentChildHandler, currentChildOptions, currentChildAttrs))给当前的pipeline加了一个handler ServerBootstrapAcceptor,这个就是后面讲accept流程里面要用到的。
任务2:pipeline.bind
这个任务的添加点是doBind0方。
private static void doBind0(
        final ChannelFuture regFuture, final Channel channel,
        final SocketAddress localAddress, final ChannelPromise promise) {

    // This method is invoked before channelRegistered() is triggered.  Give user handlers a chance to set up
    // the pipeline in its channelRegistered() implementation.
    channel.eventLoop().execute(new Runnable() {
        @Override
        public void run() {
            if (regFuture.isSuccess()) {
                channel.bind(localAddress, promise).addListener(ChannelFutureListener.CLOSE_ON_FAILURE);
            } else {
                promise.setFailure(regFuture.cause());
            }
        }
    });
}
bind是出站事件,channel会调用
pipeline.bind(localAddress, promise)最终这里是调用了unsafe的bind,然后又添加了一个任务。
bind0也会失败,比如端口本身就被占用,就会调用:
channel.bind(localAddress, promise).addListener(ChannelFutureListener.CLOSE_ON_FAILURE)
ChannelFutureListener CLOSE_ON_FAILURE = new ChannelFutureListener() {
    @Override
    public void operationComplete(ChannelFuture future) {
        if (!future.isSuccess()) {
            future.channel().close();
        }
    }
};
任务3:fireChannelActive
unsafe.bind注册的任务是:
new Runnable() {
    @Override
    public void run() {
        pipeline.fireChannelActive();
    }
}
这个任务会让head HeadContext的channelActive方法去注册accept的key.
public void channelActive(ChannelHandlerContext ctx) {
    ctx.fireChannelActive();
    readIfIsAutoRead();
}-
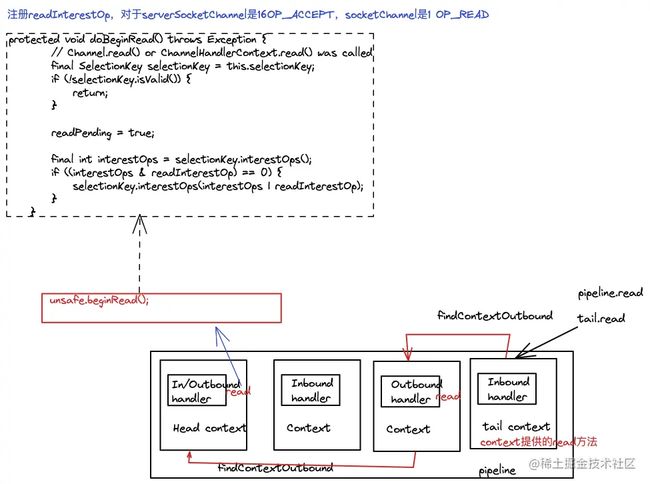
readIfIsAutoRead调用了read这个outBound事件,一直触发到head,也就是unsafe执行了doRead
-
在doRead这里调用了 doBeginRead,注册了SelectionKey.OP_ACCEPT
protected void doBeginRead() throws Exception {
    // Channel.read() or ChannelHandlerContext.read() was called
    final SelectionKey selectionKey = this.selectionKey;
    if (!selectionKey.isValid()) {
        return;
    }
    readPending = true;
    final int interestOps = selectionKey.interestOps();
    if ((interestOps & readInterestOp) == 0) {
        selectionKey.interestOps(interestOps | readInterestOp);
    }
}
在AbstractNioChannel里面readInterestOp为SelectionKey.OP_ACCEPT,这是因为这个channel初始化的时候设置了。
public NioServerSocketChannel(ServerSocketChannel channel) {
    super(null, channel, SelectionKey.OP_ACCEPT);
    config = new NioServerSocketChannelConfig(this, javaChannel().socket());
}
bind流程总结
bind流程里面触发了四种任务,任务是先进先出的。触发了一个inbound调用channelActive,触发了两个outbound调用bind和read.
client connect
上面整理了bind的流程,是从任务添加的角度来讲的。现在可以看看bind的流程是怎样的。
流程
connect的整体流程是:
流程和bind基本相同,略有区别。这是因为connect调用之后添加了一些回调函数:
public ChannelFuture connect(SocketAddress remoteAddress, SocketAddress localAddress) {
    ObjectUtil.checkNotNull(remoteAddress, "remoteAddress");
    validate();
    return doResolveAndConnect(remoteAddress, localAddress);
}
doResolveAndConnect添加的listener
final PendingRegistrationPromise promise = new PendingRegistrationPromise(channel);
regFuture.addListener(new ChannelFutureListener() {
    @Override
    public void operationComplete(ChannelFuture future) throws Exception {
        // Directly obtain the cause and do a null check so we only need one volatile read in case of a
        // failure.
        Throwable cause = future.cause();
        if (cause != null) {
            // Registration on the EventLoop failed so fail the ChannelPromise directly to not cause an
            // IllegalStateException once we try to access the EventLoop of the Channel.
            promise.setFailure(cause);
        } else {
            // Registration was successful, so set the correct executor to use.
            // See https://github.com/netty/netty/issues/2586
            promise.registered();
            doResolveAndConnect0(channel, remoteAddress, localAddress, promise);
        }
    }
});
在注册完成之后,回调这个函数doResolveAndConnect0。而doResolveAndConnect0添加了一个任务:
{
    @Override
    public void run() {
        if (localAddress == null) {
            channel.connect(remoteAddress, connectPromise);
        } else {
            channel.connect(remoteAddress, localAddress, connectPromise);
        }
        connectPromise.addListener(ChannelFutureListener.CLOSE_ON_FAILURE);
    }
}
也就是真正的连接事件channel.connect
触发pipeline connect
connect是出站事件,整体的pipiline走向为:
上面的任务调用的就是pipeline.connect,通过这样的调用链最后交给了unsafe的connect函数去处理,会调用Java NIO的connect处理。
告警和重连处理
unsafe的connect处理如下:
public final void connect(final SocketAddress remoteAddress, final SocketAddress localAddress, final ChannelPromise promise) {
    try {...
        if (doConnect(remoteAddress, localAddress)) {
            fulfillConnectPromise(promise, wasActive);
        } else {
            connectPromise = promise;
            requestedRemoteAddress = remoteAddress;
            // Schedule connect timeout.
            int connectTimeoutMillis = config().getConnectTimeoutMillis();
            if (connectTimeoutMillis > 0) {
                connectTimeoutFuture = eventLoop().schedule(new Runnable() {
                    @Override
                    public void run() {
                        ChannelPromise connectPromise = AbstractNioChannel.this.connectPromise;
                        if (connectPromise != null && !connectPromise.isDone()
                                && connectPromise.tryFailure(new ConnectTimeoutException(
                                        "connection timed out: " + remoteAddress))) {
                            close(voidPromise());
                        }
                    }
                }, connectTimeoutMillis, TimeUnit.MILLISECONDS);
            }

       ...
        }
    }...
}
首先调用doConnect:
protected boolean doConnect(SocketAddress remoteAddress, SocketAddress localAddress) {
    if (localAddress != null) {
        doBind0(localAddress);
    }

    boolean success = false;
    try {
        boolean connected = SocketUtils.connect(javaChannel(), remoteAddress);
        if (!connected) {
            selectionKey().interestOps(SelectionKey.OP_CONNECT);
        }
        success = true;
        return connected;
    } finally {
        if (!success) {
            doClose();
        }
    }
}- 这里的doConnect
SocketUtils.connect(javaChannel(), remoteAddress)的返回结果connected false,调用selectionKey().interestOps(SelectionKey.OP_CONNECT) - 则在connect函数里面走的是else流程
- 启动了一个定时任务,看是否超时,默认的超时时间是30s
也就是说这个时候连接还没有成功,通过Selector监听SelectionKey.OP_CONNECT,开始监听IO事件来发起连接。
if ((readyOps & SelectionKey.OP_CONNECT) != 0) {
    int ops = k.interestOps();
    ops &= ~SelectionKey.OP_CONNECT;
    k.interestOps(ops);
    unsafe.finishConnect();
}处理这个IO事件的时候,会先取消注册SelectionKey.OP_CONNECT,然后:
doFinishConnect();
fulfillConnectPromise(connectPromise, wasActive);- fulfillConnectPromise取消超时定时任务
@Override
public boolean cancel(boolean mayInterruptIfRunning) {
    boolean canceled = super.cancel(mayInterruptIfRunning);
    if (canceled) {
        scheduledExecutor().removeScheduled(this);
    }
    return canceled;
}
fulfillConnectPromise函数里面还会触发pipeline.fireChannelActive,主要的功能是注册读操作。
channelActive
fireChannelActive执行流程如下:
在active调用之后,通过pipeline的read注册readInterestOp,对于serverSocketChannel是16:OP_ACCEPT,socketChannel是1 :OP_READ.
connect流程总结
connect流程里面触发了oubound connect的调用,channelActive inbound的调用。并且进行了SelectionKey.OP_CONNECT的IO事件的处理:
- 连接成功会取消注册SelectionKey.OP_CONNECT,移除延时任务,注册SelectionKey.OP_READ事件
- 连接失败会不停的重连,直到超时则触发超时任务
server accept
客户端connect的时候,server收到accept的event,parentGroup的reactor监听epoll_wait的accept事件,连接建立完成之后,会触发一个新的NioEventLoop线程去处理这条连接的任务。
bind后的读事件
if ((readyOps & (SelectionKey.OP_READ | SelectionKey.OP_ACCEPT)) != 0 || readyOps == 0) {
    unsafe.read();
}
监听到 SelectionKey.OP_ACCEPT于是调用unsafe.read()处理。
unsafe.read和pipeline
对于NioServerSocketChannel,绑定的unsafe类型是NioMessageUnsafe。NioMessageUnsafe里的read函数会调用到doReadMessages:
protected int doReadMessages(List调用doReadMessages之后,会触发
pipeline.fireChannelRead(readBuf.get(i));accept整体流程如下:
我们知道NioMessageChannel已经在bind流程将ServerBootstrapAcceptor添加进来作为handler,最终调用到这个Handler的channelRead方法
public void channelRead(ChannelHandlerContext ctx, Object msg) {
    final Channel child = (Channel) msg;

    child.pipeline().addLast(childHandler);

    setChannelOptions(child, childOptions, logger);
    setAttributes(child, childAttrs);

    try {
        childGroup.register(child).addListener(new ChannelFutureListener() {
            @Override
            public void operationComplete(ChannelFuture future) throws Exception {
                if (!future.isSuccess()) {
                    forceClose(child, future.cause());
                }
            }
        });
    } catch (Throwable t) {
        forceClose(child, t);
    }
}
在这里,将msg对象转为Channel类型,将bootstrap设置的childHandler添加到child channel的pipeline。最后 又回到那个熟悉的register:childGroup.register(child)
这样会在childGroup启动一个新的NIOEventLoop线程,调用register0,register0任务里面触发了,
pipeline.fireChannelActive();就像上面提到的ChannelActive反应链,里面触发了read op的注册,后面的流程也已经很熟悉了。
accept流程总结
accept流程里面进行了SelectionKey.OP_ACCEPT的IO事件的处理,触发了inbound channelRead的调用,使用bind过程绑定的ServerBootstrapAcceptor来处理read事件,给新连接分配了新的处理线程,并且监听了可读事件。
总结
netty客户端和服务器通过bind-connect-accept这样的交互建立了一条连接,于是可以进行数据传输了。
作者:小圆规
链接:https://juejin.cn/post/7049490068888616991
来源:稀土掘金


