Linux0.11 系统调用进程创建与执行(九)
系列文章目录
Linux 0.11启动过程分析(一)
Linux 0.11 fork 函数(二)
Linux0.11 缺页处理(三)
Linux0.11 根文件系统挂载(四)
Linux0.11 文件打开open函数(五)
Linux0.11 execve函数(六)
Linux0.11 80X86知识(七)
Linux0.11 内核体系结构(八)
Linux0.11 系统调用进程创建与执行(九)
文章目录
- 系列文章目录
- 前提回顾
-
- 内存分布
- 堆栈信息
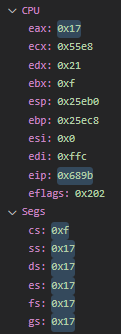
- 寄存器信息
-
- 段选择符
- 通用寄存器
- task[0] 信息
-
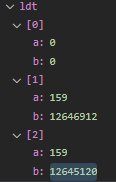
- ldt
- tss
- 一、环境初始化
- 二、move_to_user_mode
-
-
- 寄存器
- 分析
-
- 段选择符
- 段描述符
- 描述
-
- 三、补充配置
-
- 1、空格
- 2、文字颜色
- 3、文字大小
- 4、字体
- 5、背景色
- 6、文章转载
- 7、代码片
- 8、文字居中
- 9、公式
- 总结
前提回顾
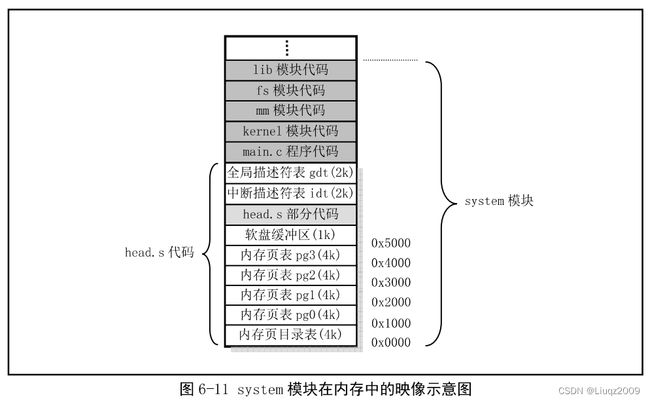
Linux 系统经历 BIOS、bootsect.s、setup.s、head.s 一系列执行后, 其从实模式切换到了 32 位保护模式,此时即将运行 init/main.c 中的 main 函数。
内存分布
堆栈信息
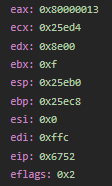
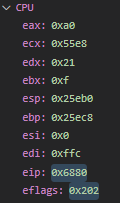
寄存器信息
段选择符
通用寄存器
task[0] 信息
struct task_struct {
	// ...

    /* 本任务的局部表描述符。 0 空, 1 代码段 cs, 2 数据段和堆栈段 ds&ss */
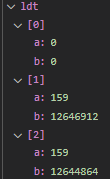
	struct desc_struct ldt[3];
    /* 本进程的任务状态段信息结构 */
	struct tss_struct tss;
};
ldt
tss
一、环境初始化
void main(void) /* This really IS void, no error here. */
{               /* The startup routine assumes (well, ...) this */
                /*
                 * Interrupts are still disabled. Do necessary setups, then
                 * enable them
                 */

  ROOT_DEV = ORIG_ROOT_DEV;
  drive_info = DRIVE_INFO;
  memory_end = (1 << 20) + (EXT_MEM_K << 10);
  memory_end &= 0xfffff000;
  if (memory_end > 16 * 1024 * 1024)
    memory_end = 16 * 1024 * 1024;
  if (memory_end > 12 * 1024 * 1024)
    buffer_memory_end = 4 * 1024 * 1024;
  else if (memory_end > 6 * 1024 * 1024)
    buffer_memory_end = 2 * 1024 * 1024;
  else
    buffer_memory_end = 1 * 1024 * 1024;
  main_memory_start = buffer_memory_end;
#ifdef RAMDISK
  main_memory_start += rd_init(main_memory_start, RAMDISK * 1024);
#endif
  mem_init(main_memory_start, memory_end);
  trap_init();
  blk_dev_init();
  chr_dev_init();
  tty_init();
  time_init();
  sched_init();
  buffer_init(buffer_memory_end);
  hd_init();
  floppy_init();
  sti();
  move_to_user_mode();
  if (!fork()) { /* we count on this going ok */
    init();
  }
  /*
   *   NOTE!!   For any other task 'pause()' would mean we have to get a
   * signal to awaken, but task0 is the sole exception (see 'schedule()')
   * as task 0 gets activated at every idle moment (when no other tasks
   * can run). For task0 'pause()' just means we go check if some other
   * task can run, and if not we return here.
   */
  for (;;)
    pause();
}
代码执行到 move_to_user_mode 函数之前,其进行了一系列初始化操作。跟踪发现除了通用寄存器发生变化外,段寄存器,task[0] 中 ldt ,tss 都未发生变化。
执行完 move_to_user_mode 函数后,程序由内核态进入用户态(任务 0 的用户态)。
二、move_to_user_mode
move_to_user_mode 函数把进程 0 由内核态转成用户态。其代码如下:
#define move_to_user_mode() \		// 模仿中断硬件压栈,顺序是 ss、esp、eflags、cs、eip
__asm__ ("movl %%esp,%%eax\n\t" \
	"pushl $0x17\n\t" \				// ss 入栈, 0x17 即二进制的 10111(特权级3、LDT、数据段)
	"pushl %%eax\n\t" \				// esp 入栈
	"pushfl\n\t" \					// eflags 入栈
	"pushl $0x0f\n\t" \				// cs 入栈, 0x0f 即 111 (特权级3、LDT、代码段)
	"pushl $1f\n\t" \				// eip 入栈
	"iret\n" \						// 出栈恢复现场,翻转特权级从 0 到 3
	"1:\tmovl $0x17,%%eax\n\t" \	// 下面的代码使 ds、es、fs、gs 与 ss 一致
	"movw %%ax,%%ds\n\t" \
	"movw %%ax,%%es\n\t" \
	"movw %%ax,%%fs\n\t" \
	"movw %%ax,%%gs" \
	:::"ax")
寄存器
分析
typedef struct desc_struct {
	unsigned long a,b;
} desc_table[256];
以下为 GDT、LDT、TSS 间的关系:
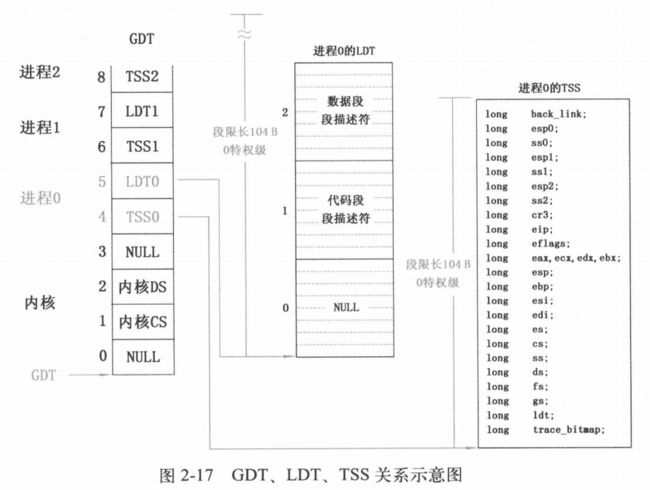
值的形式为:b:a
| 0 | 1 | 2 | 3 | 4 | 5 |
|---|---|---|---|---|---|
| NULL | 内核CS | 内核DS | NULL | TSS0 | LDT0 |
| 0:0 | C09A00:FFF | C09300:FFF | 0:0 | 8B01:F4480068 | 8201:F4300068 |
| 6 | 7 | 8 | 9 | … | |
| TSS1 | LDT1 | TSS2 | LDT2 | … | |
| 0:0 | 0:0 | 0:0 | 0:0 | … |
段选择符
段描述符
描述
段寄存器 CS 由 0x08 变为 0x0F。
-
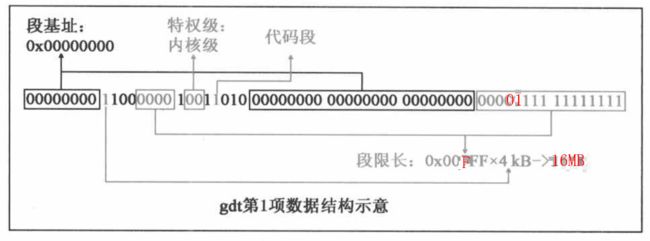
选择符(0x08)指定了 GDT 中具有 RPL=0 的段 1,其索引字段值是 1,TI 位是 0,指定 GDT 表。其指向的描述符值为:0xC09A00:FFF。
-
选择符(0x0f)指定了 LDT 中具有 RPL=3 的段 1,其索引字段值是 1,TI 位是 1,指定 LDT 表。其指向Task0的局部描述符,其值为:C0FA00:0x9F。
其他段寄存器 SS、DS、ES、FS、GS 由 0x10 变成了 0x17。
-
选择符(0x10)指定了 GDT 中具有 RPL=0 的段 2,其索引字段值是 2,TI 位是 0,指定 GDT 表。其指向的描述符值为:0xC09300:FFF。
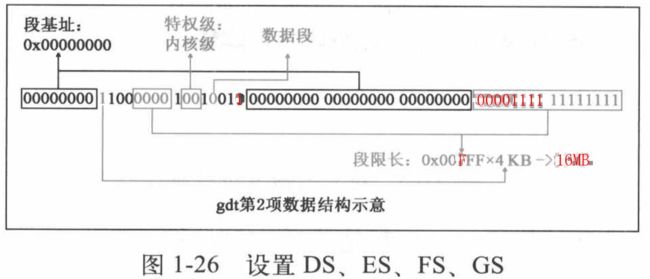
-
选择符(0x17)指定了 LDT 中具有 RPL=3 的段 2,其索引字段值是 2,TI 位是 1,指定 LDT 表。其指向Task0的局部描述符,其值为:C0F300:0x9F。
三、补充配置
1、空格
为“全角空格”
为“全角空格”
为“不换行空格”
2、文字颜色
浅红色文字:<font color="#dd0000">浅红色文字:font><br />
深红色文字:<font color="#660000">深红色文字font><br />
浅绿色文字:<font color="#00dd00">浅绿色文字font><br />
深绿色文字:<font color="#006600">深绿色文字font><br />
浅蓝色文字:<font color="#0000dd">浅蓝色文字font><br />
深蓝色文字:<font color="#000066">深蓝色文字font><br />
浅黄色文字:<font color="#dddd00">浅黄色文字font><br />
深黄色文字:<font color="#666600">深黄色文字font><br />
浅青色文字:<font color="#00dddd">浅青色文字font><br />
深青色文字:<font color="#006666">深青色文字font><br />
浅紫色文字:<font color="#dd00dd">浅紫色文字font><br />
深紫色文字:<font color="#660066">深紫色文字font><br />
3、文字大小
size为1:<font size="1">size为1font><br />
size为2:<font size="2">size为2font><br />
size为3:<font size="3">size为3font><br />
size为4:<font size="4">size为4font><br />
size为10:<font size="10">size为10font><br />
4、字体
<font face="黑体">我是黑体字font>
<font face="宋体">我是宋体字font>
<font face="微软雅黑">我是微软雅黑字font>
<font face="fantasy">我是fantasy字font>
<font face="Helvetica">我是Helvetica字font>
5、背景色
<table>
    <tr>
        <td bgcolor=#FF00FF>背景色的设置是按照十六进制颜色值:#7FFFD4td>		tr>
table>
<table>
    <tr>
        <td bgcolor=#FF83FA>背景色的设置是按照十六进制颜色值:#FF83FA
        td>
    tr>
table>
<table>
    <tr>
        <td bgcolor=#D1EEEE>背景色的设置是按照十六进制颜色值:#D1EEEE
        td>
    tr>
table>
<table>
    <tr>
        <td bgcolor=#C0FF3E>背景色的设置是按照十六进制颜色值:#C0FF3E
        td>
    tr>
table>
<table>
    <tr>
        <td bgcolor=#54FF9F>背景色的设置是按照十六进制颜色值:#54FF9F
        td>
    tr>
table>
<table>
    <tr>
        <td bgcolor=DarkSeaGreen>这里的背景色是:DarkSeaGreen,此处输入任意想输入的内容
        td>
    tr>
table>
6、文章转载
文章作者(任意想输入的汉字), <a href="转载文章的网址">转载文章的名称a>
7、代码片
| 名称 | 关键字 | 调用的js | 说明 |
|---|---|---|---|
| AppleScript | applescript | shBrushAppleScript.js | |
| ActionScript 3.0 | actionscript3 , as3 | shBrushAS3.js | |
| Shell | bash , shell | shBrushBash.js | |
| ColdFusion | coldfusion , cf | shBrushColdFusion.js | |
| C | cpp , c | shBrushCpp.js | |
| C# | c# , c-sharp , csharp | shBrushCSharp.js | |
| CSS | css | shBrushCss.js | |
| Delphi | delphi , pascal , pas | shBrushDelphi.js | |
| diff&patch | diff patch | shBrushDiff.js | 用代码版本库时,遇到代码冲突,其语法就是这个 |
| Erlang | erl , erlang | shBrushErlang.js | |
| Groovy | groovy | shBrushGroovy.js | |
| Java | java | shBrushJava.js | |
| JavaFX | jfx , javafx | shBrushJavaFX.js | |
| JavaScript | js , jscript , javascript | shBrushJScript.js | |
| Perl | perl , pl , Perl | shBrushPerl.js | |
| PHP | php | shBrushPhp.js | |
| text | text , plain | shBrushPlain.js | 就是普通文本 |
| Python | py , python | shBrushPython.js | |
| Ruby | ruby , rails , ror , rb | shBrushRuby.js | |
| SASS&SCSS | sass , scss | shBrushSass.js | |
| Scala | scala | shBrushScala.js | |
| SQL | sql | shBrushSql.js | |
| Visual Basic | vb , vbnet | shBrushVb.js | |
| XML | xml , xhtml , xslt , html | shBrushXml.js | |
| Objective C | objc , obj-c | shBrushObjectiveC.js | |
| F# | f# f-sharp , fsharp | shBrushFSharp.js | |
| xpp | xpp , dynamics-xpp | shBrushDynamics.js | |
| R | r , s , splus | shBrushR.js | |
| matlab | matlab | shBrushMatlab.js | |
| swift | swift | shBrushSwift.js | |
| GO | go , golang | shBrushGo.js |
8、文字居中
<center>数据结构和算法是居中展示,使用center标签center>
9、公式
MarkDown数学公式基本语法
总结
提示:这里对文章进行总结:
例如:以上就是今天要讲的内容,本文仅仅简单介绍了pandas的使用,而pandas提供了大量能使我们快速便捷地处理数据的函数和方法。


