剪枝与重参第三课:常用剪枝工具
目录
- 常用剪枝工具
-
- 前言
- 1.torch.nn.utils.prune
-
- 1.1 API简单示例
- 1.2 拓展之钩子函数
- 2.pytorch pruning functions
- 3.custom pruning functions
- 总结
常用剪枝工具
前言
手写AI推出的全新模型剪枝与重参课程。记录下个人学习笔记,仅供自己参考。
本次课程主要讲解常用剪枝工具。
课程大纲可看下面的思维导图
1.torch.nn.utils.prune
1.1 API简单示例
使用pytorch提供的API进行剪枝
下面是简单的示例代码:
import torch
import torch.nn as nn
import torch.nn.utils.prune as prune

# Define a simple linear layer
class MyLinearLayer(nn.Module):
    def __init__(self, in_features, out_features) -> None:
        super(MyLinearLayer, self).__init__()
        self.weight = nn.Parameter(torch.randn(out_features, in_features))

    def forward(self, x):
        return torch.matmul(x, self.weight.t())

# Create an instance of the linear layer
linear_layer = MyLinearLayer(5, 3)
print("before pruning")
print(linear_layer.weight)

# Apply pruning to the layer's weight
prune.random_unstructured(linear_layer, name='weight', amount=0.5)

# Define the forward pre-hook
def apply_pruning(module, input):
    module.weight.data = module.weight * module.weight_mask

# Register the forward pre-hook
linear_layer.register_forward_pre_hook(apply_pruning)

# Perform a forward pass
input_tensor = torch.randn(1, 5)
output_tensor = linear_layer(input_tensor)

print("after pruning")

print("Input Tensor:")
print(input_tensor)

print("Weight Tensor")
print(linear_layer.weight)

print("Output Tensor:")
print(output_tensor)
在上面的示例代码中展示了如何使用pytorch的API进行简单的剪枝操作。代码中定义了一个简单的线性层MyLinearLayer,使用prune.random_unstructured函数将权重矩阵的50%随机剪枝。同时,定义了一个前向钩子函数apply_pruning,在模块前向计算之前被调用。该函数用于将权重矩阵与其对应的掩码相乘,实现对剪枝权重的应用。
1.2 拓展之钩子函数
钩子函数是pytorch提供的一种回调机制,可以在模型的前向传播、反向传播或权重更新等过程中插入自定义的操作。注册钩子函数可以使用户在模型运行过程中捕获相关的中间结果或梯度信息,以便进行后续的处理或可视化。(from chatGPT)
在pytorch中,每个钩子函数的输入参数是固定的,都是(module, input),即当前模块以及该模块的输入。
在pytorch中,每个nn.Module都有一个register_forward_pre_hook方法和一个register_forward_hook方法,可以用来注册前向传播预处理钩子和前向传播钩子。类似的,每个nn.Parameter都有register_hook方法,可以用来注册梯度钩子,以便在梯度计算过程中捕获相关的中间结果。
注册钩子函数时,需要指定钩子函数本身和钩子函数所对应的模块或函数。在模型运行时,pytorch会自动调用这些钩子函数,并将相关的数据作为参数传递给它们。
前向传播预处理钩子可以用来修改模型的输入或权重(可用来完成剪枝),或者为模型添加噪声或dropout等操作。前向传播钩子可以用来捕获模型的中间结果,以便进行可视化或保存。梯度钩子可以用来捕获模型的梯度信息,以便进行梯度修剪或梯度反转等操作。
总之,钩子函数和注册钩子函数是pytorch提供的一种方便灵活的回调机制,可以让用户在模型运行过程中自由插入自定义操作,从而实现更加高效和个性化的模型训练和优化。
2.pytorch pruning functions
调用pytorch官方pruning functions案例
对于model中的某个module进行剪枝的示例图如下:
在上图中,named_parameters中存储的是一些权重信息,包括weights、bias等等,而name_buffer存储的是对应剪枝的mask信息,它不参与梯度的反向传播。当执行prune操作后,name_buffer中的mask不再为空,而是存储着对应的值。
调用pytorch官方pruning functions的示例代码如下:
import torch
from torch import nn
import torch.nn.utils.prune as prune
import torch.nn.functional as F

device = torch.device("cuda" if torch.cuda.is_available() else "cpu")

class LeNet(nn.Module):
    def __init__(self):
        super(LeNet, self).__init__()
        # 1 input image channel, 6 output channels, 3x3 square conv kernel
        self.conv1 = nn.Conv2d(1, 6, 3)
        self.conv2 = nn.Conv2d(6, 16, 3)
        self.fc1 = nn.Linear(16 * 5 * 5, 120)   # 5x5 image dimension
        self.fc2 = nn.Linear(120, 84)
        self.fc3 = nn.Linear(84, 10)

    def forward(self, x):
        x = F.max_pool2d(F.relu(self.conv1(x)), (2, 2))
        x = F.max_pool2d(F.relu(self.conv2(x)), 2)
        x = x.view(-1, int(x.nelement() / x.shape[0]))
        x = F.relu(self.fc1(x))
        x = F.relu(self.fc2(x))
        x = self.fc3(x)
        return x

model = LeNet().to(device=device)

# Iterative Pruning
module = model.conv1
# https://pytorch.org/docs/stable/search.html?q=TORCH.NN.UTILS.PRUNE&check_keywords=yes&area=default
prune.random_unstructured(module, name='weight', amount=0.3)   # weight所有参数的30%
prune.ln_structured(module, name='weight', amount=0.5, n=2, dim=0)
print("=====Iterative Pruning=====")
print(model.state_dict().keys())

# Pruning multiple parameters in a model
new_model = LeNet()
for name, module in new_model.named_modules():
    # prune 20% of connections in all 2D-conv layers
    if isinstance(module, torch.nn.Conv2d):
        prune.l1_unstructured(module, name='weight', amount=0.2)
    # prune 40% of connections in all linear layers
    if isinstance(module, torch.nn.Linear):
        prune.l1_unstructured(module, name='weight', amount=0.4)
print("=====Pruning multiple parameters in a model=====")
print(dict(new_model.named_buffers()).keys())   # to verify that all masks exist

# Global pruning
model = LeNet()

parameters_to_prune = (
    (model.conv1, 'weight'),
    (model.conv2, 'weight'),
    (model.fc1, 'weight'),
    (model.fc2, 'weight'),
    (model.fc3, 'weight')
)

prune.global_unstructured(parameters_to_prune, pruning_method=prune.L1Unstructured, amount=0.2)
print("=====Global pruning=====")
print(
    "Sparsity in conv1.weight: {:.2f}%".format(
        100. * float(torch.sum(model.conv1.weight == 0))
        / float(model.conv1.weight.nelement())
    )
)
print(
    "Sparsity in conv2.weight: {:.2f}%".format(
        100. * float(torch.sum(model.conv2.weight == 0))
        / float(model.conv2.weight.nelement())
    )
)
print(
    "Sparsity in fc1.weight: {:.2f}%".format(
        100. * float(torch.sum(model.fc1.weight == 0))
        / float(model.fc1.weight.nelement())
    )
)
print(
    "Sparsity in fc2.weight: {:.2f}%".format(
        100. * float(torch.sum(model.fc2.weight == 0))
        / float(model.fc2.weight.nelement())
    )
)
print(
    "Sparsity in fc3.weight: {:.2f}%".format(
        100. * float(torch.sum(model.fc3.weight == 0))
        / float(model.fc3.weight.nelement())
    )
)
print(
    "Global sparsity: {:.2f}%".format(
        100. * float(
            torch.sum(model.conv1.weight == 0)
            + torch.sum(model.conv2.weight == 0)
            + torch.sum(model.fc1.weight == 0)
            + torch.sum(model.fc2.weight == 0)
            + torch.sum(model.fc3.weight == 0)
        )
        / float(
            model.conv1.weight.nelement()
            + model.conv2.weight.nelement()
            + model.fc1.weight.nelement()
            + model.fc2.weight.nelement()
            + model.fc3.weight.nelement()
        )
    )
)
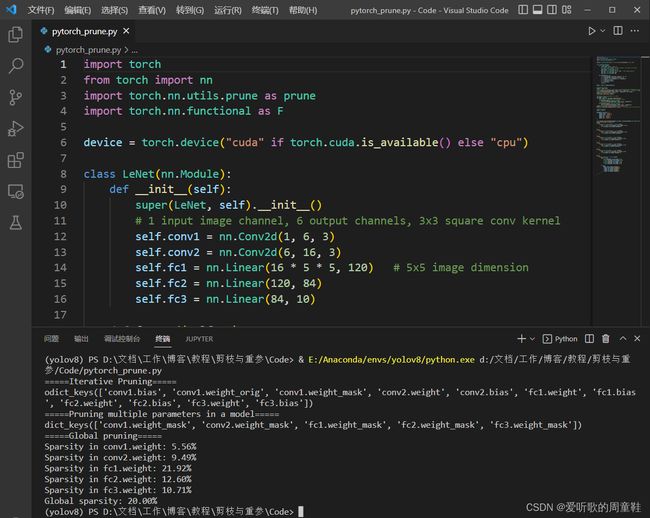
首先展示了对于一个module可以使用pytorch的剪枝函数对其进行Iterative pruning即迭代剪枝。接下来展示了如何在模型中剪枝多个参数,代码中使用pytorch剪枝函数对卷积层中的20%和全连接层的40%进行了剪枝。最后,展示了如何进行全局剪枝(global pruning),代码中使用了prune.global_unstructured()函数,并指定了要进行剪枝的参数列表、剪枝方法和剪枝比例。剪枝后,打印了每个参数的稀疏度以及全局稀疏度。
输出结果如下:
3.custom pruning functions
自定义prune functions案例
步骤如下:
- 1.interface
- 2.implementation compute_mask
- 3.prune a module
实现一个简单的剪枝案例,对bias进行剪枝,相隔一个数则将bias置0,示例代码如下:
import torch
from torch import nn
import torch.nn.utils.prune as prune
import torch.nn.functional as F

device = torch.device("cuda" if torch.cuda.is_available() else "cpu")

class LeNet(nn.Module):
    def __init__(self):
        super(LeNet, self).__init__()
        # 1 input image channel, 6 output channels, 3x3 square conv kernel
        self.conv1 = nn.Conv2d(1, 6, 3)
        self.conv2 = nn.Conv2d(6, 16, 3)
        self.fc1 = nn.Linear(16 * 5 * 5, 120)   # 5x5 image dimension
        self.fc2 = nn.Linear(120, 84)
        self.fc3 = nn.Linear(84, 10)

    def forward(self, x):
        x = F.max_pool2d(F.relu(self.conv1(x)), (2, 2))
        x = F.max_pool2d(F.relu(self.conv2(x)), 2)
        x = x.view(-1, int(x.nelement() / x.shape[0]))
        x = F.relu(self.fc1(x))
        x = F.relu(self.fc2(x))
        x = self.fc3(x)
        return x

class ImplEveryOtherPruningMethod(prune.BasePruningMethod):
    """Prune every other entry in a tensor
    """
    PRUNING_TYPE = 'unstructured'

    def compute_mask(self, t, default_mask):
        # pytorch源码参考: https://github.com/pytorch/pytorch/blob/master/torch/nn/utils/prune.py#:~:text=%40abstractmethod,method%20recipe.
        mask = default_mask.clone()
        mask.view(-1)[::2] = 0
        return mask

def Ieveryother_unstructured_prune(module, name):
    # pytorch官方教程: https://pytorch.org/tutorials/intermediate/pruning_tutorial.html#:~:text=Global%20sparsity%3A%2020.00%25-,Extending%20torch.nn.utils.prune%20with%20custom%20pruning,-functions
    ImplEveryOtherPruningMethod.apply(module, name) # apply: generate a mask and and apply the mask to the module's parameters
    return module

model = LeNet()
Ieveryother_unstructured_prune(model.fc3, name='bias')

print(model.fc3.bias_mask)
这是一个自定义的prune方法的例子。这里实现了一个名为ImplEveryOtherPruningMethod的类,该类继承自prune.BasePruningMethod,并实现了compute_mask方法,该方法接受两个参数t的default_mask,并返回一个mask。然后,我们定义了一个名为Ieveryother_unstructured_prune的函数,该函数应用ImplEveryOtherPruningMethod类的apply方法来生成掩码并将其应用于所提供的模块的参数。最后,我们在模型的第3个全连接层的偏置上应用了这个自定义的prune方法,并打印了生成的mask。
总结
本次课程我们学习了pytorch中的剪枝工具,以及实现了一个简单的自定义prune方法。下节课主要讲解NVIDIA的2:4稀疏patter技术,博客链接,2:4实现链接。


