consul服务注册及与spingboot的整合
1.本地安装consul
安装包可在官网下载Consul by HashiCorp
2.本地启动consul
进入本地的consul目录下,新建cfg目录作为config目录,data目录作为数据目录,然后输入
//这里根据自己的实际路径来写,我这里写的是我的路径
consul agent -dev -client=0.0.0.0 -config-dir=./cfg -data-dir=./data
此时若在 ps -ef | grep consul指令输入后,能找到对应的consul进程,则启动成功
3.springboot配置
pom.xml文件中引入springboot和springcloud的依赖
    UTF-8
    1.8
    1.8
    2.0.6.RELEASE
    Finchley.SR2


      org.springframework.boot
      spring-boot-starter-actuator
      ${spring-boot.verson}


      org.springframework.cloud
      spring-cloud-starter-consul-config


      org.springframework.cloud
      spring-cloud-starter-consul-discovery


          guava
          com.google.guava


      org.springframework.boot
      spring-boot-starter-web
      ${spring-boot.verson}


      org.springframework.boot
      spring-boot-starter-test
      ${spring-boot.verson}
      test


      org.projectlombok
      lombok
      1.16.22


      org.json
      json
      20200518


      com.google.code.gson
      gson
      2.8.5


      com.google.guava
      guava
      25.0-jre
      compile


          jsr305
          com.google.code.findbugs


        org.springframework.cloud
        spring-cloud-dependencies
        ${spring-cloud.version}
        pom
        import
4.配置application.yml
# 端口名称(必填)
server:
  port: 8081
spring:
	# spring项目的名称,必填,用于后续服务的注册
  application:
    name: spring-cloud-consul-test
  # springMVC配置
  mvc:
    servlet:
      load-on-startup: 1
    throw-exception-if-no-handler-found: true
  cloud:
    consul:
      discovery:
      	# 测试环境,lab环境,现网环境注册服务需要token,本地配置忽略
        acl-token: ${spring.cloud.consul.config.acl-token}
        # 启用服务发现
        enabled: true
        # 启用服务注册
        register: true
        # 服务停止时取消注册
        deregister: true
        # 表示注册时使用IP而不是hostname
        prefer-ip-address: true
        #                prefer-agent-address: true
        #                ip-address: 127.0.0.1
        # 执行监控检查的频率
        health-check-interval: 30s
        # 设置健康检查失败多长时间后,取消注册
        health-check-critical-timeout: 600s
        # 健康检查的路径,请保证controller层中有这个方法
        health-check-path: /v1/hello
        # 服务注册标识,格式为:应用名称+服务器IP+端口
        instance-id: ${spring.application.name}:${spring.cloud.client.ip-address}:${server.port}
  #json解析配置
  jackson:
    default-property-inclusion: non_null   # mybatis-plus.configuration.call-setters-on-null冲突
    time-zone: GMT+8
    date-format: yyyy-MM-dd HH:mm:ss
    serialization:
      write_null_map_values: true
      write_dates_as_timestamps: false
    deserialization:
      fail_on_unknown_properties: false
    parser:
      allow_single_quotes: true
5.配置bootStrap.yml
spring:
  cloud:
    inetutils:
      ignored-interfaces:
        - eno.*
        - docker.*
        - veth.*
        - em.*
      use-only-site-local-interfaces: true
    consul:
      host: 127.0.0.1 #云主机 172.29.70.180 # staging 172.29.17.177
      port: 8500  #staging  9520
      config:
        acl-token: ${ACL_TOKEN}
        enabled: true   #默认是true --
        format: YAML    # 表示consul上面文件的格式 有四种 YAML PROPERTIES KEY-VALUE FILES
        #data-key: configuration    #表示consul上面的KEY值(或者说文件的名字) 默认是data
        data-key: data    #表示consul上面的KEY值(或者说文件的名字) 默认是data
        #prefix设置配置值的基本文件夹
        #defaultContext设置所有应用程序使用的文件夹名称,默认值为spring.application.name
        #profileSeparator设置用于使用配置文件在属性源中分隔配置文件名称的分隔符的值
        #watch选项为配置监视功能,主要监视配置的改变
        watch:
          enabled: true
          delay: 10000
          wait-time: 30
这里主要是写consul的key/value的yaml文件的,在127.0.0.1:8500中点击key/value标签可以在这里存放一些consul的配置文件。
解释一下config中字段的含义:
1)acl-token为注册服务时需要用到的token,本地注册请忽略
2)enabled : true 表示开启kv键值对存储
3)format:YAML表示kv文件的格式是yaml
4)prefix: 默认读取config文件夹下的文件,若不想读取config目录下的文件,可以通过prefix来指明文件路径,这里没有写prefix,默认读取config目录下文件。
5)profileSeparator:指明文件的名字,默认值是spring.application.name
profileSeparator指的是文件名字的分隔符,若存在多个环境,文件名称应该这么写:knpBlobStore,dev; knpBlobStore,lab,此时可以通过profileSeparator来制定这个分割符号,若不写,则默认为','
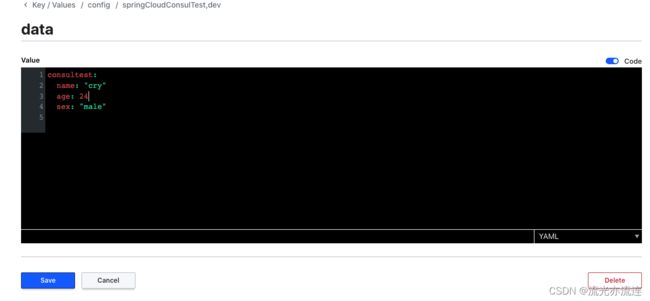
6)data-key:指的是最后一层目录,这里写的data,对应consul中kv部分的配置最后的kv键值对应该写在data里面。
比如:
6.启动服务
在主启动类Application上添加注解@EnableDiscoveryClient,待服务成功启动后,就可以注册到consul上了
在consul中的service下面可以看到:
![]()
此时说明服务注册成功
7.获取consul中的kv键值对
首先写一个配置类ConsulConfig.class,对应consul中kv的配置,prefix字段指明kv的前缀是哪一个
@ConfigurationProperties(prefix = "consultest")
@Configuration
@Data
public class ConsulConfig {
    private String name;
    private Integer age;
    private String sex;
}
在controller层中注入这个配置类,并进行测试
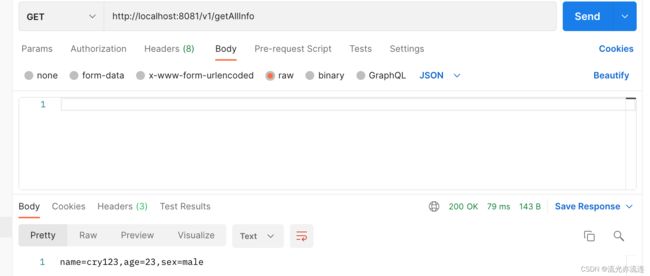
@RequestMapping("/getAllInfo")
public String getAllInfo() {
return "name=" + consulConfig.getName() + ",age=" + consulConfig.getAge()
+ ",sex=" + consulConfig.getSex();
}
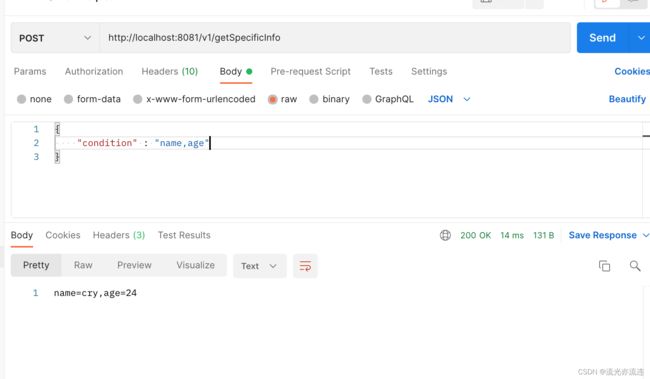
@RequestMapping("/getSpecificInfo")
public String getSpecificInfo(@RequestBody String input) throws Exception {
JSONObject jsonObject = str2Json(input);
String[] conds = jsonObject.getString("condition").split("\\,");
StringBuilder sb = new StringBuilder();
for (String cond : conds) {
sb.append(cond + "=");
sb.append(consulConfig.getClass().getMethod("get"
+ cond.substring(0, 1).toUpperCase() + cond.substring(1)).invoke(consulConfig).toString());
sb.append(",");
}
return sb.deleteCharAt(sb.length() - 1).toString();
}8.不同环境下consul的实现
假如我在不同的环境下操作,现在我想对于每个环境各配置一个consul文件,那么该怎么做呢?
只需要将profiles.active来修改就可以,针对不同的环境,对这个属性进行赋值即可。
比如,现在我在test环境下进行操作:
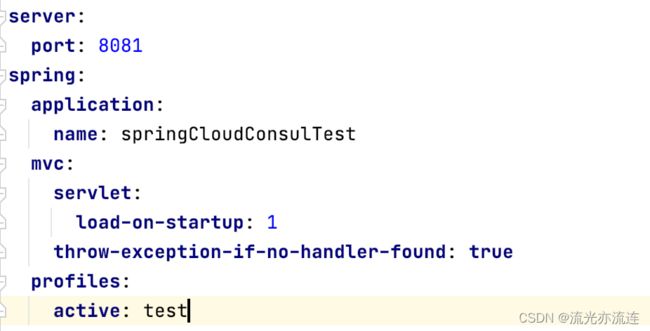
读取的应该是springCloudConsulTest,test/data,这一点可以从控制台上输出的数据看出
![]()
consul中springCloudConsulTest,test/data的配置如下

现在对输出的结果进行测试:

那么现在将profiles.active改为dev,那么,它应该就会读取springClouConsulTest,dev/data中的数据,那么我们来验证一下:


可以看到读取的数据确实发生了变化。