arm架构linux内核调试实战
前言
偶然间,发现了一个很好用的仓,可以十分方便地进行 arm 架构的 linux 内核调试,该仓地址如下 https://github.com/cc-droid/v-kernel-qemu ,对应的解析视频在 《linux内核源码分析 【0-00】从零搭建分析调试环境》
本篇笔记旨在记录一下对于该仓的使用流程,并且对其进行了一些小调整
环境搭建
Ubuntu安装
VMware + Ubuntu20.04 ,这部分略过
前置配置
安装 sshd,git,vim
sudo apt-get install openssh-server
sudo apt-get install git
sudo apt-get install vim
主要配置
通过 git 获取对应仓内容,笔者是先 fork 到 gitee 再进行 clone 的,进入 doc/ 里面有详细的环境搭建说明,一步步安装即可
preinstall
sudo apt install build-essential
sudo apt install bison
sudo apt install flex
sudo apt-get install gconf2
sudo apt install net-tools
sudo apt-get install bridge-utils
sudo apt-get install uml-utilities
sudo apt-get install libncurses5-dev libncursesw5-dev
sudo apt-get install u-boot-tools
qemu install
sudo apt install qemu
sudo apt install qemu-system
toolchain install
对于交叉编译链的安装需要格外注意版本,最好保持统一否则编译过程会不通过
wget https://developer.arm.com/-/media/Files/downloads/gnu-a/9.2-2019.12/binrel/gcc-arm-9.2-2019.12-x86_64-arm-none-linux-gnueabihf.tar.xz
sudo tar xvf gcc-arm-9.2-2019.12-x86_64-arm-none-linux-gnueabihf.tar.xz -C /opt
-
environment variables set
sudo vim /etc/profileadd
PATH=$PATH:/opt/gcc-arm-9.2-2019.12-x86_64-arm-none-linux-gnueabihf/binat tail -
test toolchain
source /etc/profile`
arm-none-linux-gnueabihf-gcc --version
if output as below, succeed:
arm-none-linux-gnueabihf-gcc (GNU Toolchain for the A-profile Architecture 9.2-2019.12 (arm-9.10)) 9.2.1 20191025
For Debug
这部分为笔者的补充,在后续 debug 过程中如果不安装下列包会发生报错
sudo apt-get install libtinfo5
sudo apt-get autoremove libncurses-dev
sudo apt-get install libncurses-dev
sudo apt-get install libtinfo5 libncursesw5
sudo apt-get install libpython2.7
对于网络部分的配置,笔者没有进行,由于不影响内核调试就不进行记录
至此,用于内核调试的环境搭建完毕
内核编译
该仓之所以令人称赞,其原因就是写好了方便的脚本,特别是关于 arm 架构的
其脚本入口为 ./smake -arm,其说明如下
usage for arm:
  ./smake -arm zImage                -- cross-complie linux kernel zImage
  ./smake -arm uImage                -- cross-complie linux kernel uImage
  ./smake -arm uboot                 -- cross-complie uboot
  ./smake -arm busybox               -- cross-complie busybox
  ./smake -arm rootfs                -- create rootfs ext3 image
  ./smake -arm clean_rootfs          -- clean rootfs dir
  ./smake -arm run_uboot             -- run uboot in qemu without graphic
  ./smake -arm run_zImage            -- run zImage in qemu with graphic
  ./smake -arm debug_uboot           -- debug uboot use gdb in qemu without graphic
  ./smake -arm debug_zImage          -- debug zImage use gdb in qemu with graphic
  ./smake -arm clean_boot            -- clean uboot,reserve config
  ./smake -arm clean_kernel          -- clean kernel,reserve config
  ./smake -arm disclean_boot         -- deep clean uboot
  ./smake -arm distclean_kernel      -- distclean kernel
  ./smake -arm clean_busybox         -- clean busybox
  ./smake -arm distclean_busybox     -- distclean busybox
  ./smake -arm setup_net             -- setup net connection with qemu
  ./smake -arm modules xxx           -- make kernel modules in src/modules/xxx,xxx indicates modules directory
  ./smake -arm modules clean xxx     -- clean kernel modules in src/modules/xxx,xxx indicates modules directory
因此,想要将内核运行起来,需要执行以下步骤,分别对内核、文件系统进行编译
./smake -arm zImage编译内核./smake -arm busybox编译 busybox./smake -arm rootfs根据 busybox 建立 rootfs 文件系统
内核运行
执行如下指令便能让内核运行起来
./smake -arm run_zImage
笔者在默认的运行方式中,会出现一些报错,如下图所示

对此,决定不采用图形化界面的方式,修改 arm_func 的部分内容如下,添加了 -nographic 参数,并修改 console=ttyAMA0
function run_arm_zImage(){
   sudo qemu-system-arm -M vexpress-a9 -m 512M -dtb $dtb_obj -kernel $zImage_obj -smp 4\
  	 -append "console=ttyAMA0 root=/dev/mmcblk0 rw rootwait earlyprintk  init=/linuxrc" -sd $rootfs_obj\
       -net nic -net tap,ifname=tap0,script=no,downscript=no -nographic
}

function debug_arm_zImage(){
   sudo qemu-system-arm -S -s -M vexpress-a9 -m 512M -dtb $dtb_obj -kernel $zImage_obj -smp 4\
  	 -append "root=/dev/mmcblk0 rw rootwait earlyprintk console=ttyAMA0 init=/linuxrc" -sd $rootfs_obj\
       -net nic -net tap,ifname=tap0,script=no,downscript=no -nographic
}
重新执行内核运行指令,便能够成功运行,进入内核

模块加载
通过该仓,也能够便捷地实现模块的加载与调试,与模块相关的内容主要包括:
- 编译模块
- 将模块放入内核文件系统
- 启动内核进行加载
编译模块
根据 smake 的说明,编译模块只需要执行以下命令
./smake -arm modules xxx
xxx 对应 src/module/xxx 文件夹名字,以 helloworld 为例,执行 ./smake -arm modules helloworld 成功后便能够得到 test_module.ko 文件

查看其文件类型,为 arm
![]()
将模块移入fs
前面内核编译的过程中,smake 基于 buysbox 创建了 rootfs,因此,只需要将 ko 文件移入 rootfs 镜像中即可
首先,将 rootfs 挂载到指定目录,便于利用当前 ubuntu 内核进行文件拷贝操作
sudo mount -t ext3 images/rootfs.ext3 /mnt
可以进入 /mnt 中通过 ls 查看 rootfs 的内容

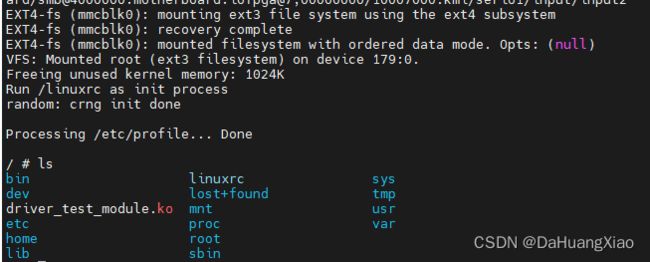
将 test_module.ko 移入 /mnt 中即可,此时再运行内核就能在内核中看到相应 ko 文件
加载模块
调用 insmod 进行模块加载,如下截图所示,说明加载成功

至此,模块运行与调试部分结束,值得一提的是,该仓默认的 rootfs 容量很小,需要修改 rootfs_build.sh 将其大小改大一些才能便于调试
调试内核
调试内核分为两步:
- 以调试的方式启动内核
- 通过 gdb 开启调试
以调试的方式启动内核
根据 smake 说明,执行以下指令
./smake -arm debug_zImage
此时的内核会被启动,但不会继续执行,等待 gdb 建立链接

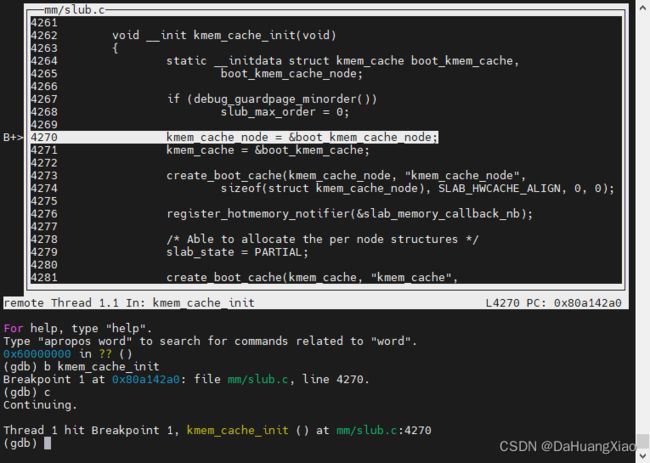
通过 gdb 直接调试
另起一个窗口,执行如下调试命令开启内核调试
./debug kernel
调试界面如下所示,以最近在学习的 kmem_cache_init 为例,通过 b kmem_cache_init对其打了个断点,执行 c 继续执行命令,可以跟踪到改函数中
通过 vscode 间接调试
由于通过 gdb 原生方式阅读比较困难,考虑使用 vscode 进行调试,其需要执行以下步骤
- 安装 vscode 的 c/c++ 插件
- 获取内核对应的 vmlinux
- 配置 vscode 的 lauch.json
- 打断点并运行调试
安装插件

配置 lauch.json
安装好插件后,执行 F5 会自动生成 .vscode 目录,里面有 lauch.json 和 task.json 两个文件,需要删除 task.json ,并配置 lauch.json 如下
{
    "version": "0.2.0",
    "configurations": [
        {
            "name": "kernel-debug",
            "type": "cppdbg",
            "request": "launch",
            "miDebuggerServerAddress": "127.0.0.1:1234", //服务器的地址和端口
            "program": "/home/wonghiu/v-kernel-qemu/src/linux-5.6.11/vmlinux", //要调试的程序名
            "args": [],
            "stopAtEntry": false,
            "cwd": "/home/wonghiu/v-kernel-qemu/src/linux-5.6.11", //调试程度的路径
            "environment": [],
            "externalConsole": false,
            "logging": {
                "engineLogging": false
            },
            "MIMode": "gdb",
            "miDebuggerPath": "arm-none-linux-gnueabihf-gdb", //需要修改为arm-none-linux-gnueabihf-gdb的绝对路径
        }
    ]
}
执行调试
例如,笔者在 init/main.c 的 start_kernel 处打了个断点,按 F5 开启调试。(别忘了要以调试的方式启动内核)

至此,该仓的基本功能体验完成。进一步地,就是根据脚本源码学习一下具体地执行流程