【Jetpack】DataBinding 架构组件 ③ ( 使用 include 导入二级界面布局 | 二级页面绑定数据模型 )
文章目录
- 一、使用 include 导入二级界面布局
- 二、二级页面绑定数据模型
-
- 1、将二级界面布局转为 DataBinding 布局
- 2、在主布局中为二级界面布局传递数据模型
- 三、核心代码示例
-
- 1、主布局
- 2、子布局
- 3、Java 代码
- 4、执行结果
一、使用 include 导入二级界面布局
如果在 DataBinding 布局 中 , 通过 include 引入了其它布局 , 数据模型对象 需要 绑定到 通过 include 引入的二级页面 布局文件中 ;
在上一篇博客 【Jetpack】DataBinding 架构组件 ② ( 字符串拼接函数 | 绑定点击事件函数 | DataBinding 布局中使用 import 标签导入 Java、Kotlin 类 ) 的示例中 , 有两个 TextView 组件 , 将其中显示年龄的 TextView 组件设置到单独的 XML 布局文件中 , 使用 include 标签引入该布局文件 , 这里就需要 将绑定的数据对象 , 传递到二级页面 ;
设置一个子布局 activity_sub.xml , 内容如下 :
<androidx.constraintlayout.widget.ConstraintLayout
    xmlns:android="http://schemas.android.com/apk/res/android"
    xmlns:app="http://schemas.android.com/apk/res-auto"
    xmlns:tools="http://schemas.android.com/tools"
    android:layout_width="match_parent"
    android:layout_height="match_parent">

    <TextView
        android:id="@+id/textView"
        android:layout_width="wrap_content"
        android:layout_height="wrap_content"
        android:onClick="@{student.onClick}"
        android:text="@{student.ageText()}"
        app:layout_constraintBottom_toBottomOf="parent"
        app:layout_constraintEnd_toEndOf="parent"
        app:layout_constraintHorizontal_bias="0.498"
        app:layout_constraintStart_toStartOf="parent"
        app:layout_constraintTop_toTopOf="parent"
        app:layout_constraintVertical_bias="0.2"
        tools:text="18" />

androidx.constraintlayout.widget.ConstraintLayout>
在 activity_main 的 Design 模式下 , 拖动一个 include 容器到布局中 , include 在 Containers 类别下 ;
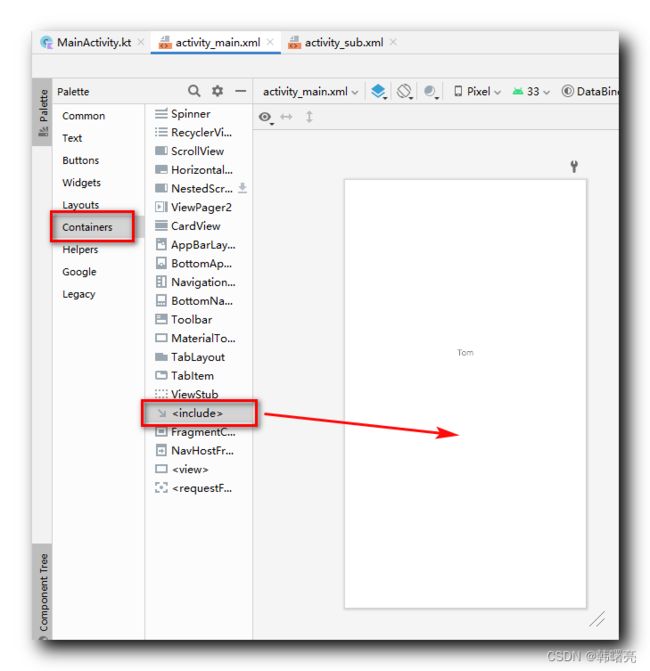
拖入后 , 选择之前创建的子布局 ;

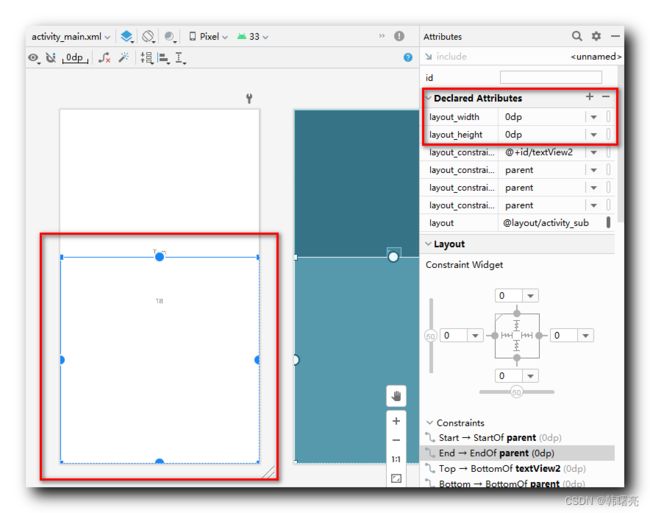
为 include 设置四个方向上的约束 ;
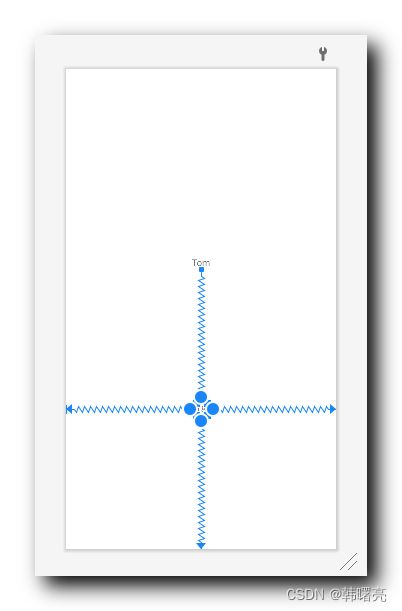
将 include 宽高设置为 0dp , 也就是 match_parent ;
当前布局代码如下 :
<layout xmlns:android="http://schemas.android.com/apk/res/android"
    xmlns:app="http://schemas.android.com/apk/res-auto"
    xmlns:tools="http://schemas.android.com/tools">

    <data>
        <variable
            name="student"
            type="kim.hsl.databinding_demo.Student" />
    data>

    <androidx.constraintlayout.widget.ConstraintLayout
        android:layout_width="match_parent"
        android:layout_height="match_parent"
        tools:context=".MainActivity">

        <TextView
            android:id="@+id/textView2"
            android:layout_width="wrap_content"
            android:layout_height="wrap_content"
            tools:text="Tom"
            android:text="@{student.nameText()}"
            android:onClick="@{student.onClick}"
            app:layout_constraintBottom_toBottomOf="parent"
            app:layout_constraintEnd_toEndOf="parent"
            app:layout_constraintStart_toStartOf="parent"
            app:layout_constraintTop_toTopOf="parent"
            app:layout_constraintVertical_bias="0.4" />

        <include
            layout="@layout/activity_sub"
            android:layout_width="0dp"
            android:layout_height="0dp"
            app:layout_constraintBottom_toBottomOf="parent"
            app:layout_constraintEnd_toEndOf="parent"
            app:layout_constraintStart_toStartOf="parent"
            app:layout_constraintTop_toBottomOf="@+id/textView2" />


    androidx.constraintlayout.widget.ConstraintLayout>
layout>
二、二级页面绑定数据模型
1、将二级界面布局转为 DataBinding 布局
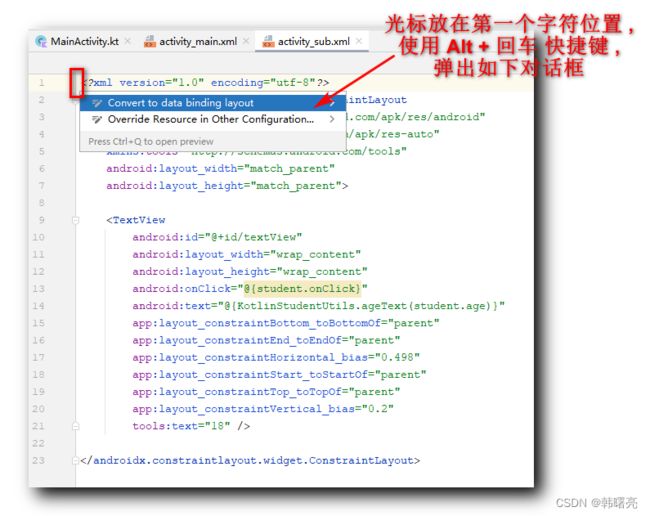
将导入的 activity_sub.xml 也转为 DataBinding 布局 , 将光标放在第一个字符位置 , 使用 Alt + 回车 快捷键 ,
弹出如下对话框 , 选择 " Convert to data binding layout " 选项 ,
转换为 DataBinding 布局后 , 设置如下数据模型 :
    <data>
        <variable
            name="student"
            type="kim.hsl.databinding_demo.Student" />
    data>
完整的布局文件如下 :
<layout xmlns:android="http://schemas.android.com/apk/res/android"
    xmlns:app="http://schemas.android.com/apk/res-auto"
    xmlns:tools="http://schemas.android.com/tools">

    <data>
        <variable
            name="student"
            type="kim.hsl.databinding_demo.Student" />
    data>

    <androidx.constraintlayout.widget.ConstraintLayout
        android:layout_width="match_parent"
        android:layout_height="match_parent">

        <TextView
            android:id="@+id/textView"
            android:layout_width="wrap_content"
            android:layout_height="wrap_content"
            android:onClick="@{student.onClick}"
            android:text="@{student.ageText()}"
            app:layout_constraintBottom_toBottomOf="parent"
            app:layout_constraintEnd_toEndOf="parent"
            app:layout_constraintHorizontal_bias="0.498"
            app:layout_constraintStart_toStartOf="parent"
            app:layout_constraintTop_toTopOf="parent"
            app:layout_constraintVertical_bias="0.2"
            tools:text="18" />

    androidx.constraintlayout.widget.ConstraintLayout>
layout>
2、在主布局中为二级界面布局传递数据模型
首先 , 在布局根目录 , 声明如下命名空间 ;
xmlns:app="http://schemas.android.com/apk/res-auto"
然后 , 在 include 标签中 , 设置 app:student 属性标签 , 属性值为 variable 标签中的 name 对象名称 ;
- 属性名称 : 该属性的名称 , 也是不固定的 , 属性名称是
app:对象名称;
        <include
            layout="@layout/activity_sub"
            app:student="@{student}"
            android:layout_width="0dp"
            android:layout_height="0dp"
            app:layout_constraintBottom_toBottomOf="parent"
            app:layout_constraintEnd_toEndOf="parent"
            app:layout_constraintStart_toStartOf="parent"
            app:layout_constraintTop_toBottomOf="@+id/textView2" />
最后 , 在 二级页面 布局中 , 使用数据模型 ;
        <TextView
            android:id="@+id/textView"
            android:layout_width="wrap_content"
            android:layout_height="wrap_content"
            android:onClick="@{student.onClick}"
            android:text="@{student.ageText()}"
            app:layout_constraintBottom_toBottomOf="parent"
            app:layout_constraintEnd_toEndOf="parent"
            app:layout_constraintHorizontal_bias="0.498"
            app:layout_constraintStart_toStartOf="parent"
            app:layout_constraintTop_toTopOf="parent"
            app:layout_constraintVertical_bias="0.2"
            tools:text="年龄 : 18" />
三、核心代码示例
1、主布局
在主布局中使用 include 导入二级页面 , 在 include 标签中 , 设置
app:student="@{student}"
属性 , 该属性名称是 app:数据模型对象名称 , 属性值是 数据模型对象 ;
在
    <data>
        <variable
            name="student"
            type="kim.hsl.databinding_demo.Student" />
    data>
中 , 设置的 DataBinding 数据模型对象名称是 student , 在 include 中传递的 数据模型 属性的属性名称就是 app:student ;
布局代码 :
<layout xmlns:android="http://schemas.android.com/apk/res/android"
    xmlns:app="http://schemas.android.com/apk/res-auto"
    xmlns:tools="http://schemas.android.com/tools">

    <data>
        <variable
            name="student"
            type="kim.hsl.databinding_demo.Student" />
    data>

    <androidx.constraintlayout.widget.ConstraintLayout
        android:layout_width="match_parent"
        android:layout_height="match_parent"
        tools:context=".MainActivity">

        <TextView
            android:id="@+id/textView2"
            android:layout_width="wrap_content"
            android:layout_height="wrap_content"
            tools:text="Tom"
            android:text="@{student.nameText()}"
            android:onClick="@{student.onClick}"
            app:layout_constraintBottom_toBottomOf="parent"
            app:layout_constraintEnd_toEndOf="parent"
            app:layout_constraintStart_toStartOf="parent"
            app:layout_constraintTop_toTopOf="parent"
            app:layout_constraintVertical_bias="0.4" />

        <include
            layout="@layout/activity_sub"
            app:student="@{student}"
            android:layout_width="0dp"
            android:layout_height="0dp"
            app:layout_constraintBottom_toBottomOf="parent"
            app:layout_constraintEnd_toEndOf="parent"
            app:layout_constraintStart_toStartOf="parent"
            app:layout_constraintTop_toBottomOf="@+id/textView2" />

    androidx.constraintlayout.widget.ConstraintLayout>
layout>
2、子布局
在子布局中 , 也需要转为 DataBinding 布局 , 配置的 数据模型
    <data>
        <variable
            name="student"
            type="kim.hsl.databinding_demo.Student" />
    data>
与 主布局 一样 , 在主布局中的 include 中使用 app:student="@{student}" 配置导入数据模型 ,
即可在子布局中使用该 数据模型 ;
子布局代码 :
<layout xmlns:android="http://schemas.android.com/apk/res/android"
    xmlns:app="http://schemas.android.com/apk/res-auto"
    xmlns:tools="http://schemas.android.com/tools">

    <data>
        <variable
            name="student"
            type="kim.hsl.databinding_demo.Student" />
    data>

    <androidx.constraintlayout.widget.ConstraintLayout
        android:layout_width="match_parent"
        android:layout_height="match_parent">

        <TextView
            android:id="@+id/textView"
            android:layout_width="wrap_content"
            android:layout_height="wrap_content"
            android:onClick="@{student.onClick}"
            android:text="@{student.ageText()}"
            app:layout_constraintBottom_toBottomOf="parent"
            app:layout_constraintEnd_toEndOf="parent"
            app:layout_constraintHorizontal_bias="0.498"
            app:layout_constraintStart_toStartOf="parent"
            app:layout_constraintTop_toTopOf="parent"
            app:layout_constraintVertical_bias="0.2"
            tools:text="年龄 : 18" />

    androidx.constraintlayout.widget.ConstraintLayout>
layout>
3、Java 代码
数据模型代码 : 该数据模型 , 封装了 name 和 age 两个属性 , 以及对应的 字符串拼接函数 ;
package kim.hsl.databinding_demo
import android.util.Log
import android.view.View
class Student(var name: String, var age: Int) {
fun nameText(): String {
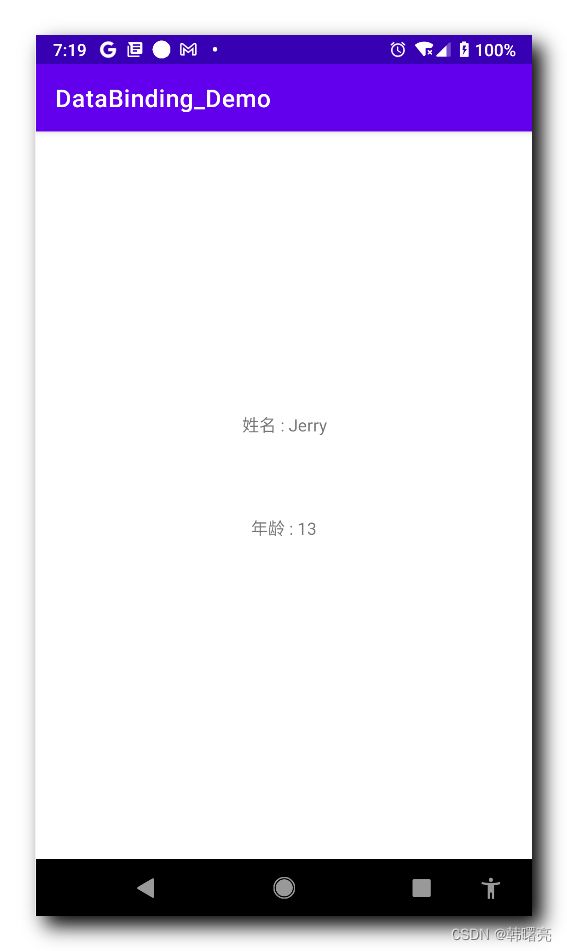
return "姓名 : ${name}"
}
fun ageText(): String {
return "年龄 : ${age}"
}
fun onClick(view: View): Unit {
Log.i("", "${nameText()} ${ageText()} 触发点击事件")
}
}
Activity 组件代码 : 在 Activity 组件中 , 为布局设置 Student 数据模型对象 ;
package kim.hsl.databinding_demo

import androidx.appcompat.app.AppCompatActivity
import android.os.Bundle
import androidx.databinding.DataBindingUtil
import kim.hsl.databinding_demo.databinding.ActivityMainBinding

class MainActivity : AppCompatActivity() {
    override fun onCreate(savedInstanceState: Bundle?) {
        super.onCreate(savedInstanceState)

        // 设置布局文件
        // 布局文件是 activity_main.xml
        // 该类名称生成规则是 布局文件名称 + Binding
        var activityMainBinding: ActivityMainBinding =
            DataBindingUtil.setContentView(this, R.layout.activity_main)

        // 为布局 设置 数据
        activityMainBinding.student = Student("Jerry", 13)
    }
}
4、执行结果