PYQT5:基于QsciScintilla的代码编辑器分析5--多文档编辑区介绍
这里提供本编辑器可执行文件(exe)的下载链接:
1.Code51.Code51_STC
2.百度盘链接::https://pan.baidu.com/s/1Ihxb7WX0ozUuRs3KFyzApQ
提取码:i6my
3.源代码:百度盘链接:https://pan.baidu.com/s/1jlRvWgN2LFHTtnKogeUZZw
提取码:w437
4.源代码的码云链接:https://gitee.com/huangweide001/code4STC51
读者在调试代码时,可以直接运行主文件《texteditor2.py》。
写完工程视图,应该进入编辑区视图了。这个项目虽然大部分完成了,期间也查过大量关于QsciScintilla的资料,可是到现在我还是对它懵懵懂懂,一知半解。真是不知道如何说起。csdn有个博主theXX_SHI 的一篇文章介绍得很好,QScintilla for Python 中文文档请前往阅读。我这里直接贴源码,源码尽量增加注释,方便读者阅读。
1.c语法的高亮显示
MyLexerCPP继承自QsciLexerCPP,字体信息由QsciScintilla传入。在这里,不同语法内容的颜色是固定的,不能更改。也可以通过对话框设置各种颜色,在第10章10–语法高亮颜色选择详讲。
class MyLexerCPP(QsciLexerCPP):
    def __init__(self,parent):
        QsciLexerCPP.__init__(self,parent)
        self.setFont(self.parent().Font)
        self.setColor(QColor(0, 0, 0))          #设置默认的字体颜色
        self.setPaper(QColor(255, 255, 255))    #设置底色
        self.setColor(QColor("#B0171F"), QsciLexerCPP.Keyword)

        self.setColor(QColor("#008000"), QsciLexerCPP.CommentDoc)#文档注释 /**开头的颜色
        self.setColor(QColor("#008000"), QsciLexerCPP.Comment)#块注释 的颜色
        self.setColor(QColor("#008000"), QsciLexerCPP.CommentLine)#行注释的颜色
        self.setColor(QColor("#007f7f"), QsciLexerCPP.Number)       #数字 的颜色
        self.setColor(QColor("#ff00ff"), QsciLexerCPP.DoubleQuotedString)#双引号字符串的颜色
        self.setColor(QColor("#ff00ff"), QsciLexerCPP.SingleQuotedString)#单引号字符的颜色
        self.setColor(QColor("#be07ff"), QsciLexerCPP.PreProcessor)#预编译语句的颜色
        self.setColor(QColor("#191970"), QsciLexerCPP.Operator)
        #self.setColor(QColor("#000000"), QsciLexerCPP.Identifier)  #可识别字符的颜色,这个范围很广,包含了关键词,函数名;所以要取消这句
        self.setColor(QColor("#0000FF"), QsciLexerCPP.UnclosedString)#未完成输入的字符串的颜色

        font = QFont(self.parent().Font)
        font.setBold(True)
        self.setFont(font,5)    #默认的字体加粗。

        font = QFont(self.parent().Font)
        font.setItalic(True)
        self.setFont(font,QsciLexerCPP.Comment)   #注释的字体用斜体。
2.页边设置和自动补全设置
SciTextEdit继承自QsciScintilla,传入参数有文件名,主窗口。
class SciTextEdit(QsciScintilla):
    NextId = 1

    def __init__(self, filename='', wins=None, parent=None):
        global g_allFuncList
        super(QsciScintilla, self).__init__(parent)
        self.win=wins
        self.jumpName=''
        self.list_line=[]
        self.Font = self.win.EditFont   #采用主窗口传入的字体
        self.Font.setFixedPitch(True)
        self.setFont(self.Font)
        #1.设置文档的编码格式为 “utf8” ,换行符为 windows   【可选linux,Mac】
        self.setUtf8(True)
        self.setEolMode(QsciScintilla.SC_EOL_CRLF)#文件中的每一行都以EOL字符结尾(换行符为 \r \n)
        #2.设置括号匹配模式
        self.setBraceMatching(QsciScintilla.StrictBraceMatch)#
        #3.设置 Tab 键功能
        self.setIndentationsUseTabs(True)#行首缩进采用Tab键,反向缩进是Shift +Tab
        self.setIndentationWidth(4)     #行首缩进宽度为4个空格
        self.setIndentationGuides(True)#    显示虚线垂直线的方式来指示缩进
        self.setTabIndents(True)    #编辑器将行首第一个非空格字符推送到下一个缩进级别
        self.setAutoIndent(True)    #插入新行时,自动缩进将光标推送到与前一个相同的缩进级别
        self.setBackspaceUnindents(True)
        self.setTabWidth(4)         # Tab 等于 4 个空格
        #4.设置光标
        self.setCaretWidth(2)           #光标宽度(以像素为单位),0表示不显示光标
        self.setCaretForegroundColor(QColor("darkCyan"))    #光标颜色
        self.setCaretLineVisible(True)      #是否高亮显示光标所在行
        self.setCaretLineBackgroundColor(QColor('#FFCFCF'))     #光标所在行的底色
        #5.设置页边特性。        这里有3种Margin:[0]行号    [1]改动标识   [2]代码折叠
            #5.1 设置行号
        self.setMarginsFont(self.Font)      #行号字体
        self.setMarginLineNumbers(0,True)    #设置标号为0的页边显示行号
        self.setMarginWidth(0,'00000')  #行号宽度
        self.setMarkerForegroundColor(QColor("#FFFFFF"),0)
            #5.2 设置改动标记
        self.setMarginType(1, QsciScintilla.SymbolMargin)   # 设置标号为1的页边用于显示改动标记
        self.setMarginWidth(1, "0000")          #改动标记占用的宽度
        img = QPixmap(":/leftside.png")     #改动标记图标,大小是48 x 48
        sym_1 = img.scaled(QSize(16, 16))       #图标缩小为 16 x 16
        self.markerDefine(sym_1, 0)
        self.setMarginMarkerMask(1, 0b1111)
        self.setMarkerForegroundColor(QColor("#ee1111"),1)  #00ff00
            #5.3  设置代码自动折叠区域
        self.setFolding(QsciScintilla.PlainFoldStyle)
        self.setMarginWidth(2,12)
                #5.3.1 设置代码折叠和展开时的页边标记 - +
        self.markerDefine(QsciScintilla.Minus, QsciScintilla.SC_MARKNUM_FOLDEROPEN)
        self.markerDefine(QsciScintilla.Plus, QsciScintilla.SC_MARKNUM_FOLDER)
        self.markerDefine(QsciScintilla.Minus, QsciScintilla.SC_MARKNUM_FOLDEROPENMID)
        self.markerDefine(QsciScintilla.Plus, QsciScintilla.SC_MARKNUM_FOLDEREND)
                #5.3.2 设置代码折叠后,+ 的颜色FFFFFF
        self.setMarkerBackgroundColor(QColor("#FFBCBC"), QsciScintilla.SC_MARKNUM_FOLDEREND)
        self.setMarkerForegroundColor(QColor("red"), QsciScintilla.SC_MARKNUM_FOLDEREND)

        #6.语法高亮显示
            #6.1语法高亮的设置见 MyLexerCPP类 源码
        self.lexer=MyLexerCPP(self)
        self.setLexer(self.lexer)
            #6.2设置自动补全
        self.mod=False
        self.__api = QsciAPIs(self.lexer)
            # SDCC编译器的关键字 列表
        sdcc_kwlist=['__data','__idata','__pdata','__xdata','__code','__bit','__sbit',
                        '__sfr' , 'u8', 'u16' , 'WORD', 'BYTE','define' , 'include','__interrupt',
                        'auto' , 'double' , 'int' , 'struct' , 'break' , 'else' , 'long' ,
                        'switch' , 'case','enum' , 'register' , 'typedef' , 'default' ,
                        'char' , 'extern' , 'return' , 'union' , 'const' , 'float',
                       'short' , 'unsigned' , 'continue' , 'for' , 'signed' , 'void' ,
                       'goto','sizeof' , 'volatile' , 'do' , 'while' , 'static' , 'if']
        autocompletions = keyword.kwlist+sdcc_kwlist
        for ac in autocompletions:
            self.__api.add(ac)
        self.__api.prepare()
        self.autoCompleteFromAll()
        self.setAutoCompletionSource(QsciScintilla.AcsAll) #自动补全所以地方出现的
        self.setAutoCompletionCaseSensitivity(True) #设置自动补全大小写敏感
        self.setAutoCompletionThreshold(1);     #输入1个字符,就出现自动补全 提示
        self.setAutoCompletionReplaceWord(False)
        self.setAutoCompletionUseSingle(QsciScintilla.AcusExplicit)
        self.setAttribute(Qt.WA_DeleteOnClose)
        #设置函数名为关键字2    KeyWord = sdcc_kwlistcc  ;KeywordSet2 = 函数名
        self.SendScintilla(QsciScintilla.SCI_SETKEYWORDS, 0," ".join(sdcc_kwlist).encode(encoding='utf-8'))
        self.SendScintilla(QsciScintilla.SCI_STYLESETFORE, QsciLexerCPP.KeywordSet2, 0x7f0000)
        self.SendScintilla(QsciScintilla.SCI_SETKEYWORDS, 1," ".join(g_allFuncList).encode(encoding='utf-8'))

        self.filename = filename
        if self.filename=='':
            self.filename = str("未命名-{0}".format(SciTextEdit.NextId))
            SciTextEdit.NextId += 1
        self.setModified(False)
        #设置文档窗口的标题
        self.setWindowTitle(QFileInfo(self.filename).fileName())
        #将槽函数链接到文本改动的信号
        self.textChanged.connect(self.textChangedAction)
        #给文档窗口添加右键菜单
        self.setContextMenuPolicy(Qt.CustomContextMenu)#
        self.customContextMenuRequested.connect(self.RightMenu)
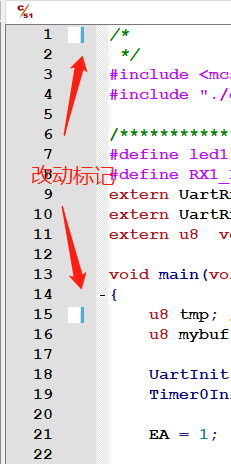
3.文本改动标记–在页边显示改动标记
重写textChangedAction函数,该函数是关联了文档内容改变的信号的槽函数,当内容变化时就自动触发这个函数。 保存文件时消除改动标记。

回看上一节class SciTextEdit().init()与改动标识相关的页边设置源码:
        self.setMarginType(1, QsciScintilla.SymbolMargin)   # 设置标号为1的页边用于显示改动标记
        self.setMarginWidth(1, "0000")          #改动标记占用的宽度
        img = QPixmap(":/leftside.png")     #改动标记图标,大小是48 x 48
        sym_1 = img.scaled(QSize(16, 16))       #图标缩小为 16 x 16
        self.markerDefine(sym_1, 0)
        self.setMarginMarkerMask(1, 0b1111)
        self.setMarkerForegroundColor(QColor("#ee1111"),1)  #00ff00
编辑区文档内容变动信号触发的槽函数:
    def textChangedAction(self):
        line, index=self.getCursorPosition()    #获取当前光标所在行
        handle_01 = self.markerAdd(line, 0)     # 添加改动标记
        self.list_line.append(handle_01)        #保存改动标记所在的地方,给后面保存文档时消除标记提供信息
在save()函数中消除改动标记:
    def save(self):
        ......
        #将保存过的文件消除改动标识,清空记录改动的列表
        for line in self.list_line:
            self.markerDeleteHandle(line)
        self.list_line.clear()
4.跳转到函数体和打开包含文件
在编辑区右击文字时,将判断所在行是否有包含文件,或者光标所在的字符串是否是函数名,然后显示右键菜单,进行下一步操作。(这里有2个细节在下一章《获取c文件的函数名列表》中讲述:1.获取光标所在单词;2.如何知道函数体在哪个文件哪一行。)
    def RightMenu(self):
        line_num, index=self.getCursorPosition()
        text=self.text()
        #0.获取光标所在行的全部字符
        str1=text.splitlines(False)[line_num]
        if len(str1) != 0:
            #0.1 如果字符串有 ‘#in’ ,那么应该包含文件名
            if '#in' in str1:
                self.jumpName = self.getIncludeFile(str1)
            #0.2 如果含有 字符 (  ,那么应该有函数名
            elif '(' in str1:
                self.jumpName= self.getFuncNameInLine(str1)
        #1.Jump to
        self.popMenu = QMenu()
        Jump2Function=QAction('Jump to '+self.jumpName, self)
        self.popMenu.addAction(Jump2Function)
        Jump2Function.triggered.connect(self.do_Jump2Function)
        #setEnabled   isRedoAvailable  isUndoAvailable
        #2.undo
        undoAction =QAction('Undo', self)
        undoAction.triggered.connect(self.undo)
        undoAction.setEnabled(self.isUndoAvailable())
        self.popMenu.addAction(undoAction)
        #3.redo
        redoAction =QAction('Redo', self)
        redoAction.triggered.connect(self.redo)
        redoAction.setEnabled(self.isRedoAvailable())
        self.popMenu.addAction(redoAction)
        #4.copy
        copyAction =QAction('Copy', self)
        copyAction.triggered.connect(self.copy)
        self.popMenu.addAction(copyAction)
        #5.cut
        cutAction =QAction('Cut', self)
        cutAction.triggered.connect(self.cut)
        self.popMenu.addAction(cutAction)
        #6.paste
        pasteAction =QAction('Paste', self)
        pasteAction.triggered.connect(self.paste)
        self.popMenu.addAction(pasteAction)
         #7.在鼠标位置显示右菜单
        self.popMenu.exec_(QCursor.pos())
因为跳转涉及到其它文档,必须向主窗口发送信号。先在主窗口类声明2个信号:
class MainWindow(QMainWindow):
    Jump2Func_Signal = pyqtSignal(str)
    Jump2IncludeFile_Signal = pyqtSignal(str)
    ......
将信号和槽函数关联起来:
         #给SciTextEdit 文档编辑窗口右键菜单 发过来的消息
        self.Jump2Func_Signal[str].connect(self.do_Jump2Function)#右键跳转到函数
        self.Jump2IncludeFile_Signal[str].connect(self.do_Jump2IncludeFile)#右键跳转到包含文件
然后看看跳转函数是怎么实现的,代码中比较难理解的是字典self.fileFuncDict 的数据结构(也在下一章《获取c文件的函数名列表》详解):
    def do_Jump2Function(self, str1):   #传入参数str1 为函数名
        for file in self.file_list:         #查找文件列表中的c文件
            if file[-2: ]=='.c' or  file[-2: ]=='.C' :
                [dirname,filename]=os.path.split(file)
                _dict=self.fileFuncDict[filename]   #这个字典是存放文件名,函数名,函数所在行信息的。
                funcs=list(_dict.keys())
                for func in funcs:
                    if func == str1:    #1. 字典中的函数名和传参相等,则查找结束,跳转
                        for textEdit_MSW in self.mdi.subWindowList(): #1.1 遍历已打开文档,判断函数所在的文件是否已经打开
                            textEdit=textEdit_MSW.widget()
                            if textEdit.filename == file:
                                self.mdi.setActiveSubWindow(textEdit_MSW)
                                break
                        else:   #1.2   确认该文件还没有打开,需要打开
                            self.loadFile(file)

                        textEdit=self.mdi.currentSubWindow().widget()
                        #2.跳转到该函数名所在的文件的行数
                        if textEdit != None:
                            # self.fileFuncDict[filename][str1] 就是行数,在字典中先查文件名,再查函数名
                            textEdit.setCursorPosition(self.fileFuncDict[filename][str1], 0 ) #设置光标的行数,列数
                            textEdit.setCaretLineBackgroundColor(Qt.lightGray)  #光标所在行显示灰色
                            textEdit.setFocus()                 #当前文档赋给焦点
                        return
看看打开包含文件的代码:
    def do_Jump2IncludeFile(self, str1):
        end = len(str1)-1
        start = 1
        if str1[0] == '"':  # "driver/STC8F.h"  可能1
            if str1[1]=='.': # "./driver/STC8F.h"   可能2
                start = 3
            elif str1[1]=="\\" or str1[1]=="/" :# "/driver/STC8F.h"     可能3
                start = 2
            else:
                pass
            textEdit = self.mdi.activeSubWindow()
            textEdit=textEdit.widget()
            if textEdit is None :
                return
            _fdir,_fename=os.path.split(textEdit.filename)
            fileName = _fdir+'/'+str1[start:end]
        elif  str1[0] == '<':   #系统的包含文字在编译器目录下的 '/include/mcs51/'
            _fdir,_fename=os.path.split(str1[1:end])
            fileName = self.compilePath+'/include/mcs51/'+_fename
        else:
            return
        self.loadFile(fileName)